Page 137 of 150
134 Navigation
Settings
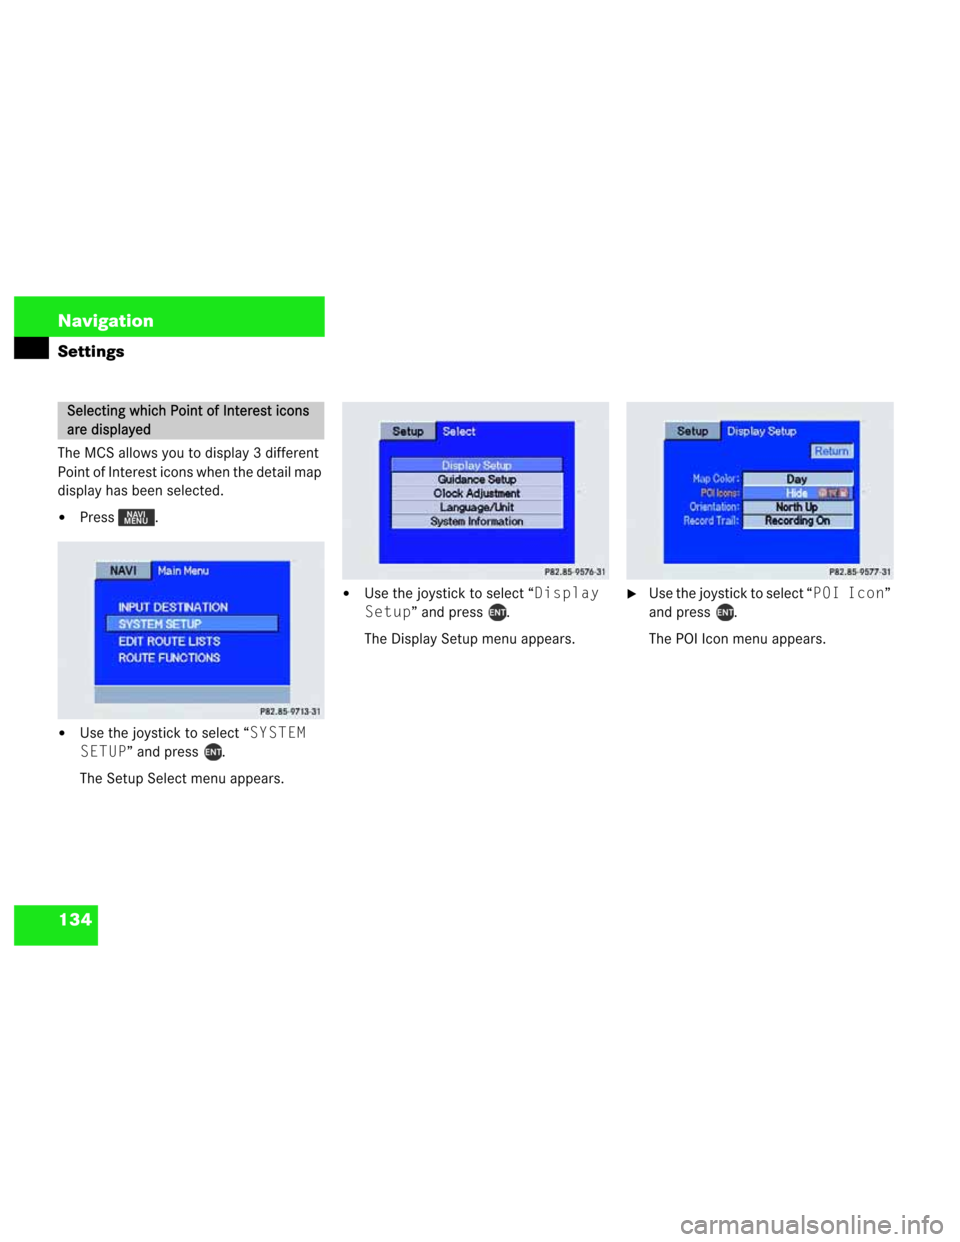
The MCS allows you to display 3 different
Point of Interest icons when the detail map
display has been selected.
�Press .
�Use the joystick to select “SYSTEM
SETUP” and press .
The Setup Select menu appears.
�Use the joystick to select “Display
Setup” and press .
The Display Setup menu appears. �Use the joystick to select “POI Icon”
and press .
The POI Icon menu appears.
Selecting which Point of Interest icons
are displayed
P82.85-9566-31
P82.85-9576-31P82.85-9577-31
Page 138 of 150

135 Navigation
Settings
�Use the joystick to select one of the fol-
lowing POI modes and press .
�“Show”: The selected POI icons are
shown when you select the detail
map display.
�“Hide”: No POI icons are dis-
played.
�“Edit”: Allows you to select which
POI icons are displayed.
�To save the settings, use the joystick to
select “Return” and press .
When you move the Present Vehicle Posi-
tion icon to any of the visible POI icons and
press , the name, address, and phone
number respective of the POI icon will be
displayed.Editing POI icons
If you select “Edit” a list of 6 icons appears.
Use the joystick to select up to 3 of the
following icon types. After selecting each
icon, press .
�“ATM”
�“Bank”
�“Gas Station”
�“Hotel”
�“Parking”
�“Restaurant” and type of restau-
rantYou can set the map display so that north
is always referenced towards the top of the
display or the Present Vehicle Position icon
is always pointing towards the top of the
screen.
�Press .
�Use the joystick to select “SYSTEM
SETUP” and press .
The Setup Select menu appears.
Setting map and screen orientation
P82.85-9566-31
��
Page 139 of 150
136 Navigation
Settings
�Use the joystick to select “Display
Setup” and press .
The Display Setup menu appears. �Use the joystick to select “Orienta-
tion” and press .
The Orientation menu appears.
�Use the joystick to select one of the fol-
lowing orientation modes and press
.
�“Heading Up”: The Map display
rotates such that the Present
Vehicle Position icon is always
pointing toward the top of the
screen.
�“North Up”: The Map display
always shows the map with north
facing toward the top of the screen.
The Present Vehicle Position icon
rotates on the map.
�To save the settings, use the joystick to
select “Return” and press .
P82.85-9576-31P82.85-9668-31
Page 141 of 150

138
Info Services/System settings
Info Services
Info Services
The following chapter provides detailed in-
formation on how to:
�Request and display Info Services*
�Switch between the light and the dark
mode
�Set the display dimming characteris-
tics
�Select the language/unit of measure
�Set time
�View system information
If you have not already done so, please fa-
miliarize yourself with these functions by
reading the chapter "At a glance"
(
�page 9).When subscribed to Info Services, you can
download information directly to your
MCS. You can select from news, weather,
sports, stocks, and calendar reminders.
To personalize your selections, visit
�www.MBUSA.com
or call
�1-800-FOR-MERCedes.
�Press SSVC.
The info service menu appears and the
last information the MCS received is
displayed.
If no information is stored, the message
“NO INFORMATION STORED IN
MEMORY PLEASE UPDATE” appears.
�To retrieve information or update the
existing information, press the softkey
“UPDT”.
i
This function is not available in some
countries.
Requesting and displaying
InfoServices*
i
Before you can receive Info Services,
you must activate Tele Aid at the
Response Center and select the Info
Services option.
Page 142 of 150

139
Info Services/System settings
Info Services
After new information has been download-
ed, the message “NEW INFO RECEIVED
READ LATER WHEN STOPPED” ap-
pears.
�By pressing the softkey “YES”,
you switch back to the current back-
ground audio mode (e. g. radio mode).
�By pressing the softkey “NO”, the
new information is displayed immedi-
ately.
�With the softkeys and
or with the joystick you can flip
to the next or previous page.
�To exit the info service mode, switch to
the radio, tape or CD mode, or switch
off the MCS.
i
If Info Services can not be retrieved,
one of the following error messages is
displayed:
�“DATA CONNECTION CANNOT
BE ESTABLISHED” - request has
failed because the Response Center
can not be accessed.
�“TELE AID PLEASE VISIT
WORKSHOP” - a hardware error has
been detected. Contact your autho-
rized Mercedes-Benz Center.
�“INFO SERVICE NOT ACTI-
VATED” - Info Services is not acti-
vated. You must activate Tele Aid at
the Response Center and select the
optional Info Services.
If one of the above error messages is
displayed, press the softkey
“RTN” to return to Info Services display.
WarningG
A driver's attention to the road must always
be his/her primary focus when driving.
For your safety and the safety of others, we
recommend that you pull over to a safe loca-
tion and stop the vehicle before requesting
or receiving any info services.
Page 143 of 150
140
Info Services/System settings
System settings
System settings
When the parking lights are turned on, the
display switches to the dark mode and au-
tomatically dims the display.
Audio mode
�Press the softkey “ADJ” in any
audio menu.
The main audio adjust menu appears
and the current settings are displayed.
�If you want to switch to the light mode,
press the softkey “LGHT”.
or
�If you want to switch to the dark mode,
press the softkey “DARK”.
Navigation mode
�Press any softkey in the naviga-
tion mode.
The softkeys are activated.
�If you want to switch to the light mode,
press the softkey “LGHT”.
or
�If you want to switch to the dark mode,
press the softkey “DARK”.Adjusting the brightness
in the dark mode
You can adjust the display brightness of
your MCS in conjunction with your vehicles
instrument clusters illumination.
Please refer to your Operator’s Manual for
additional instructions.
Switching between the light and the
dark mode
Page 144 of 150
141
Info Services/System settings
System settings
You can set the monitor’s dimming charac-
teristics for the navigation mode.
�Press .
Use the joystick to select the menu
“SYSTEM SETUP” and press .
�Select the “Display Setup” menu
by pushing the joystick up or down and
press .
The display menu appears with the
current settings.
�Select the “Map Color” menu by
pushing the joystick up or down and
press .You can select from 3 display dimming
modes:
�“Day” mode: The display colors are al-
ways bright.
�“Night” mode: The display colors are al-
ways dark.
�“Auto” mode: The display switches au-
tomatically between Night and Day
mode when the parking lights are
turned on and off.
�After selecting the mode, press .
�To return to the setup mode, use the
joystick to select “Return” and press
.
Setting the display dimming character-
istics
P82.85-9566-31
P82.85-9577-31
Page 145 of 150
142
Info Services/System settings
System settings
The language affects the menu text dis-
plays and the voice output during route
guidance.
The selectable languages depend on the
MCS unit installed and the navigation DVD
inserted.
�Press .
Use the joystick to select the menu
“SYSTEM SETUP” and press .
�Select the “Language/Unit” menu
by pushing the joystick up or down and
press .
The Language/Unit menu appears and
the current settings are displayed.�Select the desired language by pushing
the joystick up or down and press .
�Certain languages allow you to select
the unit of measure, e. g. US or metric.
�After selecting the unit of measure,
press .
�To return to the setup mode, use the
joystick to select “Return” and press
.
Selecting the language and unit of mea-
sure
P82.85-9566-31
P82.85-9576-31P82.85-9579-31