Page 146 of 360

146 Controls in detailDifferential locksRear axle differential lock�
Press switch2.
The yellow engagement indicator lamp
lights up first, followed by the red func-
tion indicator lamp.
The rear axle differential lock is
switched on.
Front differential lock
�
Press switch 3.
The yellow engagement indicator lamp
lights up first, followed by the red func-
tion indicator lamp.
The front differential lock is switched
on. Switching differential locks off
There are two different methods to disen-
gage differential locks:
�
You can switch the differential locks off
in reverse order (3, 2, 1).
�
To switch off all differential locks at the
same time:�
Press switch1.
The yellow engagement indicator
lamps go out first. The red function
indicator lamps go out when the
switching process has been carried
out in the differential.To activate the ESP, BAS and ABS systems,
drive again for three seconds using a con-
stant driving style.
All messages in the multifunction display
disappear. The
v
and
-
warning
lamps in the instrument cluster go out.
iIf the function lamps do not go out
when the differential locks are disen-
gaged, bring vehicle to a stop and then
continue driving. Changing the vehicle
load can help to disengage locks. Warning!
G
Always remember to disengage the differen-
tial locks when returning to drive on paved
roads, see “A few words about differentials
and differential locks” (
�page 144).
Page 147 of 360
 and for setting the rear view
mirrors (
�page 38) is found in the “Get-
ting started” secti")
147 Controls in detail
Good visibility
Good visibility
Information on the windshield wipers
(�page 47) and for setting the rear view
mirrors (
�page 38) is found in the “Get-
ting started” section.
Rear view mirror
Automatic antiglare rear view mirror
The reflection brightness of the inside rear
view mirror will respond automatically to
glare when �
the ignition is switched on, and
�
incoming light from headlamps falls on
the sensor in the inside rear view mir-
ror
The rear view mirror will not react if
�
reverse gear is engaged
�
the interior lighting is turned on
Warning!
G
The automatic antiglare function does not
react if incoming light is not aimed directly
at sensors in the inside rear view mirror.
The inside rear view mirror does not react,
for example, if the cargo area is fully loaded.
Glare can endanger you and others.Warning!
G
Exercise care when using the passenger
side exterior rear view mirror. The mirror
surface is convex (outwardly curved surface
for a wider field of view). Objects in mirror
are closer than they appear. Check your in-
side rear view mirror or glance over your
shoulder before changing lanes.
Warning!
G
In the case of an accident, liquid electrolyte
may escape from the mirror housing if the
mirror glass breaks.
Electrolyte has an irritating effect. Do not al-
low the liquid to come into contact with
eyes, skin, clothing, or the respiratory sys-
tem. In case it does, immediately flush af-
fected area with water, and seek medical
help if necessary.
Page 149 of 360
149 Controls in detail
Good visibility
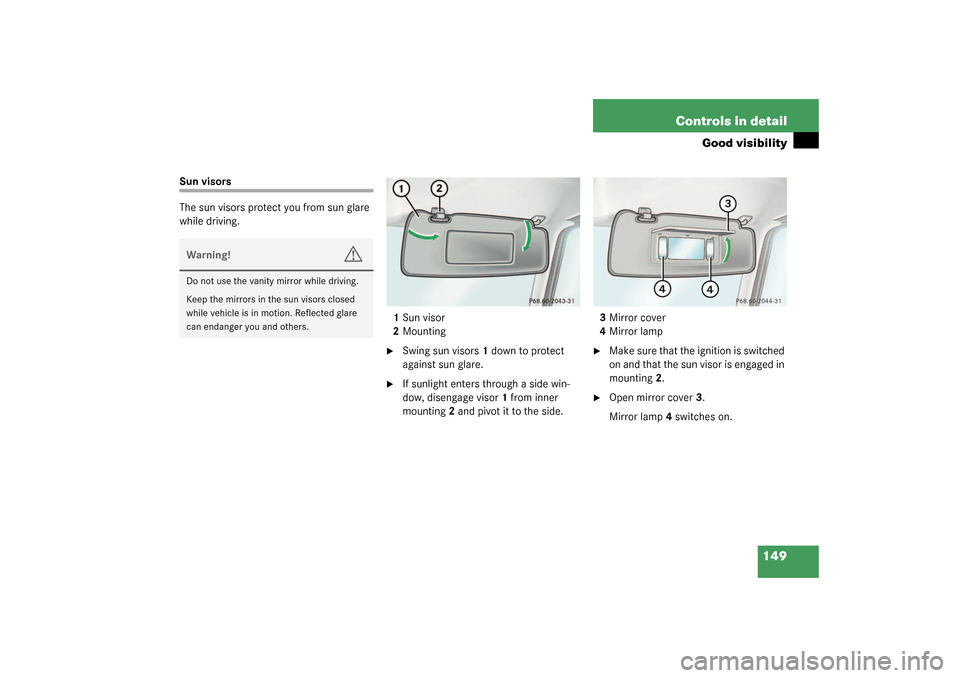
Sun visors
The sun visors protect you from sun glare
while driving.
1Sun visor
2Mounting
�
Swing sun visors 1 down to protect
against sun glare.
�
If sunlight enters through a side win-
dow, disengage visor 1 from inner
mounting 2 and pivot it to the side.3Mirror cover
4Mirror lamp
�
Make sure that the ignition is switched
on and that the sun visor is engaged in
mounting 2.
�
Open mirror cover3.
Mirror lamp4 switches on.
Warning!
G
Do not use the vanity mirror while driving.
Keep the mirrors in the sun visors closed
while vehicle is in motion. Reflected glare
can endanger you and others.
Page 152 of 360

152 Controls in detailClimate controlThe climate control is operational whenev-
er the engine is running. You can operate
the climate control system in either the au-
tomatic or manual mode. The system cools
or heats the interior depending on the se-
lected interior temperature and the cur-
rent outside temperature.
Nearly all dust particles, pollutants and
odors are filtered out before outside air en-
ters the passenger compartment through
the air distribution system.
The air conditioning will not engage (no
cooling) if the AC
OFF
mode is selected
(
�page 157).
Setting the temperature
Use temperature controls2 and3 to sepa-
rately adjust the air temperature on each
side of the passenger compartment. You
should raise or lower the temperature set-
ting in small increments, preferably start-
ing at 72°F (22°C).Increasing
�
Turn the temperature control a few de-
grees to the right.
The climate control system will corre-
spondingly adjust the interior air tem-
perature.
Decreasing
�
Turn the temperature control a few de-
grees to the left.
The climate control system will corre-
spondingly adjust the interior air tem-
perature.
Warning!
G
Follow the recommended settings for heat-
ing and cooling given on the following pag-
es. Otherwise the windows could fog up,
impairing visibility and endangering you and
others.
iIf the vehicle interior is hot, ventilate
the interior before driving off.
Keep the air intake grille in front of the
windshield free of snow and debris.iWhen operating the climate control
system in automatic mode, you will
only rarely need to adjust the tempera-
ture, air volume and air distribution.
Page 154 of 360

154 Controls in detailClimate controlDefrosting
Activating�
Press button
P
.
The indicator lamp in the button illumi-
nates.
The climate control automatically
switches to the following functions:
�
maximum blower and heat output
�
air distribution to the windshield
and the side windows
�
rear ventilation is turned off
Deactivating
�
Press the
P
button.
The indicator lamp in the button goes
out. Defrosting is turned off.
Air recirculation
Switch to air recirculation mode to prevent
unpleasant odors from entering the vehicle
from the outside. This setting cuts off the
intake of outside air and recirculates the
air in the passenger compartment.
Activating�
Press button
O
briefly.
The indicator lamp in the button illumi-
nates.Deactivating
�
Press button
O
briefly.
The indicator lamp in the button goes
out.
The air recirculation mode is deactivated
automatically:
�
after 30 minutes if the outside temper-
ature is above about 41°F (5°C)
�
after 5 minutes if the outside tempera-
ture is below about 41°F (5°C)
�
after 5 minutes if economy mode
AC
OFF
is selected
Warning!
G
When the outside temperature is below
41°F (5°C), only switch to air recirculation
mode for short periods to prevent window
fogging.
iThe air recirculation mode is activated
automatically:�
at high outside temperatures
If you have turned off the air condition-
er or the outside temperature is below
41°F (5°C), the air recirculation mode
will not switch on automatically.
Page 158 of 360

158 Controls in detailPower windows
Power windowsOpening and closing the windows
The side windows can be opened and
closed electrically. The switches for all the
side windows are on the driver’s door. The
switches for the respective windows are
on the front passenger and the rear doors.
1Switch for rear door window override
(
�page 69)
2Left front window
3Right front window
4Right rear window
5Left rear window
�
Turn key in the starter switch to
position1 or2.
Opening the windows
�
Press switch to resistance point.
The window will move downwards until
you release the switch.
Closing the windows
�
Pull on switch.
The window will move upwards until
you release the switch.
Warning!
G
When closing the windows, make sure that
there is no danger of anyone being harmed
by the closing procedure.
The closing procedure can be immediately
halted by releasing the switch or by releas-
ing button
‹
on the remote control.
When leaving the vehicle, always remove the
key from starter switch, and lock your vehi-
cle. Do not leave children unattended in the
vehicle, or with access to an unlocked vehi-
cle. Unsupervised use of vehicle equipment
can cause an accident and/or serious per-
sonal injury.
iWith a front door opened and the key in
starter switch position0 or1, or re-
moved from starter switch, the power
windows can be operated for
approx. 30 minutes.
Page 159 of 360

159 Controls in detail
Power windows
Fully opening windows�
Press switch past resistance point and
release.
The window opens completely.
Stopping windows
�
Press or pull respective switch again.
Opening and closing windows with the
SmartKey
The sliding/pop-up roof will also be
opened or closed when you operate the
power windows with the key.
�
Aim transmitter eye at the driver’s door
handle.
Opening (Summer opening feature)
�
Press and hold button
Œ
after un-
locking the vehicle.
The windows and sliding/pop-up roof
begin to open after approximately one
second.
�
Release transmit button to interrupt
procedure.Closing (Convenience feature)
�
Press and hold button
‹
after lock-
ing the vehicle.
The windows and sliding/pop-up roof
begin to close after approximately one
second.
�
Release transmit button to interrupt
procedure.
Ensure that all side windows and the slid-
ing/pop-up roof are properly closed before
leaving the vehicle.
Warning!
G
Never operate the windows or slid-
ing/pop-up roof if there is the possibility of
anyone being harmed by the opening or
closing procedure.
In case the procedure causes potential dan-
ger, the procedure can be immediately halt-
ed by releasing the remote control button.
To reverse direction of movement,
pressŒ for opening or ‹ for closing.
Page 160 of 360

160 Controls in detailSliding/pop-up roof
Sliding/pop-up roofOpening and closing the sliding/pop-up roof
1Push back to slide roof open
2Push forward to slide roof closed
3Push up to raise roof at rear
4Pull down to lower roof at rear
�
Turn the key in the starter switch to
position1 or2.
Opening and closing the sliding/pop-up
roof
�
To open, close, raise or lower the slid-
ing/pop-up roof, move the switch to re-
sistance point in the required direction.
Release the switch when the roof has
reached the required position.Opening and closing the sliding/pop-up
roof automatically
�
Move the switch past resistance point
in the direction required and release.
The sliding/pop-up roof opens or clos-
es completely.
Stopping the sliding/pop-up roof
�
Move the switch in any direction.
If the movement of the sliding/pop-up
roof is blocked during the closing pro-
cedure, the roof will stop and reopen
slightly.
Warning!
G
When closing the sliding/pop-up roof, make
s ur e th at th er e is n o da ng er o f a ny o n e bei ng
harmed by the closing procedure.
The closing procedure of the sliding/pop-up
roof can be immediately reversed by either
moving the switch in any direction,
or pressing button
Œ
on the SmartKey
and holding it.
When leaving the vehicle, always remove the
key from starter switch, and lock your vehi-
cle. Do not leave children unattended in the
vehicle, or with access to an unlocked vehi-
cle. Unsupervised use of vehicle equipment
can cause an accident and/or serious per-
sonal injury.
!To avoid damaging the seals, do not
transport any objects with sharp edges
which can stick out of the slid-
ing/pop-up roof.
The sliding/pop-up roof can be opened
or closed manually should an electrical
malfunction occur (
�page 276).