Page 320 of 399
320 Practical hintsWhat to do if …Display
Possible cause
Possible solution
H
Tire pressure monitor-
ing
Visit workshop!
The tire inflation pressure monitor is mal-
functioning.
A wheel without proper sensor was in-
stalled.
�
Have the tire inflation pressure monitor
checked by an authorized
Mercedes-Benz Center.
�
Change the wheel.
Tire pressure, rear left
Caution tire defect!
The left rear tire is rapidly deflating.
�
Carefully bring the vehicle to a halt,
avoiding abrupt steering and braking ma-
neuvers.
�
Change the wheel (
�page 338).
Tire pressure, rear left
Check tires!
The left rear tire pressure is low.
�
Carefully bring the vehicle to a halt.
�
Check the tire pressure.
�
Change the wheel (
�page 338).
Warning!
G
Do not drive with a flat tire. A flat tire affects
the ability to steer or brake the vehicle. You
may lose control of the vehicle.
Continued driving with a flat tire will cause
excessive heat build-up and possibly a fire.
ProCarManuals.com
Page 321 of 399
321 Practical hints
What to do if …
Display
Possible cause
Possible solution
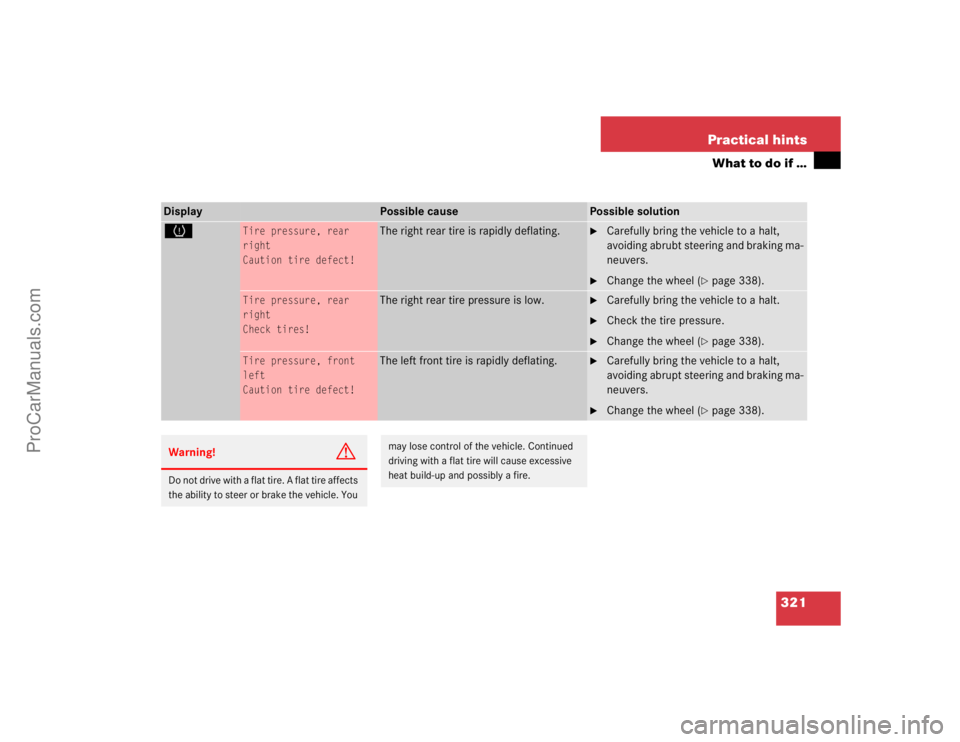
H
Tire pressure, rear
right
Caution tire defect!
The right rear tire is rapidly deflating.
�
Carefully bring the vehicle to a halt,
avoiding abrubt steering and braking ma-
neuvers.
�
Change the wheel (
�page 338).
Tire pressure, rear
right
Check tires!
The right rear tire pressure is low.
�
Carefully bring the vehicle to a halt.
�
Check the tire pressure.
�
Change the wheel (
�page 338).
Tire pressure, front
left
Caution tire defect!
The left front tire is rapidly deflating.
�
Carefully bring the vehicle to a halt,
avoiding abrupt steering and braking ma-
neuvers.
�
Change the wheel (
�page 338).
Warning!
G
Do not drive with a flat tire. A flat tire affects
the ability to steer or brake the vehicle. You
may lose control of the vehicle. Continued
driving with a flat tire will cause excessive
heat build-up and possibly a fire.
ProCarManuals.com
Page 322 of 399
322 Practical hintsWhat to do if …Display
Possible cause
Possible solution
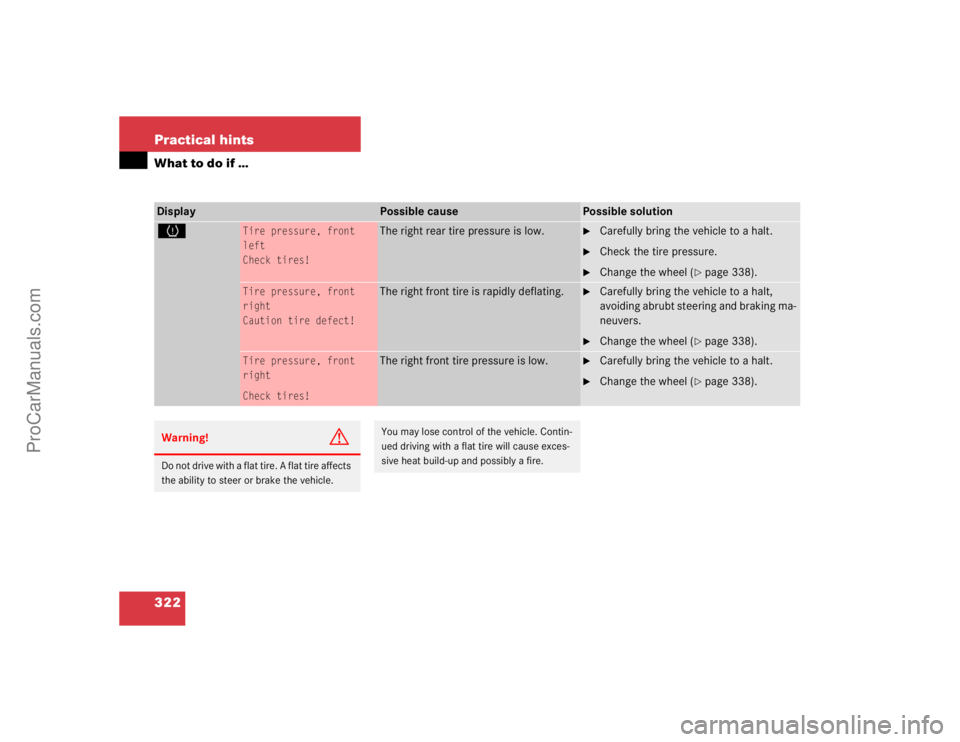
H
Tire pressure, front
left
Check tires!
The right rear tire pressure is low.
�
Carefully bring the vehicle to a halt.
�
Check the tire pressure.
�
Change the wheel (
�page 338).
Tire pressure, front
right
Caution tire defect!
The right front tire is rapidly deflating.
�
Carefully bring the vehicle to a halt,
avoiding abrubt steering and braking ma-
neuvers.
�
Change the wheel (
�page 338).
Tire pressure, front
right
Check tires!
The right front tire pressure is low.
�
Carefully bring the vehicle to a halt.
�
Change the wheel (
�page 338).
Warning!
G
Do not drive with a flat tire. A flat tire affects
the ability to steer or brake the vehicle.
You may lose control of the vehicle. Contin-
ued driving with a flat tire will cause exces-
sive heat build-up and possibly a fire.
ProCarManuals.com
Page 325 of 399

325 Practical hints
Where will I find ...?
Minispare wheel
In the case of a flat tire, you may tempo-
rarily use the Minispare* wheel when ob-
serving the following restrictions:�
Do not exceed a vehicle speed of
50 mph (80km/h).
�
Drive to the nearest tire repair facility
to have the flat tire repaired or re-
placed as appropriate.
�
Do not operate vehicle with more than
one spare wheel mounted.More information can be found in the
"Technical data" section (
�page 362).
Luggage box
Remove luggage box
1Fastening clip
2Luggage box�
Turn fastening clips1 to the left up-
wards from fastening bolts.
�
Lift luggage box in the area of the fas-
tening bolts and remove it from trunk.Install luggage box
�
Insert luggage box into trunk so that
fastening clips are in line with fastening
bolts.
�
Push front edge of luggage box in direc-
tion of arrow under cover of trunk sill.
�
Press fastening clips onto fastening
bolts until they lock into place.
Warning!
G
The dimensions of the Minispare* wheel are
different from those of the road wheels. As
a result, the vehicle handling characteristics
change when driving with a Minispare*
wheel mounted.
The spare wheel should only be used tempo-
rarily, and replaced with a regular road
wheel as quick as possible.
ProCarManuals.com
Page 338 of 399

338 Practical hintsFlat tire
Flat tirePreparing the vehicle�
Park the vehicle as far as possible from
moving traffic on a hard surface.
�
Turn on the hazard warning flashers.
�
Engage the steering wheel lock in the
straight-ahead position and set the
parking brake.
�
Move the selector lever toP.
�
Have any passenger exit the vehicle at
a safe distance from the roadway.
Mounting the spare wheel
Preparing the vehicle
Prepare the vehicle as described under
"Preparing the vehicle" on this page.�
Take the spare wheel out of the trunk
(�page 324).
Lifting the vehicle
�
Prevent the vehicle from rolling away
by blocking wheels with wheel chocks
(not included) or other sizable objects.
When changing wheel on a level surface:
�
Place one chock in front of and one be-
hind the wheel that is diagonally oppo-
site to the wheel being changed.When changing wheel on a hill:
�
Place chocks on the downhill side
blocking both wheels of the other axle.
�
Take the two-piece wheel wrench and
the jack out of the trunk (
�page 326).
Assemble wheel wrench.
Warning!
G
The jack is designed exclusively for jacking
up the vehicle at the jack take-up brackets
built into either side of the vehicle. To help
avoid personal injury, use the jack only to lift
the vehicle during a wheel change. Never
get beneath the vehicle while it is supported
by the jack. Keep hands and feet away from
the area under the lifted vehicle. Always
firmly set parking brake and block wheels
before raising vehicle with jack.
Do not disengage parking brake while the
vehicle is raised. Be certain that the jack is
ProCarManuals.com
Page 340 of 399

340 Practical hintsFlat tire
Removing the wheel
1Alignment bolt�
Unscrew the upper-most wheel bolt
and remove.
�
Replace this wheel bolt with alignment
bolt1 supplied in the tool kit.
�
Remove the remaining bolts.
�
Remove the wheel.Mounting the Minispare wheel
�
Clean contact surfaces of wheel and
wheel hub.
�
Guide the spare wheel onto the align-
ment bolt and push it on.
�
Insert wheel bolts and tighten them
slightly.
Warning!
G
Position the jack only on the jack take-up
brackets designed for this purpose.
If the jack is not properly positioned, the ve-
hicle may slip off of the jack.Warning!
G
The jack is intended only for lifting the vehi-
cle briefly for wheel changes. It is not suited
for performing maintenance work under the
vehicle. Never lie down under the raised ve-
hicle. Do not start the engine when the vehi-
cle is raised.
!Do not place wheel bolts in sand or dirt.
This could result in damage to the bolt
and wheel hub threads.
!To avoid paint damage, place wheel flat
against hub and hold it there while in-
stalling first wheel bolt.
ProCarManuals.com
Page 341 of 399

341 Practical hints
Flat tire
�
Unscrew the alignment bolt, install last
wheel bolt and tighten slightly.In the case of a flat tire, you may tempo-
rarily use the Minispare* wheel when ob-
serving the following restrictions:
�
Do not exceed a vehicle speed of
50 mph (80km/h).
�
Drive to the nearest tire repair facility
to have the flat tire repaired or re-
placed as appropriate.
�
Do not operate vehicle with more than
one spare wheel mounted.
Warning!
G
Always replace wheel bolts that are dam-
aged or rusted.
Never apply oil or grease to wheel bolts.
Damaged wheel hub threads should be re-
paired immediately. Do not continue to drive
under these circumstances! Contact an au-
thorized Mercedes-Benz Center or call
Roadside Assistance.
Incorrect mounting bolts or improperly
tightened mounting bolts can cause the
wheel to come off. This could cause an acci-
dent. Be sure to use the correct mounting
bolts.
Warning!
G
Use only genuine equipment
Mercedes-Benz wheel bolts. They are identi-
fied by the Mercedes star. Other wheel bolts
may come loose.
Do not tighten the wheel bolts when the ve-
hicle is raised. Otherwise the vehicle could
tip over.
Warning!
G
The dimensions of the Minispare* wheel are
different from those of the road wheels. As
a result, the vehicle handling characteristics
change when driving with a Minispare*
wheel mounted.
The spare wheel should only be used tempo-
rarily, and replaced with a regular road
wheel as quick as possible.
ProCarManuals.com
Page 376 of 399

376 Technical termsControl system
The control system is used to call up
vehicle information and to change
component settings. Information and
messages appear in the multifunction
display. The driver uses the buttons on
the multifunction steering wheel to
navigate through the system and to ad-
just settings.
Cruise control
Driving convenience system for auto-
matically maintaining the vehicle speed
set by the driver.Distronic*
A driving convenience cruise control
system which helps the driver maintain
a pre-selected speed:
�
If there is no vehicle directly ahead,
the system operates in the same
way as conventional ->cruise con-
trol.
�
If a slower moving vehicle is ahead,
Distronic will reduce your vehicle
speed to the extent permitted by re-
duced throttle and up to 20% brak-
ing power to maintain the preset
minimum following distance.
DTR
(->Distronic*)Engine number
The number set by the manufacturer
and placed on the cylinder block to
uniquely identify each engine pro-
duced.
Engine oil viscosity
Measurement for the inner friction (vis-
cosity) of the oil at different tempera-
tures. The higher the temperature an
oil can tolerate without becoming thin,
or the lower the temperature it can tol-
erate without becoming viscous, the
better the viscosity.
ESP
(E
lectronic S
tability Pr
ogram)
Improves vehicle handling and direc-
tional stability.
ProCarManuals.com