Page 209 of 394

209 Controls in detail
Driving systems
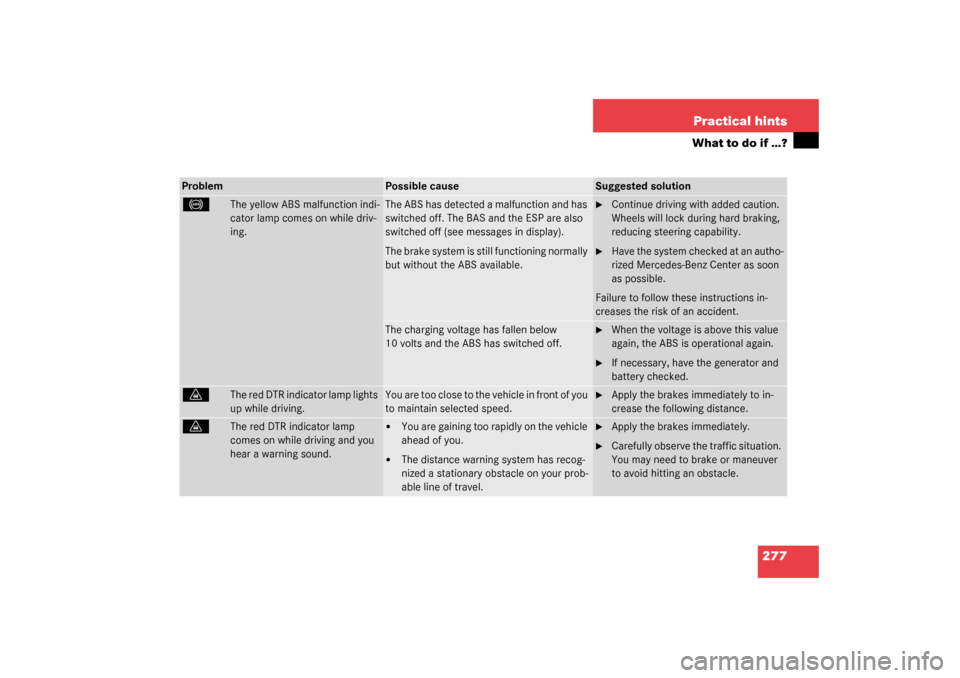
Range of the sensors
To function properly, the sensors must be
free of dirt, ice, snow and slush. Clean the
sensors regularly, being careful not to
scratch or damage the sensors.Front sensors
Rear sensors
Minimum distance
If the system encounters an obstacle in
this range, all the warning lamps light up
and you hear a warning signal. If the obsta-
cle is closer than the minimum distance,
the actual distance may no longer be indi-
cated by the system.
Center
approx. 40 in (100 cm)
Corners
approx. 23 in (60 cm)
Center
approx. 48 in (120 cm)
Corners
approx. 32 in (80 cm)
!During parking maneuvers, pay special
attention to objects located above or
below the height of the sensors (e.g.
planters or trailer hitches). The Park-
tronic system will not detect such ob-
jects at close range and damage to
your vehicle or the object may result.
Ultrasonic signals from outside sourc-
es (e.g. truck air brakes or jackham-
mers) may impair the operation of the
Parktronic system.
Center
approx. 8 in (20 cm)
Corners
approx. 6 in (15 cm)
Page 252 of 394

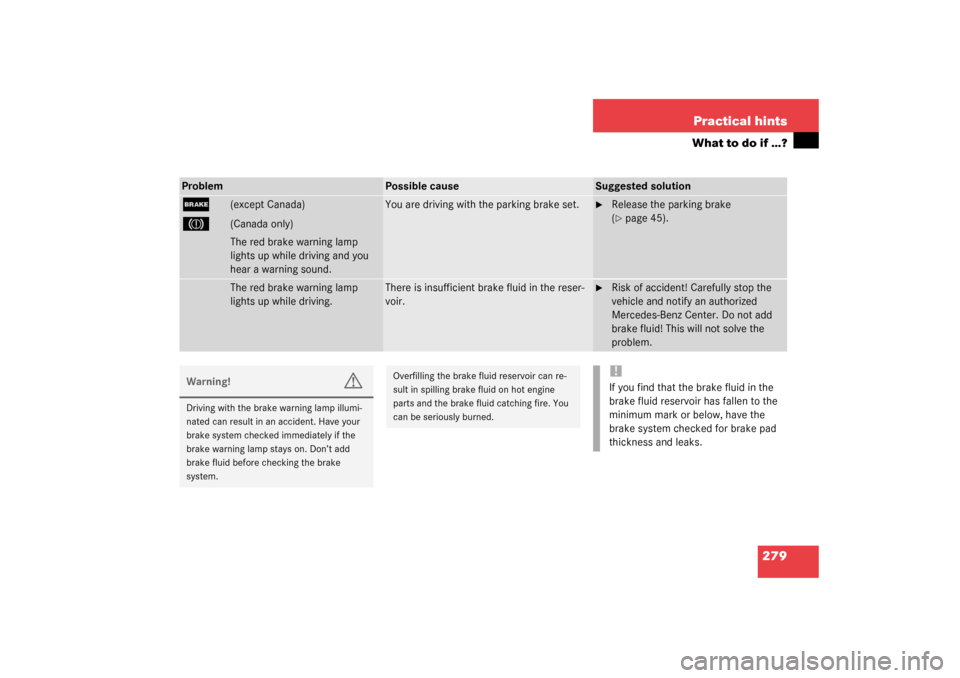
252 OperationAt the gas station
Check regularly and before a long trip
1Coolant level
More information on coolant can be
found in the “Operation” section on
(
�page 256).
2Brake fluid (fuse box cover removed)
More information on brake fluid can be
found in the “Technical data” section
on (�page 353).
3Windshield washer and headlamp
cleaning system
More information on refilling the reser-
voir can be found in the “Operation”
section on (
�page 259).Engine oil level
More information on engine oil can be
found in the “Operation” section on
(
�page 254).
Vehicle lighting
Check function and cleanliness.More infor-
mation on replacing light bulbs can be
found in the “Practical hints” section on
(�page 316).
Tire inflation pressure
More information on tire inflate pressure
can be found in the “Operation” section on
(�page 262).
Opening hood see (
�page 253).
Removing fuse box cover see
(
�page 337).
Exterior lamp switch see (
�page 105)
iLeaving the engine running and the fuel
cap open can cause the
?
lamp to
illuminate.
More information can be found in the
“Practical hints” section (
�page 280).
Page 277 of 394

277 Practical hints
What to do if …?
Problem
Possible cause
Suggested solution
-
The yellow ABS malfunction indi-
cator lamp comes on while driv-
ing.
The ABS has detected a malfunction and has
switched off. The BAS and the ESP are also
switched off (see messages in display).
The brake system is still functioning normally
but without the ABS available.
�
Continue driving with added caution.
Wheels will lock during hard braking,
reducing steering capability.
�
Have the system checked at an autho-
rized Mercedes-Benz Center as soon
as possible.
Failure to follow these instructions in-
creases the risk of an accident.
The charging voltage has fallen below
10 volts and the ABS has switched off.
�
When the voltage is above this value
again, the ABS is operational again.
�
If necessary, have the generator and
battery checked.
l
The red DTR indicator lamp lights
up while driving.
You are too close to the vehicle in front of you
to maintain selected speed.
�
Apply the brakes immediately to in-
crease the following distance.
l
The red DTR indicator lamp
comes on while driving and you
hear a warning sound.
�
You are gaining too rapidly on the vehicle
ahead of you.
�
The distance warning system has recog-
nized a stationary obstacle on your prob-
able line of travel.
�
Apply the brakes immediately.
�
Carefully observe the traffic situation.
You may need to brake or maneuver
to avoid hitting an obstacle.
Page 279 of 394

279 Practical hints
What to do if …?
Problem
Possible cause
Suggested solution
;
(except Canada)
3
(Canada only)
You are driving with the parking brake set.
�
Release the parking brake
(�page 45).
The red brake warning lamp
lights up while driving and you
hear a warning sound.The red brake warning lamp
lights up while driving.
There is insufficient brake fluid in the reser-
voir.
�
Risk of accident! Carefully stop the
vehicle and notify an authorized
Mercedes-Benz Center. Do not add
brake fluid! This will not solve the
problem.
Warning!
G
Driving with the brake warning lamp illumi-
nated can result in an accident. Have your
brake system checked immediately if the
brake warning lamp stays on. Don’t add
brake fluid before checking the brake
system.
Overfilling the brake fluid reservoir can re-
sult in spilling brake fluid on hot engine
parts and the brake fluid catching fire. You
can be seriously burned.
!If you find that the brake fluid in the
brake fluid reservoir has fallen to the
minimum mark or below, have the
brake system checked for brake pad
thickness and leaks.
Page 280 of 394

280 Practical hintsWhat to do if …?Problem
Possible cause
Suggested solution
?
The yellow “CHECK ENGINE”
malfunction indicator lamp
comes on while driving.
There is a malfunction in:�
The fuel management system
�
The ignition system
�
The emission control system
�
Systems which impact emissions
Such malfunctions may result in excessive
emissions values and may switch the engine
to its Limp-Home Mode (emergency opera-
tion).
�
Have the vehicle checked as soon as
possible by an authorized
Mercedes-Benz Center.
An on-board diagnostic connector is
used by the service station to link the
vehicle to the shop diagnostics system.
It allows the accurate identification of
system malfunctions through the read-
out of diagnostic trouble codes. It is lo-
cated in the front left area of the
footwell next to the parking brake pedal.
The fuel cap is not closed tightly.
�
Check the fuel cap.
Your gas tank is empty.
�
After refuelling, start the engine three or
four times in succession.
The Limp-Home mode is canceled. You do
not need to have your vehicle checked.
<
The red seat belt warning lamp
blinks for a brief period after
starting the engine.
The warning lamp reminds you to fasten seat
belts.
�
Fasten your seat belt.
A
The yellow fuel tank reserve
warning lamp lights up while
driving.
The fuel level has gone below the reserve
mark.
�
Refuel at the next gas station
(�page 251).
Page 297 of 394

297 Practical hints
What to do if …?
Display
Possible cause
Suggested solution
.
Turn signal in
left mirror
The left turn signal in the side mirror is
malfunctioning. This message will only ap-
pear if all light emitting diodes have
stopped working.
�
Have the LEDs replaced as soon as
possible.
Side marker lamp,
front left
T h e f r o n t l e f t s i d e m a r k e r l a m p i s m a l f u n c-
tioning.
�
Replace the bulb as soon as possible.
Side marker lamp
front right
The front right side marker lamp is mal-
functioning.
�
Replace the bulb as soon as possible.
Turn signal in
right mirror
The right turn signal in the side mirror is
malfunctioning. This message will only ap-
pear if all light emitting diodes have
stopped working.
�
Have the LEDs replaced as soon as
possible.
Turn signal front left
Substitute lamp on!
The left front turn signal lamp is malfunc-
tioning. A backup bulb is being used.
�
Replace the bulb as soon as possible.
Turn signal front right
Substitute lamp on!
The right front turn signal lamp is malfunc-
tioning. A backup bulb is being used.
�
Replace the bulb as soon as possible.
Stop lamp
Visit workshop!
Stop lamp illumination is delayed or lamp
is permanently on.
�
Visit an authorized Mercedes-Benz
Center as soon as possible.
Turn off lamps!
Lamps have been turned on although the
key in the starter switch is in position 0.
�
Visit an authorized Mercedes-Benz
Center as soon as possible.
Stop lamp, left
The left brake lamp is malfunctioning.
�
Visit an authorized Mercedes-Benz
Center as soon as possible.
Page 309 of 394
309 Practical hints
Where will I find...?
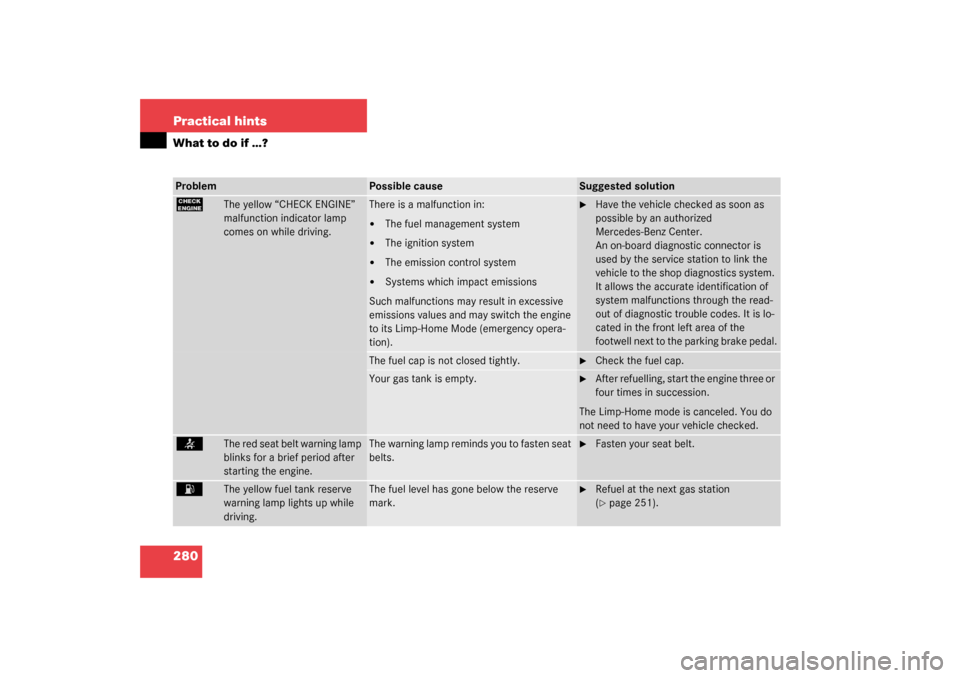
In the case of a flat tire, you may tempo-
rarily use the Minispare wheel when ob-
serving the following restrictions:�
Do not exceed a vehicle speed of
50 mph (80 km/h).
�
Drive to the nearest tire repair facility
to have the flat tire repaired or re-
placed as appropriate.
�
Do not operate vehicle with more than
one Minispare wheel mounted.
More information can be found in the
“Technical data” section (
�page 345).Minispare wheel bolts
1Wheel bolt for light alloy rims
2Wheel bolt for Minispare wheel or other
steel rims
!Wheel bolts2 must be used when
mounting the Minispare wheel. The use
of any wheel bolts other than wheel
bolts 2 for the Minispare will physically
damage the vehicle's brakes.
Warning!
G
Be sure to use the original length wheel
bolts when remounting the original wheel af-
ter it has been repaired.
Page 316 of 394
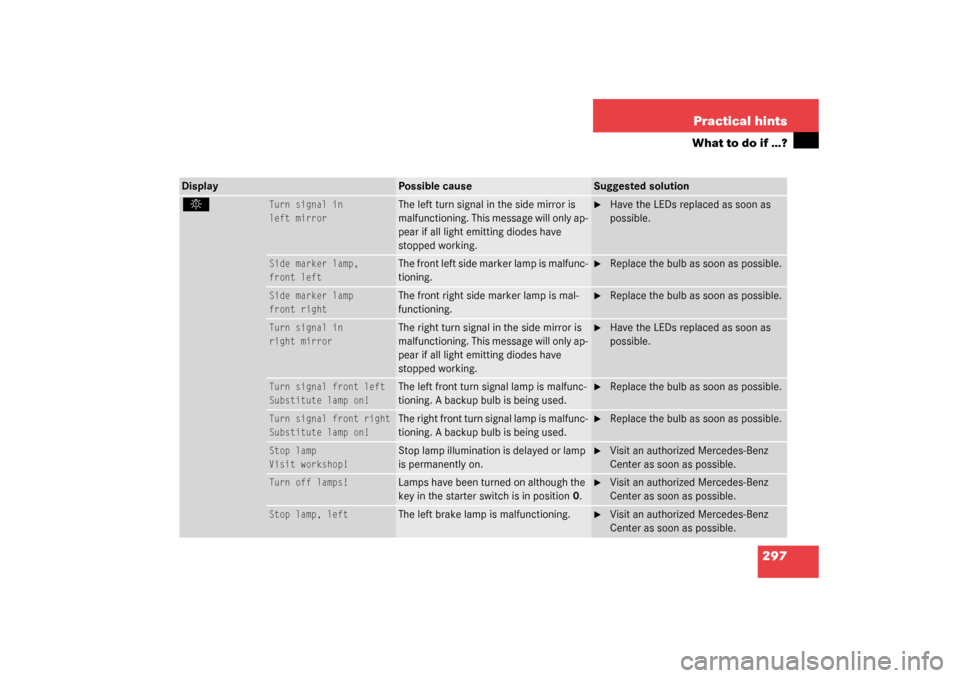
316 Practical hintsReplacing bulbs
Replacing bulbsSafe vehicle operation depends on proper
exterior lighting and signaling. It is there-
fore essential that all bulbs and lamp as-
semblies are in good working order at all
times.
Correct headlamp adjustment is extremely
important. Have headlamps checked and
readjusted at regular intervals and when a
bulb has been replaced. See your autho-
rized Mercedes-Benz Center for headlamp
adjustment.
Bulbs
iIf the headlamps are fogged up on the
inside as a result of high humidity, driv-
ing the vehicle a distance should clear
up the fogging.
iBackup bulbs will be brought into use
when the following lamps malfunction:�
Turn signal lamps
�
Brake lamps
�
Parking lamps
�
Tail lamps