Page 318 of 394
318 Practical hintsReplacing bulbs�
Only use 12 volt bulbs of the same type
and with the specified watt rating.
�
Switch lights off before changing a bulb
to prevent short circuits.
�
Always use a clean lint-free cloth when
handling bulbs.
�
Your hands should be dry and free of oil
and grease.
�
If the newly installed bulb does not light
up, visit an authorized Mercedes-Benz
Center.
�
Have the LEDs and bulbs for the follow-
ing lamps replaced by an authorized
Mercedes-Benz Center.�
Additional turn signal lamps in the
exterior rear view mirrors
�
High mounted brake lamp
�
Bi-Xenon* lamps
�
Front fog lamps
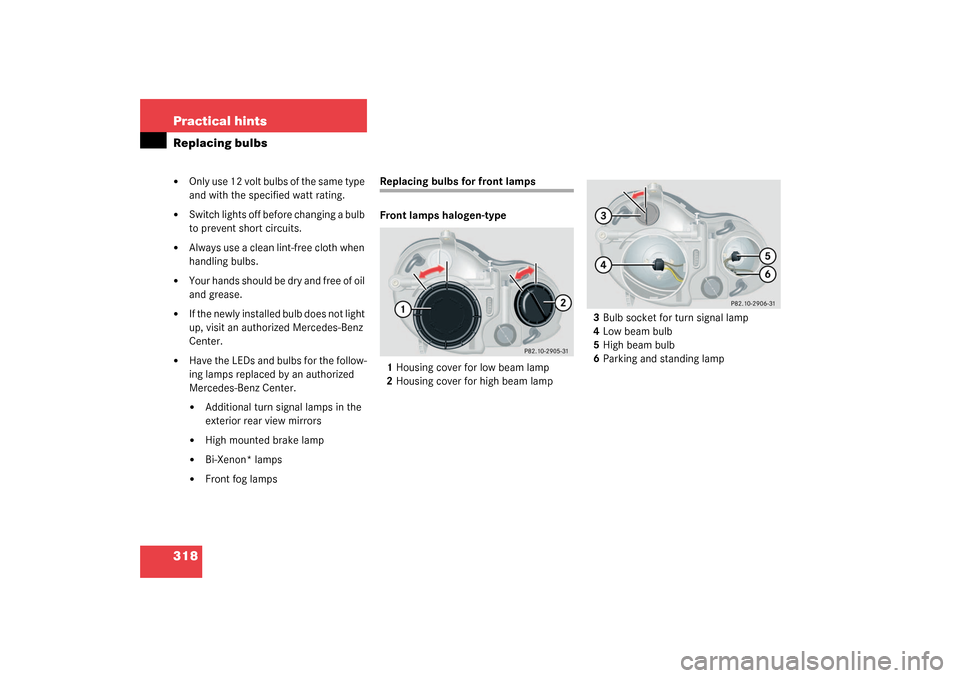
Replacing bulbs for front lamps
Front lamps halogen-type
1Housing cover for low beam lamp
2Housing cover for high beam lamp3Bulb socket for turn signal lamp
4Low beam bulb
5High beam bulb
6Parking and standing lamp
Page 322 of 394
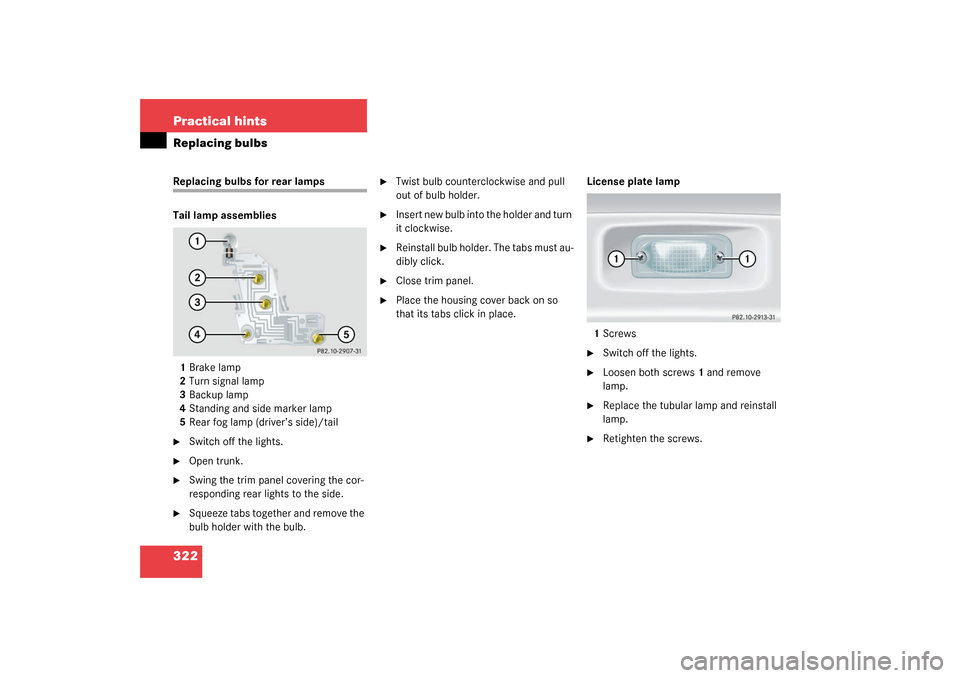
322 Practical hintsReplacing bulbsReplacing bulbs for rear lamps
Tail lamp assemblies
1Brake lamp
2Turn signal lamp
3Backup lamp
4Standing and side marker lamp
5Rear fog lamp (driver’s side)/tail�
Switch off the lights.
�
Open trunk.
�
Swing the trim panel covering the cor-
responding rear lights to the side.
�
Squeeze tabs together and remove the
bulb holder with the bulb.
�
Twist bulb counterclockwise and pull
out of bulb holder.
�
Insert new bulb into the holder and turn
it clockwise.
�
Reinstall bulb holder. The tabs must au-
dibly click.
�
Close trim panel.
�
Place the housing cover back on so
that its tabs click in place. License plate lamp
1Screws
�
Switch off the lights.
�
Loosen both screws1 and remove
lamp.
�
Replace the tubular lamp and reinstall
lamp.
�
Retighten the screws.
Page 326 of 394
 from the
ground. Never start engine while vehi-
cle is raised.Removing the wheel
4Alignment bolt
�
Uns")
326 Practical hintsFlat tire�
Jack up the vehicle until the wheel is a
maximum of 1.2 in (3 cm) from the
ground. Never start engine while vehi-
cle is raised.Removing the wheel
4Alignment bolt
�
Unscrew upper-most wheel bolt and re-
move.
�
Replace this wheel bolt with alignment
bolt4 supplied in the tool kit.
�
Remove the remaining bolts.
�
Remove the wheel.Mounting the new wheel
5Wheel bolt for light alloy rims
6Wheel bolt for Minispare wheel or other
steel rims
�
Clean contact surfaces of wheel and
wheel hub.
Warning!
G
The jack is intended only for lifting the vehi-
cle briefly for wheel changes. It is not suited
for performing maintenance work under the
vehicle.�
Never start the engine when the vehicle
is raised.
�
Never lie down under the raised vehicle.
!Do not place wheel bolts in sand or dirt.
This could result in damage to the bolt
and wheel hub threads.
!Wheel bolts6 must be used when
mounting the Minispare wheel. The use
of any wheel bolts other than wheel
bolts 6 for the Minispare will physically
damage the vehicle's brakes.
Page 333 of 394

333 Practical hints
Jump starting
The battery is located in the engine com-
partment on the right hand side. For jump
starting use the terminals in front of the
battery.�
Make sure that the two vehicles do not
touch.
�
Turn off all electrical consumers.
�
Apply parking brake.
�
Shift selector lever to positionP.1Positive terminal of charged battery
2Positive under hood terminal in front of
discharged battery
3Negative under hood terminal in front
of discharged battery
4Negative terminal of charged battery
�
Connect the positive terminal1 of the
charged battery with the under hood
terminal 2 in front of the discharged
battery with the jumper cable. Clamp
cable to charged battery1 first.
�
Let the engine of the assisting vehicle
run at idle speed.
�
Connect the negative terminal4 of the
charged battery with the under hood
terminal 3 in front of the discharged
battery with the jumper cable. Clamp
cable to charged battery4 first.
�
Start the engine of the disabled vehi-
cle.
Now you can again turn on the electrical
consumers. Do not turn on the lights under
any circumstances.
�
Remove the jumper cables first from
the negative terminals3 and4 and
then from the positive terminals1
and2.
�
Have the battery checked at the near-
est authorized Mercedes-Benz Center.
Warning!
G
Keep flames or sparks away from battery.
Do not smoke.
Observe all safety instructions and precau-
tions when handling automotive batteries
(�page 258).
iThe vehicle cannot be started via
tow-start.
Page 361 of 394

Prevents the wheels from locking up
during braking so that the vehicle can
continue to be steered.
Alignment bolt
Metal pin with thread. The center")
361 Technical terms
ABS
(A
ntilock B
rake S
ystem)
Prevents the wheels from locking up
during braking so that the vehicle can
continue to be steered.
Alignment bolt
Metal pin with thread. The centering
pin is an aid used when changing a tire
to align the wheel with the wheel hub.BabySmart
TM
airbag deactivation
system
This system detects if a special system
compatible child restraint seat is in-
stalled on the front passenger seat. The
system will automatically deactivate
the passenger front airbag when such a
seat is properly installed (indicator
lamp
7
in the center console lights
up). See your authorized
Mercedes-Benz Center for availability.
BabySmartTM
compatible child seats
Special restraint system for children.
The sensor system for the passenger
seat prevents deployment of the pas-
senger side airbag if a BabySmart
TM
compatible child seat is installed.BAS
(B
rake A
ssist S
ystem)
System for potentially reducing braking
distances in emergency braking situa-
tions. The system is activated when it
senses an emergency based on how
fast the brake is applied.
Bi-Xenon headlamps*
Headlamps which use an electric arc as
the light source and produce a more in-
tense light than filament headlamps.
Bi-Xenon headlamps produce low
beam and high beam.
Page 369 of 394

369 Index
Automatic lighting control
Activating 109
Deactivating 109
Automatic locking when driving 95
Automatic transmission 141
Accelerator position 146
Activating steering wheel gearshift
control 147
Deactivating steering wheel gearshift
control 148
Emergency operation (Limp Home
Mode) 146
Fluid level 256
Gear ranges 143
Gear selector lever position 144
Gear shifting malfunctions 146
Kickdown 146
Manual shift program, CLK 55 AMG
146
One-touch gearshifting 142
Program mode selector switch 145
Selector lever position 141
Speedshift, CLK 55 AMG 146
Starting the engine 43
Steering wheel gearshift control
(Speedshift), CLK 55 AMG 146Transmission fluid 256
Winter program mode 145, 147
Auxiliary fuse box 338
B
BabySmart
TM
Airbag deactivation system 68
Compatible child seats 68, 361
Self-test 68
BabySmart
TM airbag deactivation system
361
Backrest
Folding forward 216
Folding rearward 217
Backup lamps 317, 322
Bulbs 317
BAS 76, 361
Messages in display 285
Batteries, SmartKey
Changing 312
Check lamp 85
Checking 86
Batteries, SmartKey with KEYLESS-GO*
Changing 312
Checking 86
Battery discharged
Jump starting 332Battery, vehicle 258, 329
Charging 330
Disconnecting 330
Messages in display 303
Reconnecting 331
Reinstalling 330
Removing 330
Bi-Xenon headlamps* 361
Block heater* 265
Blocking
Rear window operation 72
Bolts
For Minispare wheel 309
Brake assist system (BAS) 361
Brake fluid 353
Brake lamp bulbs 317
Brake lamp, high mounted 317
Brake pads
Message in display 286
Brakes 242
Warning lamp 279
Break-in period 240
Page 370 of 394

370 IndexBulbs, replacing 316
Additional turn signals 317
Backup lamps 317
Brake lamps 317
Fog lamps 317
Front lamps 317
High beam 317
High mounted brake lamp 317
License plate lamps 317, 322
Low beam 317
Parking lamps 317, 319, 321
Rear fog lamp 317
Rear fog lamps 322
Side marker lamps 317, 321
Standing lamps 317, 319, 321
Tail lamp assemblies 317, 322
Turn signal lamps 317
Button
Audio system 168C
CAC (Customer Assistance Center) 362
Calling up
Distronic* settings 121
Range (distance to empty) 137
Service indicator 267
CAN system 362
Capacities
Fuels, coolants, lubricants, etc. 351
Cargo tie-down rings 218
Casette mode
Playing cassettes 174
Cassette player
Operating 121
Catalytic converter 248
CD changer* 178
CD mode 178
CD player
Operating 120
Center console 25
AIRBAG OFF indicator lamp 282
Lower part 26
Upper part 25
Centigrade
Setting temperature units 126Central locking
Automatic 95
From inside 95
Switch 95
Switching on/off (control system) 133
Unlocking from inside 95
Central locking switch 95
Changing
Batteries (SmartKey with KEY-
LESS-GO*) 312
Batteries (SmartKey) 312
Key setting 133
Changing CDs 178
Charcoal filter 161
Activating 161
Deactivating 161
Charging
Vehicle battery 330
CHECK ENGINE malfunction indicator
lamp 280
Checking
Coolant level 256
Oil level 252, 254
Tire inflate pressure 252
Vehicle lighting 252
Page 379 of 394

379 Index
L
Labels, identification 342
Lamp bulbs, exterior 316
Lamps, exterior
Front 317
Light sensor 296
Messages in display 296–299
Rear 317
Lamps, indicator and warning
ABS 277
Airbag Off 61
Battery (SmartKey) 85
Brakes 279
CHECK ENGINE 280
Coolant 281, 289
DTR* 198
Engine diagnostics 280
ESP 276
Fuel reserve 280
Instrument cluster 276–281
Seat belts 280
Service indicator 266
SRS 57
Turn signals 23Language
Multifunction display 127
Setting 127
LATCH child seat mounts 71
Folding back 71
Layout of poly-V-belt drive 343
Leather upholstery
Cleaning 273
Lever
For cruise control 200
License plate lamps
Messages in display 298
Replacing bulbs 317, 322
Light alloy wheels
Cleaning 272
Technical data 345
Light sensor 296
Lighter see Cigarette lighter 224Lighting 105
Automatic headlamp mode 106
Combination switch 108
Daytime running lamp mode 106
Door entry lamps 110
Exterior lamp switch 105
Front fog lamps 107
High beam flasher 108
High beams 108
Instrument cluster illumination 111
Interior 109
Locator lighting 107
Low beam 105
Manual headlamp mode 106
Night security illumination 107
Parking lamps 105
Rear fog lamp 107
Settings (control system) 129
Limiting the gear range 143
Limp Home Mode 146
Line of fall 363