Page 252 of 394
.
2Brake fluid (fuse box")
252 OperationAt the gas station
Check regularly and before a long trip
1Coolant level
More information on coolant can be
found in the “Operation” section on
(
�page 256).
2Brake fluid (fuse box cover removed)
More information on brake fluid can be
found in the “Technical data” section
on (�page 353).
3Windshield washer and headlamp
cleaning system
More information on refilling the reser-
voir can be found in the “Operation”
section on (
�page 259).Engine oil level
More information on engine oil can be
found in the “Operation” section on
(
�page 254).
Vehicle lighting
Check function and cleanliness.More infor-
mation on replacing light bulbs can be
found in the “Practical hints” section on
(�page 316).
Tire inflation pressure
More information on tire inflate pressure
can be found in the “Operation” section on
(�page 262).
Opening hood see (
�page 253).
Removing fuse box cover see
(
�page 337).
Exterior lamp switch see (
�page 105)
iLeaving the engine running and the fuel
cap open can cause the
?
lamp to
illuminate.
More information can be found in the
“Practical hints” section (
�page 280).
Page 276 of 394

276 Practical hintsWhat to do if …?
What to do if …?Lamps in instrument clusterGeneral information:
If a bulb in the instrument cluster fails to
light up during the bulb self-check when turning the SmartKey in the starter switch
to position2, have it checked and replaced
if necessary.Problem
Possible cause
Suggested solution
v
The yellow ESP warning lamp
lights up while driving.
The ESP is deactivated.
Risk of accident!
Adapt your speed and driving to the prevail-
ing road conditions.
�
Turn the ESP back on (
�page 78).
If the ESP cannot be turned back on, have
the system checked at an authorized
Mercedes-Benz Center as soon as possi-
ble.
v
The yellow ESP warning lamp
flashes while driving.
The ESP or traction control has come into op-
eration because of detected traction loss in
at least one tire.
Distronic* is deactivated.
�
When driving off apply as little throttle
as possible.
�
While driving, ease up on the acceler-
ator.
�
Adapt your speed and driving to the
prevailing road and weather condi-
tions.
�
Do not deactivate the ESP -- excep-
tions: (
�page 78).
Failure to follow these instructions in-
creases the risk of accidents.
Page 297 of 394

297 Practical hints
What to do if …?
Display
Possible cause
Suggested solution
.
Turn signal in
left mirror
The left turn signal in the side mirror is
malfunctioning. This message will only ap-
pear if all light emitting diodes have
stopped working.
�
Have the LEDs replaced as soon as
possible.
Side marker lamp,
front left
T h e f r o n t l e f t s i d e m a r k e r l a m p i s m a l f u n c-
tioning.
�
Replace the bulb as soon as possible.
Side marker lamp
front right
The front right side marker lamp is mal-
functioning.
�
Replace the bulb as soon as possible.
Turn signal in
right mirror
The right turn signal in the side mirror is
malfunctioning. This message will only ap-
pear if all light emitting diodes have
stopped working.
�
Have the LEDs replaced as soon as
possible.
Turn signal front left
Substitute lamp on!
The left front turn signal lamp is malfunc-
tioning. A backup bulb is being used.
�
Replace the bulb as soon as possible.
Turn signal front right
Substitute lamp on!
The right front turn signal lamp is malfunc-
tioning. A backup bulb is being used.
�
Replace the bulb as soon as possible.
Stop lamp
Visit workshop!
Stop lamp illumination is delayed or lamp
is permanently on.
�
Visit an authorized Mercedes-Benz
Center as soon as possible.
Turn off lamps!
Lamps have been turned on although the
key in the starter switch is in position 0.
�
Visit an authorized Mercedes-Benz
Center as soon as possible.
Stop lamp, left
The left brake lamp is malfunctioning.
�
Visit an authorized Mercedes-Benz
Center as soon as possible.
Page 316 of 394
316 Practical hintsReplacing bulbs
Replacing bulbsSafe vehicle operation depends on proper
exterior lighting and signaling. It is there-
fore essential that all bulbs and lamp as-
semblies are in good working order at all
times.
Correct headlamp adjustment is extremely
important. Have headlamps checked and
readjusted at regular intervals and when a
bulb has been replaced. See your autho-
rized Mercedes-Benz Center for headlamp
adjustment.
Bulbs
iIf the headlamps are fogged up on the
inside as a result of high humidity, driv-
ing the vehicle a distance should clear
up the fogging.
iBackup bulbs will be brought into use
when the following lamps malfunction:�
Turn signal lamps
�
Brake lamps
�
Parking lamps
�
Tail lamps
Page 318 of 394
318 Practical hintsReplacing bulbs�
Only use 12 volt bulbs of the same type
and with the specified watt rating.
�
Switch lights off before changing a bulb
to prevent short circuits.
�
Always use a clean lint-free cloth when
handling bulbs.
�
Your hands should be dry and free of oil
and grease.
�
If the newly installed bulb does not light
up, visit an authorized Mercedes-Benz
Center.
�
Have the LEDs and bulbs for the follow-
ing lamps replaced by an authorized
Mercedes-Benz Center.�
Additional turn signal lamps in the
exterior rear view mirrors
�
High mounted brake lamp
�
Bi-Xenon* lamps
�
Front fog lamps
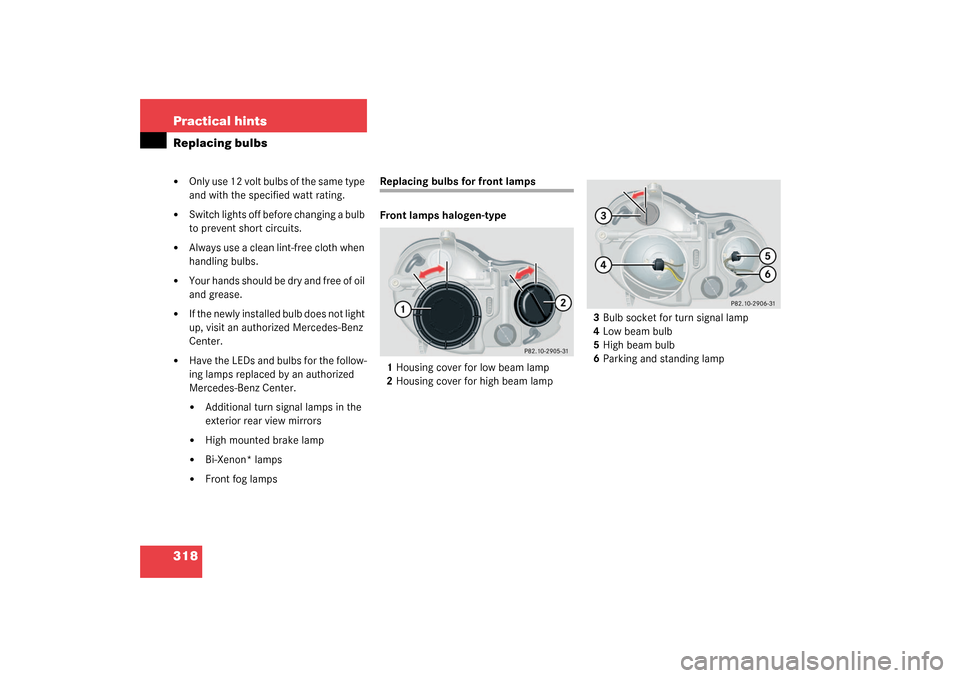
Replacing bulbs for front lamps
Front lamps halogen-type
1Housing cover for low beam lamp
2Housing cover for high beam lamp3Bulb socket for turn signal lamp
4Low beam bulb
5High beam bulb
6Parking and standing lamp
Page 319 of 394
.
�
Turn housing cover1 or 2 counter-
clockwise and remove.
�
Turn bulb holder 4 or")
319 Practical hints
Replacing bulbs
Low beam and high beam bulb�
Switch off the lights.
�
Open the hood (
�page 253).
�
Turn housing cover1 or 2 counter-
clockwise and remove.
�
Turn bulb holder 4 or 5 with the bulb
counterclockwise and remove.
�
Press the bulb backwards and turn
counterclockwise out of the bulb hold-
er.
�
Press the new bulb into the holder and
twist it clockwise.
�
Place the bulb holder back into the
lamp and turn it clockwise.
�
Place the corresponding housing cov-
ers back on and turn them clockwise.Front turn signal lamp bulb
�
Switch off the lights.
�
Open the hood (
�page 253).
�
Twist bulb socket3 counterclockwise
and pull out.
�
Push bulb into socket, turn counter-
clockwise and remove.
�
Insert new bulb in socket, push in and
twist clockwise.
�
Reinsert bulb socket in lamp and twist
clockwise.Parking and standing lamp bulb
�
Switch off the lights.
�
Open the hood (
�page 253).
�
Turn housing cover2 counterclockwise
and remove.
�
Pull out the bulb socket with the bulb.
�
Pull the bulb out of the bulb socket.
�
Insert a new bulb in the socket.
�
Reinstall the bulb socket.
�
Align housing cover and click into
place.
Page 320 of 394
320 Practical hintsReplacing bulbsFront lamps Bi-Xenon*-type
1Bulb socket for turn signal lamp
2Housing cover for high beam lamp
3Housing cover for Bi-Xenon* lamp4High beam bulb
5Parking and standing lampHigh beam bulb
�
Switch off the lights.
�
Open the hood (
�page 253).
�
Turn housing cover2 counterclockwise
and remove.
�
Turn bulb holder 4 with the bulb coun-
terclockwise and remove.
�
Press the bulb backwards and turn
counterclockwise out of the bulb hold-
er.
�
Press the new bulb into the holder and
twist it clockwise.
�
Place the bulb holder back into the
lamp and turn it clockwise.
�
Place the housing cover 2 back on and
turn them clockwise.
Warning!
G
Do not remove the cover 3 for the Bi-Xenon*
headlamp. Because of high voltage in xenon
lamps, it is dangerous to replace the bulb or
repair the lamp and its components. We rec-
o mme nd t h at y ou ha ve s uc h w o rk do n e by a
qualified technician.
Page 321 of 394
.
�
Twist bulb socket1 counterclockwise
and pull out.
�
Push bulb into socket, turn")
321 Practical hints
Replacing bulbs
Front turn signal lamp bulb�
Switch off the lights.
�
Open the hood (
�page 253).
�
Twist bulb socket1 counterclockwise
and pull out.
�
Push bulb into socket, turn counter-
clockwise and remove.
�
Insert new bulb in socket, push in and
twist clockwise.
�
Reinsert bulb socket in lamp and twist
clockwise.Parking and standing lamp bulb
�
Switch off the lights.
�
Open the hood (
�page 253).
�
Turn housing cover2 counterclockwise
and remove.
�
Pull out the bulb socket with the bulb.
�
Pull the bulb out of the bulb socket.
�
Insert a new bulb in the socket.
�
Reinstall the bulb socket.
�
Align housing cover and click into
place.
Side marker lamp bulb�
Switch off the lights.
�
Carefully slide lamp towards rear.
�
Remove front end first.
�
Twist bulb socket counterclockwise
and pull out.
�
Pull bulb out of the bulb socket.
�
Insert new bulb in socket.
�
Reinstall bulb socket, push in and twist
clockwise.
�
To reinstall lamp, set rear end in
bumper and let front end snap into
place.