Page 141 of 384

141 Controls in detail
Control system
After entering the vehicle, the steering
wheel and seat will move into the position
stored in memory when�
the driver’s door is closed
�
you put the key in the starter switch
�
press the appropriate stored position
button on the memory switch
(�page 105).
�
Move the selection marker with
the
æ
or
ç
button to
the
CONVENIENCE
submenu.
�
Press button
j
or
k
repeatedly
until you see this message in the dis-
play:
EASY-ENTRY FEATURE ACTIVATE
.
The selection marker is on the current
setting.
�
Press
æ
or
ç
to change the
easy-entry / exit setting.
The following settings are available for the
easy-entry / exit feature:
Warning!
G
You must make sure that no one can be-
come trapped or injured by the moving
steering wheel and the driver’s seat when
the easy-entry / exit feature is in operation
and the driver’s door is being opened or the
key is removed from the starter switch. Do
not leave children unattended in the vehicle,
or with access to an unlocked vehicle. Unsu-
pervised use of vehicle equipment may
cause an accident and / or serious personal
injury.
Do not leave children unattended in the ve-
hicle, or with access to an unlocked vehicle.
Children could open the driver’s door and
unintentionally activate the easy-entry / exit
feature, which could result in an accident
and / or serious personal injury.
iTo cancel seat / steering wheel move-
ment, do one of the following:�
Press seat adjustment switch
(�page 35)
�
Move the steering column stalk
(�page 37)
�
Press the memory switch
(�page 105)
OFF
The
easy-entry / exit
feature is deactivat-
ed.
STEER. COL.
Only the steering
column is moved.
ST. COL + SEAT
Both the steering
column and the
seat are moved.
Page 142 of 384

142 Controls in detailControl systemSetting parking position for exterior rear
view mirror
Use the
MIRROR SETTING WHEN PARKING
function to select whether the passenger
side exterior rear view mirror should be
turned downward during parking maneu-
vers when reverse gear is engaged. For ad-
ditional information see “Setting parking
position for exterior rear view mirror”
(
�page 142).
�
Move the selection marker to
the
CONVENIENCE
submenu using
the
æ
or
ç
button.
�
Press the
j
or
k
button repeat-
edly until the message MIRROR SETTING
WHEN PARKING
appears in the display.The selection marker is on the current
setting.
�
Press
æ
or
ç
to switch function
ON or
OFF
.
Setting fold-in function for exterior rear
view mirrors
Using this function, you can set the exteri-
or rear view mirrors to be automatically
folded in when you lock your vehicle
(
�page 152).
�
Move the selection marker to
the
CONVENIENCE
submenu using
the
æ
or
ç
button.
�
Press the
j
or
k
button repeat-
edly until the message FOLD MIRRORS
WHEN LOCKING
appears in the display.
The selection marker is on the current
setting.
�
Press the
æ
or
ç
button to
switch the automatic fold-in setting for
the mirrors
ON or
OFF
when the vehicle
is locked.
Page 149 of 384
149 Controls in detail
Automatic transmission
Steering wheel gearshift control
(Speedshift) and manual shift program CL 55 AMG
The CL 55 AMG can be driven in both the
automatic and manual shift program
modes. In the manual shift program mode
you can change the gears manually on the
steering wheel or by using the selector le-
ver.
1Right button: upshift
2Left button: downshiftTo do so, you must first select the manual
shift program M on the program mode se-
lector switch.
3Program mode selector switch
S Sport For standard driving
C Comfort For comfort driving
M Manual For manual gear shiftingActivating steering wheel gearshift
control
�
Press the program mode selector
switch repeatedly until the
M for manual
shift program appears in the tachome-
ter display.
Automatic gear shifting is activated.
!Never change the program mode when
the selector lever is out of positionP. It
could result in a change of driving char-
acteristics for which you may not be
prepared.
Page 150 of 384

150 Controls in detailAutomatic transmissionUpshifting�
Press the button located on the right
side of the steering wheel.
or
�
Briefly press the selector lever to the
right in the D+direction.
The transmission shifts to the next
higher gear.
Warm up the engine smoothly. Do not
place full load on the engine until the oper-
ating temperature has been reached. Shift
into reverse gear only when the vehicle is
stopped.Downshifting
�
Press the button located on the left
side of the steering wheel.
or
�
Briefly press the selector lever to the
right in the D-direction.
The transmission shifts to the next low-
er gear.
Warm up the engine smoothly. Do not
place full load on the engine until the oper-
ating temperature has been reached. Shift
into reverse gear only when the vehicle is
stopped.Deactivating steering wheel gearshift
control
�
Press the program mode selector
switch repeatedly until the
S or
C for au-
tomatic shift program appears in the
tachometer display.
Automatic gear shifting is activated.
!Avoid spinning of a drive wheel for an
extended period when driving off on
slippery surface. This may cause seri-
ous damage to the drivetrain which is
not covered by the Mercedes-Benz
Limited Warranty.
Warning!
G
On slippery road surfaces, never downshift
in order to obtain braking action. This could
result in drive wheel slip and reduced vehi-
cle control. Your vehicle’s ABS will not pre-
vent this type of loss of control.
iAt each engine start, the transmission
will go into the last automatic shift pro-
gram mode selected (S or C). Program
modeM is not stored and will not be re-
called when engine is restarted.
Page 152 of 384

152 Controls in detailGood visibilityActivating exterior rear view mirror
parking position
The buttons are located on the driver’s
door.
1Driver’s side exterior rear view mirror
2Passenger-side exterior rear view
mirror
Follow these steps to activate the mirror
parking position so that the passen-
ger-side exterior rear view mirror will be
turned downward to the stored position.�
Make sure you have stored a parking
position for the passenger-side exterior
rear view mirror (
�page 107).
�
Make sure that the
MIRROR SETTING
WHEN PARKING
function in the
CONVENIENCE
submenu in the control
system, is switched to
ON (�page 142).
�
Switch on ignition (if not already on).
�
Press button2 for passenger-side ex-
terior rear view mirror.
�
Place the gear selector lever in reverse
gear R.
The passenger-side exterior rear view
mirror will be turned downward in the
stored position.
The exterior rear view mirror returns to its
previously stored driving position:
�
10 seconds after you put the gear se-
lector lever out of position R
�
immediately once you exceed a vehicle
speed of approx. 6 mph (10 km/h)
�
immediately when you press button1
for driver’s side exterior rear view
mirrorElectrically folding exterior rear view
mirrors
Folding the exterior rear view mirrors in
and out automatically
When the corresponding function in the
control system is activated (
�page 142):
�
The exterior rear view mirrors automat-
ically fold in as soon as the vehicle is
locked from the outside.
�
The exterior rear view mirrors automat-
ically fold out as soon as the vehicle is
unlocked and the driver’s or passenger
door are subsequently opened.
Page 153 of 384

153 Controls in detail
Good visibility
Folding the exterior rear view mirrors in
and out manually
The exterior rear view mirrors can vibrate if
they are not completely folded out.
The buttons are located on the driver’s
door.
1Folds the exterior mirrors out
2Folds the exterior mirrors in�
Make sure the ignition is switched on.
All the lamps in the instrument cluster
should light up.Folding in
�
Briefly press button 2.
The mirrors fold in.
Folding out
�
Briefly press button 1.
The mirrors fold out.!Before you drive the vehicle through an
automatic car wash, fold the exterior
mirrors in, otherwise they may get
damaged.iIf you are driving at more than 9 mph
(15 km/h), you will not be able to fold
the exterior mirrors in.
!If an exterior mirror housing is forcibly
pushed forward (hit from the rear), re-
position it manually by applying firm
pressure until it snaps back into place.
If an exterior mirror is forcibly pushed
rearward (hit from the front) press
button2 to fold mirrors in, then press
button1 to fold mirrors out. Do not
force mirror by hand as it may damage
the adjustment mechanism.
The mirror housing is now properly po-
sitioned and you can adjust the mirror
normally.
Page 156 of 384
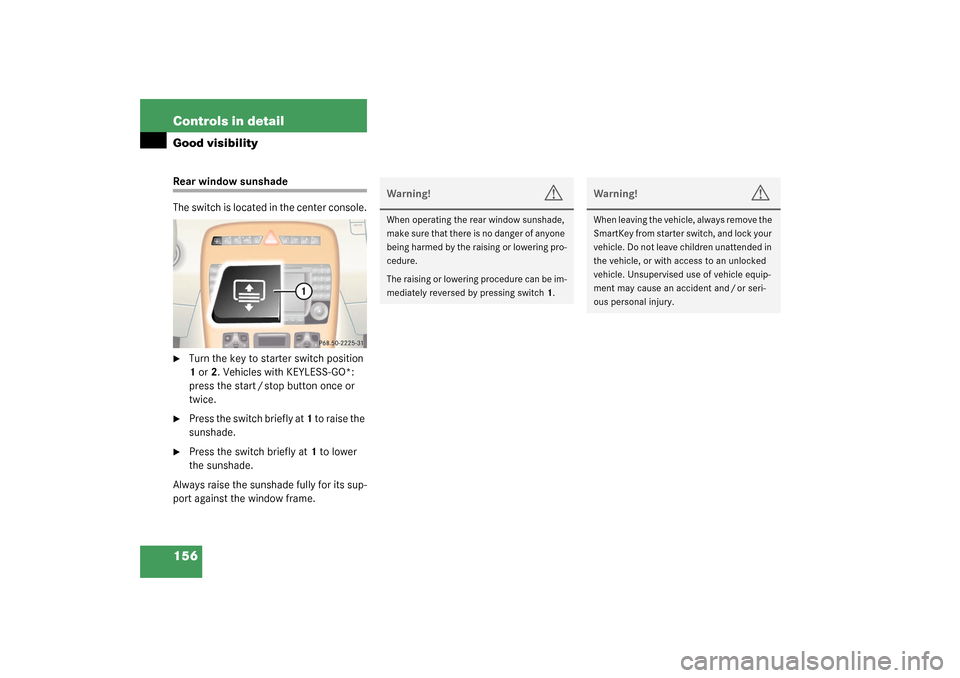
156 Controls in detailGood visibilityRear window sunshade
The switch is located in the center console.�
Turn the key to starter switch position
1 or 2. Vehicles with KEYLESS-GO*:
press the start / stop button once or
twice.
�
Press the switch briefly at 1 to raise the
sunshade.
�
Press the switch briefly at 1 to lower
the sunshade.
Always raise the sunshade fully for its sup-
port against the window frame.
Warning!
G
When operating the rear window sunshade,
ma ke s ur e th at t h ere is no dan ge r o f an y on e
being harmed by the raising or lowering pro-
cedure.
The raising or lowering procedure can be im-
mediately reversed by pressing switch1.
Warning!
G
When leaving the vehicle, always remove the
SmartKey from starter switch, and lock your
vehicle. Do not leave children unattended in
the vehicle, or with access to an unlocked
vehicle. Unsupervised use of vehicle equip-
ment may cause an accident and / or seri-
ous personal injury.
Page 160 of 384

10for the left side or8 for the right side to
separately adjust the air temperature on")
160 Controls in detailAutomatic climate control
Setting the temperature
Use temperature controls (
�page 159)
10for the left side or8 for the right side to
separately adjust the air temperature on
each side of the passenger compartment.
You should raise or lower the temperature
setting in small increments, preferably
starting at 72°F (22°C).
Increasing / decreasing
�
Press button 10 or 8 repeatedly up or
down until the display shows the de-
sired temperature.
The automatic climate control system
will accordingly adjust the interior air
temperature.Adjusting the temperature for center
air vents
When outside temperatures are low, you
can manually raise the air temperature for
the center and side air vents. The
thumbwheel4 is located between the cen-
ter air vents (
�page 157).
Automatic temperature control
�
Turn thumbwheel 4 to A.
The indicator lamp above the thumb-
wheel lights up. The temperature is au-
tomatically adjusted to the set value.
Turning on warm air
�
Turn thumbwheel4 in the direction of
the white marking.
Warm air will enter from the center air
vent.
iThe current climate control settings
(ON / OFF, temperature, air volume, ac-
tivated charcoal filter, etc.) are stored
for each electronic key before it is re-
moved from the starter switch or when
the vehicle is locked using the
KEYLESS-GO* card (
�page 105).
If the vehicle interior is hot, ventilate
the interior before driving off.
Keep the air intake grille in front of the
windshield free of snow, leaves, sticks
and any other debris.
Do not obstruct air volume by placing
objects on the air volume-through ex-
haust slots below the rear window.
iWhen operating the climate control
system in automatic mode, you will
only rarely need to adjust the tempera-
ture, air volume and air distribution.
 and manual shift program CL 55 AMG
The CL 55 AMG can be driven in both the
automatic and manual shift prog")