Page 201 of 384
201 Controls in detail
Useful features
Opening storage compartment
The compartment contains a coin holder.�
Press button1 and lift the armrest.
Opening storage tray
�
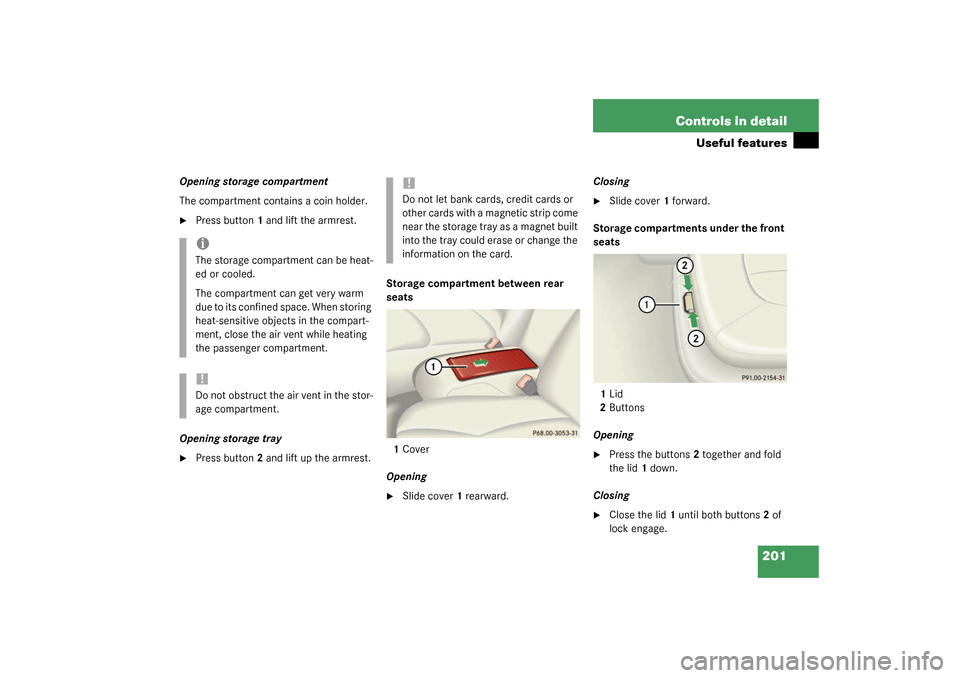
Press button2 and lift up the armrest.Storage compartment between rear
seats
1Cover
Opening
�
Slide cover1 rearward.Closing
�
Slide cover1 forward.
Storage compartments under the front
seats
1Lid
2Buttons
Opening
�
Press the buttons2 together and fold
the lid1 down.
Closing
�
Close the lid1 until both buttons2 of
lock engage.
iThe storage compartment can be heat-
ed or cooled.
The compartment can get very warm
due to its confined space. When storing
heat-sensitive objects in the compart-
ment, close the air vent while heating
the passenger compartment.!Do not obstruct the air vent in the stor-
age compartment.
!Do not let bank cards, credit cards or
other cards with a magnetic strip come
near the storage tray as a magnet built
into the tray could erase or change the
information on the card.
Page 202 of 384
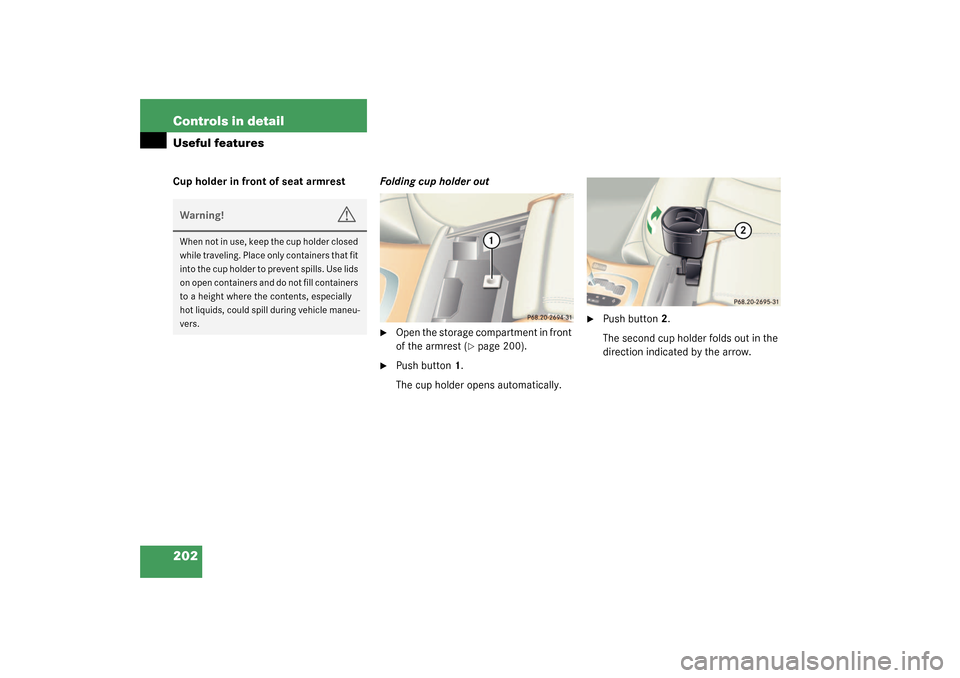
202 Controls in detailUseful featuresCup holder in front of seat armrestFolding cup holder out
�
Open the storage compartment in front
of the armrest (
�page 200).
�
Push button1.
The cup holder opens automatically.
�
Push button2.
The second cup holder folds out in the
direction indicated by the arrow.
Warning!
G
When not in use, keep the cup holder closed
while traveling. Place only containers that fit
into the cup holder to prevent spills. Use lids
on open containers and do not fill containers
to a height where the contents, especially
hot liquids, could spill during vehicle maneu-
vers.
Page 203 of 384
203 Controls in detail
Useful features
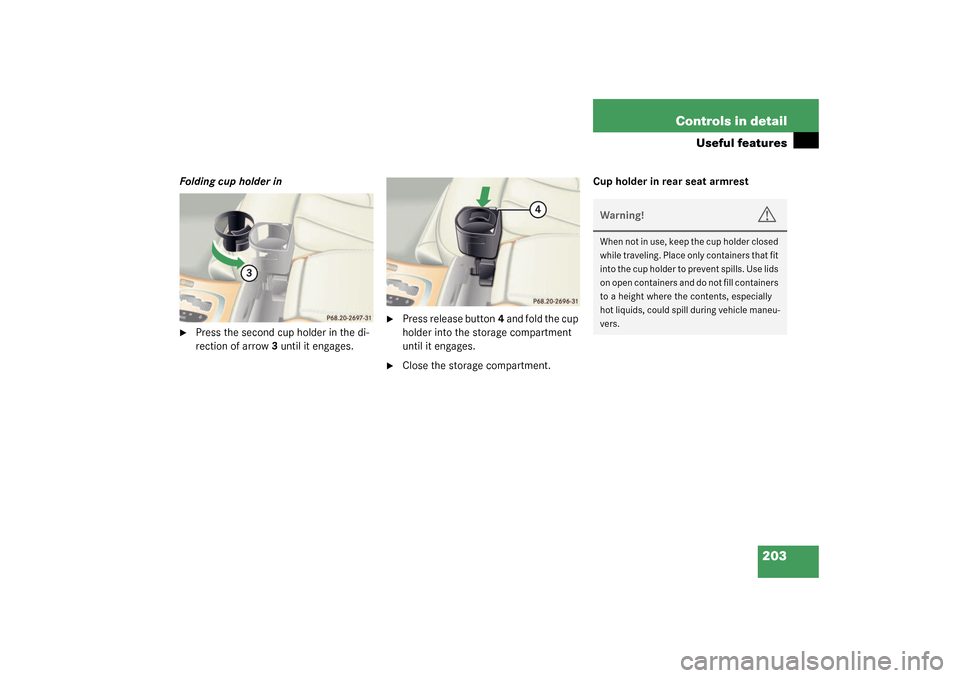
Folding cup holder in�
Press the second cup holder in the di-
rection of arrow3 until it engages.
�
Press release button4 and fold the cup
holder into the storage compartment
until it engages.
�
Close the storage compartment.Cup holder in rear seat armrest
Warning!
G
When not in use, keep the cup holder closed
while traveling. Place only containers that fit
into the cup holder to prevent spills. Use lids
on open containers and do not fill containers
to a height where the contents, especially
hot liquids, could spill during vehicle maneu-
vers.
Page 206 of 384
.�
Hang the parc")
206 Controls in detailUseful featuresParcel net in trunk
You can hang a parcel net in the trunk. The
hooks and the parcel net in the trunk can
hold a load of up to 29.8 lbs (13.5 kg).�
Hang the parcel net on hooks1 on the
left and right sides of the trunk.
Ashtrays
Center console ashtray
Opening ashtray�
Briefly touch cover plate.
The ashtray opens automatically.Removing ashtray insert
�
Prevent vehicle from moving by setting
the parking brake. Move the selector
lever to positionN.
Now you have more room to remove
the insert.
�
Push sliding button1 to the right.
The ashtray is disengaged and slides
out a short way out.
�
Remove insert from ashtray frame.
Reinstalling the ashtray insert
�
Install insert by pushing back into
frame until it engages again.
!The parcel net cannot protect or suffi-
ciently secure goods in the event of an
accident.
Warning!
G
Remove front ashtray only with vehicle
standing still. Set the parking brake to se-
cure vehicle from movement. Move gear se-
lector lever to positionN. With gear selector
lever in positionN, turn off the engine.
Page 209 of 384

209 Controls in detail
Useful features
You can take and make telephone calls us-
ing the
í
and
ì
buttons on the
steering wheel. To carry out other tele-
phone functions, use the control system
(
�page 117).
See separate operating manual for instruc-
tions on how to use the telephone.
Tele Aid
Warning!
G
Please do not forget that your primary re-
sponsibility is to drive the vehicle. A driver’s
attention to the road must always be
his / her primary focus when driving. For
your safety and the safety of others, we rec-
o m m e n d t h a t y o u p u l l o v e r t o a s a f e l o c a t i o n
and stop before placing or taking a tele-
phone call.
If you choose to use the telephone
1 while
driving, please use the hands-free device
and only use the telephone when road,
weather and traffic conditions permit. Some
jurisdictions prohibit the driver from using a
cellular telephone while driving a vehicle.
Only operate the COMAND (Cockpit Man-
agement and Data System)
1 if road, weather
and traffic conditions permit.
1Observe all legal requirements.
Bear in mind that at a speed of just 30 mph
(approximately 50 km / h), your vehicle is
covering a distance of approx. 44 feet (ap-
proximately 13.5 m) every second.
!The initial activation of the Tele Aid sys-
tem may only be performed by com-
pleting the subscriber agreement and
placing an acquaintance call using the
SOS button. Failure to complete either
of these steps will result in a system
that is not activated. If the system is
not activated, the indicator lamp in the
SOS button stays on after turning key
in starter switch to position2 or press-
ing KEYLESS-GO* start / stop button
twice to position2 (
�page 33). The
message
TELE AID – NOT ACTIVATED
will be shown in the multifunction dis-
play for approx. 10 seconds.
If you have any questions regarding ac-
tivation, please call the Response Cen-
ter at 1-800-756-9018 (in the USA) or
1-888-923-8367 (in Canada).
Page 210 of 384

The Tele Aid system consists of three types
of response:
�
Automatic and manual emergency
�
Ro")
210 Controls in detailUseful featuresThe Tele Aid system
(Telematic A
larm I
dentification on D
e-
mand)
The Tele Aid system consists of three types
of response:
�
Automatic and manual emergency
�
Roadside Assistance and
�
Information
The Tele Aid system is operational provid-
ing that the vehicle’s battery is charged,
properly connected, not damaged and cel-
lular and GPS coverage is available.
The speaker volume of a Tele Aid call can
be adjusted using the volume control on
the multifunction steering wheel. To raise,
press button
æ
and to lower, press
button
ç
.
�
To activate, press the SOS button, the
Roadside Assistance button
•
or
the Information button
¡
, depend-
ing on the type of response required.Shortly after the completion of your Ac-
quaintance Call, you will receive a user ID
and password via first call mail. By visiting
www.mbusa.com and selecting “Tele Aid”
( U S A o n l y ) , y o u w i l l h a v e a c c e s s t o a c c o u n t
information, remote door unlock, profile
and more.System self-check
Initially, after turning the key in starter
switch to position2, malfunctions are de-
tected and indicated (the indicator lamps
in the SOS button, the Roadside Assis-
tance button
•
and the Information
button
¡
stay on longer than
10 seconds or do not come on). The mes-
sage
TELE AID – VISIT WORKSHOP!
ap-
pears for approx. 10 seconds in the
multifunction display.
iThe SOS button is located above the in-
terior rear view mirror.
The Roadside Assistance button
•
and the Information button
¡
are
located below the center armrest cov-
er.
!The Tele Aid system utilizes the cellular
network for communication and the
GPS (Global Positioning System) satel-
lites for vehicle location. If either of
these signals are unavailable, the
Tele Aid system may not function and if
this occurs, assistance must be sum-
moned by other means.
Page 211 of 384

or airbags deploy
�
if")
211 Controls in detail
Useful features
Emergency calls
An emergency call is initiated automatical-
ly:�
following an accident in which the
emergency tensioning devices (ETDs)
or airbags deploy
�
if the anti-theft alarm or the tow-away
alarm stays on for more than
20 seconds. See anti-theft alarm sys-
tem (
�page 76) and tow-away alarm
(
�page 78)
An emergency call can also be initiated
manually by opening the cover next to the
inside rear view mirror labeled SOS, then
briefly pressing the button located under
the cover. See below for instructions on
initiating an emergency call manually.
Once the emergency call is in progress, the
indicator lamp in the SOS button will begin
to flash. The message
EMERGENCY CALL –
CONNECTING CALL
appears in the multifunc-
tion display. When the connection is estab-
lished, the message
EMERGENCY CALL –
CALL CONNECTED
appears in the multifunc-tion display. All information relevant to the
emergency, such as the location of the ve-
hicle (determined by the GPS satellite loca-
tion system), vehicle model, identification
number and color are generated.
A voice connection between the Response
Center and the occupants of the vehicle
will be established automatically soon af-
ter the emergency call has been initiated.
When a voice connection is established the
audio system mutes and the message
TELE AID – CALL CONNECTED
appears in
the multifunction display. The Response
Center will attempt to determine more pre-
cisely the nature of the accident provided
they can speak to an occupant of the vehi-
cle.
Warning!
G
If the indicator lamps in the SOS button, in
the Roadside Assistance button and/or in
the Information button do not come on dur-
ing the system self-check or if any of these
indicators remain illuminated constantly in
red and/or the message
TELE AID -
VISIT WORKSHOP!
is displayed in the multi-
function display after the system self-check,
a malfunction in the system has been de-
tected.
If a malfunction is indicated as outlined
above, the system may not operate as ex-
pected. Have the system checked at the
nearest Mercedes-Benz Center as soon as
possible.
Page 212 of 384

212 Controls in detailUseful featuresThe Tele Aid system is available if:�
It has been activated and is operation-
al. Activation requires a subscription
for monitoring services, connection
and cellular air time
�
The relevant cellular phone network
and GPS signals are available and pass
the information on to the response cen-
terInitiating an emergency call manually
1SOS button
�
Briefly press on the cover of the emer-
gency call button with the
inscriptionSOS above the inside rear
view mirror.
The cover will open.
�
Press SOS button1 briefly.
The indicator lamp in SOS button1 will
flash until the emergency call is con-
cluded.
�
Wait for a voice connection to the Re-
sponse Center.
iLocation of the vehicle on a map is only
possible if the vehicle is able to receive
signals from the GPS satellite network
and pass the information on to the re-
sponse center.
Warning!
G
If the indicator lamp in the SOS button is il-
luminated continuously and there was no
voice connection to the Response Center
established, then the Tele Aid system could
not initiate an emergency call (e.g. the rele-
vant cellular phone network is not available).
The message
EMERGENCY CALL –
CALL FAILED appears in the multifunction
display for approx. 10 seconds.
Should this occur, assistance must be sum-
moned by other means.