Page 265 of 370

271 Practical hints
What to do if …
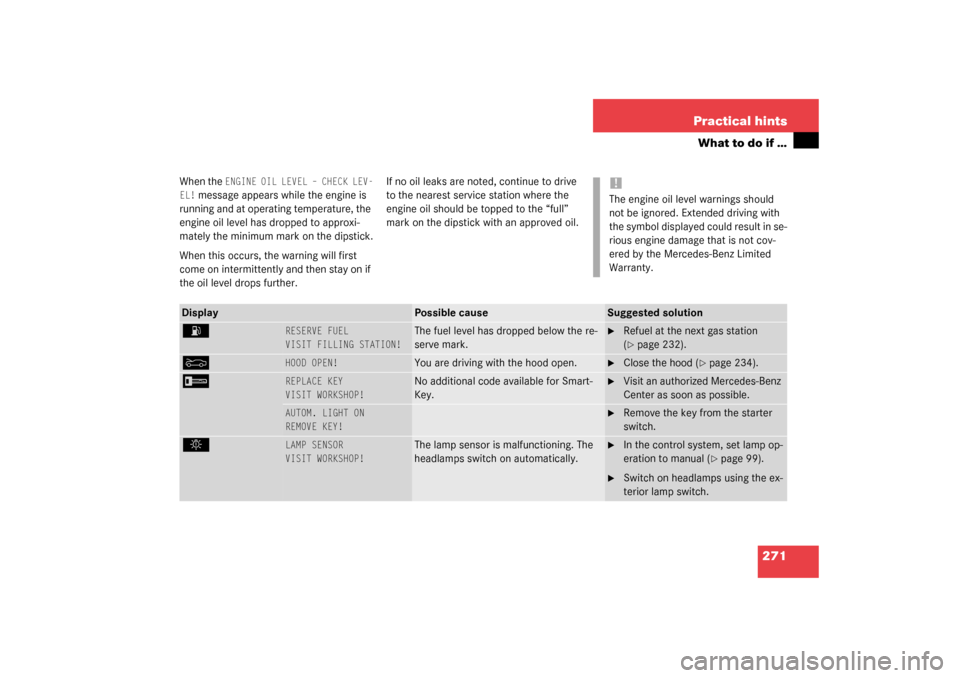
When the
ENGINE OIL LEVEL – CHECK LEV-
EL!
message appears while the engine is
running and at operating temperature, the
engine oil level has dropped to approxi-
mately the minimum mark on the dipstick.
When this occurs, the warning will first
come on intermittently and then stay on if
the oil level drops further.If no oil leaks are noted, continue to drive
to the nearest service station where the
engine oil should be topped to the “full”
mark on the dipstick with an approved oil.
!The engine oil level warnings should
not be ignored. Extended driving with
the symbol displayed could result in se-
rious engine damage that is not cov-
ered by the Mercedes-Benz Limited
Warranty.
Display
Possible cause
Suggested solution
A
RESERVE FUEL
VISIT FILLING STATION!
The fuel level has dropped below the re-
serve mark.
�
Refuel at the next gas station
(�page 232).
Y
HOOD OPEN!
You are driving with the hood open.
�
Close the hood (
�page 234).
I
REPLACE KEY
VISIT WORKSHOP!
No additional code available for Smart-
Key.
�
Visit an authorized Mercedes-Benz
Center as soon as possible.
AUTOM. LIGHT ON
REMOVE KEY!
�
Remove the key from the starter
switch.
.
LAMP SENSOR
VISIT WORKSHOP!
The lamp sensor is malfunctioning. The
headlamps switch on automatically.
�
In the control system, set lamp op-
eration to manual (
�page 99).
�
Switch on headlamps using the ex-
terior lamp switch.
S203 MY03_A.book Page 271 Tuesday, January 28, 2003 2:22 PM
Page 276 of 370
282 Practical hintsWhere will I find ...?Spare wheel bolts
1Wheel bolt for light alloy rims
2Wheel bolt for Minispare wheel or other
steel rims
Wheel bolts2 must be used when mount-
ing steel wheel rim.Vehicles with Minispare wheel
The Minispare wheel is located in the stor-
age compartment underneath the cargo
floor.
Removing the Minispare wheel
1Retaining screw
2Storage well casing
�
Lift cargo floor cover.
�
Loosen retaining screw1 in the middle
of storage well casing2.
�
Remove storage well casing2.
!The use of any wheel bolts other than
wheel bolts2 for steel wheel rims can
cause physical damage to the vehicle.
Warning!
G
Be sure to use the original length wheel
bolts when remounting the original wheel af-
ter it has been repaired.
S203 MY03_A.book Page 282 Tuesday, January 28, 2003 2:22 PM
Page 278 of 370
284 Practical hintsWhere will I find ...?Minispare wheel bolts
1Wheel bolt for light alloy rims
2Wheel bolt for Minispare wheel or other
steel rims
!Wheel bolts2 must be used when
mounting the Minispare wheel. The use
of any wheel bolts other than wheel
bolts 2 for the Minispare can cause
physical damage to the vehicle.
Warning!
G
Be sure to use the original length wheel
bolts when remounting the original wheel af-
ter it has been repaired.
S203 MY03_A.book Page 284 Tuesday, January 28, 2003 2:22 PM
Page 287 of 370

293 Practical hints
Replacing bulbs
Rear lamps Notes on bulb replacement
�
Use only 12 volt bulbs of the same type
and with the specified watt rating.
�
Switch lights off before changing a bulb
to prevent short circuits.
�
Always use a clean lint-free cloth when
handling bulbs.
�
Your hands should be dry and free of oil
and grease.
�
If the newly installed bulb does not light
up, visit an authorized Mercedes-Benz
Center.
�
Have the LEDs and bulbs for the follow-
ing lamps replaced by an authorized
Mercedes-Benz Center:�
Additional turn signals in the
exterior rear view mirrors
�
High mounted brake lamp
�
Xenon lamps
�
Front fog lamps
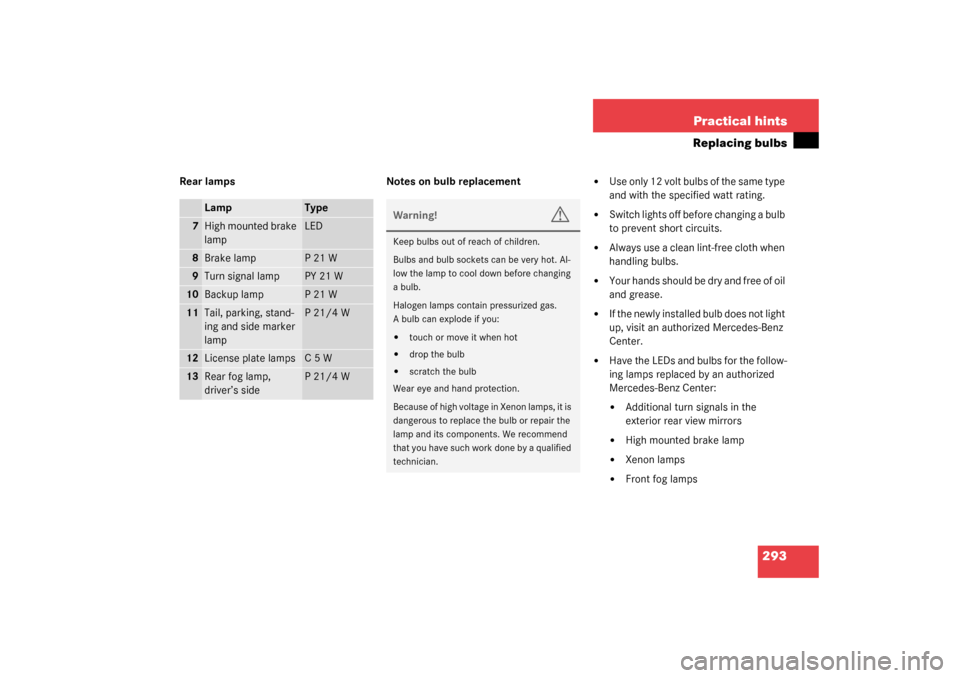
Lamp
Type
7
High mounted brake
lamp
LED
8
Brake lamp
P21W
9
Turn signal lamp
PY 21 W
10
Backup lamp
P21W
11
Tail, parking, stand-
ing and side marker
lamp
P21/4W
12
License plate lamps
C5W
13
Rear fog lamp,
driver’s side
P21/4W
Warning!
G
Keep bulbs out of reach of children.
Bulbs and bulb sockets can be very hot. Al-
low the lamp to cool down before changing
a bulb.
Halogen lamps contain pressurized gas.
A bulb can explode if you:�
touch or move it when hot
�
drop the bulb
�
scratch the bulb
Wear eye and hand protection.
Because of high voltage in Xenon lamps, it is
dangerous to replace the bulb or repair the
lamp and its components. We recommend
that you have such work done by a qualified
technician.
S203 MY03_A.book Page 293 Tuesday, January 28, 2003 2:22 PM
Page 289 of 370

295 Practical hints
Replacing bulbs
Parking and standing lamp bulb�
Switch off the lights.
�
Open the hood (
�page 234).
�
Press the clamp and remove headlamp
cover2.
�
Pull out the bulb socket6 with the
bulb.
�
Pull the bulb out of the bulb socket.
�
Insert a new bulb in the socket.
�
Reinstall the bulb socket.
�
Align headlamp cover2 and click into
place.Bi-Xenon* headlamps
1Bulb socket for turn signal lamp
2Headlamp cover for high beam bulb,
parking and standing lamp
3Headlamp cover for Bi-Xenon lamp4High beam headlamp bulb
5Bayonet socket for high beam head-
lamp bulb
6Bulb socket for parking and standing
lamp
High beam bulb
�
Switch off the lights.
�
Open the hood (
�page 234).
�
Press the clamp and remove headlamp
cover2.
�
Pull electrical connector4 off.
Warning!
G
Do not remove the cover3 for the Bi-Xenon
headlamp. Because of high voltage in
Bi-Xenon lamps, it is dangerous to replace
the bulb or repair the lamp and its compo-
nents. We recommend that you have such
work done by a qualified technician.
��
S203 MY03_A.book Page 295 Tuesday, January 28, 2003 2:22 PM
Page 297 of 370

303 Practical hints
Flat tire
�
Unscrew the alignment bolt, install last
wheel bolt and tighten slightly.Minispare wheel
In the case of a flat tire, you may tempo-
rarily use the Minispare wheel when ob-
serving the following restrictions:
�
Do not exceed a vehicle speed of
50 mph (80km/h).
�
Drive to the nearest tire repair facility
to have the flat tire repaired or re-
placed as appropriate.
�
Do not operate vehicle with more than
one spare wheel mounted.
Warning!
G
Always replace wheel bolts that are dam-
aged or rusted.
Never apply oil or grease to wheel bolts.
Damaged wheel hub threads should be re-
paired immediately. Do not continue to drive
under these circumstances! Contact an au-
thorized Mercedes-Benz Center or call
Roadside Assistance.
Incorrect mounting bolts or improperly
tightened mounting bolts can cause the
wheel to come off. This could cause an acci-
dent. Be sure to use the correct mounting
bolts.
Warning!
G
Use only genuine equipment
Mercedes-Benz wheel bolts. They are identi-
fied by the Mercedes star. Other wheel bolts
may come loose.
Do not tighten the wheel bolts when the ve-
hicle is raised. Otherwise the vehicle could
tip over.
Warning!
G
The dimensions of the Minispare wheel are
different from those of the road wheels. As
a result, the vehicle handling characteristics
change when driving with a Minispare wheel
mounted.
The spare wheel should only be used tempo-
rarily, and replaced with a regular road
wheel as quick as possible.
S203 MY03_A.book Page 303 Tuesday, January 28, 2003 2:22 PM
Page 303 of 370

309 Practical hints
Jump starting
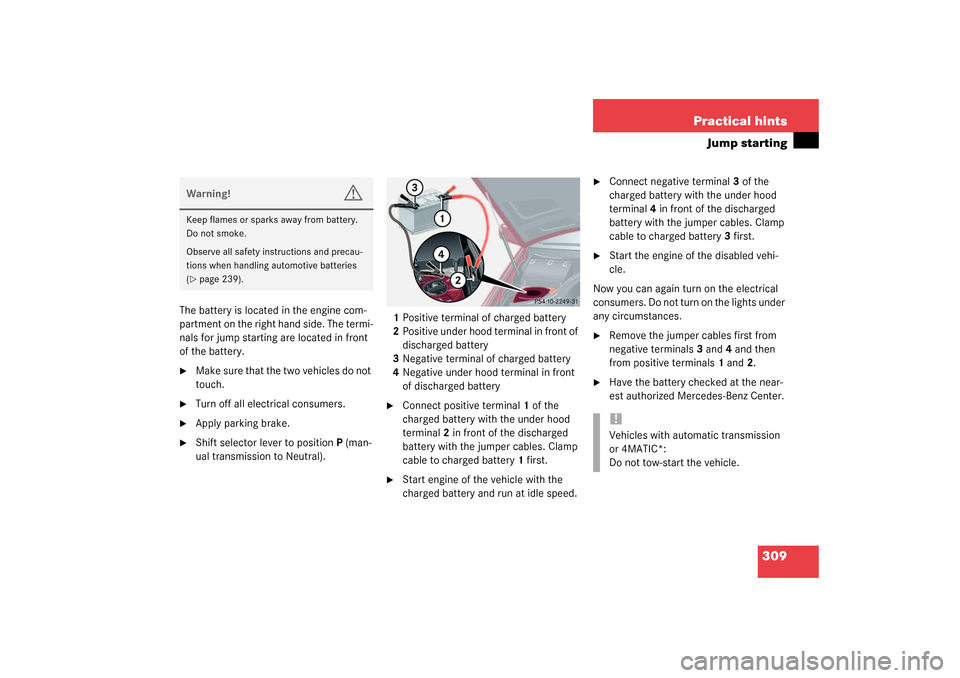
The battery is located in the engine com-
partment on the right hand side. The termi-
nals for jump starting are located in front
of the battery.�
Make sure that the two vehicles do not
touch.
�
Turn off all electrical consumers.
�
Apply parking brake.
�
Shift selector lever to positionP (man-
ual transmission to Neutral).1Positive terminal of charged battery
2Positive under hood terminal in front of
discharged battery
3Negative terminal of charged battery
4Negative under hood terminal in front
of discharged battery
�
Connect positive terminal1 of the
charged battery with the under hood
terminal2 in front of the discharged
battery with the jumper cables. Clamp
cable to charged battery1 first.
�
Start engine of the vehicle with the
charged battery and run at idle speed.
�
Connect negative terminal3 of the
charged battery with the under hood
terminal4 in front of the discharged
battery with the jumper cables. Clamp
cable to charged battery3 first.
�
Start the engine of the disabled vehi-
cle.
Now you can again turn on the electrical
consumers. Do not turn on the lights under
any circumstances.
�
Remove the jumper cables first from
negative terminals3 and4 and then
from positive terminals1 and2.
�
Have the battery checked at the near-
est authorized Mercedes-Benz Center.
Warning!
G
Keep flames or sparks away from battery.
Do not smoke.
Observe all safety instructions and precau-
tions when handling automotive batteries
(�page 239).
!Vehicles with automatic transmission
or 4MATIC*:
Do not tow-start the vehicle.
S203 MY03_A.book Page 309 Tuesday, January 28, 2003 2:22 PM
Page 333 of 370

339 Technical terms
ABS
(Antilock Brake System)
Prevents the wheels from locking up
during braking so that the vehicle can
continue to be steered.
Alignment bolt
Metal pin with thread. The centering pin is
an aid used when changing a tire to align
the wheel with the wheel hub.
BabySmartTM airbag deactivation
system
This system detects if a special system
compatible child restraint seat is installed
on the front passenger seat. The system
will automatically deactivate the passen-
ger front airbag when such a seat is prop-
erly installed (indicator lamp 7 on the
center console lights up). See your autho-
rized Mercedes-Benz Center for availabili-
ty.BabySmartTM compatible child seats
Special restraint system for children. The
sensor system for the passenger seat pre-
vents deployment of the passenger side
airbag if a BabySmartTM compatible child
seat is installed.
BAS
(Brake Assist System)
System for potentially reducing braking
distances in emergency braking situa-
tions. The system is activated when it
senses an emergency based on how
fast the brake is applied.
Bi-xenon headlamps*
Headlamps which use an electric arc as
the light source and produce a more in-
tense light than filament headlamps. Bi-xe-
non headlamps produce low beam and
high beam.CAC
(Customer Assistance Center)
Mercedes-Benz customer service cen-
ter, which can help you with any ques-
tions about your vehicle and provide
assistance in the event of a break-
down.
CAN system
(Controller Area Network)
Data bus network serving to control ve-
hicle functions such as door locking or
windshield wiping depending on vehi-
cle settings and/or ambient condi-
tions.
Cockpit
All instruments, switches, buttons and in-
dicator/warning lamps in the passenger
compartment needed for vehicle operation
and monitoring.
S203 MY03_A.book Page 339 Tuesday, January 28, 2003 2:22 PM