Page 271 of 370

277 Practical hints
What to do if …
Display
Possible cause
Suggested solution
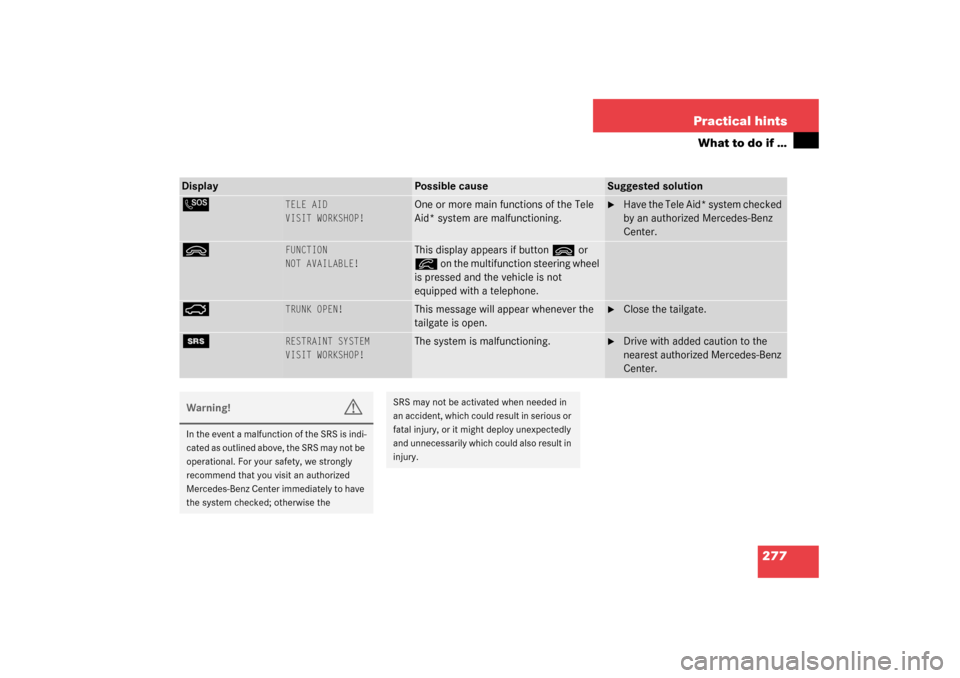
L
TELE AID
VISIT WORKSHOP!
One or more main functions of the Tele
Aid* system are malfunctioning.
�
Have the Tele Aid* system checked
by an authorized Mercedes-Benz
Center.
ì
FUNCTION
NOT AVAILABLE!
This display appears if button
ì
or
í
on the multifunction steering wheel
is pressed and the vehicle is not
equipped with a telephone.
Ê
TRUNK OPEN!
This message will appear whenever the
tailgate is open.
�
Close the tailgate.
1
RESTRAINT SYSTEM
VISIT WORKSHOP!
The system is malfunctioning.
�
Drive with added caution to the
nearest authorized Mercedes-Benz
Center.
Warning!
G
In the event a malfunction of the SRS is indi-
cated as outlined above, the SRS may not be
operational. For your safety, we strongly
recommend that you visit an authorized
Mercedes-Benz Center immediately to have
the system checked; otherwise the
SRS may not be activated when needed in
an accident, which could result in serious or
fatal injury, or it might deploy unexpectedly
and unnecessarily which could also result in
injury.
S203 MY03_A.book Page 277 Tuesday, January 28, 2003 2:22 PM
Page 294 of 370

300 Practical hintsFlat tire
Flat tirePreparing the vehicle�
Park the vehicle as far as possible from
moving traffic on a hard surface.
�
Turn on the hazard warning flashers.
�
Engage the steering wheel lock in the
straight ahead position and set the
parking brake.
�
Move the selector lever toP (manual
transmission to first or reverse gear).
�
Have any passenger exit the vehicle at
a safe distance from the roadway.
Mounting the spare wheel�
Prepare the vehicle as described under
"Preparing the vehicle" on this page.
�
Take the spare wheel out of the trunk
as described on (
�page 281) (full size
tire spare wheel) or (�page 282)
(Minispare wheel).
Lifting the vehicle
�
Prevent the vehicle from rolling away
by blocking wheels with wheel chocks
(not included) or other sizable objects.
When changing wheel on a level surface:
�
Place one chock in front of and one be-
hind the wheel that is diagonally oppo-
site to the wheel being changed.When changing wheel on a hill:
�
Place chocks on the downhill side
blocking both wheels of the other axle.
�
Take the two-piece wheel wrench and
the jack out of the cargo compartment
(�page 279). Assemble wheel wrench.
Warning!
G
The jack is designed exclusively for jacking
up the vehicle at the jack take-up brackets
built into both sides of the vehicle. To help
avoid personal injury, use the jack only to lift
the vehicle during a wheel change. Never
get beneath the vehicle while it is supported
by the jack. Keep hands and feet away from
the area under the lifted vehicle. Always
firmly set parking brake and block wheels
before raising vehicle with jack.
Do not disengage parking brake while the
vehicle is raised. Be certain that the jack is
S203 MY03_A.book Page 300 Tuesday, January 28, 2003 2:22 PM
Page 343 of 370

349 Index
MB Tex upholstery 252
Plastic and rubber parts 252
Seat belts 252
Steering wheel 251
Windows 251
Windshield 49
Wiper blades 251
Climate control 144
Adjusting 147
Defogging windshield 147
Defrosting 147
Rear window defroster 149
Setting the temperature 146
Clock 23, 118
Closing
Glove box 203
Hood 235
Side windows 185
Sliding/pop-up roof 187, 290
Sliding/pop-up roof with
SmartKey 188
Tailgate 87
Trunk lid 87
Windows 184
Windows with SmartKey 186Closing sliding/pop-up roof
In an emergency 290
Cockpit 20, 339
COMAND* 340
see separate operating instructions
Combination switch 101
High beam flasher 48, 101
Turn signals 47
Windshield wipers 48
Consumer information 337
Control and operation of radio
transmitter 230
Control system 107, 340
AUDIO menu 112
Convenience submenu 126
Display digital speedometer 112
Functions 108, 111
Instrument cluster submenu 118
Lighting submenu 121
Malfunction memory menu 115
Menus 110, 111
Multifunction display 107
Multifunction steering wheel 108
NAVI menu 114
Selecting radio system 113
Settings menu 116Standard display menu 112
Submenus 109, 111
TEL* menu 131
Trip computer menu 128
Vehicle submenu 124
Convenience submenu 126
Activating easy-entry/exit
feature 126
Setting key dependency 127
Setting parking position for exterior
rear view mirror 128
Coolant 238, 334
Adding 238
Anticorrosion/antifreeze
quantity 334
Capacities 328
Checking level 238
Messages in display 265, 266
Temperature 231
Temperature gauge 104
Warning lamp 266
Coolant level
Checking 233, 238
Cruise control 190, 340
Canceling 191
Driving downhill 191
S203 MY03_A.book Page 349 Tuesday, January 28, 2003 2:22 PM
Page 360 of 370

366 IndexTilt
Backrest 33
Head restraint 34
Seat cushion 33
Time
Setting hours 118
Setting minutes 118
Time display
Setting 119
Tire inflation pressure
Checking 233, 242
Tire speed rating 227
Tire traction 227
Tires 241, 323
Consumer information 337
Direction of rotation 242
Driving instructions 226
Retreads 241
Rims and tires 323
Service life 242
Temperature 243
Temperature grades 338
Traction 337
Tread depth 244
Wear pattern 243
Winter 244Tools 279
Tow-away alarm 25
Arming 80
Disarming 80
Disarming for transport 80
Tow-away alarm* 80
Towing eye bolt (vehicle tool kit)
Installing 313
Towing the vehicle 310
Tracking services
For stolen vehicle 217
Traction 139, 343
Traction (Tires) 337
Transmission see Automatic
transmission 237
Transmission selector lever 289
Unlocking manually 289
Traveling abroad 229
Tread depth (tires) 244
Tread wear 337
Trim panel
Opening 315
Trip computer 128
Trip odometer
Resetting 105Trunk
Closing the lid 87
Trunk see Cargo compartment 87
Turn signal lamps
Replacing bulbs 292, 293
Turn signals 47
Additional in mirrors 292
Cleaning lenses 250
Front bulbs 292, 294, 296
Indicator lamps 23
Rear bulbs 293, 298
Turning off
Engine 52
Twin-reel roller blind
Installing 199
Luggage cover and partition net 197
Removing 198
U
Units
Setting speedometer units 119
Setting temperature units 119
Unlocking 30, 84
Centrally from inside 89
Driver’s door in an emergency 285
Fuel filler flap 232
Global 85S203 MY03_A.book Page 366 Tuesday, January 28, 2003 2:22 PM