Page 27 of 370

33 Getting started
Adjusting
Manual seat
1Seat fore and aft adjustment
2Seat cushion tilt
3Backrest tilt
4Seat heightSeat fore and aft adjustment
�
Lift handle1.
�
Slide seat to the desired position.
�
Allow handle1 to reengage.
�
Check for proper engagement before
driving.
Adjust to a comfortable seating position
that still allows you to reach the accelera-
tor/brake pedal safely. The position
should be as far to the rear as possible,
consistent with ability to properly operate
controls.
Seat cushion tilt
�
Turn handwheel2 forward or backward
until your upper legs are lightly sup-
ported.Backrest tilt
�
Press switch3 in direction of arrow un-
til your arms are slightly angled when
holding the steering wheel.
Seat height
�
Press the switch4 in direction of arrow
until your legs are lightly supported.
Head restraint height
A child’s risk of serious or fatal injuries is
significantly increased if the child restraints
are not properly secured in the vehicle and
the child is not properly secured in the child
restraint.
iWhen moving the seat, be sure that
there are no items in the footwell or be-
hind the seats. Otherwise you could
damage the seats.
Warning!
G
For your protection, drive only with properly
positioned head restraints.
Adjust head restraint to support the back of
the head approximately at ear level.
Do not drive the vehicle without the seat
head restraints. Head restraints are intend-
ed to help reduce injuries during an acci-
dent.
S203 MY03_A.book Page 33 Tuesday, January 28, 2003 2:22 PM
Page 28 of 370

34 Getting startedAdjusting1Release knob�
Manually adjust the height of the head
restraint by pulling it upward. To lower
the head restraint, push release knob1
and push down on the head restraint.
Head restraint tilt
�
Manually adjust the angle of the head
restraint. Push or pull on the lower
edge of the head restraint cushion.
More information can be found in the
“Controls in detail” section (
�page 91).Power seat*
�
Turn the key in the starter switch to
position1 or2.
or
�
Open the driver’s or front passenger
door.
The seat adjustment switches are located
in each front door.
1Head restraint height
2Seat height
3Seat cushion tilt
4Seat fore and aft adjustment
5Backrest tiltSeat fore and aft adjustment
�
Press the switch forward or backward
in the direction of arrow4.
Adjust to a comfortable seating posi-
tion that still allows you to reach the
accelerator/brake pedal safely. The
position should be as far to the rear as
possible, consistent with ability to
properly operate controls.iWhen moving the seat, be sure that
there are no items in the footwell or be-
hind the seats. Otherwise you could
damage the seats.
With the memory function, you can
store seat positions together with set-
tings for the steering wheel and the ex-
terior rear view mirrors (
�page 95).
S203 MY03_A.book Page 34 Tuesday, January 28, 2003 2:22 PM
Page 29 of 370

35 Getting started
Adjusting
Seat height�
Press the switch up or down in the di-
rection of arrow2.
Seat cushion tilt
�
Press the switch up or down in the di-
rection of arrow3 until your upper legs
are lightly supported.Backrest tilt
�
Press the switch forward or back in di-
rection of arrow5 until your arms are
slightly angled when holding the steer-
ing wheel.
Head restraint height
�
Press the switch up or down in the di-
rection of arrow1.Head restraint tilt
�
Manually adjust the angle of the head
restraint. Push or pull on the lower
edge of the head restraint cushion.
More information can be found in the
“Controls in detail” section (
�page 91).
Rear seat head restraints
Warning!
G
For your protection, drive only with properly
positioned head restraints.
Adjust head restraint to support the back of
the head approximately at ear level.
Do not drive the vehicle without the seat
head restraints. Head restraints are intend-
ed to help reduce injuries during an acci-
dent.
Warning!
G
For safety reasons, always drive with the
rear head restraints in the upright position
when the rear seats are occupied.
Keep the area around head restraints clear
of articles (e.g. clothing) to not obstruct the
folding operation of the head restraints.
S203 MY03_A.book Page 35 Tuesday, January 28, 2003 2:22 PM
Page 30 of 370
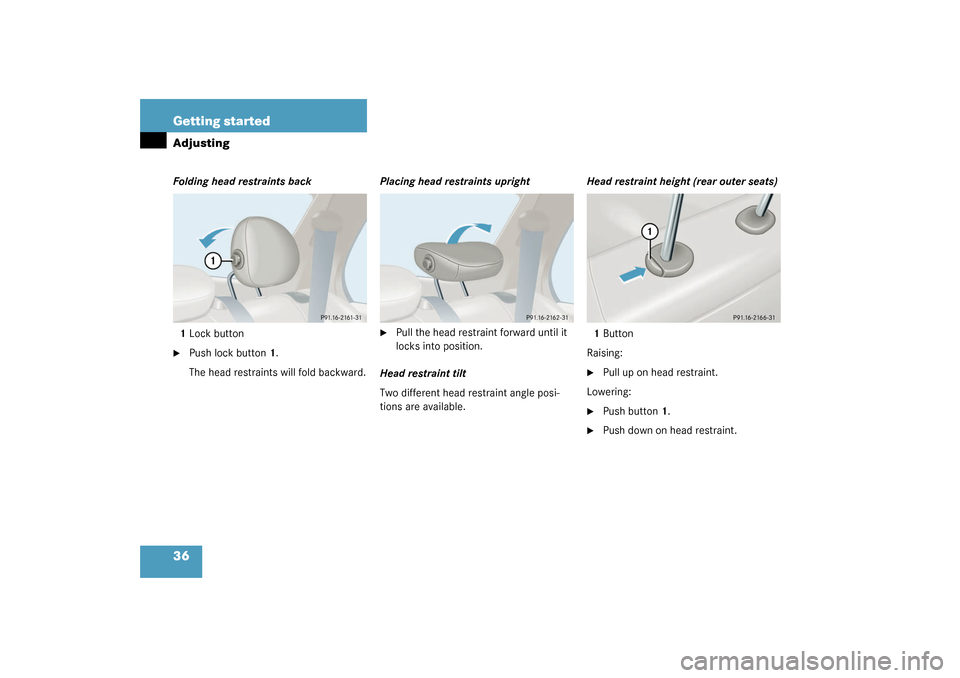
36 Getting startedAdjustingFolding head restraints back
1Lock button�
Push lock button1.
The head restraints will fold backward.Placing head restraints upright
�
Pull the head restraint forward until it
locks into position.
Head restraint tilt
Two different head restraint angle posi-
tions are available.Head restraint height (rear outer seats)
1Button
Raising:
�
Pull up on head restraint.
Lowering:
�
Push button1.
�
Push down on head restraint.
S203 MY03_A.book Page 36 Tuesday, January 28, 2003 2:22 PM
Page 31 of 370

37 Getting started
Adjusting
Steering wheel Steering wheel adjustment, manual
1Release handle
2Steering column, lengthen or shorten
3Steering column, height
�
To unlock the steering column, pull
handle 1 out until its stop limit.
�
Adjust the steering wheel to the de-
sired position.
�
To lock, press handle1 all the way in
until it engages.
The steering wheel is once again
locked into position.
Warning!
G
Do not adjust the steering wheel while driv-
ing. Adjusting the steering wheel while driv-
ing, or driving without the adjustment
locked could cause the driver to lose control
of the vehicle.
When leaving the vehicle, always remove the
key from the starter switch, and lock your
vehicle.
The electrical steering wheel adjustment
feature* can also be operated with the driv-
er’s door open. Do not leave children unat-
tended in the vehicle, or with access to an
unlocked vehicle. Unsupervised use of vehi-
cle equipment may cause an accident
and/or serious personal injury.
!Do not drive the vehicle until you have
properly locked the steering column.
If the warning message
STEERING
WHEEL ADJUST – LOCK! is displayed
while the engine is running, the steer-
ing column is not locked properly
(
�page 276).
S203 MY03_A.book Page 37 Tuesday, January 28, 2003 2:22 PM
Page 32 of 370
.
1Steering column, lengthen or shorten
2Steering column, height�
Turn the ke")
38 Getting startedAdjustingSteering wheel adjustment, electrical*
The stalk is located on the steering column
(lower left).
1Steering column, lengthen or shorten
2Steering column, height�
Turn the key in the starter switch to
position1 or2.
or
�
Open the driver’s door.Steering column, lengthen or shorten
�
Move stalk forward or backward in the
direction of arrow1 until a comfortable
steering wheel position is reached with
your arms slightly bent at the elbow.
Steering column, height
�
Move stalk up or down in the direction
of arrow2. Make sure that your legs
can move freely and that all the dis-
plays (including malfunction and indi-
cator lamps) on the instrument cluster
are clearly visible.
Mirrors
Adjust the inside and exterior rear view
mirrors before driving so that you have a
good view of the road and traffic condi-
tions.
Inside rear view mirror�
Manually adjust the inside rear view
mirror.
More information can be found in the
“Controls in detail” section (
�page 141).
iWith the memory function, you can
store seat positions together with set-
tings for the steering wheel and the ex-
terior rear view mirrors (
�page 95).
Warning!
G
In the case of an accident liquid electrolyte
may escape the mirror housing if the mirror
glass breaks.
Electrolyte has an irritating effect. Do not al-
low the liquid to come into contact with
eyes, skin, clothing, or respiratory system.
In case it does, immediately flush affected
area with water, and seek medical help if
necessary.
S203 MY03_A.book Page 38 Tuesday, January 28, 2003 2:22 PM
Page 36 of 370
42 Getting startedDriving�
With a smooth motion, pull the belt
from the belt outlet.
�
Place the belt over your shoulder.
�
Push latch plate1 into buckle2 until it
clicks.
�
If necessary, tighten the lap portion to
a snug fit by pulling shoulder portion
up.Seat belt height adjustment
Front seats
4Button for belt outlet height adjust-
ment
�
Press button4 and slide belt outlet up-
ward or downward.Rear outer seats
5Button for belt outlet height adjust-
ment
�
Press button5 and slide belt outlet up-
ward or downward.
S203 MY03_A.book Page 42 Tuesday, January 28, 2003 2:22 PM
Page 37 of 370

43 Getting started
Driving
Proper use of seat belts�
Do not twist the belt when fastening.
�
Adjust seat belt so that the shoulder
portion is located as close as possible
to the middle of the shoulder (it should
not touch the neck or pass under the
arm). For this purpose, you can adjust
the height of the belt outlet.
�
Position the lap belt as low as possible
on your hips (over hip joint) and not
across the abdomen.
�
Place the seat backrest in a nearly up-
right position.
�
Never use a seat belt for more than one
person at time.
�
Do not fasten a seat belt around a per-
son and another object at the same
time.
�
Check your seat belt during travel to
ensure that it is properly positioned.
�
Ensure that the seat belt is always fit-
ted snugly. You should avoid wearing
bulky clothing, such as winter coats,
when traveling in the vehicle.
Warning!
G
Do not pass belts over sharp edges. They
could tear.
Do not allow the belt to get caught in the
door or in the seat adjustment mechanism.
This could damage the belt.
Never attempt to make modifications to
seat belts. This could impair the effective-
ness of the belts.
Damaged seat belts or belts that were highly
stressed in an accident must be replaced by
an authorized Mercedes-Benz Center.
S203 MY03_A.book Page 43 Tuesday, January 28, 2003 2:22 PM