Page 284 of 370
290 Practical hintsOpening/closing in an emergency
Opening/closing in an emergencySliding/pop-up roof
The sliding/pop-up roof drive is located
behind the lens of the interior overhead
light.
You can open or close the sliding/pop-up
roof manually should an electrical malfunc-
tion occur.�
Pry off lens1 using a flat blade screw-
driver.
�
Slide both locking tabs2 in direction of
arrow.
�
Lower rear of cover and remove.
�
Remove cover.
�
Obtain crank3.
�
Insert crank3 through hole.
�
Turn crank3 clockwise to:�
slide roof closed
�
raise roof at the rear
iDo not disconnect electrical connec-
tors.
S203 MY03_A.book Page 290 Tuesday, January 28, 2003 2:22 PM
Page 285 of 370
291 Practical hints
Opening/closing in an emergency
�
Turn crank3 counterclockwise to:�
slide roof open
�
lower roof at the rear
The sliding/pop-up roof must be resyn-
chronized after being operated manually.
S203 MY03_A.book Page 291 Tuesday, January 28, 2003 2:22 PM
Page 288 of 370

294 Practical hintsReplacing bulbsReplacing bulbs for front lamps
Halogen headlamps
1Bulb socket for turn signal lamp
2Headlamp cover for high beam head-
lamp and for parking and standing
lamp
3Headlamp cover for low beam head-
lamp4Low beam bulb
5High beam bulb
6Bulb socket for parking and standing
lamp
Low and high beam bulb
�
Switch off the lights.
�
Open the hood (
�page 234).
�
Press the clamp and remove headlamp
cover2 or 3.
�
Pull electrical connector off.
�
Unclip the retainer springs and take out
the bulb.
�
Insert the new bulb so that the base
locates in the recess on the holder.
�
Clip the retainer springs and plug the
connector onto the bulb.
�
Align headlamp cover2 or 3 and click
into place.
Front turn signal lamp bulb
�
Switch off the lights.
�
Open the hood (
�page 234).
�
Twist bulb socket1 counterclockwise
and pull out.
�
Push bulb into socket, turn counter-
clockwise and remove.
�
Insert new bulb in socket, push in and
twist clockwise.
�
Reinsert bulb socket in lamp and twist
clockwise.
S203 MY03_A.book Page 294 Tuesday, January 28, 2003 2:22 PM
Page 290 of 370
.
�
Pull the bulb out of the socket.
�
Insert the new bulb so that the base lo-
cates in the rec")
296 Practical hintsReplacing bulbs�
Twist bayonet socket5 counterclock-
wise to the stop (do not remove).
�
Pull the bulb out of the socket.
�
Insert the new bulb so that the base lo-
cates in the recess in the bayonet
socket5.
�
Twist bayonet socket clockwise until
you hear it snap into place.
�
Plug the connector onto the bulb.
�
Align headlamp cover2 and click into
place.Front turn signal lamp bulb
�
Switch off the lights.
�
Open the hood (
�page 234).
�
Twist bulb socket1 counterclockwise
and pull out.
�
Push bulb into socket, turn counter-
clockwise and remove.
�
Insert new bulb in socket, push in and
twist clockwise.
�
Reinsert bulb socket in lamp and twist
clockwise.Parking and standing lamp bulb
�
Switch off the lights.
�
Open the hood (
�page 234).
�
Press the clamp and remove headlamp
cover2.
�
Pull out the bulb socket6 with the
bulb.
�
Pull the bulb out of the bulb socket.
�
Insert a new bulb in the socket.
�
Reinstall the bulb socket.
�
Align headlamp cover2 and click into
place.
S203 MY03_A.book Page 296 Tuesday, January 28, 2003 2:22 PM
Page 291 of 370
297 Practical hints
Replacing bulbs
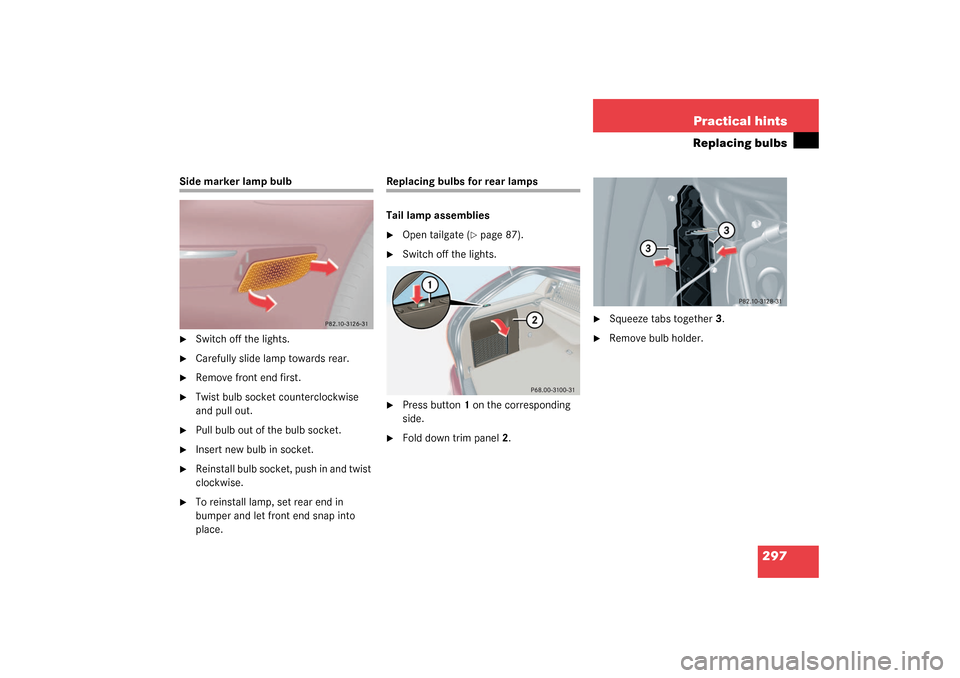
Side marker lamp bulb�
Switch off the lights.
�
Carefully slide lamp towards rear.
�
Remove front end first.
�
Twist bulb socket counterclockwise
and pull out.
�
Pull bulb out of the bulb socket.
�
Insert new bulb in socket.
�
Reinstall bulb socket, push in and twist
clockwise.
�
To reinstall lamp, set rear end in
bumper and let front end snap into
place.
Replacing bulbs for rear lamps
Tail lamp assemblies�
Open tailgate (
�page 87).
�
Switch off the lights.
�
Press button1 on the corresponding
side.
�
Fold down trim panel2.
�
Squeeze tabs together3.
�
Remove bulb holder.
S203 MY03_A.book Page 297 Tuesday, January 28, 2003 2:22 PM
Page 292 of 370
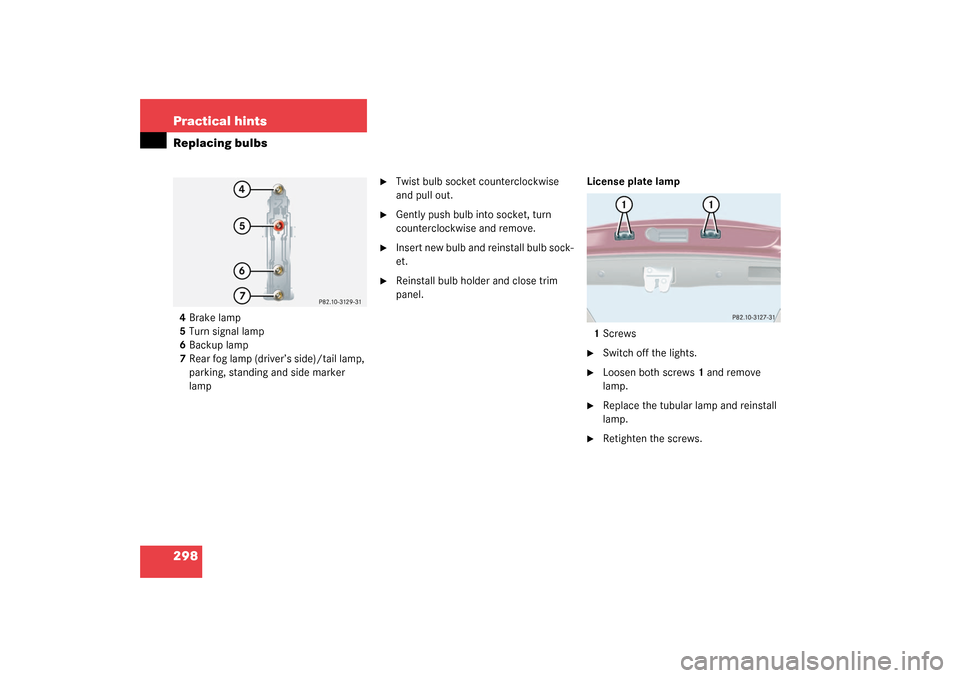
298 Practical hintsReplacing bulbs4Brake lamp
5Turn signal lamp
6Backup lamp
7Rear fog lamp (driver’s side)/tail lamp,
parking, standing and side marker
lamp
�
Twist bulb socket counterclockwise
and pull out.
�
Gently push bulb into socket, turn
counterclockwise and remove.
�
Insert new bulb and reinstall bulb sock-
et.
�
Reinstall bulb holder and close trim
panel.License plate lamp
1Screws
�
Switch off the lights.
�
Loosen both screws1 and remove
lamp.
�
Replace the tubular lamp and reinstall
lamp.
�
Retighten the screws.
S203 MY03_A.book Page 298 Tuesday, January 28, 2003 2:22 PM
Page 293 of 370

299 Practical hints
Replacing wiper blades
Replacing wiper blades
Removing�
Fold the wiper arm forward.
�
Press safety tab2 down.
�
Push wiper blade1 downward and re-
move.Replacing wiper blade insert
�
Place wiper blade on firm support.
�
Press down both tabs.
�
Slide (direction of arrow) the wiper
blade insert out of the retainer claws.
�
Slide (direction of arrow) the new wiper
blade insert into retainer claws until
tabs are engaged.
Installing�
Slide wiper blade onto wiper arm until
it locks in place.
Warning!
G
For safety reasons, remove key from starter
switch before replacing a wiper blade, other-
wise the motor could suddenly turn on and
cause injury.
!Never open the hood when the wiper
arm is folded forward.
Do not allow the wiper arms to contact
the windshield glass without a wiper
blade inserted.
Make certain that the wiper blades are
properly installed. Improperly installed
wiper blades may cause windshield
damage.
For your convenience, we recommend
that you have this work carried out by
an authorized Mercedes-Benz Center.
S203 MY03_A.book Page 299 Tuesday, January 28, 2003 2:22 PM
Page 294 of 370

300 Practical hintsFlat tire
Flat tirePreparing the vehicle�
Park the vehicle as far as possible from
moving traffic on a hard surface.
�
Turn on the hazard warning flashers.
�
Engage the steering wheel lock in the
straight ahead position and set the
parking brake.
�
Move the selector lever toP (manual
transmission to first or reverse gear).
�
Have any passenger exit the vehicle at
a safe distance from the roadway.
Mounting the spare wheel�
Prepare the vehicle as described under
"Preparing the vehicle" on this page.
�
Take the spare wheel out of the trunk
as described on (
�page 281) (full size
tire spare wheel) or (�page 282)
(Minispare wheel).
Lifting the vehicle
�
Prevent the vehicle from rolling away
by blocking wheels with wheel chocks
(not included) or other sizable objects.
When changing wheel on a level surface:
�
Place one chock in front of and one be-
hind the wheel that is diagonally oppo-
site to the wheel being changed.When changing wheel on a hill:
�
Place chocks on the downhill side
blocking both wheels of the other axle.
�
Take the two-piece wheel wrench and
the jack out of the cargo compartment
(�page 279). Assemble wheel wrench.
Warning!
G
The jack is designed exclusively for jacking
up the vehicle at the jack take-up brackets
built into both sides of the vehicle. To help
avoid personal injury, use the jack only to lift
the vehicle during a wheel change. Never
get beneath the vehicle while it is supported
by the jack. Keep hands and feet away from
the area under the lifted vehicle. Always
firmly set parking brake and block wheels
before raising vehicle with jack.
Do not disengage parking brake while the
vehicle is raised. Be certain that the jack is
S203 MY03_A.book Page 300 Tuesday, January 28, 2003 2:22 PM