Page 77 of 376

77 Safety and Security
Driving safety systems
The switch is located on the center con-
sole.
1ESP off
2ESP on�
Press upper half1 of the ESP switch
until the ESP warning lamp
v
in the
speedometer lights up.
ESP is deactivated.If one or more drive wheels are spinning,
the ESP warning lamp
v
in the speed-
ometer flashes, regardless of the speed.
Traction control brakes a spinning wheel
even when ESP is deactivated.
ESP always operates when you are brak-
ing, even when it has been deactivated.
Switching on the ESP
�
Press lower half2 of the ESP switch
until the ESP warning lamp
v
in the
speedometer goes out.
You are now again in normal driving
mode.
!Avoid spinning of a drive wheel for an
extended period with the ESP switched
off. This may cause serious damage to
the drive train which is not covered by
the Mercedes-Benz Limited Warranty.
Warning!
G
When the ESP warning lamp
v
is
illuminated continuously, the ESP is
switched off.
Adapt your speed and driving to the prevail-
ing road conditions and to the non-operating
status of the ESP.
Page 101 of 376
.
Exterior lamp switch
The exterior l")
101 Controls in detail
Lighting
Lighting
For notes on how to switch on the head-
lamps and use the turn signals, see the
“Getting started” section (
�page 47).
Exterior lamp switch
The exterior lamp switch is located on the
dashboard to the left of the steering wheel.
M
Off
U
Automatic headlamp mode
C
Parking lamps (also side marker
lamps, tail lamps, license plate
lamps, instrument panel lamps)
Canada only:
When engine is running, the low
beam is also switched on.
B
Low beam plus parking lamps or
high beam headlamps (combination
switch pushed forward).
ˆ
Standing lamps, right (turn left one
stop)
‚
Standing lamps, left (turn left two
stops)
iIf you remove the key and open the
driver’s door while the parking lamps or
low beam headlamps are switched on,
then �
a warning sounds
�
$
appears in the multifunction
display
�
the message
TURN OFF LAMPS!
ap-
pears in the multifunction display
iWith the daytime running lamp mode
activated and the engine running, the
low beam headlamps cannot be
switched off manually.
Page 102 of 376

102 Controls in detailLightingManual headlamp mode
The low beam headlamps and parking
lamps can be switched on and off with the
exterior lamp switch. For exterior lamp
switch, see above.
Automatic headlamp mode
The parking lamps, low beam headlamps
and license plate lamps switch on and off
automatically depending on the brightness
of the ambient light.�
Turn the exterior lamp switch to
U
.
Warning!
G
In automatic headlamp mode, the head-
lamps will not be automatically switched on
under foggy conditions. To minimize risk to
you and to others, activate headlamps by
turning exterior lamp switch to
B
.
The driver is responsible for the operation of
the vehicle’s lights at all times. The automat-
ic headlamp feature is only an aid to the
driver. Switch on the vehicle lights manually
when driving or when traffic conditions
require you to do so.
iWith the daytime running lamp mode
activated, the low beam headlamps will
not be switched off automatically.
iFront fog lamps and rear fog lamp can
not be switched on manually with exte-
rior lamp switch in position
U
. To
activate the fog lamps, turn exterior
lamp switch to position
B
.
iIf you drive in countries where vehicles
drive on the other side of the road than
the country where the vehicle is regis-
tered, you must have the headlamps
modified for symmetrical low beams.
Relevant information can be obtained
at your authorized Mercedes-Benz Cen-
ter.
Page 104 of 376

104 Controls in detailLightingCombination switch
The combination switch is located on the
left side of the steering column.
1High beam
2High beam flasher
Switching on high beams�
Turn exterior lamp switch to
position
B
or to
U
(
�page 101).
�
Push the combination switch in
direction1.
The high beam symbol is illuminated on
the instrument cluster.High beam flasher
�
Pull the combination switch briefly in
direction2.
Hazard warning flasher
The hazard warning flasher can be activat-
ed with the ignition switched on or off. It is
activated automatically when an airbag is
deployed.
The switch is located on the center con-
sole.
1Hazard warning flasher switchSwitching on the hazard warning
flasher
�
Press the hazard warning flasher
switch.
All turn signals will blink.
Switching off the hazard warning
flasher
�
Press hazard warning flasher switch
again.iWith the hazard warning flasher acti-
vated and the combination switch set
for either left or right turn, only the re-
spective left or right turn signals will
operate when the key in the starter
switch is in position1 or2.
Page 144 of 376
 and for setting the rear view
mirrors (
�page 39) is found in the “Get-
ting started” section")
144 Controls in detailGood visibility
Good visibilityInformation on the windshield wipers
(�page 48) and for setting the rear view
mirrors (
�page 39) is found in the “Get-
ting started” section.
Rear view mirror
Inside rear view mirror, antiglare
position
Tilt the mirror to the antiglare night posi-
tion using the lever at its lower edge.
Automatic antiglare rear view mirror*
The reflection brightness of the exterior
rear view mirror on the driver’s side and
the inside rear view mirror will respond au-
tomatically to glare when�
the ignition is switched on, and
�
incoming light from headlamps falls on
the sensor in the inside rear view mir-
ror.The rear view mirror will not react if
�
reverse gear is engaged
�
the interior lighting is turned onWarning!
G
The automatic antiglare function does not
react if incoming light is not aimed directly
at sensors in the inside rear view mirror.
The inside rear view mirror and the exterior
rear view mirror on the driver’s side do not
react, for example, if the rear window sun-
shade is in raised position.
Glare can endanger you and others.
Warning!
G
In the case of an accident liquid electrolyte
may escape from the mirror housing if the
mirror glass breaks.
Electrolyte has an irritating effect. Do not al-
low the liquid to come into contact with
eyes, skin, clothing, or respiratory system.
In case it does, immediately flush affected
area with water, and seek medical help if
necessary.Warning!
G
Exercise care when using the passenger
side exterior rear view mirror. The mirror
surface is convex (outwardly curved surface
for a wider field of view). Objects in mirror
are closer than they appear. Check your in-
side rear view mirror or glance over your
shoulder before changing lanes.
Page 146 of 376
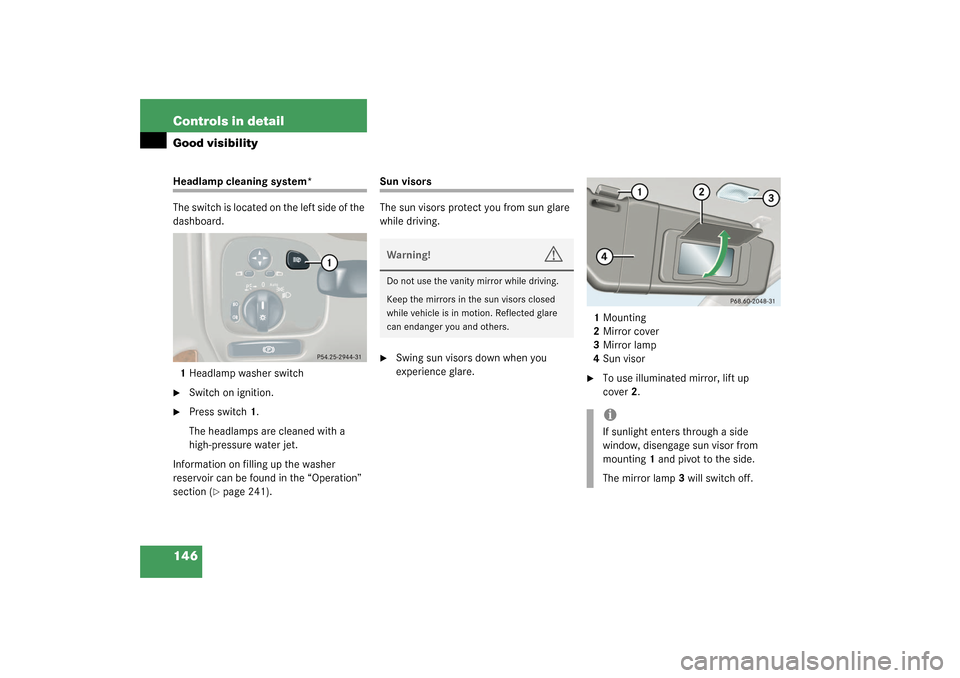
146 Controls in detailGood visibilityHeadlamp cleaning system*
The switch is located on the left side of the
dashboard.
1Headlamp washer switch�
Switch on ignition.
�
Press switch1.
The headlamps are cleaned with a
high-pressure water jet.
Information on filling up the washer
reservoir can be found in the “Operation”
section (
�page 241).
Sun visors
The sun visors protect you from sun glare
while driving.�
Swing sun visors down when you
experience glare.1Mounting
2Mirror cover
3Mirror lamp
4Sun visor
�
To use illuminated mirror, lift up
cover2.
Warning!
G
Do not use the vanity mirror while driving.
Keep the mirrors in the sun visors closed
while vehicle is in motion. Reflected glare
can endanger you and others.
iIf sunlight enters through a side
window, disengage sun visor from
mounting1 and pivot to the side.
The mirror lamp3 will switch off.
Page 150 of 376

150 Controls in detailClimate controlThe climate control is operational whenev-
er the engine is running. You can operate
the climate control system in either the au-
tomatic or manual mode. The system cools
or heats the interior depending on the se-
lected interior temperature and the cur-
rent outside temperature.
Nearly all dust particles, pollutants and
odors are filtered out before outside air en-
ters the passenger compartment through
the air distribution system.
The air conditioning will not engage (no
cooling) if theAC
OFF
mode is selected
(
�page 154).
Setting the temperature
Use the temperature controls2 and3
(�page 149) to separately adjust the air
temperature on each side of the passenger
compartment. You should raise or lower
the temperature setting in small incre-
ments, preferably starting at 72°F (22°C).
Increasing
�
Turn the control slightly to the right.
The climate control system will corre-
spondingly adjust the interior air tem-
perature.
Decreasing
�
Turn the control slightly to the left.
The climate control system will corre-
spondingly adjust the interior air tem-
perature.
Warning!
G
Follow the recommended settings for heat-
ing and cooling given on the following pag-
es. Otherwise the windows could fog up,
impairing visibility and endangering you and
others.iIf the vehicle interior is hot, ventilate
the interior before driving off.
Keep the air intake grille in front of the
windshield free of snow and debris.
Do not obstruct air flow by placing ob-
jects on the air flow-through exhaust
slots below the rear window.
Page 153 of 376

153 Controls in detail
Climate control
Rear window defroster
The rear window defroster uses a large
amount of power. To keep the battery
drain to a minimum, switch off the defrost-
er as soon as the rear window is clear. The
defroster is automatically deactivated af-
ter approximately 6 to 17 minutes of oper-
ation depending on the outside
temperature.
Activating�
Press button
F
.
The indicator lamp on the button lights
up.
Deactivating
�
Press button
F
again.
The indicator lamp on the button goes
out.Deactivating the climate control
system
Deactivating�
Set the air volume control
(�page 149) to position 0.
Reactivating
�
Set the air volume control
(�page 149) to any speed.
Warning!
G
Any accumulation of snow and ice should be
removed from the rear window before driv-
ing. Visibility could otherwise be impaired,
endangering you and others.!If the rear window defroster switches
off too soon and the indicator lamp
starts blinking, this means that too
many electrical consumers are operat-
ing simultaneously and there is insuffi-
cient voltage in the battery. The system
responds automatically by deactivating
the rear window defroster.
As soon as the battery has sufficient
voltage, the rear window defroster au-
tomatically turns itself back on.