Page 299 of 370
305 Practical hints
Battery
Battery
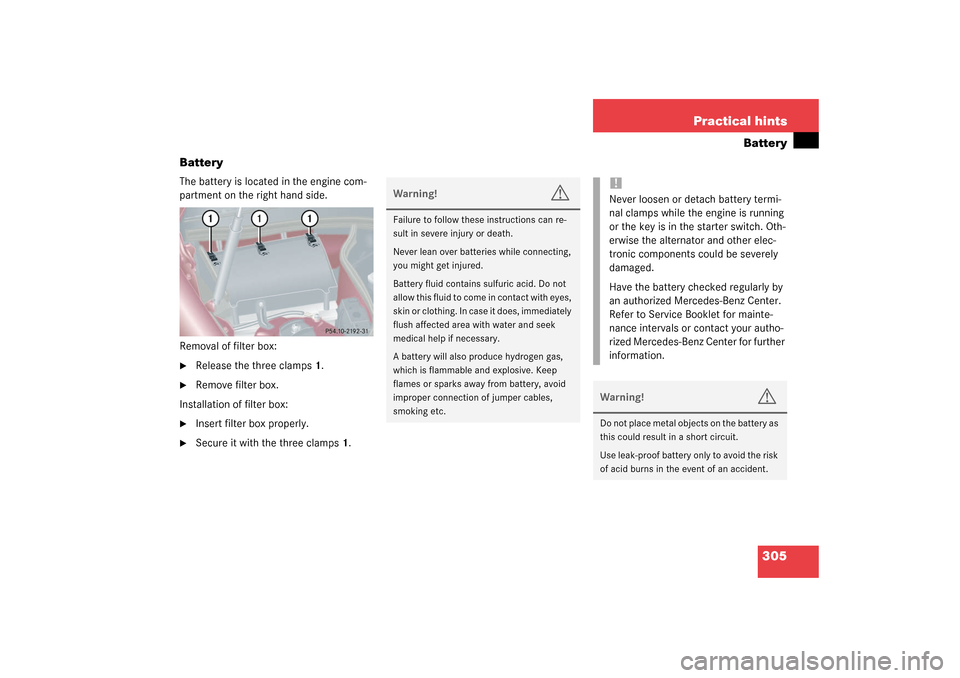
The battery is located in the engine com-
partment on the right hand side.
Removal of filter box:�
Release the three clamps1.
�
Remove filter box.
Installation of filter box:
�
Insert filter box properly.
�
Secure it with the three clamps1.
Warning!
G
Failure to follow these instructions can re-
sult in severe injury or death.
Never lean over batteries while connecting,
you might get injured.
Battery fluid contains sulfuric acid. Do not
allow this fluid to come in contact with eyes,
skin or clothing. In case it does, immediately
flush affected area with water and seek
medical help if necessary.
A battery will also produce hydrogen gas,
which is flammable and explosive. Keep
flames or sparks away from battery, avoid
improper connection of jumper cables,
smoking etc.
!Never loosen or detach battery termi-
nal clamps while the engine is running
or the key is in the starter switch. Oth-
erwise the alternator and other elec-
tronic components could be severely
damaged.
Have the battery checked regularly by
an authorized Mercedes-Benz Center.
Refer to Service Booklet for mainte-
nance intervals or contact your autho-
rized Mercedes-Benz Center for further
information.Warning!
G
Do not place metal objects on the battery as
this could result in a short circuit.
Use leak-proof battery only to avoid the risk
of acid burns in the event of an accident.
S203 MY03_A.book Page 305 Tuesday, January 28, 2003 2:22 PM
Page 300 of 370
306 Practical hintsBattery
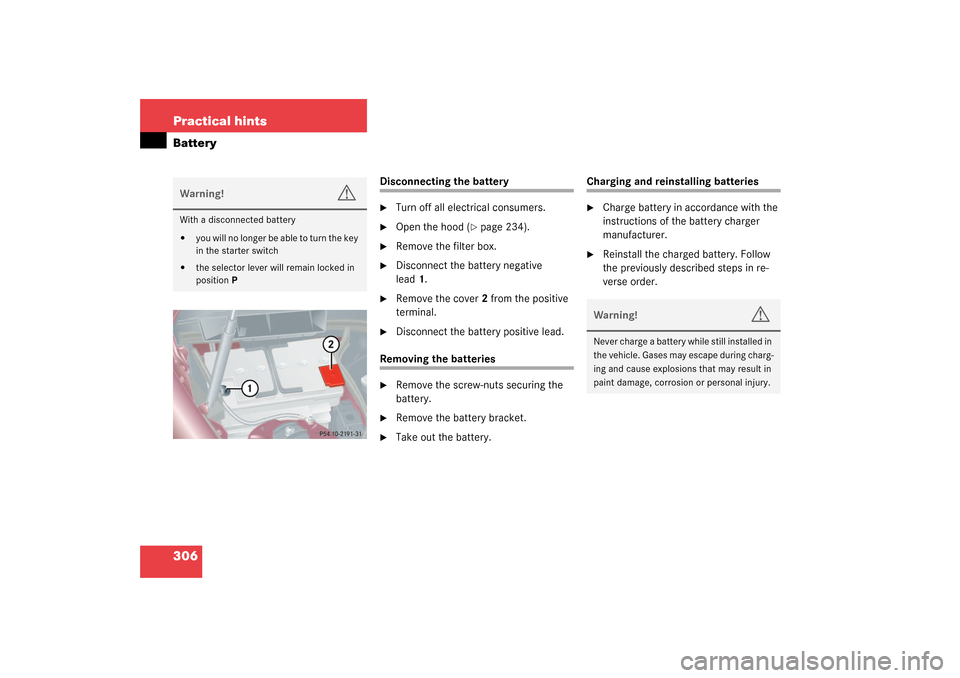
Disconnecting the battery�
Turn off all electrical consumers.
�
Open the hood (
�page 234).
�
Remove the filter box.
�
Disconnect the battery negative
lead1.
�
Remove the cover2 from the positive
terminal.
�
Disconnect the battery positive lead.
Removing the batteries�
Remove the screw-nuts securing the
battery.
�
Remove the battery bracket.
�
Take out the battery.
Charging and reinstalling batteries�
Charge battery in accordance with the
instructions of the battery charger
manufacturer.
�
Reinstall the charged battery. Follow
the previously described steps in re-
verse order.
Warning!
G
With a disconnected battery�
y o u w i l l n o l o n g e r b e a b l e t o t u r n t h e k e y
in the starter switch
�
the selector lever will remain locked in
positionP
Warning!
G
Never charge a battery while still installed in
the vehicle. Gases may escape during charg-
ing and cause explosions that may result in
paint damage, corrosion or personal injury.
S203 MY03_A.book Page 306 Tuesday, January 28, 2003 2:22 PM
Page 301 of 370
307 Practical hints
Battery
Reconnecting the batteries�
Turn off all electrical consumers.
�
Connect the positive lead and fasten its
cover2.
�
Connect the negative lead1.
�
Reinstall the filter box.Batteries contain materials that can harm
the environment if disposed of improperly.
Large 12-volt storage batteries contain
lead. Recycling of batteries is the preferred
method of disposal. Many states require
sellers of batteries to accept old batteries
for recycling.!NEVER invert the terminal connections.!The battery, its filler caps and the vent
tube must always be securely installed
when the vehicle is in operation.
iThe following procedures must be car-
ried out following any interruption of
battery power (e.g. due to reconnec-
tion):�
Set the clock (
�page 118) (vehi-
cles with COMAND*: see COMAND
operator’s manual).
�
Resynchronize the ESP
(�page 268).
�
Resynchronize side windows
(�page 186).
�
Resynchronize sliding/pop-up roof
(�page 189).
S203 MY03_A.book Page 307 Tuesday, January 28, 2003 2:22 PM
Page 309 of 370
315 Practical hintsFuses
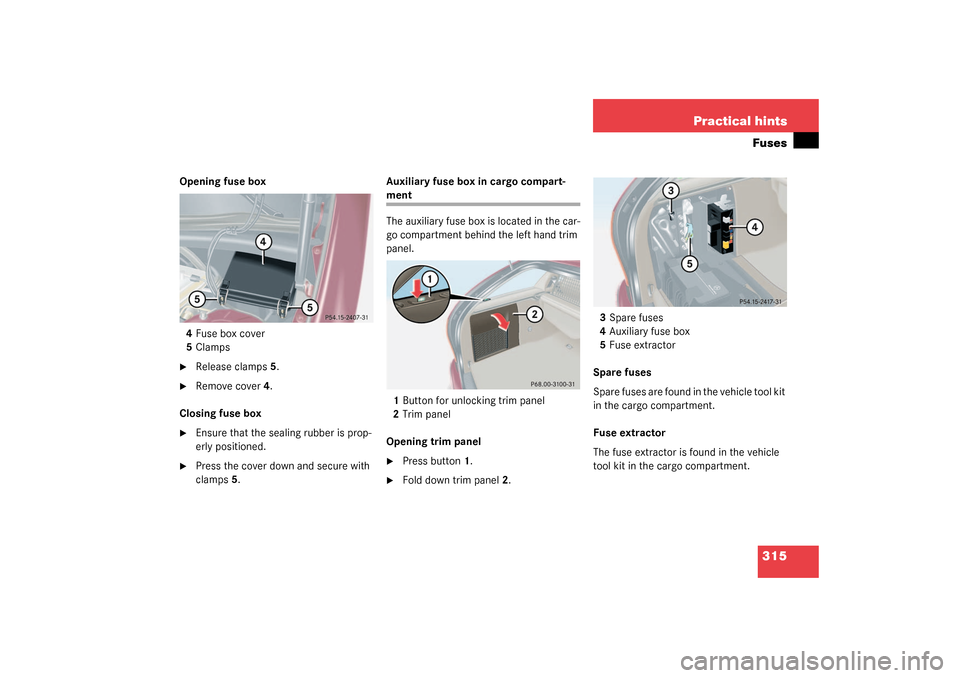
Opening fuse box
4Fuse box cover
5Clamps�
Release clamps5.
�
Remove cover4.
Closing fuse box
�
Ensure that the sealing rubber is prop-
erly positioned.
�
Press the cover down and secure with
clamps5.Auxiliary fuse box in cargo compart-
ment
The auxiliary fuse box is located in the car-
go compartment behind the left hand trim
panel.
1Button for unlocking trim panel
2Trim panel
Opening trim panel�
Press button1.
�
Fold down trim panel2.3Spare fuses
4Auxiliary fuse box
5Fuse extractor
Spare fuses
Spare fuses are found in the vehicle tool kit
in the cargo compartment.
Fuse extractor
The fuse extractor is found in the vehicle
tool kit in the cargo compartment.
S203 MY03_A.book Page 315 Tuesday, January 28, 2003 2:22 PM
Page 350 of 370

356 IndexLicense plate lamps
Messages in display 274
Replacing bulbs 293, 298
Light alloy wheels
Cleaning 251
Technical data 323
Light sensor 271
Lighter see Cigarette lighter 208
Lighting 98
Automatic headlamp mode 99
Cargo compartment 103
Combination switch 101
Daytime running lamp mode 100
Door entry lamps 103
Exterior lamp switch 98
Front fog lamps 100
High beam flasher 101
High beams 101
Instrument cluster illumination 104
Interior 102
Locator lighting 100
Low beam 98
Manual headlamp mode 99
Night security illumination 100
Parking lamps 98
Rear fog lamp 100Settings (control system) 121
Limiting the gear range 137
Limp Home Mode 140
Loading 193
Cargo tie-down rings 202
Instructions 201
Roof rack 193
Ski sack 193
Split rear bench seat 199
Locator lighting 100
Setting 122
Lock button
Doors 341
Locking 51, 84
Automatic while driving 88
Centrally from inside 89
Fuel filler flap 232
Global, SmartKey 85
Vehicle in an emergency 286
Loss of keys 86
Loss of Service and Warranty Information
Booklet 319
Low beam headlamps
Messages in display 272
Replacing bulbs 292, 294Lowering
Vehicle 304
Lubricants
Technical data 328
Luggage cover 198
Retractable 198
M
Main dimensions 326
Maintenance 12, 246
Vehicles with E85 fuel 333
Malfunction
Displaying 115
Malfunction memory 115
Calling up 115
Clearing 115
Manual headlamp mode 99
Manual operations
Fuel filler flap 288
Interior lighting control 102
Locking the vehicle 286
Sliding/pop-up roof 290
Unlocking the driver’s door 285
Unlocking transmission selector
lever 289S203 MY03_A.book Page 356 Tuesday, January 28, 2003 2:22 PM
Page 352 of 370

358 Index
Tailgate 277
Tele Aid* 277
Telephone* 277
Washer fluid 278
Multifunction steering wheel 24, 108,
341
Buttons 108
N
Navigation system
Operating 114
See separate COMAND* operating in-
structions
Network provider 131
Night security illumination 100
Setting 122
O
Occupant safety 56
Airbags 57
Children and airbags 58
Children in the vehicle 65
Fastening the seat belt 40
Infant and child restraint systems 65
LATCH child seat anchors 70
Seat belts 40, 59
Odometer, main 23Oil
Adding 236
Checking level 235
Consumption 235
Dipstick 235
Filler neck 236
Oil level
Checking 233
One-touch gearshifting 136
Canceling gear range limit 136
Downshifting 136
Upshifting 136
Opening
Ashtray 207
Doors from the inside 88
Fuel filler flap 232
Fuel filler flap manually 288
Glove box 203
Hood 234
Side windows 185
Sliding/pop-up roof 187, 290
Sliding/pop-up roof in an
emergency 290
Sliding/pop-up roof with
SmartKey 188
Tailgate 87Windows 184
Windows with SmartKey 186
Operating
Audio system 161
Cassette player 114
CD player 113
COMAND* see separate operating in-
structions
Garage door opener 220
Integrated remote control 220
Navigation system 114
Radio 113
Radio transmitter 230
Safety 16
Telephone 161
Telephone* 131, 178
Vehicle outside the USA and
Canada 13
Operating safety 16
Audio system 161
Operator’s Manual 10
Ornamental moldings 250
Outer seats
Rear seat head restraints 92
Outside temperature indicator 106
Overdue service 246
S203 MY03_A.book Page 358 Tuesday, January 28, 2003 2:22 PM
Page 356 of 370

362 IndexSeats 90
Adjusting 32
Easy entry/exit feature 90
Heater 94
Manual 33
Multicontour seat 93
Power seats 34
Rapid seat heating 94
Split rear bench seat 199
Securing cargo
Cargo tie-down rings 202
Selecting
Display 120
Selector lever 23
Lock 44
Position (automatic
transmission) 23, 135
Self-test
BabySmart
TM airbag deactivation
system 67
Tele Aid* 211
Service
Calling up the service indicator 247
Major service (Service B) 246
Minor service (Service A) 246
Overdue 246Spare parts 318
Types 246
When due 246
Service and Warranty Booklet
Loss of 319
Service and warranty information 10
Service indicator 246
Calling up 247
Clearing 246, 247
Service life (tires) 242
Service see Maintenance 246
Service System see FSS 246
Setting
Convenience functions 117, 126
Cruise control 191
Daytime running lamp mode 121
Exterior rear view mirror parking
position 97
Higher speed in cruise control 192
Hours (clock) 118
Individual vehicle settings 116
Interior lighting delayed shut-off 124
Key dependent memory 127
Lamps and lighting (control
system) 121
Language, multifunction display 120Locator lighting 122
Lower speed in cruise control 192
Miles/kilometers in
speedometer 119
Minutes (clock) 118
Night security illumination 122
Parking position for exterior rear view
mirrors 128
Slower speed in cruise control 192
Speed in cruise control 192
Speedometer display mode 119
Station selection mode 125
Temperature (interior) 146, 154
Temperature indicator 119
Time display mode (Clock) 119
Units
Speedometer 119
Temperature 119
Settings
Convenience functions 126
Factory, SmartKey 85
Individual (SmartKey) 127
Lighting (control system) 121
Menus and submenus 109
Resetting all (control system) 116
Resetting in the submenu 117
S203 MY03_A.book Page 362 Tuesday, January 28, 2003 2:22 PM