Page 89 of 370

95 Controls in detail
Memory function*
Memory function*
The memory button and stored position
switch are located on the door.
You can store up to three different settings
per key.
The following settings are saved for each
stored position:�
Driver’s seat and backrest position
�
Steering wheel position
�
Driver’s side exterior rear view mirror
position
�
Passenger side exterior rear view mir-
ror position
�
Front passenger seat position
These key-dependent memory settings
can be deactivated if desired
(
�page 127).
!Prior to operating the vehicle, the driv-
er should check and adjust the seat
height, seat position fore and aft, and
seat backrest angle if necessary, to en-
sure adequate control, reach and com-
fort. The head restraint should also be
adjusted for proper height. Also see air-
bag section (
�page 57) for proper seat
positioning.
In addition, adjust the steering wheel to
ensure adequate control, reach, opera-
tion and comfort. Both the inside and
outside rear view mirrors should be ad-
justed for adequate rear vision.
Fasten seat belts. Infants and small
children should be seated in a properly
secured restraint system that complies
with U.S. Federal Motor Vehicle Safety
Standards 213 and 225 and Canadian
Motor Vehicle Safety Standards 213
and 210.2.
Warning!
G
Do not activate the memory function while
driving. Activating the memory function
while driving could cause the driver to lose
control of the vehicle.
S203 MY03_A.book Page 95 Tuesday, January 28, 2003 2:22 PM
Page 94 of 370

100 Controls in detailLightingDaytime running lamp mode�
Turn exterior lamp switch to
position
M
or
U
.
When the engine is running, the low beam
headlamps are automatically switched on.
In low ambient light conditions the parking
lamps will also switch on.
Canada only
When you shift from a driving position to
positionN orP, the low beam switches off
(with a three-minute delay).
For nighttime driving you should turn the
exterior lamp switch to position
B
to
permit activation of the high beam head-
lamps.
USA only
The high beam headlamps can also be ac-
tivated when driving with the daytime run-
ning lamp mode activated and exterior
lamp switch in position
M
.To activate the daytime running lamp
mode, see “Setting daytime running lamp
mode” (
�page 121).
Locator lighting and night security illu-
mination
Locator lighting and night security illumi-
nation are described in the control system
section under “Setting locator lighting”
(
�page 122) and “Setting night security il-
lumination” (
�page 122).
Switching on front fog lamps
�
Make sure that the low beam head-
lamps are switched on.
�
Pull out exterior lamp switch to first
stop.
The green indicator lamp
‡
in the
lamp switch lights up.Switching on rear fog lamp
�
Make sure that the low beam head-
lamps are switched on.
�
Pull out exterior lamp switch to second
stop.
The yellow indicator lamp
†
in the
lamp switch lights up.
iSee notes on the exterior lamp switch
(�page 98).
iFog lamps will operate with the parking
lamps and/or the low beam headlamps
on. Fog lamps should only be used in
conjunction with low beam headlamps.
Consult your State or Province Motor
Vehicle Regulations regarding allow-
able lamp operation.
S203 MY03_A.book Page 100 Tuesday, January 28, 2003 2:22 PM
Page 116 of 370

122 Controls in detailControl systemSetting locator lighting
During darkness, the following lamps will
come on when the exterior lamp switch is
in position
U
, the locator lighting fea-
ture is activated, and the vehicle is un-
locked by remote control:
�
Parking lamps
�
Tail lamps
�
License plate lamps
�
Front fog lamps
The locator lighting switches off when the
driver’s door is opened. It switches off au-
tomatically after a period of approximately
40 seconds.
�
Move the selection marker with
the
æ
or
ç
button to the
LIGHT-
ING
submenu.
�
Press button
j
or
k
repeatedly
until you see this message in the dis-
play:
LOCATOR LIGHTING
.The selection marker is on the current
setting.
�
Press
æ
or
ç
to select the de-
sired setting.
The locator lighting will be switched on
or off.Setting night security illumination
(Exterior lamps delayed shut-off)
Use the
HEADLAMPS DELAYED SHUT-OFF
function to set whether and for how long
you would like the exterior lamps to illumi-
nate during darkness after all doors are
closed. When the delayed shut-off feature
is activated and the exterior lamp switch is
in position
U
, the following lamps will
remain lit after you remove the key from
the starter switch:
�
Parking lamps
�
Tail lamps
�
License plate lamps
�
Front fog lampsiYou can reactivate this function within
ten minutes by opening a door.
If you do not open a door after remov-
ing the key, the lamps will automatical-
ly switch off after 60 seconds.
S203 MY03_A.book Page 122 Tuesday, January 28, 2003 2:22 PM
Page 132 of 370

138 Controls in detailAutomatic transmission*Gear selector lever position
Effect
P
Park position
Selector position when the vehicle is
parked. Only place selector lever in
positionP when vehicle is stopped.
The park position is not intended to
serve as a brake when the vehicle is
parked. Rather, the driver should al-
ways set the parking brake in addi-
tion to placing the selector lever in
positionP to secure the vehicle.
The key can only be removed from
the starter switch with the selector
lever in positionP. With the key re-
moved the selector lever is locked in
positionP.
Effect
R
Reverse gear
Place selector lever in positionR only
when vehicle is stopped.
N
Neutral
No power is transmitted from the en-
gine to the drive axle. When the
brakes are released, the vehicle can
be moved freely (pushed or towed).
To avoid damage to the transmission,
never engageN while driving.
If ESP is deactivated or malfunction-
ing:
Only move selector lever toN if the
vehicle is in danger of skidding (e.g.
on icy roads).
D
Drive
The transmission shifts automatical-
ly. All five forward gears are avail-
able.
!Coasting the vehicle, or driving for any
other reason with selector lever inN
can result in transmission damage that
is not covered by the Mercedes-Benz
Limited Warranty.Warning!
G
Getting out of your vehicle with the selector
lever not fully engaged in positionP is dan-
gerous. Also, positionP alone is not intend-
ed to or capable of preventing your vehicle
from moving, possibly hitting people or ob-
jects.
Always set the parking brake in addition to
shifting to positionP (
�page 51).
When parked on an incline, turn the front
wheels towards the road curb.
S203 MY03_A.book Page 138 Tuesday, January 28, 2003 2:22 PM
Page 184 of 370

190 Controls in detailDriving systems
Driving systemsThe driving system of your vehicle is de-
scribed on the following pages:�
Cruise control, with which the vehicle
can maintain a preset speed
The BAS, ABS and ESP driving systems are
described in the “Safety and Security” sec-
tion (�page 73).
Cruise control
Cruise control automatically maintains the
speed you set for your vehicle.
Use of cruise control is recommended for
driving at a constant speed for extended
periods of time. You can set any speed
over 20 mph (30 km/h).
The cruise control function is operated by
means of the cruise control lever.
The cruise control lever is the uppermost
lever found on the left-hand side of the
steering column (
�page 20).
Warning!
G
Cruise control is a convenience system de-
signed to assist the driver during vehicle op-
eration. The driver is and must remain at all
times responsible for the vehicle speed and
for safe brake operation.
Only use cruise control if the road, traffic
and weather conditions make it advisable to
travel at a steady speed.�
The use of cruise control can be danger-
ous on winding roads or in heavy traffic
because conditions do not allow safe
driving at a steady speed.
�
The use of cruise control can be danger-
ous on slippery roads. Rapid changes in
tire traction can result in wheel spin and
loss of control.
�
Deactivate cruise control when driving
in fog.
The “Resume” function should only be oper-
ated if the driver is fully aware of the previ-
ously set speed and wishes to resume this
particular preset speed.
S203 MY03_A.book Page 190 Tuesday, January 28, 2003 2:22 PM
Page 188 of 370
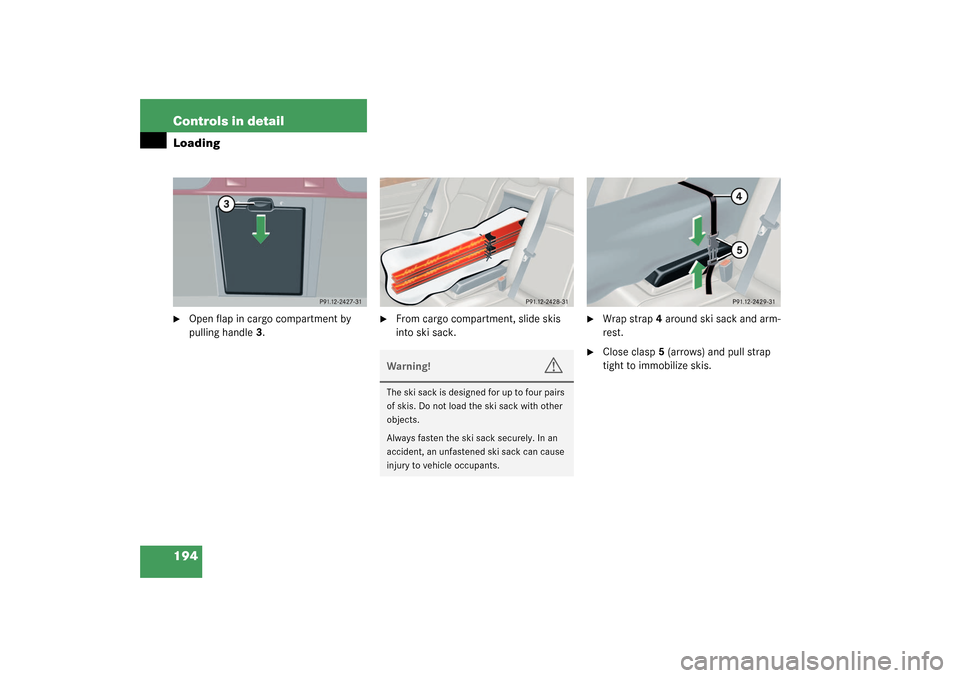
194 Controls in detailLoading�
Open flap in cargo compartment by
pulling handle3.
�
From cargo compartment, slide skis
into ski sack.
�
Wrap strap4 around ski sack and arm-
rest.
�
Close clasp5 (arrows) and pull strap
tight to immobilize skis.
Warning!
G
The ski sack is designed for up to four pairs
of skis. Do not load the ski sack with other
objects.
Always fasten the ski sack securely. In an
accident, an unfastened ski sack can cause
injury to vehicle occupants.
S203 MY03_A.book Page 194 Tuesday, January 28, 2003 2:22 PM
Page 191 of 370

197 Controls in detail
Loading
Storage compartment under cargo compartment floor
To open cargo compartment floor�
Press handle1 on the recess.
�
Lift compartment cover.To close cargo compartment floor
�
Lower the cover and lock by applying
light pressure to the handle1.
Retractable luggage cover and
partition net
The twin-reel roller blind comprises a lug-
gage cover and a partition net. It is mount-
ed on the backrest of the rear seat and can
also be used with backrest folded down.Partition net
Partition net with rear seats folded up
1Tab
2Eyelets on roof
�
Pull out upper blind (safety net) by
tabs1.
�
Engage it into eyelets on the roof2.
iThe compartment can be used to store
small, light or flat objects.
Warning!
G
If items are stored in the compartment,
make sure compartment is securely closed.
In an accident, during hard braking or sud-
den maneuvers, they could be thrown
around inside the vehicle, and cause injury
to vehicle occupants.
Warning!
G
To help avoid personal injury during a colli-
sion or sudden maneuver, always use parti-
tion net when transporting cargo.
S203 MY03_A.book Page 197 Tuesday, January 28, 2003 2:22 PM
Page 193 of 370

199 Controls in detail
Loading
Installing�
Fold split rear bench seat forward.
�
Place twin-reel roller blind1 into right
and left guide rails2.
�
Slide towards right to the end stop.
Split rear bench seat
The two sections can be folded down sep-
arately to enlarge the cargo compartment.Folding the backrest forward
�
Pull release handle1.
�
Fold seat cushion2 forward.
Right hand side of rear seat�
Slip seat belt webbing behind
retainer3.
�
Retract head restraints fully and fold
rearward (
�page 35).
Warning!
G
When expanding the luggage compartment,
always fold the seat cushions fully forward
and always use the partition net when trans-
porting cargo.
Unless you are transporting cargo, the back-
rests must remain properly locked in the up-
right position.
In an accident, during hard braking or sud-
den maneuvers, loose items will be thrown
around inside the vehicle, and cause injury
to vehicle occupants unless the items are
securely fastened in the vehicle.
Always use the cargo tie down rings
(�page 202).
S203 MY03_A.book Page 199 Tuesday, January 28, 2003 2:22 PM