Page 194 of 370

200 Controls in detailLoading�
Pull release handle4 on the left or right
backrest as required.
�
Fold the rear seat backrests5 forward.Folding the backrest rearward
�
Fold the backrest5 rearward until it
engages.
�
Fold the seat cushions2 rearward until
they lock into position.If the backrest is not locked into position,
a red indicator6 will be visible.
�
Check for secure locking by pushing
and pulling on the backrest.
iWith the twin-reel roller blind installed: �
When folding the backrest forward,
fold the right section first and then
the left section.
�
If only the left section is to be fold-
ed, first remove the twin-reel roller
blind (
�page 198).
Warning!
G
If a red indicator is visible with the backrest
up, then the backrest is not properly locked
into position.
Always lock backrest in its upright position
when rear seat bench is occupied, or the ex-
tended cargo compartment is not in use.
Check for secure locking by pushing and
S203 MY03_A.book Page 200 Tuesday, January 28, 2003 2:22 PM
Page 195 of 370

201 Controls in detail
Loading
Loading instructions
The total load weight including vehicle oc-
cupants and luggage/cargo should not ex-
ceed the vehicle capacity weight indicated
on the certification tag which can be found
on the left door pillar.
The handling characteristics of a fully load-
ed vehicle depend greatly on the load dis-
tribution. It is therefore recommended to
load the vehicle according to the illustra-
tions shown, with the heaviest items being
placed towards the front of the vehicle.
Always place items being carried against
front or rear seat backrests, and fasten
them as securely as possible.The heaviest portion of the cargo should al-
ways be kept as low as possible since it in-
fluences the handling characteristics of
the vehicle.
pulling on the backrest.
In an accident, during hard braking or sud-
den maneuvers, loose items will be thrown
around inside the vehicle, and cause injury
to vehicle occupants unless the items are
securely fastened in the vehicle.
To help avoid personal injury during a colli-
sion or sudden maneuver, exercise care
when transporting cargo.
Warning!
G
Always fasten items being carried as secure-
ly as possible.
In an accident, during hard braking or sud-
den maneuvers, loose items will be thrown
around inside the vehicle and can cause in-
jury to vehicle occupants unless the items
are securely fastened in the vehicle.
To help avoid personal injury during a colli-
sion or sudden maneuver, exercise care
when transporting cargo.
Never drive vehicle with tailgate open.
Deadly carbon monoxide (CO) gases may
enter vehicle interior resulting in uncon-
sciousness and death.
S203 MY03_A.book Page 201 Tuesday, January 28, 2003 2:22 PM
Page 196 of 370
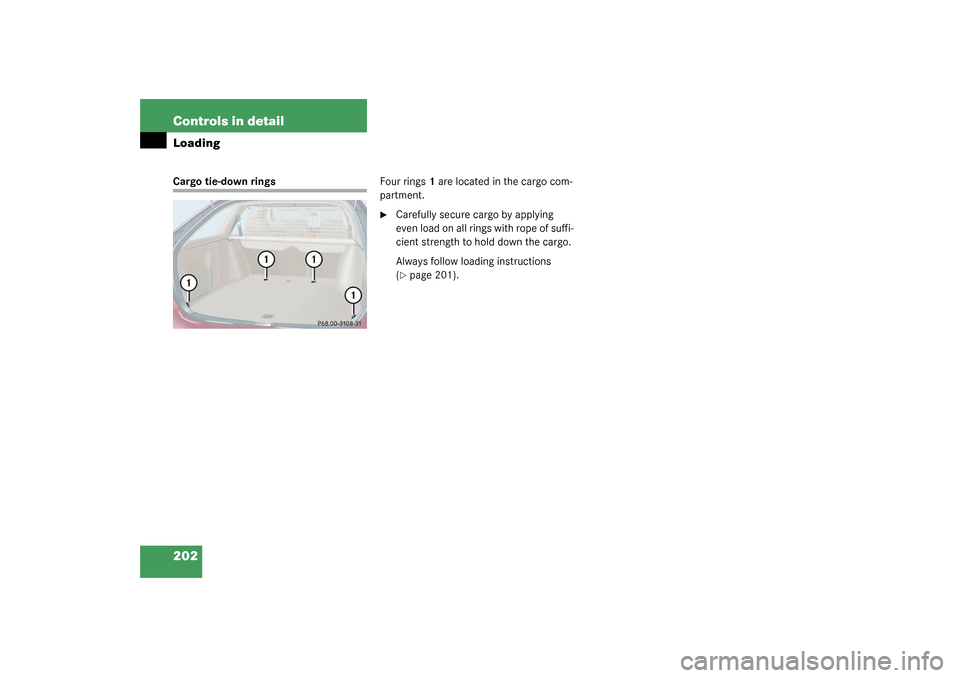
202 Controls in detailLoadingCargo tie-down ringsFour rings1 are located in the cargo com-
partment.
�
Carefully secure cargo by applying
even load on all rings with rope of suffi-
cient strength to hold down the cargo.
Always follow loading instructions
(�page 201).
S203 MY03_A.book Page 202 Tuesday, January 28, 2003 2:22 PM
Page 197 of 370

203 Controls in detail
Useful features
Useful features
Interior storage spaces Glove box
1Glove box lid release
2Glove box
Opening the glove box
�
Pull lid release1.
The glove box lid opens downward.
Closing the glove box
�
Push lid up to close.Locking the glove box
�
Insert mechanical key into the glove
box lock and turn it to position2.
Unlocking the glove box
�
Turn mechanical key in the glove box
lock to position1.
Warning!
G
To help avoid personal injury during a colli-
sion or sudden maneuver, exercise care
when stowing objects in the vehicle. Put lug-
gage or cargo in the cargo compartment if
possible. Do not pile luggage or cargo higher
than the seat backs.
Always use partition net when transporting
cargo. Partition net cannot secure hard or
heavy objects.
Parcel nets cannot secure hard or heavy ob-
jects.
Keep compartment lids closed. This will help
to prevent stored objects from being thrown
about and injuring vehicle occupants during
an accident.
iPrior to closing the glove box, close the
compartment for glasses first.
S203 MY03_A.book Page 203 Tuesday, January 28, 2003 2:22 PM
Page 201 of 370

207 Controls in detail
Useful features
Ashtrays
Center console ashtray
Opening ashtray�
Briefly touch cover plate1.
The ashtray opens automatically.Removing ashtray insert
�
Secure vehicle from movement by set-
ting the parking brake. Move the selec-
tor lever to positionN.
Now you have more room to take out
the insert.
�
Slide ashtray insert in direction of
arrow2 until it disengages.
�
Grip ashtray at indents (arrows3) and
remove insert from ashtray frame.
Reinstalling the ashtray insert
�
Install insert by pushing back into
frame until it engages again.Rear seat ashtray
Opening ashtray
�
Pull at top of cover1 to open ashtray.
Removing ashtray insert
�
Press latch2 to disengage ashtray in-
sert and remove it.
Reinstalling the ashtray insert
�
Install ashtray insert.
�
Close the ashtray.
Warning!
G
Remove front ashtray only with vehicle
standing still. Set the parking brake to se-
cure vehicle from movement. Move gear se-
lector lever to positionN. With gear selector
lever in positionN, turn off the engine.
S203 MY03_A.book Page 207 Tuesday, January 28, 2003 2:22 PM
Page 223 of 370

229 Operation
Driving instructions
Standing water
Passenger compartment
Driving abroad
Abroad, there is a widely-spread
Mercedes-Benz service network at your
disposal. If you plan to drive into areas
which are not listed in the index of your
Mercedes-Benz Center directory, you
should request pertinent information from
your authorized Mercedes-Benz Center.
!Do not drive through flooded areas or
water of unknown depth.
If you must drive through standing wa-
ter, drive slowly to prevent water from
entering the passenger compartment
or the engine compartment. Water in
these areas could cause damage to
electrical components or wiring of the
engine or transmission, or could result
in water being ingested by the engine
through the air intake causing severe
internal engine damage. Any such dam-
age is not covered by the
Mercedes-Benz Limited Warranty.
Warning!
G
Always fasten items being carried as secure-
ly as possible.
In an accident, during hard braking or sud-
den maneuvers, loose items will be thrown
around inside the vehicle, and cause injury
to vehicle occupants unless the items are
securely fastened in the vehicle.
The cargo compartment is the preferred
place to carry objects. Always use partition
net when transporting cargo. Partition net
cannot secure hard or heavy objects.
S203 MY03_A.book Page 229 Tuesday, January 28, 2003 2:22 PM
Page 275 of 370

281 Practical hints
Where will I find ...?
Spare wheel
Your vehicle is equipped with either a
spare wheel with full size tire or a Mini-
spare wheel. Full size spare tire has mark-
ing “205/55 R16” on sidewall. Minispare
has marking “T125/90 R16” on sidewall.
Identify the spare tire in your vehicle and
follow appropriate instructions.
Vehicles with full size tire spare wheel
The spare wheel is located under the cargo
floor.�
Open storage compartment under car-
go floor (
�page 197).1Spare wheel
2Luggage bowl
Removing the spare wheel
�
Turn luggage bowl2 counterclockwise.
�
Remove spare wheel1.
Storing the spare wheel
�
Place spare wheel1 in wheel well.
�
Turn luggage bowl2 clockwise to its
stop to secure the spare wheel.
Warning!
G
The jack is designed exclusively for jacking
up the vehicle at the jack take-up brackets
built into both sides of the vehicle. To help
avoid personal injury, use the jack only to lift
the vehicle during a wheel change. Never
get beneath the vehicle while it is supported
by the jack. Keep hands and feet away from
the area under the lifted vehicle. Always
firmly set parking brake and block wheels
before raising vehicle with jack.
Do not disengage parking brake while the
vehicle is raised. Be certain that the jack is
always vertical (plumb line) when in use, es-
pecially on hills. Always try to use the jack
on level surface. Make sure that the jack
arm is fully seated in the jack take-up brack-
et. Always lower the vehicle onto sufficient
capacity jackstands before working under
the vehicle.
S203 MY03_A.book Page 281 Tuesday, January 28, 2003 2:22 PM
Page 277 of 370

283 Practical hints
Where will I find ...?
3Arrow
4Minispare wheel
5Luggage bowl�
Remove luggage bowl5.
�
Remove Minispare wheel4.Storing the Minispare wheel
�
Place Minispare wheel4 in wheel well.
�
Place luggage bowl5 in Minispare
wheel.
�
Place storage well casing2 and turn
the retaining screw1 clockwise as far
as it will go to secure the Minispare
wheel.
In the case of a flat tire, you may tempo-
rarily use the Minispare wheel when ob-
serving the following restrictions:
�
Do not exceed a vehicle speed of
50 mph (80 km/h).
�
Drive to the nearest tire repair facility
to have the flat tire repaired or re-
placed as appropriate.
�
Do not operate vehicle with more than
one Minispare wheel mounted.
More information can be found in the
“Technical data” section (
�page 317).
iThe arrow3 on luggage bowl5 must
point in the direction of travel, other-
wise you cannot place the storage well
casing on top and secure the Minispare
wheel with the retaining screw.
Warning!
G
The dimensions of the Minispare wheel are
different from those of the road wheels. As
a result, the vehicle handling characteristics
change when driving with a Minispare wheel
mounted.
The spare wheel should only be used tempo-
rarily, and replaced with a regular road
wheel as quick as possible.
S203 MY03_A.book Page 283 Tuesday, January 28, 2003 2:22 PM