Page 253 of 370
259 Practical hints
What to do if …
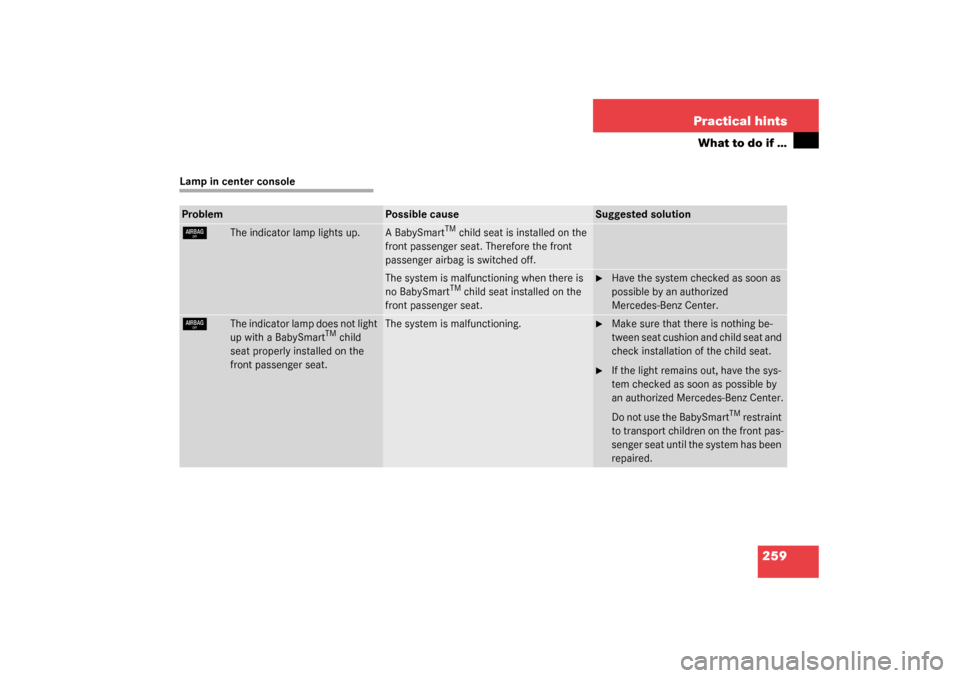
Lamp in center consoleProblem
Possible cause
Suggested solution
7
The indicator lamp lights up.
A BabySmart
TM child seat is installed on the
front passenger seat. Therefore the front
passenger airbag is switched off.
The system is malfunctioning when there is
no BabySmart
TM child seat installed on the
front passenger seat.
�
Have the system checked as soon as
possible by an authorized
Mercedes-Benz Center.
7
The indicator lamp does not light
up with a BabySmart
TM child
seat properly installed on the
front passenger seat.
The system is malfunctioning.
�
Make sure that there is nothing be-
tween seat cushion and child seat and
check installation of the child seat.
�
If the light remains out, have the sys-
tem checked as soon as possible by
an authorized Mercedes-Benz Center.
Do not use the BabySmart
TM restraint
to transport children on the front pas-
senger seat until the system has been
repaired.
S203 MY03_A.book Page 259 Tuesday, January 28, 2003 2:22 PM
Page 269 of 370
275 Practical hints
What to do if …
Display
Possible cause
Suggested solution
.
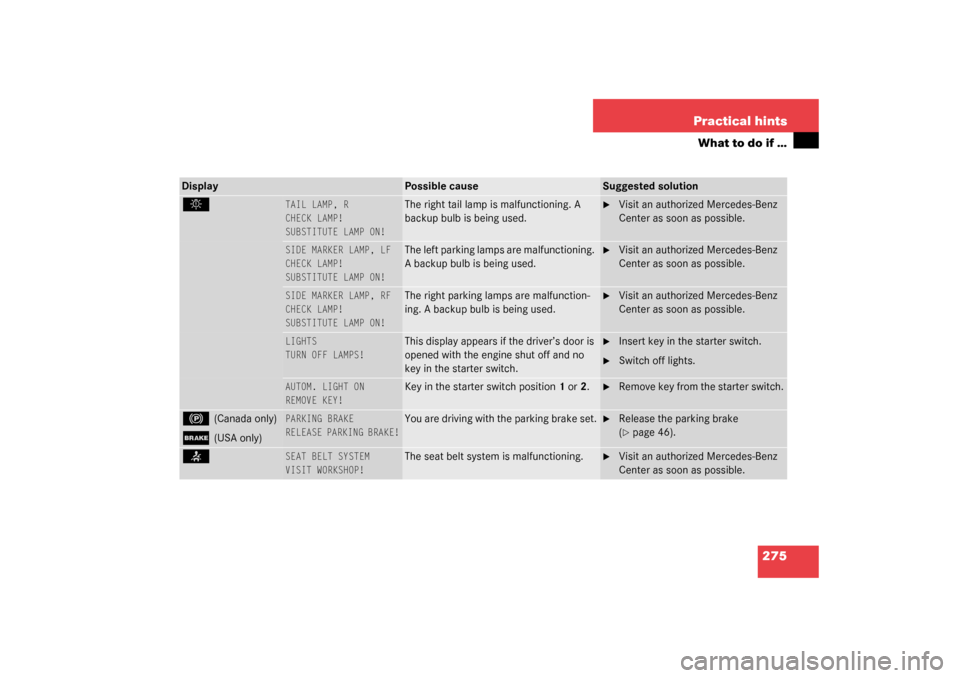
TAIL LAMP, R
CHECK LAMP!
SUBSTITUTE LAMP ON!
The right tail lamp is malfunctioning. A
backup bulb is being used.
�
Visit an authorized Mercedes-Benz
Center as soon as possible.
SIDE MARKER LAMP, LF
CHECK LAMP!
SUBSTITUTE LAMP ON!
The left parking lamps are malfunctioning.
A backup bulb is being used.
�
Visit an authorized Mercedes-Benz
Center as soon as possible.
SIDE MARKER LAMP, RF
CHECK LAMP!
SUBSTITUTE LAMP ON!
The right parking lamps are malfunction-
ing. A backup bulb is being used.
�
Visit an authorized Mercedes-Benz
Center as soon as possible.
LIGHTS
TURN OFF LAMPS!
This display appears if the driver’s door is
opened with the engine shut off and no
key in the starter switch.
�
Insert key in the starter switch.
�
Switch off lights.
AUTOM. LIGHT ON
REMOVE KEY!
Key in the starter switch position1 or2.
�
Remove key from the starter switch.
!
(Canada only)
;
(USA only)
PARKING BRAKE
RELEASE PARKING BRAKE!
You are driving with the parking brake set.
�
Release the parking brake
(�page 46).
<
SEAT BELT SYSTEM
VISIT WORKSHOP!
The seat belt system is malfunctioning.
�
Visit an authorized Mercedes-Benz
Center as soon as possible.
S203 MY03_A.book Page 275 Tuesday, January 28, 2003 2:22 PM
Page 270 of 370
276 Practical hintsWhat to do if …Display
Possible cause
Suggested solution
<
DRIVER’S SEAT BELT
FASTEN SEAT BELT!
The display reminds you and your pas-
sengers to fasten seat belts.
�
Fasten the seat belts.
_
STEERING WHEEL ADJUST
LOCK!
The steering column is not properly
locked.
�
Lock the steering column properly
(�page 37).
POWER STEERING FLUID
VISIT WORKSHOP!
The steering gear oil level is too low.
There is a danger of steering gear dam-
age.
�
Have the system checked by an au-
thorized Mercedes-Benz Center.
Warning!
G
If the level of steering gear oil in reservoir is
too low, the steering power assistance could
fail. Much greater effort will then be needed
to turn the steering wheel.
Do not add steering oil without checking the
steering system.
Do not drive the vehicle. Have the system
checked at your authorized Mercedes-Benz
Center as soon as possible.
S203 MY03_A.book Page 276 Tuesday, January 28, 2003 2:22 PM
Page 272 of 370

278 Practical hintsWhat to do if …Display
Possible cause
Suggested solution
#
UNDERVOLTAGE
ENGINE ON!
The battery has insufficient voltage and
can no longer supply the convenience
functions such as seat heater*.
�
Start the engine (
�page 44).
UNDERVOLTAGE
SWITCH CONSUMERS OFF!
The battery is malfunctioning.
�
Have the battery checked at a ser-
vice station.
G
VISIT WORKSHOP!
DISPLAY DEFECTIVE
The instrument cluster display is mal-
functioning.
�
Continue driving with added cau-
tion.
�
Visit an authorized Mercedes-Benz
Center as soon as possible.
±
VISIT WORKSHOP!
DISPLAY DEFECTIVE
Certain electronic systems are unable to
relay information to the control system.
The following systems may have failed:�
Coolant temperature display
�
Tachometer
�
Cruise control display
�
Have the electronic systems
checked by an authorized
Mercedes-Benz Center
(�page 258).
W
WASHER FLUID
CHECK LEVEL!
The fluid level has dropped to about
1/3
of total reservoir capacity.�
Add washer fluid (
�page 240).
S203 MY03_A.book Page 278 Tuesday, January 28, 2003 2:22 PM
Page 275 of 370
281 Practical hints
Where will I find ...?
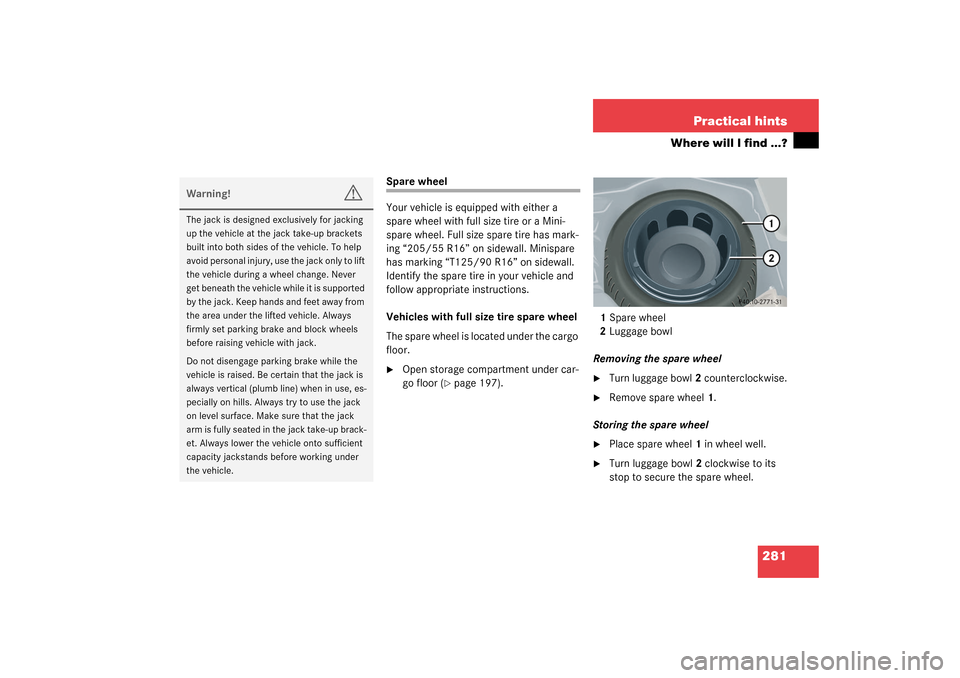
Spare wheel
Your vehicle is equipped with either a
spare wheel with full size tire or a Mini-
spare wheel. Full size spare tire has mark-
ing “205/55 R16” on sidewall. Minispare
has marking “T125/90 R16” on sidewall.
Identify the spare tire in your vehicle and
follow appropriate instructions.
Vehicles with full size tire spare wheel
The spare wheel is located under the cargo
floor.�
Open storage compartment under car-
go floor (
�page 197).1Spare wheel
2Luggage bowl
Removing the spare wheel
�
Turn luggage bowl2 counterclockwise.
�
Remove spare wheel1.
Storing the spare wheel
�
Place spare wheel1 in wheel well.
�
Turn luggage bowl2 clockwise to its
stop to secure the spare wheel.
Warning!
G
The jack is designed exclusively for jacking
up the vehicle at the jack take-up brackets
built into both sides of the vehicle. To help
avoid personal injury, use the jack only to lift
the vehicle during a wheel change. Never
get beneath the vehicle while it is supported
by the jack. Keep hands and feet away from
the area under the lifted vehicle. Always
firmly set parking brake and block wheels
before raising vehicle with jack.
Do not disengage parking brake while the
vehicle is raised. Be certain that the jack is
always vertical (plumb line) when in use, es-
pecially on hills. Always try to use the jack
on level surface. Make sure that the jack
arm is fully seated in the jack take-up brack-
et. Always lower the vehicle onto sufficient
capacity jackstands before working under
the vehicle.
S203 MY03_A.book Page 281 Tuesday, January 28, 2003 2:22 PM
Page 295 of 370
301 Practical hints
Flat tire
Wheel cover on vehicles with steel rims
(Canada only)�
On wheel to be changed, remove wheel
cover by reaching into two openings of
the wheel cover and pulling away from
the wheel.
�
On whee l to b e change d, loos en b ut do
not yet remove the wheel bolts (ap-
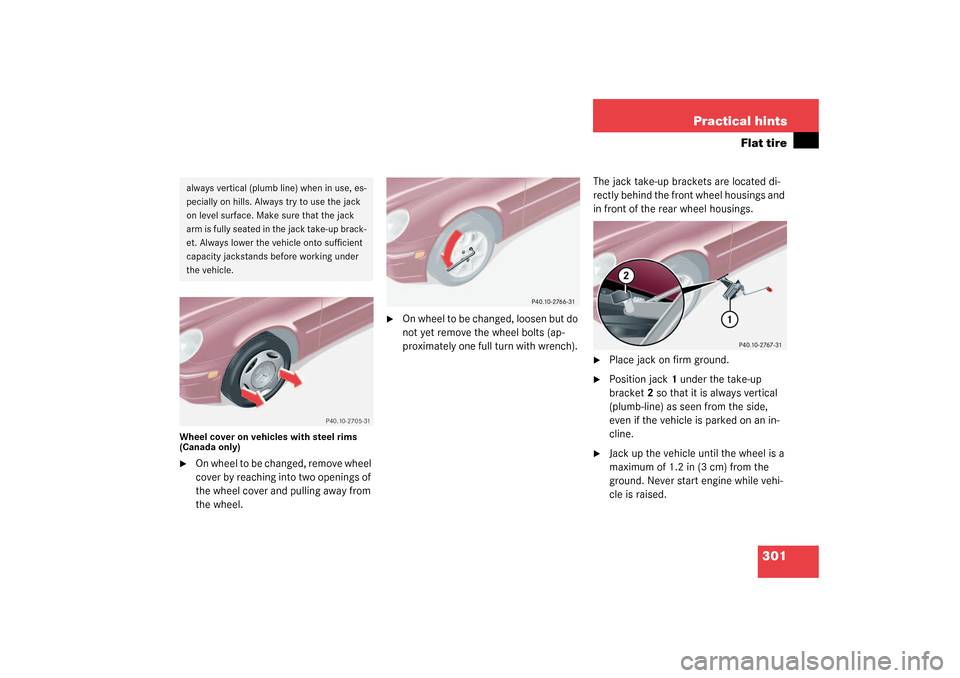
proximately one full turn with wrench). The jack take-up brackets are located di-
rectly behind the front wheel housings and
in front of the rear wheel housings.
�
Place jack on firm ground.
�
Position jack1 under the take-up
bracket2 so that it is always vertical
(plumb-line) as seen from the side,
even if the vehicle is parked on an in-
cline.
�
Jack up the vehicle until the wheel is a
maximum of 1.2 in (3 cm) from the
ground. Never start engine while vehi-
cle is raised.
always vertical (plumb line) when in use, es-
pecially on hills. Always try to use the jack
on level surface. Make sure that the jack
arm is fully seated in the jack take-up brack-
et. Always lower the vehicle onto sufficient
capacity jackstands before working under
the vehicle.
S203 MY03_A.book Page 301 Tuesday, January 28, 2003 2:22 PM
Page 298 of 370
304 Practical hintsFlat tireLowering the vehicle�
Lower vehicle by turning crank coun-
terclockwise until vehicle is resting ful-
ly on its own weight.
�
Remove the jack.
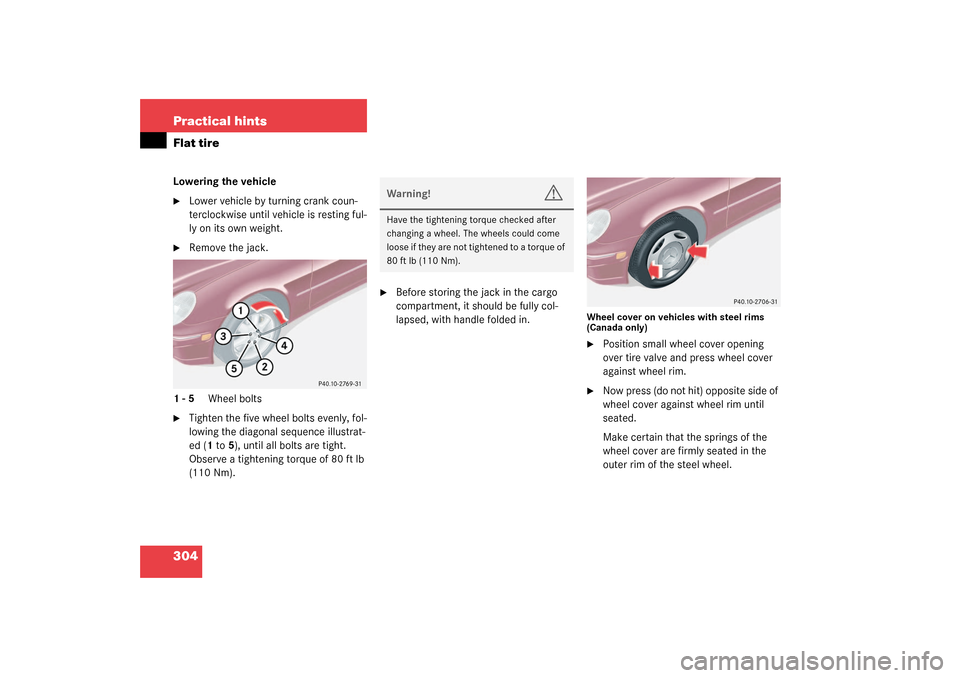
1-5 Wheel bolts
�
Tighten the five wheel bolts evenly, fol-
lowing the diagonal sequence illustrat-
ed (1 to5), until all bolts are tight.
Observe a tightening torque of 80 ft lb
(110 Nm).
�
Before storing the jack in the cargo
compartment, it should be fully col-
lapsed, with handle folded in.
Wheel cover on vehicles with steel rims
(Canada only)�
Position small wheel cover opening
over tire valve and press wheel cover
against wheel rim.
�
Now press (do not hit) opposite side of
wheel cover against wheel rim until
seated.
Make certain that the springs of the
wheel cover are firmly seated in the
outer rim of the steel wheel.
Warning!
G
Have the tightening torque checked after
changing a wheel. The wheels could come
loose if they are not tightened to a torque of
80 ft lb (110 Nm).
S203 MY03_A.book Page 304 Tuesday, January 28, 2003 2:22 PM
Page 333 of 370
339 Technical terms
ABS
(Antilock Brake System)
Prevents the wheels from locking up
during braking so that the vehicle can
continue to be steered.
Alignment bolt
Metal pin with thread. The centering pin is
an aid used when changing a tire to align
the wheel with the wheel hub.
BabySmartTM airbag deactivation
system
This system detects if a special system
compatible child restraint seat is installed
on the front passenger seat. The system
will automatically deactivate the passen-
ger front airbag when such a seat is prop-
erly installed (indicator lamp 7 on the
center console lights up). See your autho-
rized Mercedes-Benz Center for availabili-
ty.BabySmartTM compatible child seats
Special restraint system for children. The
sensor system for the passenger seat pre-
vents deployment of the passenger side
airbag if a BabySmartTM compatible child
seat is installed.
BAS
(Brake Assist System)
System for potentially reducing braking
distances in emergency braking situa-
tions. The system is activated when it
senses an emergency based on how
fast the brake is applied.
Bi-xenon headlamps*
Headlamps which use an electric arc as
the light source and produce a more in-
tense light than filament headlamps. Bi-xe-
non headlamps produce low beam and
high beam.CAC
(Customer Assistance Center)
Mercedes-Benz customer service cen-
ter, which can help you with any ques-
tions about your vehicle and provide
assistance in the event of a break-
down.
CAN system
(Controller Area Network)
Data bus network serving to control ve-
hicle functions such as door locking or
windshield wiping depending on vehi-
cle settings and/or ambient condi-
tions.
Cockpit
All instruments, switches, buttons and in-
dicator/warning lamps in the passenger
compartment needed for vehicle operation
and monitoring.
S203 MY03_A.book Page 339 Tuesday, January 28, 2003 2:22 PM