Page 90 of 370

96 Controls in detailMemory function*1Memory button
2Stored position button�
Make sure that the ignition is switched
on or the relevant door is open and the
SmartKey is inserted in the starter
switch.
Storing positions into memory�
Adjust the seats, steering wheel and
rear view mirrors to the desired posi-
tion (
�page 32).
�
Turn button2 to selected memory po-
sition.
�
Press memory button1.
�
Release memory button and push
button2 within three seconds.
All the settings are stored at the select-
ed position.
Recalling positions from memory�
Turn button2 to selected memory po-
sition.
�
Press and hold button2 until the seat,
steering wheel and rear view mirrors
have fully moved to the stored posi-
tions.iReleasing the button immediately
stops movement to the stored posi-
tions.Warning!
G
Do not operate the power seats using the
memory button if the seat backrest is in an
excessively reclined position. Doing so
could cause damage to front or rear seats.
First move backrest to an upright position.
S203 MY03_A.book Page 96 Tuesday, January 28, 2003 2:22 PM
Page 120 of 370

126 Controls in detailControl systemConvenience submenu
Access the
CONVENIENCE
submenu via the
SETTINGS
menu. Use the
CONVENIENCE
sub-
menu to change the settings for a number
of convenience features. The following
functions are available:
Activating easy-entry/exit feature
Use this function to activate and deacti-
vate the easy-entry/exit feature. When the
feature is activated, the steering wheel and
driver’s seat will move back to facilitate ex-
iting when you
�
remove the key from the starter switch
�
open the driver’s door
However, the engine must be turned off.After entering the vehicle, the steering
wheel and seat will move into the position
stored in memory when
�
the driver’s door is closed
�
you put the key in the starter switch
and
�
press the appropriate stored position
button on the memory switch
(�page 95)
Function
Page
Activate easy-entry/exit feature
see
below
Set key dependency
127
Set parking position for exterior
rear view mirror
128
Warning!
G
You must make sure that no one can be-
come trapped or injured by the moving
steering wheel and the driver’s seat when
the easy-entry/exit feature* is activated
and the driver’s door is being opened and
the engine is turned off or the SmartKey is
removed from the starter switch. Do not
leave children unattended in the vehicle, or
with access to an unlocked vehicle. Unsu-
pervised use of vehicle equipment may
cause an accident and/or serious personal
injury.
Do not leave children unattended in the ve-
hicle, or with access to an unlocked vehicle.
Children could open the driver’s door and
unintentionally activate the easy-entry/exit
feature*, which could result in an accident
and/or serious personal injury.
iTo cancel seat/steering wheel move-
ment, do one of the following:�
press the seat adjustment switch*
(�page 34)
�
move the steering column stalk*
(�page 38)
�
press the memory switch
(�page 96)
S203 MY03_A.book Page 126 Tuesday, January 28, 2003 2:22 PM
Page 121 of 370

127 Controls in detail
Control system
�
Move the selection marker with
the
æ
or
ç
button to the
CONVE-
NIENCE
submenu.
�
Press button
j
or
k
repeatedly
until you see this message in the dis-
play:
EASY-ENTRY FEATURE ACTIVATE
.
The selection marker is on the current
setting.
�
Press
æ
or
ç
to change the
easy-entry/exit setting.The following settings are available for
the easy-entry/exit feature:Setting key dependency
Use this function to set whether the mem-
ory settings for the seats, the steering
wheel and the mirrors should be stored
separately for each key (
�page 95).
�
Move the selection marker with
the
æ
or
ç
button to the
CONVE-
NIENCE
submenu.
�
Press button
j
or
k
repeatedly
until you see this message in the dis-
play:
SETTINGS KEY-DEPENDENT
.
The selection marker is on the current
setting.
�
Press
æ
or
ç
to set key depen-
dency to
ON or
OFF
.
OFF
The easy-entry/ex-
it feature is deacti-
vated.
STEERING COLUMN
Only the steering
column is moved.
STEERING COLUMN +
SEAT
Both the steering
column and the
seat are moved.
S203 MY03_A.book Page 127 Tuesday, January 28, 2003 2:22 PM
Page 139 of 370
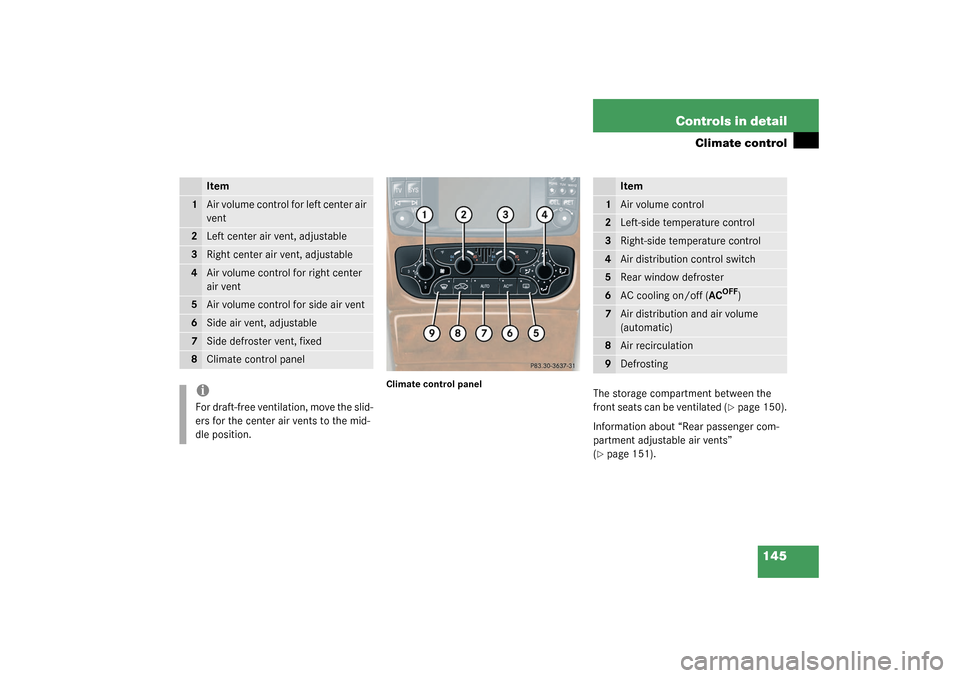
145 Controls in detail
Climate control
Climate control panel
The storage compartment between the
front seats can be ventilated (
�page 150).
Information about “Rear passenger com-
partment adjustable air vents”
(
�page 151).
Item
1
Air volume control for left center air
vent
2
Left center air vent, adjustable
3
Right center air vent, adjustable
4
Air volume control for right center
air vent
5
Air volume control for side air vent
6
Side air vent, adjustable
7
Side defroster vent, fixed
8
Climate control paneliFor draft-free ventilation, move the slid-
ers for the center air vents to the mid-
dle position.
Item
1
Air volume control
2
Left-side temperature control
3
Right-side temperature control
4
Air distribution control switch
5
Rear window defroster
6
AC cooling on/off (AC
OFF
)
7
Air distribution and air volume
(automatic)
8
Air recirculation
9
Defrosting
S203 MY03_A.book Page 145 Tuesday, January 28, 2003 2:22 PM
Page 189 of 370
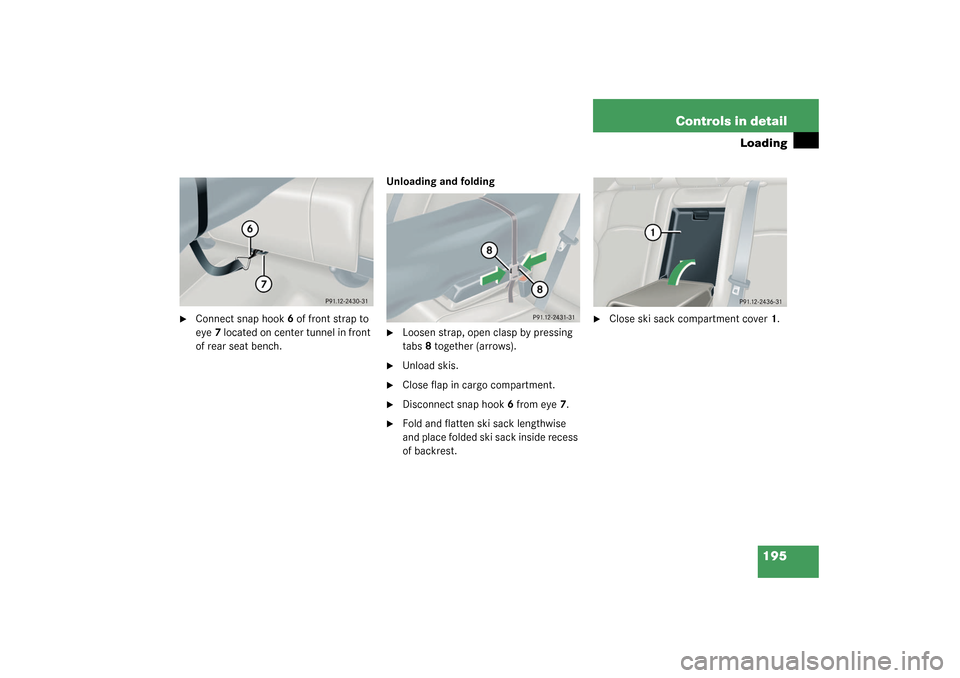
195 Controls in detail
Loading
�
Connect snap hook6 of front strap to
eye7 located on center tunnel in front
of rear seat bench.Unloading and folding
�
Loosen strap, open clasp by pressing
tabs8 together (arrows).
�
Unload skis.
�
Close flap in cargo compartment.
�
Disconnect snap hook6 from eye7.
�
Fold and flatten ski sack lengthwise
and place folded ski sack inside recess
of backrest.
�
Close ski sack compartment cover1.
S203 MY03_A.book Page 195 Tuesday, January 28, 2003 2:22 PM
Page 191 of 370

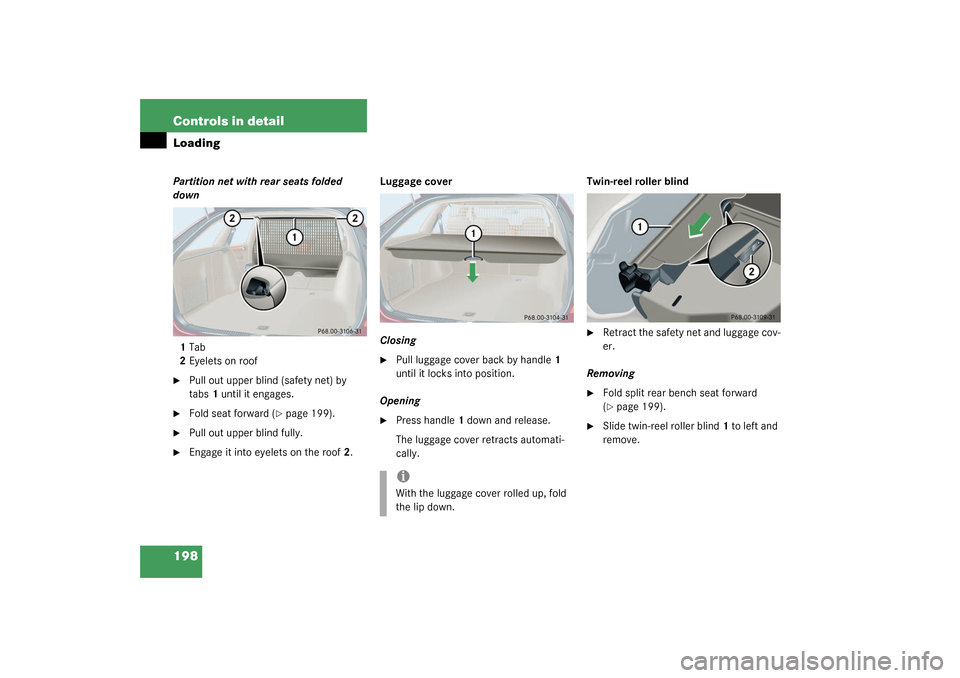
197 Controls in detail
Loading
Storage compartment under cargo compartment floor
To open cargo compartment floor�
Press handle1 on the recess.
�
Lift compartment cover.To close cargo compartment floor
�
Lower the cover and lock by applying
light pressure to the handle1.
Retractable luggage cover and
partition net
The twin-reel roller blind comprises a lug-
gage cover and a partition net. It is mount-
ed on the backrest of the rear seat and can
also be used with backrest folded down.Partition net
Partition net with rear seats folded up
1Tab
2Eyelets on roof
�
Pull out upper blind (safety net) by
tabs1.
�
Engage it into eyelets on the roof2.
iThe compartment can be used to store
small, light or flat objects.
Warning!
G
If items are stored in the compartment,
make sure compartment is securely closed.
In an accident, during hard braking or sud-
den maneuvers, they could be thrown
around inside the vehicle, and cause injury
to vehicle occupants.
Warning!
G
To help avoid personal injury during a colli-
sion or sudden maneuver, always use parti-
tion net when transporting cargo.
S203 MY03_A.book Page 197 Tuesday, January 28, 2003 2:22 PM
Page 192 of 370
198 Controls in detailLoadingPartition net with rear seats folded
down
1Tab
2Eyelets on roof�
Pull out upper blind (safety net) by
tabs1 until it engages.
�
Fold seat forward (
�page 199).
�
Pull out upper blind fully.
�
Engage it into eyelets on the roof2.Luggage cover
Closing
�
Pull luggage cover back by handle1
until it locks into position.
Opening
�
Press handle1 down and release.
The luggage cover retracts automati-
cally.Twin-reel roller blind
�
Retract the safety net and luggage cov-
er.
Removing
�
Fold split rear bench seat forward
(�page 199).
�
Slide twin-reel roller blind1 to left and
remove.
iWith the luggage cover rolled up, fold
the lip down.
S203 MY03_A.book Page 198 Tuesday, January 28, 2003 2:22 PM
Page 193 of 370

199 Controls in detail
Loading
Installing�
Fold split rear bench seat forward.
�
Place twin-reel roller blind1 into right
and left guide rails2.
�
Slide towards right to the end stop.
Split rear bench seat
The two sections can be folded down sep-
arately to enlarge the cargo compartment.Folding the backrest forward
�
Pull release handle1.
�
Fold seat cushion2 forward.
Right hand side of rear seat�
Slip seat belt webbing behind
retainer3.
�
Retract head restraints fully and fold
rearward (
�page 35).
Warning!
G
When expanding the luggage compartment,
always fold the seat cushions fully forward
and always use the partition net when trans-
porting cargo.
Unless you are transporting cargo, the back-
rests must remain properly locked in the up-
right position.
In an accident, during hard braking or sud-
den maneuvers, loose items will be thrown
around inside the vehicle, and cause injury
to vehicle occupants unless the items are
securely fastened in the vehicle.
Always use the cargo tie down rings
(�page 202).
S203 MY03_A.book Page 199 Tuesday, January 28, 2003 2:22 PM