Page 195 of 225
187
Info Services/System settings
System settings
System settings
6Displays the new message
7Switches back to the main menu
There is more than one message�
Press the right-hand rotary/push-
button v to move to the next page.
Activating the main service menu
�
Press *.
Switching back to e.g. radio main menu
�
Turn the right-hand rotary/push-button
v to highlight “No” and press to con-
firm.
Main system settings menu1Date and time
You can select the time format
(
�page 196)
2Adjusting the brightness
3Activating “Settings” menu
4Switching an auxiliary audio source on
(�page 200)
5Country setting, with a time zone
(�page 192)
�
Press (.
The main service menu will appear.
�
Turn the right-hand rotary/push-button
v to highlight “System Settings” and
press to confirm.
The main system settings menu will ap-
pear.
Activating the main settings menu
iYou will see information 5 if the clock
has been set to GPS reception and if a
country, e.g. USA and a time zone was
selected.
Page 196 of 225
188Info Services/System settingsSystem settings1Previous settings
2Current settings�
Press the right-hand rotary/push-
button v to confirm “Brightness”.
The “Brightness” menu will appear.Darkening screen
�
Turn the right-hand rotary/push-button
v to the left.
The triangle 2 will move to the left.
Brightening screen
�
Turn the right-hand rotary/push-button
v to the right.
The triangle 2 will move to the right.
Confirming new settings
�
Press the right-hand rotary/push-
button v.
The main system settings menu will ap-
pear.
Settings menu 1Selecting the language
Navigation CD must be inserted
2Setting date and time (
�page 190)
3Switching beep tones on and off
(
�page 197)
4Setting the display dimming characteri-
stics (day and night display)
(�page 198)
5Resetting all settings to the factory set-
tings (
�page 199)
Adjusting the brightness
P82.85-7710-31
2
1
Activating settings menu
Page 197 of 225
189
Info Services/System settings
System settings
�
Turn the right-hand rotary/push-button
v to highlight “Settings” in the main
system settings menu and press to
confirm.
The settings menu will appear.The language affects the menu text dis-
plays and the voice output during route
guidance.
1Current language setting appears in
red
2Page back, if the arrow is filled in
3Page forward for more languages
�
Press the right-hand rotary/push-
button v to confirm “Language...” in
the settings menu.
The languages list will appear.
�
Turn the right-hand rotary/push-button
v to highlight the desired language
and press to confirm.
COMAND displays the message “Loa-
ding the xx language” and loads the se-
lected language.
You will hear the corresponding voice
output.
After that, the main system settings
menu will appear with the display text
in the language selected.
Selecting the language
Page 198 of 225

190Info Services/System settingsSystem settingsYou can select the following languages�
“Adopt from Instrument Cluster”
COMAND will use the same language
as is set in instrument cluster
�
“Deutsch”
�
“English” (metric)
Distance measured in km,
speed in km/h
�
“English” (imperial)
Distance measured in yards and miles,
speed in miles per hour (mph)
�
“Español”
�
“Français”
�
“Italiano”
�
“Nederlands”COMAND is equipped with an integrated
clock, which it shows in the main system
settings menu.
Automatically
COMAND automatically sets date and time
if the GPS time is received.
However, you can make the following ad-
justments:�
Set the time in increments of 30 minu-
tes (
�page 191)
�
Set the time by selecting a country and
the time zone (
�page 192)Manually
You must always set the clock manually
(
�page 195), if
�
COMAND does not receive a GPS time
�
the clock has been disconnected from
the vehicle battery
�
the dates of the change between sum-
mer and winter time are not available
Setting date and timeiThe clock displays e.g. the estimated
time of arrival at the destination during
route guidance.
Page 199 of 225
191
Info Services/System settings
System settings
Setting the time in increments of 30 mi-
nutes
You can set the the time to any local time
(time zone) in increments of 30 minutes.
1COMAND receives GPS time
2Setting the clock (increments of 30 mi-
nutes)
3Selecting the country and the time
zone (
�page 192)
4Selecting the time format (
�page 196)
�
Turn the right-hand rotary/push-button
v to highlight “Date/Time...” in the
settings menu and press to confirm.
The menu displays the date and the
time, minutes are highlighted.Activating the setting mode
�
Press the right-hand rotary/push-
button v.
Setting mode is active, the minutes will
appear in red.
P82.85-7714-312
3
41
P82.85-7715-31
Page 203 of 225

195
Info Services/System settings
System settings
Manually setting date and clock
You must manually set the date and clock,
if�
COMAND does not receive a GPS time
�
the clock has been disconnected from
the vehicle battery
�
the dates of the change between sum-
mer and winter time are not available
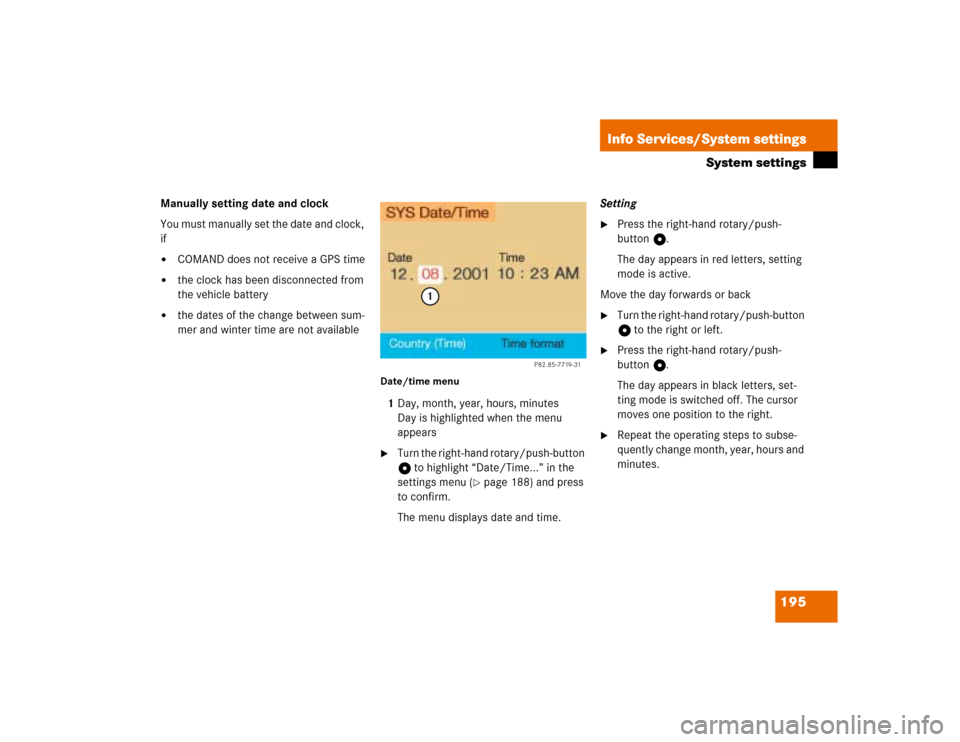
Date/time menu1Day, month, year, hours, minutes
Day is highlighted when the menu
appears�
Turn the right-hand rotary/push-button
v to highlight “Date/Time...” in the
settings menu (
�page 188) and press
to confirm.
The menu displays date and time.Setting
�
Press the right-hand rotary/push-
button v.
The day appears in red letters, setting
mode is active.
Move the day forwards or back
�
Turn the right-hand rotary/push-button
v to the right or left.
�
Press the right-hand rotary/push-
button v.
The day appears in black letters, set-
ting mode is switched off. The cursor
moves one position to the right.
�
Repeat the operating steps to subse-
quently change month, year, hours and
minutes.
P82.85-7719-31
1
Page 204 of 225
196Info Services/System settingsSystem settingsAdopting settings�
Press the right-hand rotary/push-
button v longer than 2 seconds.
The main system settings menu will ap-
pear with the changed settings.Selecting the time format
1Date display in day, month format
2Date display in month, day format
3Time display in 24-hour format
4Time display in 12-hour format
P Setting is active
Q Setting is not activeIn the “Date/Time” menu
�
Turn the right-hand rotary/push-button
v to highlight “Time format” and press
to confirm.
The “Time format” menu will appear.
Setting
�
Turn the right-hand rotary/push-button
v to highlight the desired entry and
press to confirm. A checkmark will ap-
pear P.
iIf you have selected an invalid setting,
the message “Invalid input” will appear.
iIf the 12-hour format is selected, either
AM (a
nte m
eridiem) or PM (p
ost m
eri-
diem) will appear after the time.
Page 206 of 225
198Info Services/System settingsSystem settings1Changes by pressing Ä
2Changes by pressing Ä and head-
lights switch
P Setting active
Q Setting not activeIf the settings menu (
�page 188) is dis-
played
�
Turn the right-hand rotary/push-button
v to highlight “Display (day/night)...”
and press to confirm.
The “Display (Day/Night)” menu will
appear. The setting 2 is active, when
calling up the menu for the first time.
�
Turn the right-hand rotary/push-button
v to highlight the desired setting and
press to confirm.
The desired setting is active.
Setting 2 has been selected
When the headlights are switched on, the
screen will change to night display.Changing the display
�
Press Ä to access the following dis-
plays in succession.�
Day display
�
Night display
�
Screen off
�
and the Day display again
Setting the display dimming charac-
teristics (day and night display)
P82.85-9255-3112