Page 33 of 288

Traffic function
Select TRAFFIC for traffic
information broadcast from certain
stations which will automatically
interrupt radio or CD playback at a
preset volume level.
Traffic information not available in most U.S. markets.
Information feature
Press INFO to view the frequency,
call letters and PTY category of the
selected FM station.
Program type (PTY)
This feature allows you to search for Radio Data System (RDS) stations
selectively by their program type.
Ensure that the RDS function is
turned on. Press PTY to turn the
feature on/off.
To set/change PTY:
Ensure that the RDS function is
turned on.
Press SET PTY to select from the
following program types:
•All
•Classical
•Country
SOUND
AM
FM1
FM2
CDSEEK
TUNE
PRESET SCANAUTO SET
SCAN
RDS
TRAFFIC
INFO PTYSET PTY
87.9
89.9 98.1
98.5 106.3 107.9
SOUND
AM
FM1
FM2
CDSEEK
TUNE
PRESET SCANAUTO SET
SCAN
RDS
TRAFFIC
INFO PTYSET PTY
87.9
89.9 98.1
98.5 106.3 107.9
SOUND
AM
FM1
FM2
CDSEEK
TUNE
PRESET SCANAUTO SET
SCAN
RDS
TRAFFIC
INFO PTYSET PTY
87.9
89.9 98.1
98.5 106.3 107.9
Entertainment Systems
33
Page 34 of 288
•Information
•Jazz
•Religious
•Rock
•Soft
•To p 4 0
Once PTY has been programmed,
press SEEK (
/) or SCAN to
initiate a search up or down the
frequency.
Preset scan and Autoset also initiate
PTY searches. The search will stop
when the desired program type has
been reached. If no program type is
found, a message will display.
Sound functions
To access settings for Bass, Treble, Balance, Fade, DSP (Digital Signal
Programing), SCV (Speed Compensated Volume), and Occupancy modes:
1. Press AUDIO.
2. Press SOUND.
3. Select from Bass/Treb; Bal/Fade; DSP/SCV.
4. Press +/—to increase/decrease the levels.
CD OPEN CLOSE MENU DESTMAP AUDIO VOL PUSH
FM187 . 7MHZ4:17AM
SOUND
AM
FM1
FM2
CDSEEK
TUNE
PRESET SCANAUTO SET
SCAN
RDS
TRAFFIC
INFO PTYSET PTY
87.9
89.9 98.1
98.5 106.3 107.9
Entertainment Systems
34
Page 35 of 288

Bass:Allowsyoutoincreaseor
decreasetheaudiosystem’s bass
output.
Treble: Allows you to raise or
lower the audio system’s treble
output.
Fade: Allows you to adjust sound
between the front and rear
speakers.
Balance: Allows you to adjust the
sound distribution between the right
and left speakers.
SCV(Speed Compensated Volume)
Automatically compensates for road
wind and noise. Refer toSpeed
compensated volumeearlier in this
chapter.
DSP Occupancy mode:Use to
optimize the sound based upon the
occupants in the vehicle. Select
from ALL SEATS, REAR SEATS or
DRIVER SEAT.
The radio is equipped with six station memory preset controls. These
controls can be used to select up to six preset AM stations and twelve
FM stations (six in FM1 and six in FM2).
Setting memory preset stations
1. Select the frequency band with the AM/FM select control.
2. Select a station.
3. Press and hold a memory preset until the sound returns. The
frequency will appear in the preset.
CD mode
CD units are designed to play commercially pressed 12 cm (4.75 in)
audio compact discs only. Due to technical incompatibility, certain
CNTR
Entertainment Systems
35
Page 36 of 288
recordable and re-recordable compact discs may not function
correctly when used in Ford CD players. Irregular shaped CDs,
CDs with a scratch protection film attached, and CDs with
homemade paper (adhesive) labels should not be inserted into
the CD player. The label may peel and cause the CD to become
jammed. It is recommended that homemade CDs be identified
with permanent felt tip marker rather than adhesive labels. Ball
point pens may damage CDs. Please contact your dealer for
further information.
To begin CD play (if a CD is already
loaded), press AUDIO hard button
and then CD.
Press CD. CD play will begin where
it stopped last.
If a CD is not already loaded into
the system:
1. Press CD OPEN CLOSE on the
bezel.
SOUND
AM
FM1
FM2
CDSEEK
TUNE
PRESET SCANAUTO SET
SCAN
RDS
TRAFFIC
INFO PTYSET PTY
87.9
89.9 98.1
98.5 106.3 107.9
Entertainment Systems
36
Page 45 of 288
Restore system defaults
Resets all system user-selectable
options to factory default values (i.e,
guidance, voice, search area and
route preferences).
Calibration
Press“Position”to reposition the
vehicle location. This is helpful if
the car has been towed, or is not
registering at the correct location on
the map. Press the screen to scroll
the map to the desired location and
press OK to confirm.
Press“Distance”to calibrate by
distance and improve the navigation
accuracy. It is recommended to
activate this function after ever tire
replacement. When the button is highlighted, calibration is in process
and will turn off automatically when complete.
DVD map version
Displays the version of the inserted
navigation DVD. Refer toOrdering
additional map DVDsfor further
information.
Entertainment Systems
45
Page 49 of 288

Destination entry
Selecting a destination
Press DEST to set a destination.
From this menu, you may select
from the following options:
•Address—Use to select a
destination based on a known
street address or intersection.
•Point of Interest—Use to
select a destination that is a point
of interest location (i.e., airport,
restaurant, hospital).
•Select from map—Use to select a place on the map.
•Previous Destination—Use to select a destination from among the
last 20 entered destinations
The next page will allow you to
select from the following selections:
•Memory point—Use to select
from a memory point.
•Freeway exit/entrance—Use
to select a certain freeway exit or
entrance.
•Special Memory Points—Use
to select a destination from
previously stored entries.
Search area
Your navigation system uses a
regional search area. This area is
the area from which navigational
directions will be used. To check
your area or reset, press CHANGE
under the search area listing. The
map will open and allow you to
select another regional area. Ensure
that your search area is correct prior to setting your destination.
Entertainment Systems
49
Page 91 of 288

To make the front driver or
passenger windows close fully
without holding the window control,
press the top portion of the driver
window control completely down to
the second")
Express Up (One Touch Up)
To make the front driver or
passenger windows close fully
without holding the window control,
press the top portion of the driver
window control completely down to
the second detent or“Express Up”
position. Press the control in either
direction to stop window operation.
When closing the power windows, you should verify they are free
of obstructions and ensure that children and/or pets are not in
the proximity of the window openings.
Restoring the Express up functionality
Under low battery power conditions, Express Up only functionality may
be lost. To reset this function after restoring full battery power, press the
rocker switch to the Express Up position, hold the switch until the glass
reaches the stall position and continue to hold for 2 seconds.
Accessory delay
With accessory delay, the window switches may be used for up to ten
minutes after the ignition switch is turned to the OFF position or until
either front door is opened.
Bounce Back (Front Windows Only)
When an obstacle has been detected in the window opening as the
window is moving upward, the window will automatically move down and
stop at a prescribed position.
Bounce Back Override (Front Windows Only)
To override Bounce Back, within 2 seconds after reaching Bounce Back
position, if the rocker switch is moved from the Neutral to the Express
Up positionthe window will travel up with no bounce back
protection.If the switch is released before the window reaches fully
closed position, the window will stop. For example: Bounce Back
Override can be used to overcome the resistance of ice on the window or
seals.
Driver Controls
91
Page 99 of 288
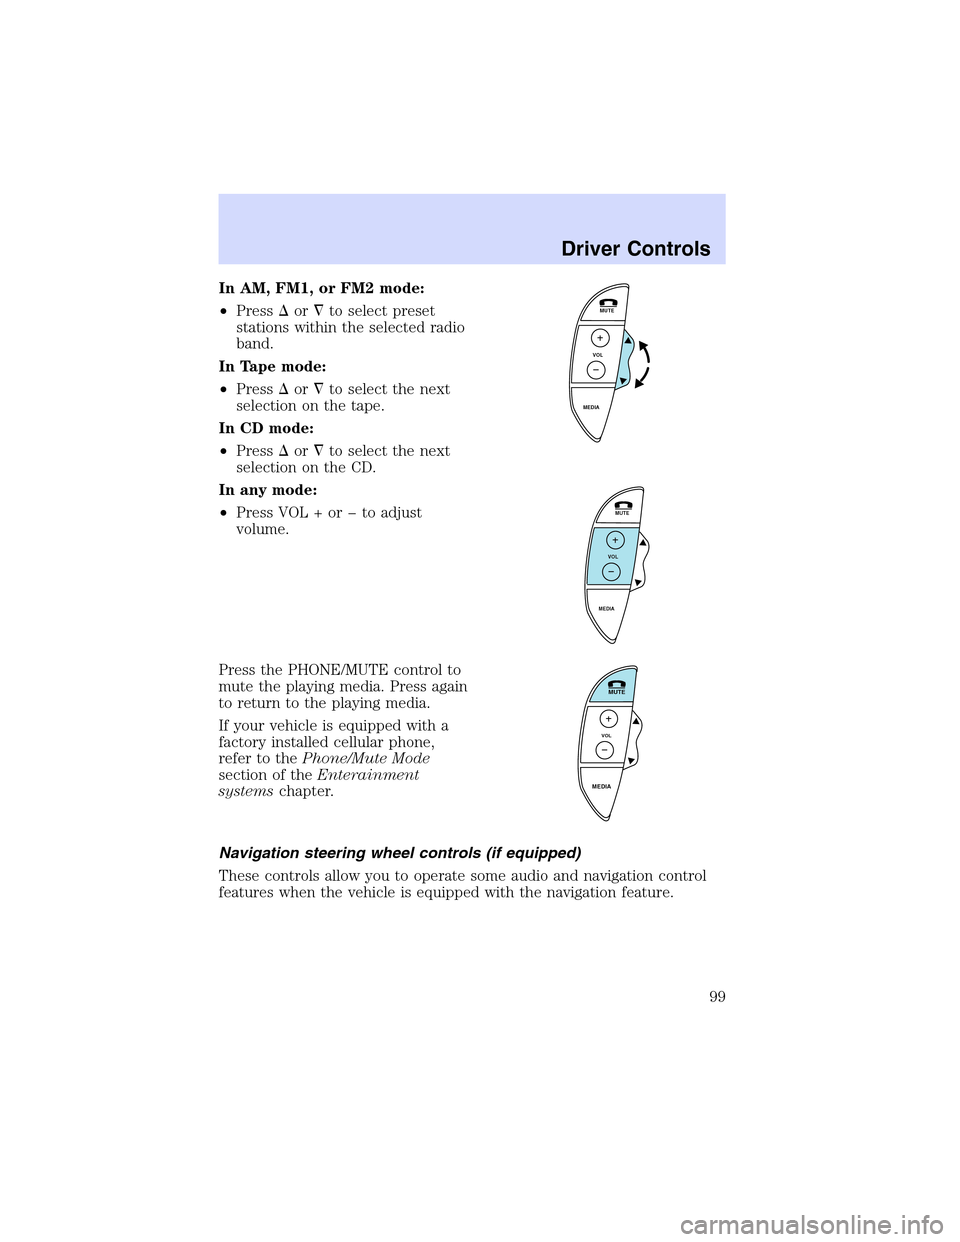
In AM, FM1, or FM2 mode:
•Press�or�to select preset
stations within the selected radio
band.
In Tape mode:
•Press�or�to select the next
selection on the tape.
In CD mode:
•Press�or�to select the next
selection on the CD.
In any mode:
•Press VOL + or � to adjust
volume.
Press the PHONE/MUTE control to
mute the playing media. Press again
to return to the playing media.
If your vehicle is equipped with a
factory installed cellular phone,
refer to thePhone/Mute Mode
section of theEnterainment
systemschapter.
Navigation steering wheel controls (if equipped)
These controls allow you to operate some audio and navigation control
features when the vehicle is equipped with the navigation feature.
MUTE
VOL
MEDIA
MUTE
VOL
MEDIA
MUTE
VOL
MEDIA
Driver Controls
99
 or SCAN to
initiate a search up or down the
frequency.
Preset scan and Autoset also initia")

.
Calibration
Press“Position”to reposition the")