2003 LINCOLN LS lights
[x] Cancel search: lightsPage 1 of 288

Introduction 4
Instrument Cluster 10
Warning and control lights 10
Gauges 14
Entertainment Systems 16
AM/FM stereo with CD 16
AM/FM stereo cassette with CD 20
Navigation System 24
Climate Controls 69
Electronic automatic temperature control 69
Lights 77
Headlamps 77
Turn signal control 81
Bulb replacement 81
Driver Controls 86
Windshield wiper/washer control 86
Steering wheel adjustment 88
Power windows 90
Mirrors 92
Speed control 95
Message center 106
Locks and Security 120
Keys 120
Locks 120
Anti-theft system 124
Table of Contents
1
Page 10 of 288
WARNING LIGHTS AND CHIMES
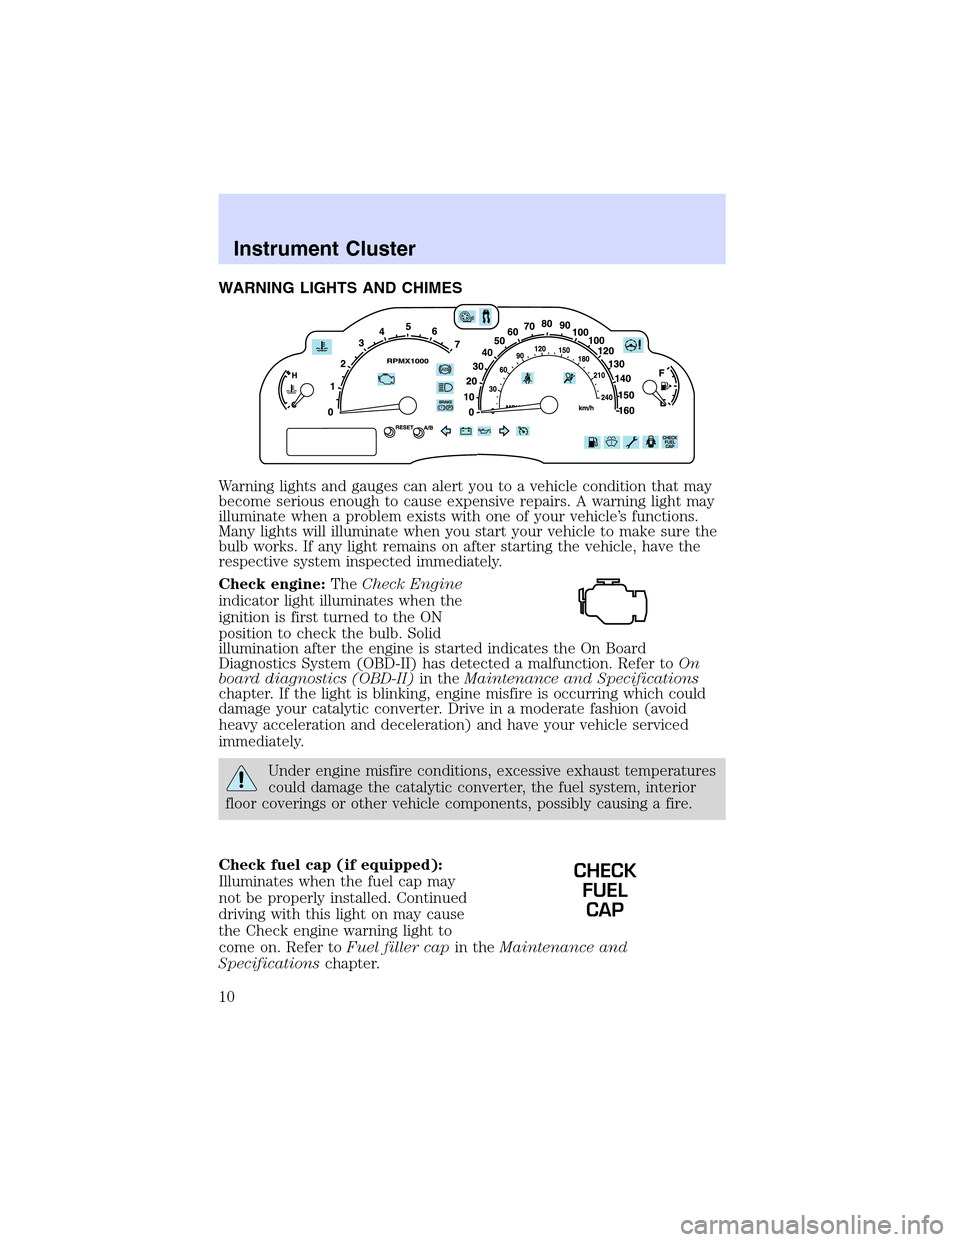
Warning lights and gauges can alert you to a vehicle condition that may
become serious enough to cause expensive repairs. A warning light may
illuminate when a problem exists with one of your vehicle’s functions.
Many lights will illuminate when you start your vehicle to make sure the
bulb works. If any light remains on after starting the vehicle, have the
respective system inspected immediately.
Check engine:TheCheck Engine
indicator light illuminates when the
ignition is first turned to the ON
position to check the bulb. Solid
illumination after the engine is started indicates the On Board
Diagnostics System (OBD-II) has detected a malfunction. Refer toOn
board diagnostics (OBD-II)in theMaintenance and Specifications
chapter. If the light is blinking, engine misfire is occurring which could
damage your catalytic converter. Drive in a moderate fashion (avoid
heavy acceleration and deceleration) and have your vehicle serviced
immediately.
Under engine misfire conditions, excessive exhaust temperatures
could damage the catalytic converter, the fuel system, interior
floor coverings or other vehicle components, possibly causing a fire.
Check fuel cap (if equipped):
Illuminates when the fuel cap may
not be properly installed. Continued
driving with this light on may cause
the Check engine warning light to
come on. Refer toFuel filler capin theMaintenance and
Specificationschapter.
CHECK
FUEL
CAP
Instrument Cluster
10
Page 13 of 288

Low fuel (if equipped):
Illuminates when the fuel level in
the fuel tank is at, or near empty
(refer toFuel gaugein this
chapter).
Speed control:Illuminates when
the speed control is activated. Turns
off when the speed control system
is deactivated.
Low washer fluid (if equipped):
Illuminates when the windshield
washer fluid is low.
Bulb warning (if equipped):
Illuminates when one of the exterior
front turn lamps or rear
brake/turn/tail lamps bulb has
burned out. Depress the RESET control to return to the Trip odometer
display.
Door ajar (if equipped):
Illuminates when the ignition is in
the ON position and any door is
open.
Turn signal:Illuminates when the
left or right turn signal or the
hazard lights are turned on. If the
indicators stay on or flash faster, check for a burned out bulb.
High beams:Illuminates when the
high beam headlamps are turned on.
Electronic throttle control (if
equipped):Illuminates when the
engine has defaulted to a
’limp-home’operation. Report the
fault to a dealer at the earliest opportunity.
Instrument Cluster
13
Page 23 of 288
function correctly when used in Ford CD players. Irregular
shaped CDs, CDs with a scratch protection film attached, and CDs
with homemade paper (adhesive) labels should not be inserted
into the CD player. The label may peel and cause the CD to
become jammed. It is recommended that homemade CDs be
identified with permanent felt tip marker rather than adhesive
labels. Ball point pens may damage CDs. Please contact your
dealer for further information.
15.Power/volume:Press to turn
the system on/off. Turn to
raise/lower the volume.
Speed sensitive volume:(if
equipped) Radio volume changes
automatically and slightly with
vehicle speed to compensate for road and wind noise.
Press and hold the volume control for five seconds. Then press SEL to
increase (
) or decrease () the volume setting. The level will
appear in the display.
16.TAPE:Press to play reverse
side of the tape.
17.CD door:Insert the disc with the playing side down and printed side
up.
18.Tape door:Insert the tape facing the right.
RADIO FREQUENCIES
AM and FM frequencies are established by the Federal Communications
Commission (FCC) and the Canadian Radio and Telecommunications
Commission (CRTC). Those frequencies are:
AM - 530, 540–1700, 1710 kHz
FM- 87.7, 87.9–107.7, 107.9 MHz
RADIO RECEPTION FACTORS
There are three factors that can effect radio reception:
•Distance/strength: The further you travel from an FM station, the
weaker the signal and the weaker the reception.
•Terrain: Hills, mountains, tall buildings, power lines, electric fences,
traffic lights and thunderstorms can interfere with your reception.
Entertainment Systems
23
Page 27 of 288
Quick Start — How to get going
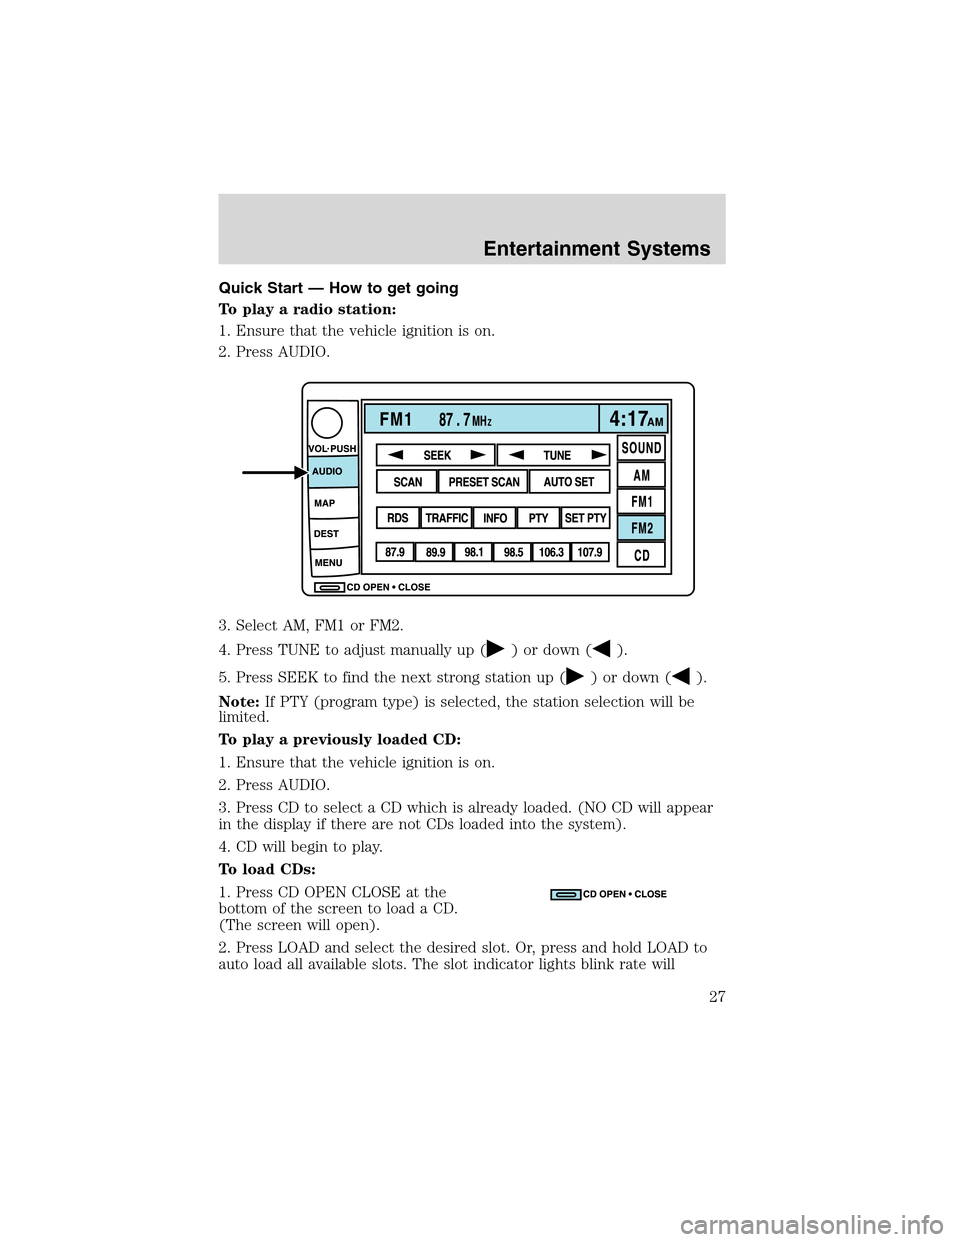
To play a radio station:
1. Ensure that the vehicle ignition is on.
2. Press AUDIO.
3. Select AM, FM1 or FM2.
4. Press TUNE to adjust manually up (
) or down ().
5. Press SEEK to find the next strong station up (
) or down ().
Note:If PTY (program type) is selected, the station selection will be
limited.
To play a previously loaded CD:
1. Ensure that the vehicle ignition is on.
2. Press AUDIO.
3. Press CD to select a CD which is already loaded. (NO CD will appear
in the display if there are not CDs loaded into the system).
4. CD will begin to play.
To load CDs:
1. Press CD OPEN CLOSE at the
bottom of the screen to load a CD.
(The screen will open).
2. Press LOAD and select the desired slot. Or, press and hold LOAD to
auto load all available slots. The slot indicator lights blink rate will
Entertainment Systems
27
Page 30 of 288

2. Press SOUND.
3. SCV is located in the middle of
the screen. Press to turn on.
4. Select setting 1 to 7 or turn off.
The AM/FM control works in radio, CD and navigation modes.
AM/FM select in radio mode
Press to switch between AM/FM1/FM2 memory preset stations.
AM/FM select in CD mode
Press to stop CD play and begin radio play.
Radio reception factors:
•Distance/strength.The further an FM signal travels, the weaker it is.
The listenable range of the average FM station is approximately 40 km
(24 miles). This range can be affected by“signal modulation.”Signal
modulation is a process radio stations use to increase their
strength/volume relative to other stations.
•Terrain.Hills, mountains and tall buildings between your vehicle’s
antenna and the radio station signal can cause FM reception problems.
Static can be caused on AM stations by power lines, electric fences,
traffic lights and thunderstorms. Moving away from an interfering
structure (out of its“shadow”) returns your reception to normal.
•Station overload.Weak signals are sometimes captured by stronger
signals when you pass a broadcast tower. A stronger signal may
temporarily overtake a weaker signal and play while the weak station
frequency is displayed.
AM/FM select in navigation mode
The radio will continue to play in the background of the navigation
screens. To access, press AUDIO then AM/FM1/FM2.SOUND
AM
FM1
FM2
CDSEEK
TUNE
PRESET SCANAUTO SET
SCAN
RDS
TRAFFIC
INFO PTYSET PTY
87.9
89.9 98.1
98.5 106.3 107.9
Entertainment Systems
30
Page 72 of 288
1.A/C control:Press to turn on
and manually control the air
conditioning. Press again to
disengage. Press AUTO for the system to automatically control the
temperature.
2.Recirculation control:Press to
engage/disengage. Used to manually
enable or disable recirculated air
operation. When activated, recirculates air in the cabin thereby reducing
the amount of time to cool down the interior of the vehicle. May also
help reduce undesired odors from reaching the interior of the vehicle.
Will work in all modes except defrost. Recirculation turns off
automatically when floor, floor/defrost or defrost mode is selected. To
reduce humidity inside the vehicle, turn recirculation off.
3.Passenger side temperature
control:Press to engage the dual
zone feature of the DEATC system.
Allows the passenger to choose and
control a different temperature than the driver, if desired.
4.Passenger heated seat:Press to turn on the passenger side heated
seat. Press once for full heat (three lights above passenger heated seat
control will be illuminated). Press a second time to select medium heat
(two lights). Press a third time to select low heat (one light). Press a
fourth time to disengage the feature (all lights will be off).
5.
R(Rear defrost): Press to defrost the rear window. Refer toRear
Window Defrostfor more information.
6.Passenger cooled seat:Press to turn on the passenger side cooled
seat. Press once for full cool (three lights above passenger cooled seat
control will be illuminated). Press a second time to select medium cool
(two lights). Press a third time to select low cool (one light). Press a
fourth time to disengage the feature (all lights will be off).
Automatic heated/cooled passenger seat:To engage, press the
passenger side heat and cool seat controls simultaneously. The center
light above the passenger side heated and cooled controls will illuminate
and the display will show
. This allows the seat to automatically heat
or cool based on the climate control temperature selected. Press either
control to disengage.
7.
(Defrost): Distributes outside air through the windshield
defroster ducts and the demister outlets. Can be used to clear ice or fog
from the windshield. The system will automatically provide outside air to
reduce window fogging.
A/C
Climate Controls
72
Page 73 of 288
8.Airflow direction control:Press to toggle through the air
distribution modes listed below. The selected mode will illuminate in the
display.
—Distributes air through the windshield defroster ducts, demister
outlets and the front and rear seat floor ducts. The system will
automatically provide outside air to reduce window fogging.
:Distributes air through the floor and rear seat floor ducts. The
system will automatically provide outside air to reduce window fogging.
: Distributes air through the instrument panel, center console
registers, and the front and rear seat floor ducts.
:Distributes air through the instrument panel and center console
registers.
9.Off:Outside air is shut out and
the fan will not operate.
10.Manual override controls:Allows you to manually select where
airflow is directed. To return to full automatic control, press AUTO.
11.Auto:Press to engage automatic
temperature control. Use the
temperature control to select the
desired temperature setting. The system will automatically determine fan
speed, airflow location, A/C on or off, and outside or recirculated air to
heat or cool the vehicle, allowing it to reach the desired temperature.
Press and hold AUTO for about two seconds to toggle between single
zone and dual zone temperature control.
12.Driver heated seat:Press to turn on the driver side heated seat.
Press once for full heat (three lights above driver heated seat control will
be illuminated). Press a second time to select medium heat (two lights).
Press a third time to select low heat (one light). Press a fourth time to
disengage the feature (all lights will be off).
13.Driver cooled seat:Press to turn on the driver side cooled seat.
Press once for full cool (three lights above driver cooled seat control will
be illuminated). Press a second time to select medium cool (two lights).
Press a third time to select low cool (one light). Press a fourth time to
disengage the feature (all lights will be off).
Automatic heated/cooled driver seat:To engage, press the driver side
heat and cool seat controls simultaneously. The center light above the
driver side heated and cooled controls will illuminate and the display will
OFF
AUTO
Climate Controls
73