Page 47 of 280
INTERIOR LAMPS
Map lamps
To turn on the map lamps, press the
control next to each lamp.
If equipped with a moon roof, press
the control next to the map lamp to
illuminate the lamp.
Rear dome lamp (if equipped)
The dome lamp lights when the
control is in the DOOR (left)
position, any door is open, the
instrument panel switch is pushed
past the detent and when any of the
remote entry controls are pressed
while the ignition is off.
The rear dome lamp can be turned
ON (center) or OFF (right) by sliding the control.
AUTO
ROOF
Lights
47
Page 48 of 280

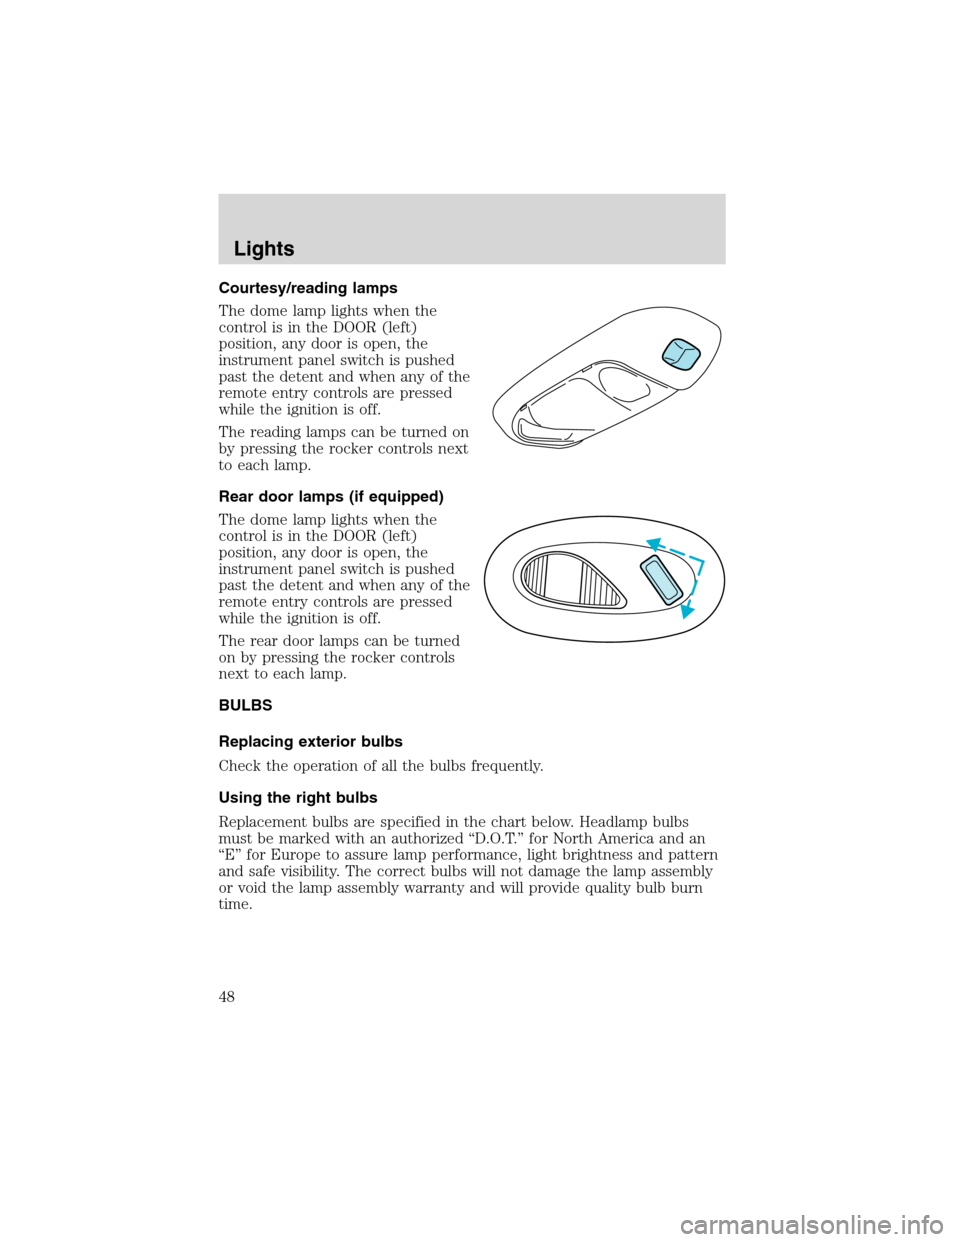
Courtesy/reading lamps
The dome lamp lights when the
control is in the DOOR (left)
position, any door is open, the
instrument panel switch is pushed
past the detent and when any of the
remote entry controls are pressed
while the ignition is off.
The reading lamps can be turned on
by pressing the rocker controls next
to each lamp.
Rear door lamps (if equipped)
The dome lamp lights when the
control is in the DOOR (left)
position, any door is open, the
instrument panel switch is pushed
past the detent and when any of the
remote entry controls are pressed
while the ignition is off.
The rear door lamps can be turned
on by pressing the rocker controls
next to each lamp.
BULBS
Replacing exterior bulbs
Check the operation of all the bulbs frequently.
Using the right bulbs
Replacement bulbs are specified in the chart below. Headlamp bulbs
must be marked with an authorized“D.O.T.”for North America and an
“E”for Europe to assure lamp performance, light brightness and pattern
and safe visibility. The correct bulbs will not damage the lamp assembly
or void the lamp assembly warranty and will provide quality bulb burn
time.
Lights
48
Page 49 of 280
Function Number of
bulbsTrade number
Headlamps 2 9007
Front park/turn lamps 2 3157AK (amber)
Foglamps 2 9145
1
Backup lamp 2 3156K
Rear stop/turn/sidemarker/tail
lamp2 3457K
High-mount brakelamp 1 912
Cargo lamp 2 912
License plate lamp 2 168
Signal mirror lamp (if equipped) 2 906/921
Running board lamp (if equipped) 4 168
All replacement bulbs are clear in color except where noted.
To replace all instrument panel lights - see your dealer
1Harley Davidson package uses bulb number H1 12V
Replacing headlamp bulbs
1. Make sure that the headlamp control is in the OFF position and open
the hood.
2. At the back of the headlamp, pull
clips rearward and up (about
3⁄4
inch) to release the headlamp
assembly.
3. Slide headlamp assembly forward
and disconnect the electrical
connector from the bulb by pulling
rearward.
Lights
49
Page 59 of 280
AUXILIARY POWER POINT
Power outlets are designed for
accessory plugs only. Do not
hang any type of accessory or
accessory bracket from the plug.
Improper use of the power
outlet can cause damage not
covered by your warranty.
The auxiliary power point is located
on the instrument panel.
Do not plug optional electrical accessories into the cigarette
lighter. Use the power point.
Harley-Davidson F-150 only
A second auxiliary power point is
located on the lower rear side of the
console. The power point is
accessible from the rear seats.
Auxiliary power point (SuperCrew only)
An additional auxiliary power point
is located on the right side rear trim
panel next to the rear seat.
CENTER CONSOLE (IF EQUIPPED)
The center console offers several useful storage features. These include:
•Large utility compartment
•Cupholders
•Coin holder slots
•PalmPilot�/PDA holder
•Pen holder
Driver Controls
59
Page 86 of 280

The anti-scan feature will turn off after:
•one minute of keypad inactivity.
•pressing the UNLOCK
control on the remote entry transmitter.
•the ignition is turned to the ON position.
Unlocking and locking the doors using keyless entry
To unlock the driver’s door,enter the factory set 5-digit code or your
personal code. Each number must be pressed within five seconds of each
other. The interior lamps will illuminate after pressing the first control on
the keypad.
To unlock all doors,press the 3•4 control within five seconds.
To lock all doors,press the 7•8 and the 9•0 at the same time. You
do notneed to enter the keypad code first.Note:The interior lamps
will turn off.
SECURILOCK�PASSIVE ANTI-THEFT SYSTEM
SecuriLock�passive anti-theft system is an engine immobilization
system. This system is designed to prevent the engine from being started
unless acoded key programmed to your vehicleis used. The use of
the wrong type of coded key may lead to a“no-start”condition.
Your vehicle comes with two coded keys; additional coded keys may be
purchased from your dealer. The dealer can program your spare keys to
your vehicle or you can program the keys yourself. Refer to
Programming spare keysfor instructions on how to program the coded
key.
Note:The SecuriLock�passive anti-theft system is not compatible with
non-Ford aftermarket remote start systems. Use of these systems may
result in vehicle starting problems and a loss of security protection.
Note:Large metallic objects, electronic devices that are used to
purchase gasoline or similar items, or a second coded key on the same
key chain may cause vehicle starting issues. You need to prevent these
objects from touching the coded key while starting the engine. These
objects will not cause damage to the coded key, but may cause a
momentary issue if they are too close to the key when starting the
engine. If a problem occurs, turn the ignition off, remove all objects on
the key chain away from the coded key and restart the engine.
Theft indicator
The theft indicator is located on top of the instrument panel.
Locks and Security
86
Page 179 of 280
Fuse/Relay
LocationFuse Amp
RatingPassenger Compartment Fuse
Panel Description
7—Not used
8 5A Radio, Remote entry module,
GEM, In-vehicle entertainment
system (SuperCrew only)
9—Not used
10—Not used
11 30A Front washer pump relay, Wiper
run/park relay, Wiper HI/LO relay,
Windshield wiper motor
12—Not used
13 20A Stop lamp switch (Lamps),
Turn/Hazard flasher
14 15A Battery saver relay, Interior lamp
relay
15 5A Stop lamp switch (speed control,
brake shift interlock), GEM, Rear
Anti-lock Brake System (RABS)
module
16 20A Headlamps (hi beams), Cluster
(hi beam indicator)
17—Not used
18 5A Instrument illumination (dimmer
switch power)
19—Not used
20 5A Audio, GEM, PCM, Transmission
range sensor
21 15A DTR sensor, Clutch switch,
Starter relay, I/P fuse 20
22 10A Air bag module, Passenger air bag
deactivation module
Roadside Emergencies
179
Page 212 of 280

INSTRUMENT PANEL AND CLUSTER LENS
Clean the instrument panel with a damp cloth, then dry with a dry cloth.
•Avoid cleaners or polish that increase the gloss of the upper portion of
the instrument panel. The dull finish in this area helps protect the
driver from undesirable windshield reflection.
Do not use chemical solvents or strong detergents when cleaning
the steering wheel or instrument panel to avoid contamination of
the air bag system.
•Be certain to wash or wipe your hands clean if you have been in
contact with certain products such as insect repellent and suntan
lotion in order to avoid possible damage to the painted surfaces.
INTERIOR TRIM
•Clean the interior trim areas with a damp cloth, then dry by wiping
with a dry, soft, clean cloth.
•Do not use household or glass cleaners as these may damage the
finish.
INTERIOR
For fabric, carpets, cloth seats and safety belts:
•Remove dust and loose dirt with a vacuum cleaner.
•Remove light stains and soil with Ford Extra Strength Upholstery
Cleaner (E8AZ-19523–AA).
•If grease or tar is present on the material, spot-clean the area first
with Motorcraft Spot and Stain Remover (ZC-14).
•Never saturate the seat covers with cleaning solution.
•Do not use household cleaning products or glass cleaners, which can
stain and discolor the fabric and affect the flame retardant abilities of
the seat materials.
Do not use cleaning solvents, bleach or dye on the vehicle’s
seatbelts, as these actions may weaken the belt webbing.
Cleaning
212
Page 217 of 280
Working with the engine on
•Automatic transmission:
1. Set the parking brake and shift to P (Park).
2. Block the wheels.
•Manual transmission:
1. Set the parking brake, depress the clutch and place the gearshift in N
(Neutral).
2. Block the wheels.
Note:Do not start your engine with the air cleaner removed and do not
remove it while the engine is running.
OPENING THE HOOD
1. Inside the vehicle, pull the hood
release handle located under the
bottom of the instrument panel.
2. Go to the front of the vehicle and
release the auxiliary latch that is
located under the front center of
the hood.
3. Lift the hood until the lift
cylinders hold it open.
BRAKE
HOOD
Maintenance and Specifications
217