2003 INFINITI G35 oil
[x] Cancel search: oilPage 63 of 256

or Anti-lock brake warning light Low washer fluid warning light High beam indicator light (Blue)
Automatic transmission check warning
light Seat belt warning light Malfunction indicator lamp (MIL)
or Brake warning light Supplemental air bag warning light Slip indicator light
Charge warning light or Automatic transmission posi-
tion indicator light Vehicle dynamics control off indicator
light
Door open warning light Cruise main switch indicator light Turn signal/hazard indicator lights
Engine oil pressure warning light Cruise set switch indicator light
CHECKING BULBS Apply the parking brake and turn the ignition
key to ON without starting the engine. The
following lights will come on:
, or , ,
The following lights come on briefly and then
go off:
, or , , ,
If any light fails to come on, it may indicate a
burned-out bulb or an open circuit in the elec-
trical system. Have the system repaired
promptly. WARNING LIGHTS
or Anti-lock brake
warning lightIf the light comes on while the engine is
running, it may indicate the anti-lock brake
system is not functioning properly. Have the
system checked by your INFINITI retailer.
If an abnormality occurs in the system, the
anti-lock function will cease but the ordinary
brakes will continue to operate normally.
If the light comes on while you are driving,
contact your INFINITI retailer for repair. Automatic transmission check
warning light When the ignition switch is turned ON, the light
comes on for 2 seconds. If the light blinks for
approximately 8 seconds, it may indicate the
automatic transmission system is not function-
ing properly. Have your INFINITI retailer check
and repair the transmission.
or Brake warning light This light functions for both the parking brake
and the foot brake systems.WARNING/INDICATOR LIGHTS
AND AUDIBLE REMINDERS
Instruments and controls
2-9
Z 02.7.29/V35-D/V5.0
X
Page 64 of 256

Parking brake indicator:
When the ignition key is in the ON position, the
light comes on when the parking brake is
applied.
Low brake fluid warning light:
The light warns of a low brake fluid level. If the
light comes on while the engine is running with
the parking brake not applied, stop the vehicle
and perform the following:
1. Check the brake fluid level. Add brake fluid
as necessary. See ªBrake fluidº in the ª8.
Do-it-yourselfº section.
WARNINGO Your brake system may not be work-
ing properly if the warning light is on.
Driving could be dangerous. If you
judge it to be safe, drive carefully to
the nearest service station for re-
pairs. Otherwise, have your vehicle
towed because driving it could be
dangerous.
O Pressing the brake pedal with the
engine stopped and/or low brake fluid level may increase your stopping dis-
tance and braking will require greater
pedal effort as well as greater pedal
travel.
O If the brake fluid level is below the
MIN mark on the brake fluid reservoir,
do not drive until the brake system
has been checked at an INFINITI re-
tailer.
2. If the brake fluid level is correct, have the
warning system checked by an INFINITI
retailer.
ABS component warning light:
The electronic component of ABS does not
work properly, if the light comes on together
with the anti-lock brake warning light when the
brake fluid is correct and the parking brake is
released. Have the system checked by an
INFINITI retailer. Drive vehicle at speeds and
avoid abrupt braking.
Charge warning light If the light comes on while the engine is
running, it may indicate that the charging sys-
tem is not functioning properly. Turn the en-
gine off and check the alternator belt. If the belt is loose, broken, missing or if the light remains
on, see your INFINITI retailer immediately.
CAUTION Do not continue driving if the belt is
loose, broken or missing.
Door open warning light This light comes on when any of the doors are
not closed securely while the ignition key is
ON.
Engine oil pressure warning
light This light warns of low engine oil pressure. If
the light flickers or comes on during normal
driving, pull off the road in a safe area, stop the
engine immediately and call an INFINITI re-
tailer or other authorized repair shop.
The engine oil pressure warning light is not
designed to indicate a low oil level. Use the
dipstick to check the oil level. See ªEngine
oilº in the ª8. Do-it-yourselfº section.
2-10 Instruments and controls
Z 02.7.29/V35-D/V5.0
X
Page 65 of 256

CAUTIONRunning the engine with the engine oil
pressure warning light on could cause
serious damage to the engine almost
immediately. Turn off the engine as soon
as it is safe to do so.
Low washer fluid warning
lightThis light comes on when the washer tank fluid
is at a low level. Add washer fluid as neces-
sary. See ªWindow washer fluidº in the ª8.
Do-it-yourselfº section.
Seat belt warning light and
chimeThe light and chime remind you to fasten seat
belts. The light illuminates whenever the igni-
tion key is turned to ON, and will remain
illuminated until the driver's seat belt is fas-
tened.
See ªSeat beltsº in the ª1. Seats, restraints and
supplemental air bag systemsº section for pre-
cautions on seat belt usage. Supplemental air bag warning
light After turning the ignition key to the ON posi-
tion, the supplemental air bag warning light will
illuminate. The supplemental air bag warning
light will turn off after about 7 seconds if the
system is operational.
If any of the following conditions occur, the
supplemental front air bag, supplemental side
air bag and curtain side-impact air bag sys-
tems, and pre-tensioner seat belt need servic-
ing and your vehicle must be taken to your
nearest authorized INFINITI retailer.
O The supplemental air bag warning light
remains on after approximately 7 seconds.
O The supplemental air bag warning light
flashes intermittently.
O The supplemental air bag warning light
does not come on at all.
Unless checked and repaired, the Supplemen-
tal Restraint System and/or the pre-tensioner
seat belt may not function properly. For addi-
tional information, see ªSupplemental restraint
systemº in the ª1. Seats, restraints and supple-
mental air bag systemsº section. WARNING If the supplemental air bag warning light
is on, it could mean that the supplemen-
tal front air bag, supplemental side air
bag and curtain side-impact air bag sys-
tems and/or pre-tensioner seat belt sys-
tem will not operate in an accident.
INDICATOR LIGHTS
or Automatic
transmission
position indicator
light When the ignition key is turned to the ON
position, the indicator in the tachometer shows
the automatic transmission selector lever po-
sition. See ªDriving with automatic transmis-
sionº in the ª5. Starting and drivingº section.
Cruise main switch indicator
light The light comes on when the cruise control
main switch is pushed. The light goes out
when the main switch is pushed again. When
the cruise main switch indicator light comes Instruments and controls
2-11
Z 02.7.29/V35-D/V5.0
X
Page 103 of 256

Recommended battery: CR2025 or equiva-
lent
Make sure that the ! side faces the
bottom case.
3. Close the lid securely.
4. Push the keyfob button two or three times
to check its operation.
See your INFINITI retailer if you need any
assistance for replacement.
If the battery is removed for any reason
other than replacement, perform step 4
above.
O Be careful not to touch the circuit board
and the battery terminal.
O An improperly disposed battery can
harm the environment. Always confirm
local regulations for battery disposal.
O The keyfob is water-resistant; however,
if it gets wet, immediately wipe it com-
pletely dry.
O When changing batteries, do not let dust
or oil get on the keyfob.
FCC Notice:
Changes or modifications not expressly
approved by the manufacturer compliance could void the user's authority to operate
the equipment. This device complies with
Part 15 of the FCC Rules and RSS-210 of
Industry Canada. Operation is subject to
the following two conditions: (1) This de-
vice may not cause harmful interference,
and (2) this device must accept any inter-
ference received, including interference
that may cause undesired operation of the
device.
Pre-driving checks and adjustments
3-9
Z 02.7.29/V35-D/V5.0
X
Page 141 of 256

O Make sure the area around the vehicle is
clear.
O Maintenance items should be checked pe-
riodically, e.g., each time you check engine
oil.
O Check that all windows and lights are clean.
O Visually inspect tires for their appearance
and condition. Also, check tires for proper
inflation.
O Lock all doors.
O Position seat and adjust head restraints.
O Adjust inside and outside mirrors.
O Fasten seat belts and ask all passengers to
do likewise.
O Check the operation of warning lights when
key is turned to the ON (3) position. 1. Apply the parking brake.
2. Automatic transmission:
Move the selector lever to P (Park) or N
(Neutral). (P preferred.)
The starter is designed not to operate if the
selector lever is in one of the driving posi-
tions.
Manual transmission:
Move the shift lever to N (Neutral) position,
and depress the clutch pedal to the floor
while cranking the engine.
The starter is designed not to operate un-
less the clutch pedal is fully depressed.
3. Crank the engine with your foot off the
accelerator pedal by turning the ignition
key to START. Release the key when the
engine starts. If the engine starts, but fails
to run, repeat the above procedure.
O If the engine is very hard to start in ex-
tremely cold weather or when restarting,
depress the accelerator pedal a little (ap-
proximately 1/5 to the floor) and hold it then
crank the engine. Release the key and the
accelerator pedal when the engine starts.
O If the engine is very hard to start because it
is flooded, depress the accelerator pedal all the way to the floor and hold it. Crank the
engine for 5 to 6 seconds. After cranking
the engine, release the accelerator pedal.
Crank the engine with your foot off the
accelerator pedal by turning the ignition
key to START. Release the key when the
engine starts. If the engine starts, but fails
to run, repeat the above procedure.
CAUTION Do not operate the starter for more than
15 seconds at a time. If the engine does
not start, turn the key off and wait 10
seconds before cranking again, other-
wise the starter could be damaged.
4. Warm-up
Allow the engine to idle for at least 30
seconds after starting. Drive at moderate
speed for a short distance first, especially in
cold weather.BEFORE STARTING THE ENGINE STARTING THE ENGINE
Starting and driving
5-7
Z 02.7.29/V35-D/V5.0
X
Page 164 of 256

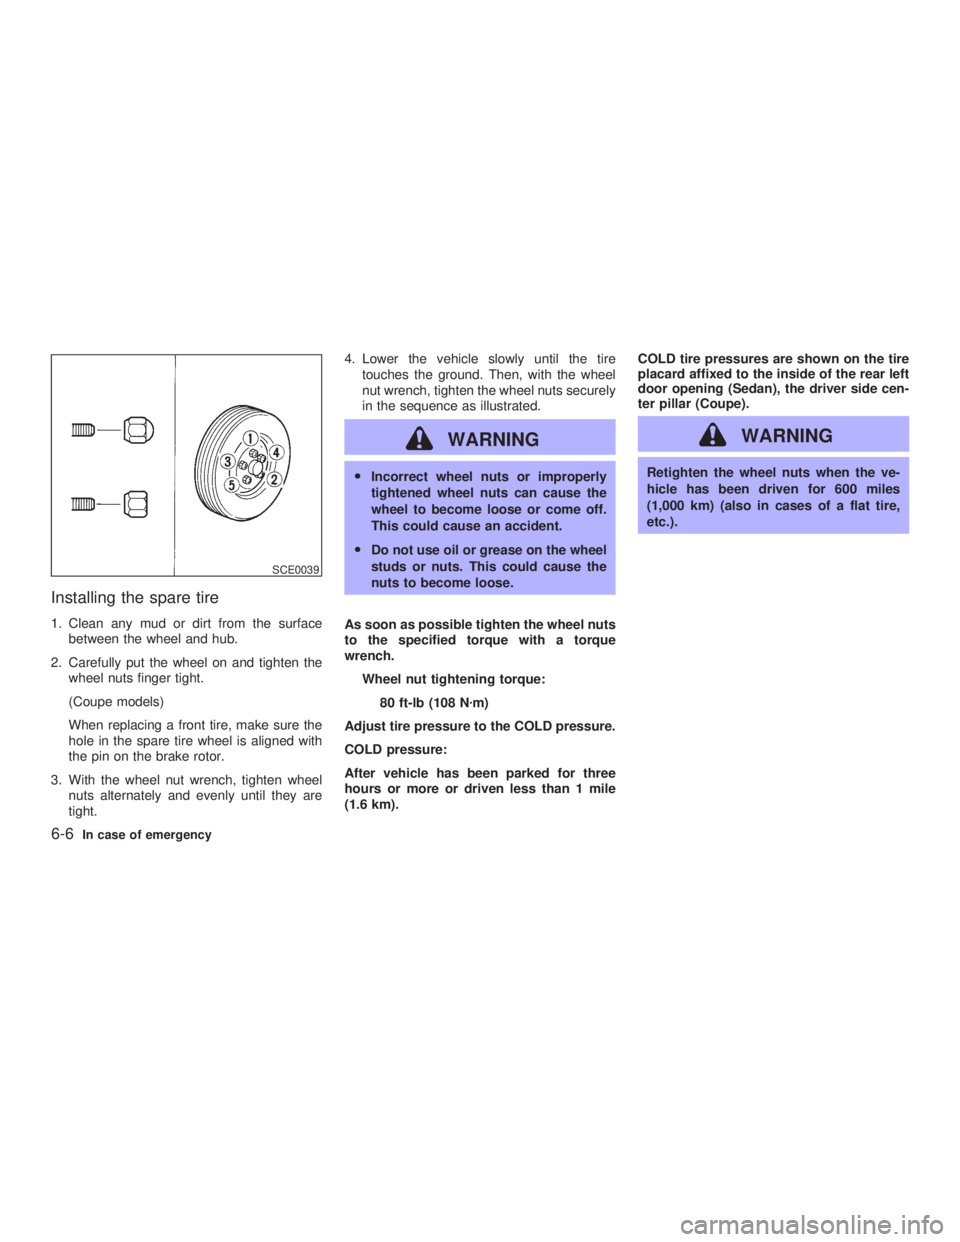
Installing the spare tire 1. Clean any mud or dirt from the surface
between the wheel and hub.
2. Carefully put the wheel on and tighten the
wheel nuts finger tight.
(Coupe models)
When replacing a front tire, make sure the
hole in the spare tire wheel is aligned with
the pin on the brake rotor.
3. With the wheel nut wrench, tighten wheel
nuts alternately and evenly until they are
tight. 4. Lower the vehicle slowly until the tire
touches the ground. Then, with the wheel
nut wrench, tighten the wheel nuts securely
in the sequence as illustrated.
WARNING O Incorrect wheel nuts or improperly
tightened wheel nuts can cause the
wheel to become loose or come off.
This could cause an accident.
O Do not use oil or grease on the wheel
studs or nuts. This could cause the
nuts to become loose.
As soon as possible tighten the wheel nuts
to the specified torque with a torque
wrench.
Wheel nut tightening torque:
80 ft-lb (108 N z m)
Adjust tire pressure to the COLD pressure.
COLD pressure:
After vehicle has been parked for three
hours or more or driven less than 1 mile
(1.6 km). COLD tire pressures are shown on the tire
placard affixed to the inside of the rear left
door opening (Sedan), the driver side cen-
ter pillar (Coupe).
WARNING Retighten the wheel nuts when the ve-
hicle has been driven for 600 miles
(1,000 km) (also in cases of a flat tire,
etc.).SCE0039
6-6 In case of emergency
Z 02.11.6/V35-D/V5.0
X
Page 175 of 256

REMOVING SPOTS Remove tar and oil spots, industrial dust, in-
sects, and tree sap as quickly as possible from
the surface of the paint to avoid lasting dam-
age or staining. Special cleaning products are
available at your INFINITI retailer or any auto-
motive accessory store.
UNDERBODY In areas where road salt is used in winter, the
underbody must be cleaned regularly. This will
prevent dirt and salt from building up and
causing underbody and suspension corrosion.
Before the winter period and again in the
spring, the underseal must be checked and, if
necessary, re-treated.
GLASS Use glass cleaner to remove smoke and dust
film from the glass surfaces. It is normal for
glass to become coated with a film after the
vehicle is parked in the hot sun. Glass cleaner
and a soft cloth will easily remove this film.
CAUTIONWhen cleaning the inside of the window,
do not use sharp-edged tools, abrasive cleaners or chlorine based disinfectant
cleaners. They could damage the elec-
trical conductors, radio antenna ele-
ments or rear window defogger ele-
ments.
ALUMINUM ALLOY WHEELS Wash regularly, especially during winter
months in areas where road salt is used. Salt
could discolor the wheel if not removed.
CHROME PARTS Clean all chrome parts regularly with a non-
abrasive chrome polish to maintain the finish. Occasionally remove loose dust from the inte-
rior trim, plastic parts and seats using a
vacuum cleaner or soft brush. Wipe the vinyl
and leather surfaces with a clean, soft cloth
dampened in mild soap solution, then wipe
clean with a dry soft cloth. Before using any
fabric protector, read the manufacturer's rec-
ommendations. Some fabric protectors con-
tain chemicals that may stain or bleach the
seat material.
Use a cloth dampened only with water, to
clean the meter and gauge lens.
CAUTION O Never use gasoline, thinner, or any
similar material.
O The leather seats should be regularly
coated with a leather wax like saddle
soap. Never use car wax.
O Never use fabric protectors unless
recommended by the manufacturer.
O Do not use glass or plastic cleaner on
meter or gauge lens covers. It may
damage the lens cover.CLEANING INTERIOR
Appearance and care
7-3
Z 02.7.29/V35-D/V5.0
X
Page 179 of 256

8 Do-it-yourself Maintenance precautions .......................................... 8-2
Engine compartment check locations ....................... 8-4
Engine cooling system .............................................. 8-5
Checking engine coolant level ............................. 8-5
Changing engine coolant ..................................... 8-6
Engine oil .................................................................. 8-7
Checking engine oil level ..................................... 8-7
Changing engine oil and filter .............................. 8-8
Automatic transmission fluid ................................... 8-10
Power steering fluid ................................................ 8-10
Brake and clutch fluid ............................................. 8-11
Brake fluid .......................................................... 8-11
Clutch fluid.......................................................... 8-11
Window washer fluid ............................................... 8-12
Battery ..................................................................... 8-13
Jump starting ...................................................... 8-14
Drive belts ............................................................... 8-14
Spark plugs ............................................................. 8-15
Replacing spark plugs ........................................ 8-15
Air cleaner ............................................................... 8-16
Windshield wiper blades ......................................... 8-16
Cleaning ............................................................. 8-16
Replacing............................................................ 8-17 Parking brake and brake pedal ............................... 8-18
Checking parking brake ..................................... 8-18
Checking brake pedal ........................................ 8-18
Brake booster ..................................................... 8-19
Fuses....................................................................... 8-20
Engine compartment .......................................... 8-20
Passenger compartment .................................... 8-21
Keyfob battery replacement .................................... 8-21
Lights ....................................................................... 8-23
Headlights........................................................... 8-25
Exterior and interior lights .................................. 8-26
Wheels and tires ..................................................... 8-30
Tire pressure ...................................................... 8-30
Types of tires...................................................... 8-30
Tire chains .......................................................... 8-31
Changing wheels and tires ................................. 8-32
Z 02.7.29/V35-D/V5.0
X