2003 Hyundai Sonata lock
[x] Cancel search: lockPage 32 of 205
1- 20 FEATURES OF YOUR HYUNDAI
!
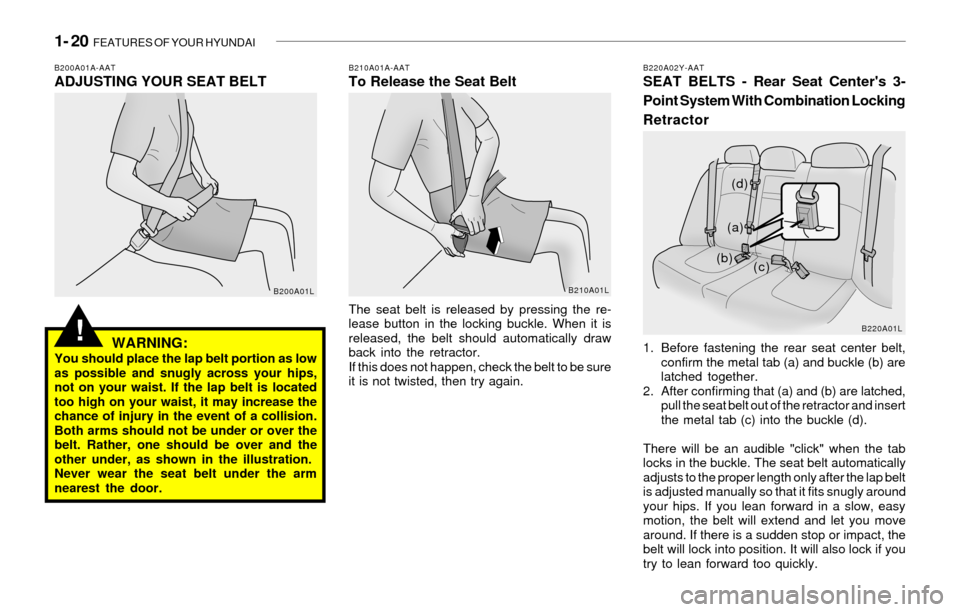
The seat belt is released by pressing the re-
lease button in the locking buckle. When it is
released, the belt should automatically draw
back into the retractor.
If this does not happen, check the belt to be sure
it is not twisted, then try again.
B220A02Y-AATSEAT BELTS - Rear Seat Center's 3-
Point System With Combination Locking
Retractor
1. Before fastening the rear seat center belt,
confirm the metal tab (a) and buckle (b) are
latched together.
2. After confirming that (a) and (b) are latched,
pull the seat belt out of the retractor and insert
the metal tab (c) into the buckle (d).
There will be an audible "click" when the tab
locks in the buckle. The seat belt automatically
adjusts to the proper length only after the lap belt
is adjusted manually so that it fits snugly around
your hips. If you lean forward in a slow, easy
motion, the belt will extend and let you move
around. If there is a sudden stop or impact, the
belt will lock into position. It will also lock if you
try to lean forward too quickly.
B200A01A-AATADJUSTING YOUR SEAT BELT
WARNING:
You should place the lap belt portion as low
as possible and snugly across your hips,
not on your waist. If the lap belt is located
too high on your waist, it may increase the
chance of injury in the event of a collision.
Both arms should not be under or over the
belt. Rather, one should be over and the
other under, as shown in the illustration.
Never wear the seat belt under the arm
nearest the door.
B210A01A-AATTo Release the Seat Belt
B200A01LB210A01L
B220A01L
(a)
(b)
(c) (d)
Page 33 of 205
FEATURES OF YOUR HYUNDAI 1- 21
!
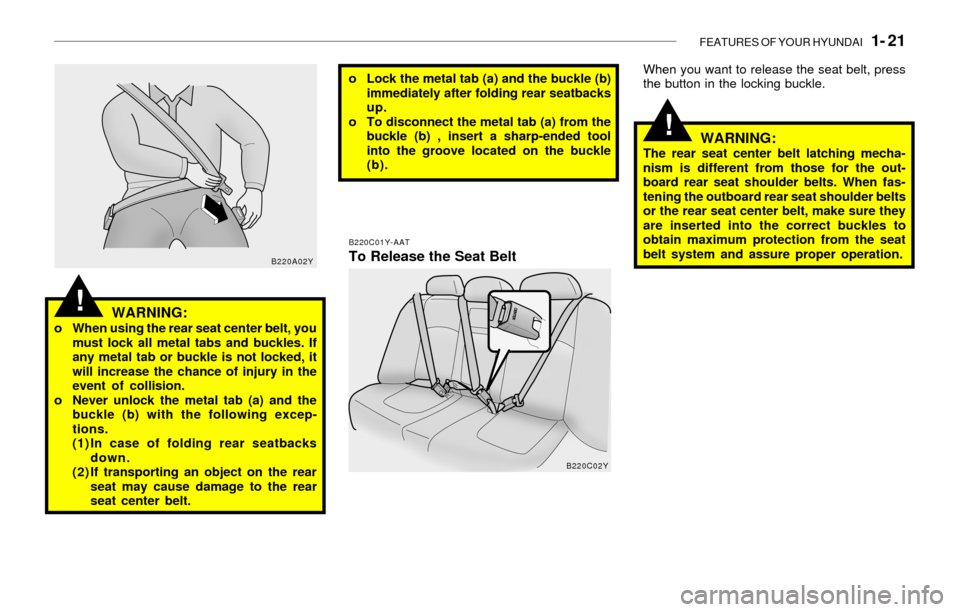
!WARNING:o When using the rear seat center belt, you
must lock all metal tabs and buckles. If
any metal tab or buckle is not locked, it
will increase the chance of injury in the
event of collision.
o Never unlock the metal tab (a) and the
buckle (b) with the following excep-
tions.
(1) In case of folding rear seatbacks
down.
(2) If transporting an object on the rear
seat may cause damage to the rear
seat center belt.o Lock the metal tab (a) and the buckle (b)
immediately after folding rear seatbacks
up.
o To disconnect the metal tab (a) from the
buckle (b) , insert a sharp-ended tool
into the groove located on the buckle
(b).
B220C01Y-AAT
To Release the Seat Belt
When you want to release the seat belt, press
the button in the locking buckle.
WARNING:The rear seat center belt latching mecha-
nism is different from those for the out-
board rear seat shoulder belts. When fas-
tening the outboard rear seat shoulder belts
or the rear seat center belt, make sure they
are inserted into the correct buckles to
obtain maximum protection from the seat
belt system and assure proper operation.
B220A02Y
B220C02Y
Page 36 of 205
1- 24 FEATURES OF YOUR HYUNDAI
!
!
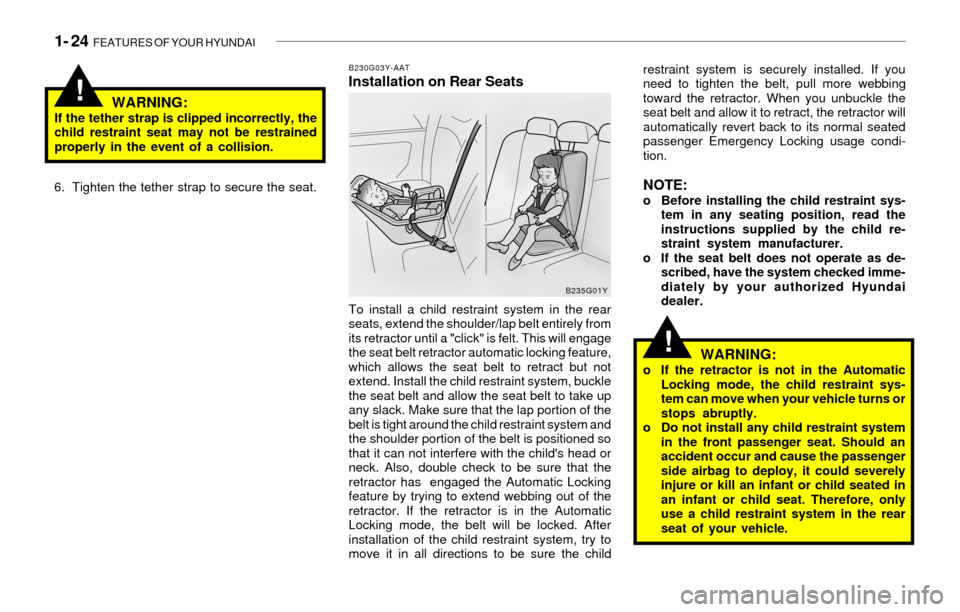
B230G03Y-AATInstallation on Rear Seats
WARNING:
If the tether strap is clipped incorrectly, the
child restraint seat may not be restrained
properly in the event of a collision.
6. Tighten the tether strap to secure the seat.
To install a child restraint system in the rear
seats, extend the shoulder/lap belt entirely from
its retractor until a "click" is felt. This will engage
the seat belt retractor automatic locking feature,
which allows the seat belt to retract but not
extend. Install the child restraint system, buckle
the seat belt and allow the seat belt to take up
any slack. Make sure that the lap portion of the
belt is tight around the child restraint system and
the shoulder portion of the belt is positioned so
that it can not interfere with the child's head or
neck. Also, double check to be sure that the
retractor has engaged the Automatic Locking
feature by trying to extend webbing out of the
retractor. If the retractor is in the Automatic
Locking mode, the belt will be locked. After
installation of the child restraint system, try to
move it in all directions to be sure the childrestraint system is securely installed. If you
need to tighten the belt, pull more webbing
toward the retractor. When you unbuckle the
seat belt and allow it to retract, the retractor will
automatically revert back to its normal seated
passenger Emergency Locking usage condi-
tion.
NOTE:o Before installing the child restraint sys-
tem in any seating position, read the
instructions supplied by the child re-
straint system manufacturer.
o If the seat belt does not operate as de-
scribed, have the system checked imme-
diately by your authorized Hyundai
dealer.
WARNING:o If the retractor is not in the Automatic
Locking mode, the child restraint sys-
tem can move when your vehicle turns or
stops abruptly.
o Do not install any child restraint system
in the front passenger seat. Should an
accident occur and cause the passenger
side airbag to deploy, it could severely
injure or kill an infant or child seated in
an infant or child seat. Therefore, only
use a child restraint system in the rear
seat of your vehicle.
B235G01Y
Page 38 of 205
1- 26 FEATURES OF YOUR HYUNDAI
!
!WARNING:If the child restraint seat is not anchored
properly, the risk of a child being seriously
injured or killed in a collision greatly in-
creases.
The pre-tensioner seat belt operates in the
same way as an Emergency Locking Retractor
(ELR) type of seat belt. When the vehicle stops
suddenly, or if the occupant tries to lean forward
too quickly, the seat belt retractor will lock into
position. However, in certain frontal collisions,
the pre-tensioner will activate and pull the seat
belt into tighter contact against the occupant's
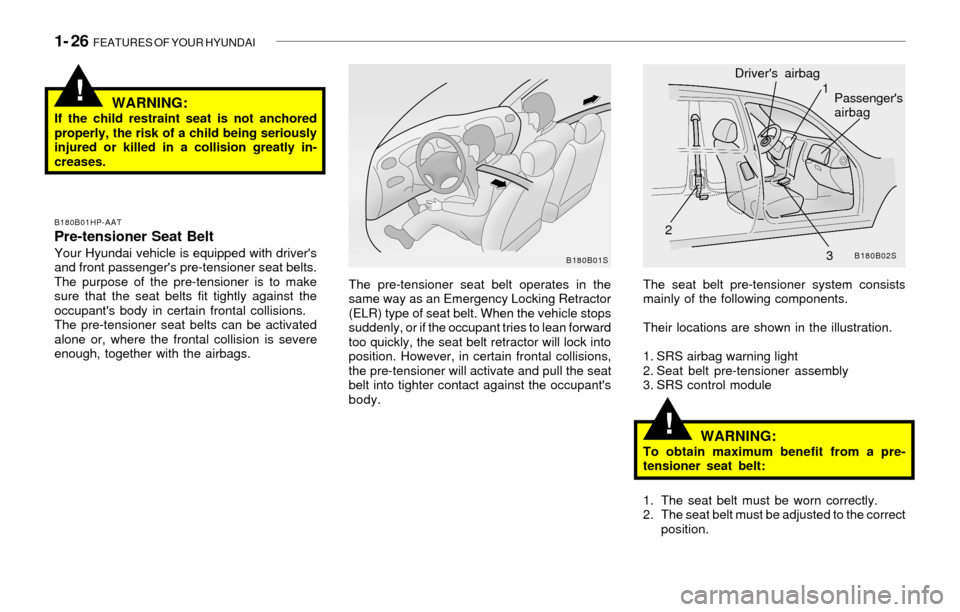
body.The seat belt pre-tensioner system consists
mainly of the following components.
Their locations are shown in the illustration.
1. SRS airbag warning light
2. Seat belt pre-tensioner assembly
3. SRS control module
B180B01HP-AATPre-tensioner Seat Belt
Your Hyundai vehicle is equipped with driver's
and front passenger's pre-tensioner seat belts.
The purpose of the pre-tensioner is to make
sure that the seat belts fit tightly against the
occupant's body in certain frontal collisions.
The pre-tensioner seat belts can be activated
alone or, where the frontal collision is severe
enough, together with the airbags.
WARNING:To obtain maximum benefit from a pre-
tensioner seat belt:
1. The seat belt must be worn correctly.
2. The seat belt must be adjusted to the correct
position.
B180B01SB180B02S
1
2
3 Driver's airbag
Passenger's
airbag
Page 42 of 205

1- 30 FEATURES OF YOUR HYUNDAI
!
The airbag modules are located both in the
center of the steering wheel and in the front
passenger's panel above the glove box.
When the SRSCM detects a considerable im-
pact to the front of the vehicle, it will automatically
deploy the airbags.
Upon deployment, tear seams molded directly
into the pad covers will separate under pres-
sure from the expansion of the airbags. Further
opening of the covers then allows full inflation of
the airbags.
A fully inflated airbag in combination with a
properly worn seat belt slows the driver's or the
passenger's forward motion, thus reducing the
risk of head or chest injury.
After complete inflation, the airbag immediately
starts deflating, enabling the driver to maintain
forward visibility.
CAUTION:When installing the container of liquid air
freshener inside a vehicle, do not place it
near the instrument cluster nor on the in-
strument panel pad surface. If there is any
leakage from the air freshener onto these
areas (Instrument cluster, instrument panel
pad or air ventilator), it may damage these
parts. If the liquid from the air freshener
does leak onto these areas, wash them with
water immediately.
WARNING:o When the SRS is activated, there may be
a loud noise and fine dust will be re-
leased throughout the vehicle. These
conditions are normal and are not haz-
ardous. However, the fine dust gener-
ated during airbag deployment may
cause skin irritation. Be sure to wash
your hands and face thoroughly with
lukewarm water and a mild soap after an
accident in which the airbags were de-
ployed.
o The SRS can function only when the
ignition key is in the "ON" position. If the
SRS SRI does not come on, or continu-
ously remains on, after flashing for about
6 seconds when the ignition key is
turned to the "ON" position, or after the
engine is started, or comes on while
driving, the SRS is not working properly.
If this occurs, have your vehicle immedi-
ately inspected by your Hyundai dealer.
o Before you replace a fuse or disconnect
a battery terminal, turn the ignition key
to the "LOCK" position or remove the
ignition key. Never remove or replace the
air bag related fuse(s) when the ignition
key is in the "ON" position. Failure to
heed this warning will cause the SRS SRI
to illuminate.
!
B240B04YB240B05L
Passenger's AirbagPassenger's Airbag
Page 43 of 205

FEATURES OF YOUR HYUNDAI 1- 31
!
!
B990A04Y-AATPASSENGER PRESENCE DETECTION
The passenger presence detection system
detects the presence of a passenger in the right
front seat. If no passenger is recognized on the
front passenger seat, the deployment of the
front passenger and/or side airbag and seat belt
pretensioner will be prevented.
This system is designed to prevent the replace-
ment of airbag components that deploy need-
lessly in an accident.
NOTE:Luggage or other cargo heavier than 33 lbs
(15 kg) should not be placed on the passen-
ger front seat. This can allow the deploy-
ment of the front passenger and/or side air
bag in the case of an accident.
WARNING:The Passenger Presence Detection system
is not intended to prevent airbag deploy-
ment while a child is in the front passen-
ger's seat. It is intended only as a means to
reduce unnecessary collision damage re-
pair expense by preventing airbag and seat
belt pretensioner deployment when the
right front passenger seat is unoccupied.
Deployment is still possible if only a few
pounds are placed upon the seat. There-
fore, children must not be transported inthe front seat. All children must be seated
in the rear seat and properly restrained with
the vehicle's restraint system or a child
restraint system appropriate for the child's
size and weight.
B990B03Y-AATSide Impact Airbag (If installed)
Your Hyundai is equipped with a side impact
airbag in each front seat. The purpose of the
airbag is to provide the vehicle's driver and/or
the front passenger with additional protection
than that offered by the seat belt alone. The side
impact airbags are designed to deploy only
during certain side-impact collisions, depend-
ing on the crash severity, angle, speed and point
of impact. The side impact air bags are not
designed to deploy in all side impact situations.
WARNING:o For best protection from the side impact
airbag system and to avoid being injured
by the deploying side impact airbag,
both front seat occupants should sit in
an upright position with the seat belt
properly fastened. The driver's hands
should be placed on the steering wheel
at the 9:00 and 3:00 o'clock positions.
The passenger's arms and hands should
be placed in their laps.
o Do not use any accessory seat covers.
o Use of seat covers could reduce or pre-
vent the effectiveness of the system.
o Do not install any accessories on the
side or near the side impact airbag.
o Do not use excessive force on the side of
the seat.
B990B02YHTB072
Side airbag
sensor
Page 46 of 205
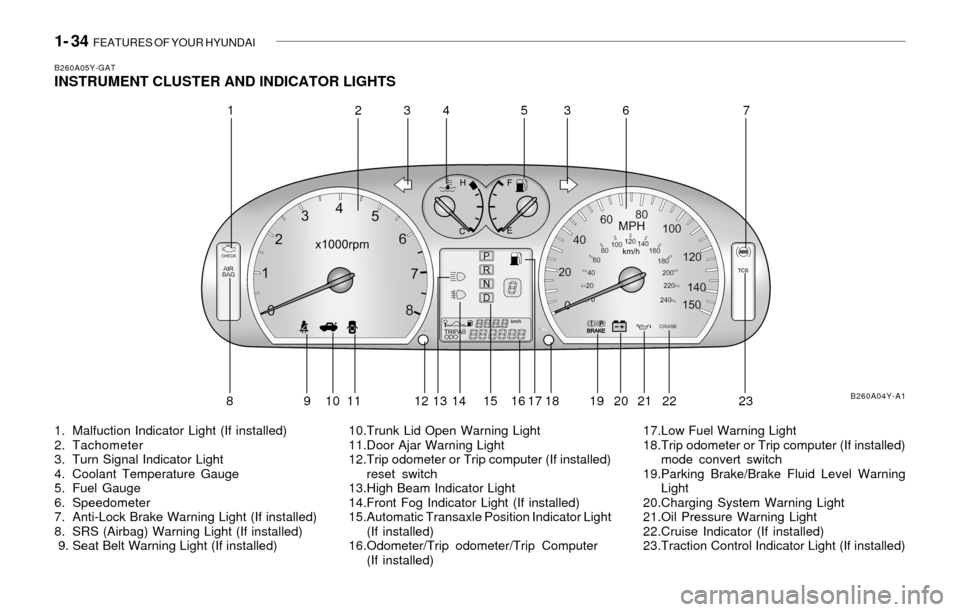
1- 34 FEATURES OF YOUR HYUNDAI
B260A05Y-GATINSTRUMENT CLUSTER AND INDICATOR LIGHTS
1. Malfuction Indicator Light (If installed)
2. Tachometer
3. Turn Signal Indicator Light
4. Coolant Temperature Gauge
5. Fuel Gauge
6. Speedometer
7. Anti-Lock Brake Warning Light (If installed)
8. SRS (Airbag) Warning Light (If installed)
9. Seat Belt Warning Light (If installed)10.Trunk Lid Open Warning Light
11.Door Ajar Warning Light
12.Trip odometer or Trip computer (If installed)
reset switch
13.High Beam Indicator Light
14.Front Fog Indicator Light (If installed)
15.Automatic Transaxle Position Indicator Light
(If installed)
16.Odometer/Trip odometer/Trip Computer
(If installed)17.Low Fuel Warning Light
18.Trip odometer or Trip computer (If installed)
mode convert switch
19.Parking Brake/Brake Fluid Level Warning
Light
20.Charging System Warning Light
21.Oil Pressure Warning Light
22.Cruise Indicator (If installed)
23.Traction Control Indicator Light (If installed)
B260A04Y-A1
12345637
8 9 10 11 12 13 14 15 16 17 18 19 20 21 22 23
Page 48 of 205

1- 36 FEATURES OF YOUR HYUNDAI
B260H02A-AATParking Brake/Brake Fluid Level
Warning Lightadding fluid, if no other trouble is found, the car
should be immediately and carefully driven to a
Hyundai dealer for inspection. If further trouble
is experienced, the vehicle should not be driven
at all but taken to a dealer by a professional
towing service or some other safe method.
Your Hyundai is equipped with dual-diagonal
braking systems. This means you still have
braking on two wheels even if one of the dual
systems should fail. With only one of the dual
systems working, more than normal pedal travel
and greater pedal pressure are required to stop
the car. Also, the car will not stop in as short a
distance with only half of the brake system
working. If the brakes fail while you are driving,
shift to a lower gear for additional engine braking
and stop the car as soon as it is safe to do so.
WARNING:If you suspect brake trouble, have your
brakes checked by a Hyundai dealer as
soon as possible. Driving your car with a
problem in either the brake electrical sys-
tem or brake hydraulic system is danger-
ous, and could result in a serious injury or
death.
Warning Light OperationThe parking brake/brake fluid level warning light
should come on when the parking brake is
applied and the ignition switch is turned to "ON"
or "START". After the engine is started, the light
should go out when the parking brake is re-
leased.
If the parking brake is not applied, the warning
light should come on when the ignition switch is
turned to "ON" or "START", then go out when
the engine starts. If the light comes on at any
other time, you should slow the vehicle and bring
it to a complete stop in a safe location off the
roadway.
The brake warning light indicates that the brake
fluid level in the brake master cylinder is low and
hydraulic brake fluid conforming to DOT 3 or
DOT 4 specifications should be added. After
B260J01A-AATCharging System Warning Light
The charging system warning light should come
on when the ignition is turned on, then go out
when the engine is running. If the light stays on
while the engine is running, there is a malfunc-
tion in the electrical charging system. If the light
comes on while you are driving, stop, turn off the
engine and check under the hood. First, make
certain the generator drive belt is in place. If it is,
check the tension of the belt. Do this as shown
on page 6-18 by pushing down on the center of
the belt. And then have the system checked by
your Hyundai dealer.
B260K01S-AATTrunk Lid Open Warning Light
This light remains on unless the trunk lid is
completely closed.
B260L01Y-AAT
Door Ajar Warning Light
and Chime
The door ajar warning light warns you that a door
is not completely closed and the chime warns
you that driver's side front door is not completely
closed.
NOTE:To remind you not to lock the key inside the
car, the warning light comes on whenever
the key is in the "LOCK" position and a door
is open. The warning chime only sounds
whenever the key is in the "LOCK" position
and driver's side front door is open. The
chime sounds and the light remains on
until the key is removed from the ignition.