2003 Hyundai Sonata radio
[x] Cancel search: radioPage 7 of 205
A070A01A-AATCAUTION: MODIFICATIONS TO YOUR HYUNDAI
Your Hyundai should not be modified in any way. Such modifications may adversely
affect the performance, safety or durability of your Hyundai and may, in addition, violate conditions of the limited
warranties covering the vehicle. Certain modifications may also be in violation of regulations established by the
U.S. Department of Transportation and other federal or state agencies.
A080A01S-AATTWO-WAY RADIO OR CELLULAR TELEPHONE INSTALLATION
Your vehicle is equipped with electronic fuel injection and other electronic components. It is possible for an
improperly installed/adjusted two-way radio or cellular telephone to adversely affect electronic systems. For this
reason, we recommend that you carefully follow the radio manufacturer's instructions or consult your Hyundai
dealer for precautionary measures or special instructions if you choose to install one of these devices.
Page 66 of 205
1- 54 FEATURES OF YOUR HYUNDAI
Flashing
Programming
Your vehicle may require that the ignition switch
to be turned to the "ACC" position to program
and/or operate HomeLink system. It is also
recommended that a new battery be placed in
the handheld transmitter of the device being
programmed to HomeLink for quicker program-
ming and accurate transmission of the radio-
frequency.
Follow these steps to program your HomeLink
mirror:
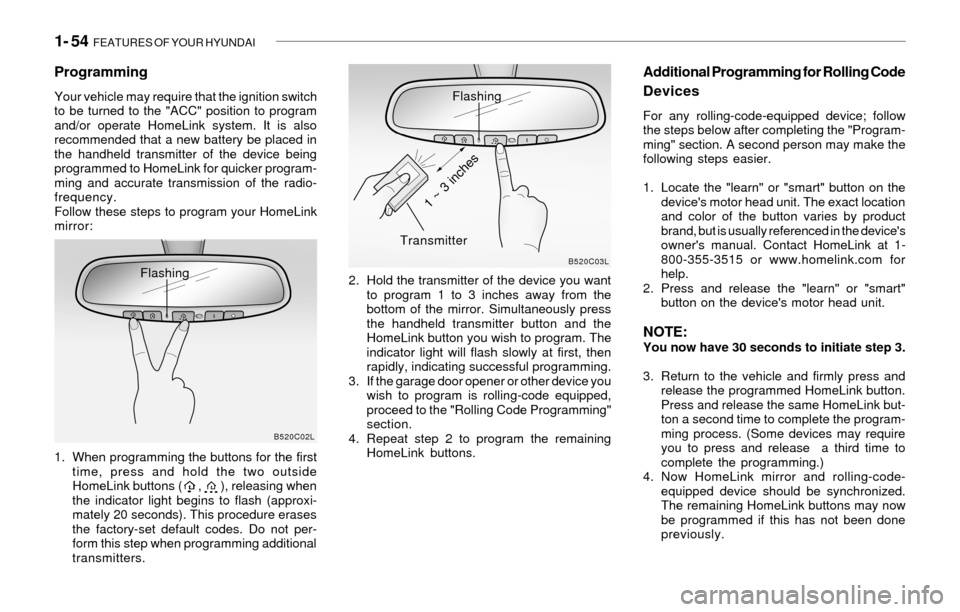
1. When programming the buttons for the first
time, press and hold the two outside
HomeLink buttons ( , ), releasing when
the indicator light begins to flash (approxi-
mately 20 seconds). This procedure erases
the factory-set default codes. Do not per-
form this step when programming additional
transmitters.2. Hold the transmitter of the device you want
to program 1 to 3 inches away from the
bottom of the mirror. Simultaneously press
the handheld transmitter button and the
HomeLink button you wish to program. The
indicator light will flash slowly at first, then
rapidly, indicating successful programming.
3. If the garage door opener or other device you
wish to program is rolling-code equipped,
proceed to the "Rolling Code Programming"
section.
4. Repeat step 2 to program the remaining
HomeLink buttons.
Additional Programming for Rolling Code
Devices
For any rolling-code-equipped device; follow
the steps below after completing the "Program-
ming" section. A second person may make the
following steps easier.
1. Locate the "learn" or "smart" button on the
device's motor head unit. The exact location
and color of the button varies by product
brand, but is usually referenced in the device's
owner's manual. Contact HomeLink at 1-
800-355-3515 or www.homelink.com for
help.
2. Press and release the "learn" or "smart"
button on the device's motor head unit.
NOTE:You now have 30 seconds to initiate step 3.
3. Return to the vehicle and firmly press and
release the programmed HomeLink button.
Press and release the same HomeLink but-
ton a second time to complete the program-
ming process. (Some devices may require
you to press and release a third time to
complete the programming.)
4. Now HomeLink mirror and rolling-code-
equipped device should be synchronized.
The remaining HomeLink buttons may now
be programmed if this has not been done
previously.
B520C02LB520C03L
Flashing
Transmitter
1 ~ 3 inches
Page 90 of 205
1- 78 FEATURES OF YOUR HYUNDAI
B750A02A-AATSTEREO SOUND SYSTEM
How Car Audio Works
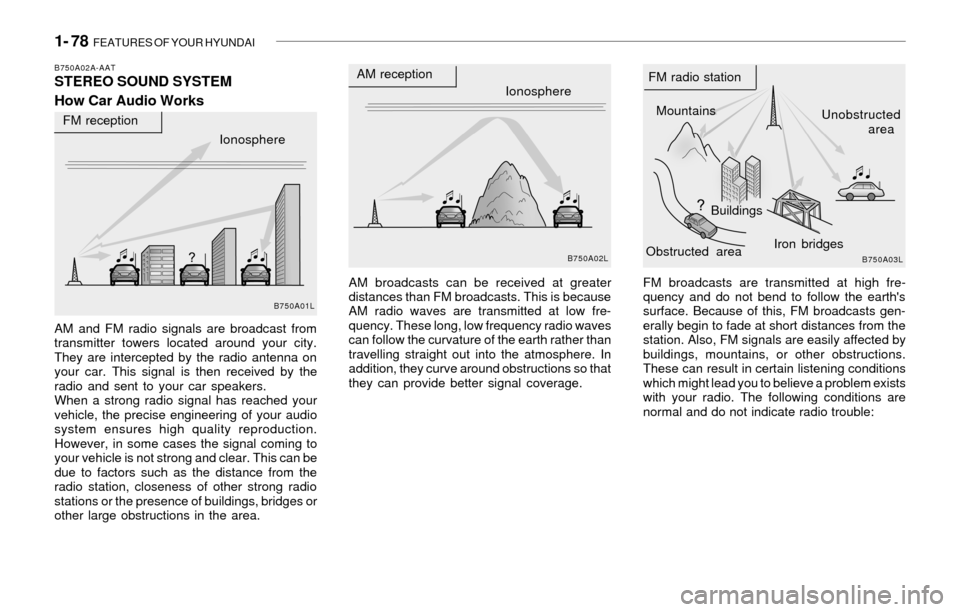
AM and FM radio signals are broadcast from
transmitter towers located around your city.
They are intercepted by the radio antenna on
your car. This signal is then received by the
radio and sent to your car speakers.
When a strong radio signal has reached your
vehicle, the precise engineering of your audio
system ensures high quality reproduction.
However, in some cases the signal coming to
your vehicle is not strong and clear. This can be
due to factors such as the distance from the
radio station, closeness of other strong radio
stations or the presence of buildings, bridges or
other large obstructions in the area.AM broadcasts can be received at greater
distances than FM broadcasts. This is because
AM radio waves are transmitted at low fre-
quency. These long, low frequency radio waves
can follow the curvature of the earth rather than
travelling straight out into the atmosphere. In
addition, they curve around obstructions so that
they can provide better signal coverage.FM broadcasts are transmitted at high fre-
quency and do not bend to follow the earth's
surface. Because of this, FM broadcasts gen-
erally begin to fade at short distances from the
station. Also, FM signals are easily affected by
buildings, mountains, or other obstructions.
These can result in certain listening conditions
which might lead you to believe a problem exists
with your radio. The following conditions are
normal and do not indicate radio trouble:
Ionosphere
B750A02L
AM reception
Mountains
BuildingsUnobstructed
area FM radio station
B750A03L
Ionosphere FM reception
B750A01L
Obstructed areaIron bridges
Page 91 of 205
FEATURES OF YOUR HYUNDAI 1- 79
!
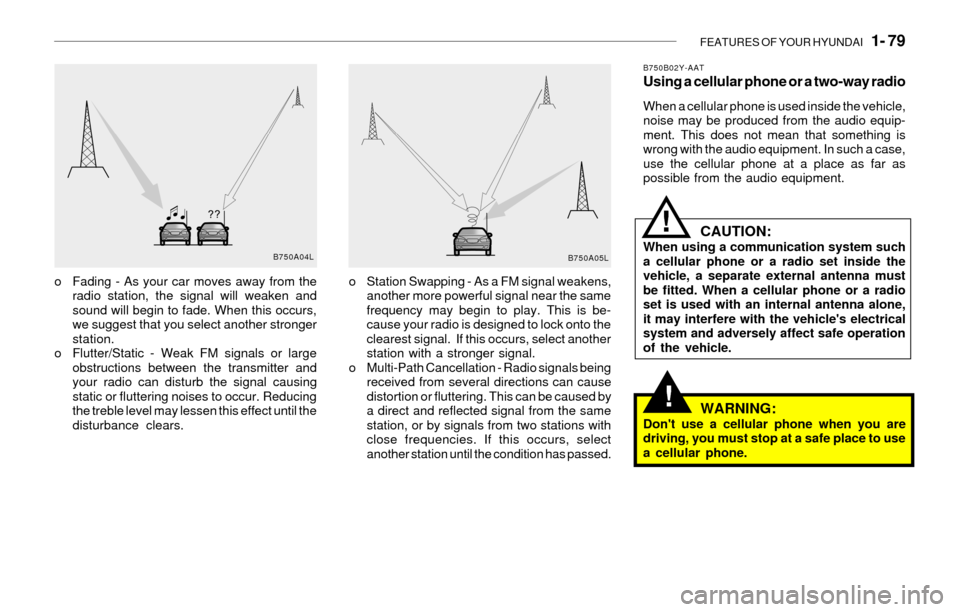
o Fading - As your car moves away from the
radio station, the signal will weaken and
sound will begin to fade. When this occurs,
we suggest that you select another stronger
station.
o Flutter/Static - Weak FM signals or large
obstructions between the transmitter and
your radio can disturb the signal causing
static or fluttering noises to occur. Reducing
the treble level may lessen this effect until the
disturbance clears.o Station Swapping - As a FM signal weakens,
another more powerful signal near the same
frequency may begin to play. This is be-
cause your radio is designed to lock onto the
clearest signal. If this occurs, select another
station with a stronger signal.
o Multi-Path Cancellation - Radio signals being
received from several directions can cause
distortion or fluttering. This can be caused by
a direct and reflected signal from the same
station, or by signals from two stations with
close frequencies. If this occurs, select
another station until the condition has passed.
B750B02Y-AATUsing a cellular phone or a two-way radio
When a cellular phone is used inside the vehicle,
noise may be produced from the audio equip-
ment. This does not mean that something is
wrong with the audio equipment. In such a case,
use the cellular phone at a place as far as
possible from the audio equipment.
CAUTION:When using a communication system such
a cellular phone or a radio set inside the
vehicle, a separate external antenna must
be fitted. When a cellular phone or a radio
set is used with an internal antenna alone,
it may interfere with the vehicle's electrical
system and adversely affect safe operation
of the vehicle.
WARNING:Don't use a cellular phone when you are
driving, you must stop at a safe place to use
a cellular phone.
!
B750A04L
B750A05L
Page 92 of 205
1- 80 FEATURES OF YOUR HYUNDAI
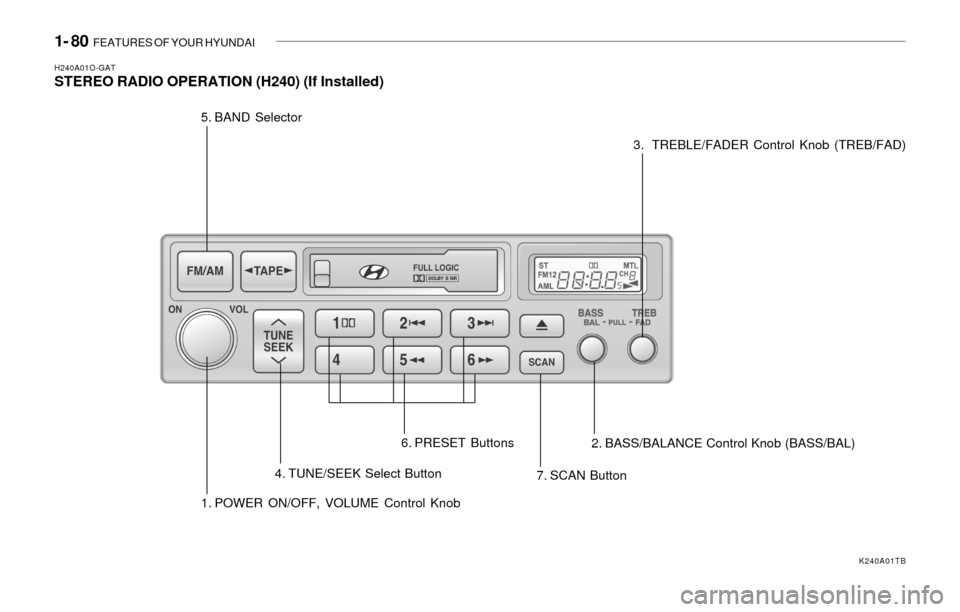
H240A01O-GATSTEREO RADIO OPERATION (H240) (If Installed)
1. POWER ON/OFF, VOLUME Control Knob 5. BAND Selector
4. TUNE/SEEK Select Button
7. SCAN Button 6. PRESET Buttons
2. BASS/BALANCE Control Knob (BASS/BAL)3. TREBLE/FADER Control Knob (TREB/FAD)
K240A01TB
Page 93 of 205

FEATURES OF YOUR HYUNDAI 1- 81
H240B03O-GAT1. POWER ON-OFF Control Knob
The radio unit may be operated when the ignition
key is in the "ACC" or "ON" position. Press the
knob to switch the power on. The LCD shows
the radio frequency in the radio mode or the tape
direction indicator in the tape mode. To switch
the power off, press the knob again.
VOLUME Control
Rotate the knob clockwise to increase the
volume and turn the knob counterclockwise to
reduce the volume.
2. BASS Control Knob
Press to pop the knob out and turn to the left or
right for the desired bass tone.
BAL (Balance Control) Knob
Pull the bass control knob further out. Turn the
control knob clockwise to emphasize right
speaker sound. (Left speaker sound will be
attenuated)
When the control knob is turned counterclock-
wise, left speaker sound will be emphasized.
(Right speaker sound will be attenuated)
3. TREB (Treble Control) Knob
Press to pop the knob out and turn to the left or
right for the desired treble tone.
FAD (Fader Control) Knob
Pull the treble control knob further out.
Turn the control knob counterclockwise to
emphasize front speaker sound. (Rear speaker
sound will be attenuated)
When the control knob is turned clockwise, rear
speaker sound will be emphasized.
(Front speaker sound will be attenuated)
4. TUNE (Manual) Select Button
Press the side or side to increase or to decrease
the frequency. Press either button and hold
down to continuously scroll. Release button
once the desired station is reached.
SEEK Operation
(Automatic Channel Selection)
Press the TUNE select button 1 sec or
more.Releasing will automatically tune to the
next available station with a beep sound.
When the ( ) side is pressed longer than 1
second, releasing will automatically tune to the
next higher frequency and when the ( ) side
is pressed longer than 1 second, releasing will
automatically tune to the next lower frequency.
5. BAND Selector
Pressing the button changes the AM, FM1
and FM2 bands. The mode selected is dis-
played on LCD.
6. PRESET STATION SELECT Button
Six (6) stations for AM, FM and FM2 respec-
tively can be preset in the electronic memory
circuit on this unit.
HOW TO PRESET STATIONS
Six AM and twelve FM stations may be pro-
grammed into the memory of the radio. Then, by
simply pressing the band select button and/or
one of the six station select buttons, you may
recall any of these stations instantly. To pro-
gram the stations, follow these steps:
o Press band selector to set the band for AM,
FM, or FM2.
o Select the desired station to be stored by
seek or manual tuning.
o Determine the preset station select button
you wish to use to access that station.
FM/AM
Page 97 of 205
FEATURES OF YOUR HYUNDAI 1- 85
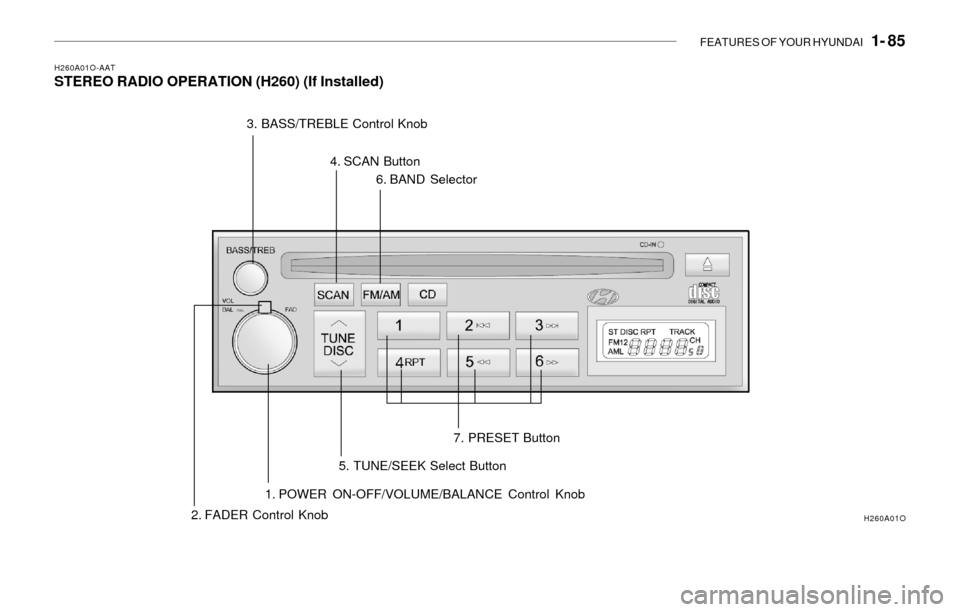
H260A01O-AATSTEREO RADIO OPERATION (H260) (If Installed)
1. POWER ON-OFF/VOLUME/BALANCE Control Knob
2. FADER Control Knob3. BASS/TREBLE Control Knob
4. SCAN Button
6. BAND Selector
5. TUNE/SEEK Select Button7. PRESET Button
H260A01O
Page 98 of 205

1- 86 FEATURES OF YOUR HYUNDAI
H260B03E-AAT1. POWER ON-OFF Control Knob
The radio unit may be operated when the ignition
key is in the "ACC" or "ON" position. Press the
knob to switch the power on. The LCD shows
the radio frequency in the radio mode or the CD
track indicator in either the CD mode or CD
AUTO CHANGER mode. To switch the power
off, press the knob again.
VOLUME Control
Rotate the knob clockwise to increase the
volume and turn the knob counterclockwise to
reduce the volume.
BALANCE Control
Pull and turn the control knob clockwise to
emphasize right speaker sound (Left speaker
sound will be attenuated). When the control
knob is turned counterclockwise, left speaker
sound will be emphasized. (Right speaker sound
will be attenuated)
2. FAD (Fader Control) Knob
Turn the control knob counterclockwise to em-
phasize front speaker sound. (Rear speaker
sound will be attenuated) When the control knob
is turned clockwise, rear speaker sound will be
emphasized. (Front speaker sound will be at-
tenuated)
3. BASS Control Knob
Press to pop the knob out and turn to the left or
right for the desired bass tone.
TREB (Treble Control) Knob
Pull the bass control knob further out. Turn to the
left or right for the desired treble tone.
4. SCAN Button
When the scan button is pressed, the frequency
will increase and the receivable stations will be
tuned in one after another, receiving each sta-
tion for 5 seconds. To stop scanning, press the
scan button again.
5. TUNE (Manual) Select Button
Press the ( ) side or ( ) side to increase or to
decrease the frequency. Press either button
and hold down to continuously scroll. Release
button once the desired station is reached.
SEEK Operation
(Automatic Channel Selection)
Press the TUNE select button for 1 sec or more.
Releasing it will automatically tune to the next
available station with a beep sound.
When the ( ) side is pressed longer than 1
second, releasing will automatically tune to the
next higher frequency and when the ( ) side is
pressed longer than 1 second, releasing will
automatically tune to the next lower frequency.
6. BAND Selector
Pressing the button changes the AM, FM1
and FM2 bands. The mode selected is dis-
played on LCD.
7. PRESET STATION SELECT Button
Six (6) stations for AM, FM or FM2 respectively
can be preset in the electronic memory circuit
on this unit.
HOW TO PRESET STATIONS
Six AM and twelve FM stations may be pro-
grammed into the memory of the radio. Then, by
simply pressing the band select button and/or
one of the six station select buttons, you may
recall any of these stations instantly. To pro-
gram the stations, follow these steps:
FM/AM