2003 Hyundai Sonata radio
[x] Cancel search: radioPage 101 of 205

FEATURES OF YOUR HYUNDAI 1- 89
B260D01O-AAT1. Playing CD
o Insert the CD with the label facing upward.
o Insert the CD to start CD playback, during
radio operation.
o When a disc is in the CD deck, if you press
the play button, the CD player will begin
playing even if the radio is being used.
o The CD player can be used when the ignition
switch is in either the "ON" or "ACC" position.
2. FF/REW ( / )
If you want to fast forward or reverse through
the compact disc track, push and hold in the FF
( ) or REW ( ) button.
When you release the button, the compact disc
player will resume playing.
3. TRACK UP/DOWN
o The desired track on the disc currently being
played can be selected using the track
number.
o Press once to skip forward to the beginn-
ing of the next track. Press once to skip
back to the beginning of the track.
4. SCAN Buttono Press the SCAN button to playback the first
10 seconds of each track.
o Press the SCAN button again within 10 sec.
for the desired track.
5. REPEAT Button
o To repeat the music you are listening to,
press the RPT button. To cancel , press
again.
o If you do not release RPT operation, when
the track ends, it will automatically be re-
played.
This process will be continued until you push
the button again.
6. EJECT Button
When the EJECT button is pressed with
the CD loaded, the CD is ejected.
NOTE:o To assure proper operation of the unit,
keep the vehicle interior temperature
within a normal range by using the
vehicle’s air conditioning or heating sys-
tem.
o When replacing the fuse, replace it with
a fuse having the correct capacity.
o The preset station frequencies are all
erased when the car battery is discon-
nected. Therefore, all data will have to be
set again if this should occur.
o Do not add any oil to the rotating parts.
Keep magnets, screwdrivers and other
metallic objects away from the tape
mechanism and head.
o This equipment is designed to be used
only in a 12 volt DC battery system with
negative ground.
o This unit is made of precision parts. Do
not attempt to disassemble or adjust
any parts.
o When driving your vehicle, be sure to
keep the volume of the unit set low
enough to allow you to hear sounds
coming from the outside.
o Do not expose this equipment (includ-
ing the speakers) to water or excessive
moisture.
Page 102 of 205

1- 90 FEATURES OF YOUR HYUNDAI
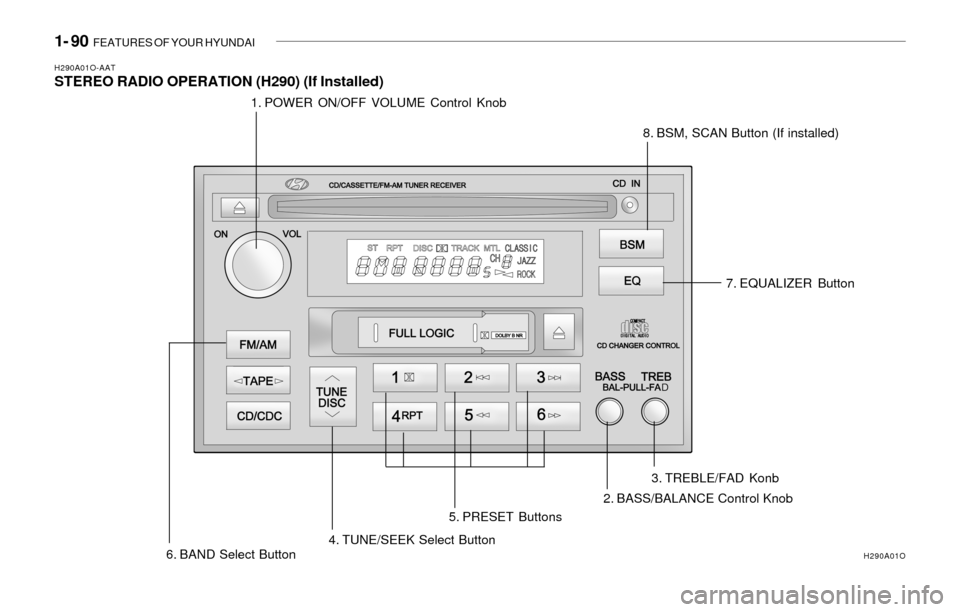
H290A01O-AATSTEREO RADIO OPERATION (H290) (If Installed)
1. POWER ON/OFF VOLUME Control Knob
8. BSM, SCAN Button (If installed)
5. PRESET Buttons
4. TUNE/SEEK Select Button
6. BAND Select Button7. EQUALIZER Button
3. TREBLE/FAD Konb
2. BASS/BALANCE Control Knob
H290A01O
Page 103 of 205

FEATURES OF YOUR HYUNDAI 1- 91
H290B03E-GAT1. POWER ON-OFF Control Knob
The radio unit may be operated when the ignition
key is in the "ACC" or "ON" position. Press the
button to switch the power on. The display
shows the radio frequency in the radio mode,
the tape direction indicator in the tape mode or
CD track in either the CD mode or CD AUTO
CHANGER mode. To switch the power off,
press the button again.
VOLUME Control
Rotate the knob clockwise to increase the
volume and turn the knob counterclockwise to
reduce the volume.
2. BASS/BALANCE Control Knob
BASS Control Knob
Press to pop the knob out. To increase the bass,
rotate the knob clockwise, while to decrease the
bass, rotate the knob counterclockwise.
BALANCE Control knob
Pull the Bass control knob out further. Rotate the
knob clockwise to emphasize right speaker
sound. (Left speaker sound will be attenuated)
When the control knob is turned counterclock-
wise, left speaker sound will be emphasized
(Right speaker sound will be attenuated).
3. TREBLE/FAD Knob
TREBLE Control Knob
Press to pop the knob out and turn to the left or
right for the desired treble tone.
FAD (Fader Control) Knob
Pull the Bass control knob out further. Turn the
control knob counterclockwise to emphasize
front speaker sound. (Rear speaker sound will
be attenuated) When the control knob is turned
clockwise, rear speaker sound will be empha-
sized. (Front speaker sound will be attenuated)
4. TUNE (Manual) Select Button
Press the ( ) side or ( ) side to increase or to
decrease the frequency. Press either button
and hold down to continuously scroll, Release
button once the desired station is reached.
SEEK Operation (Automatic Channel
Selection)
Press the TUNE select button for 0.5 sec or
more. Releasing it will automatically tune to the
next available station with a beep sound.
When the ( ) side is pressed longer than 0.5
second, releasing will automatically tune to the
next higher frequency and when the ( ) side is
pressed longer than 0.5 second, releasing will
automatically tune to the next lower frequency.
5. PRESET STATION Select Buttons
Six (6) stations for AM, FM and FM2 respec-
tively can be preset in the electronic memory
circuit.
HOW TO PRESET STATIONS
Six AM and twelve FM stations may be pro-
grammed into the memory of the radio. Then, by
simply pressing the band select button and/or
one of the six station select buttons, you may
recall any of these stations instantly. To pro-
gram the stations, follow these steps:
o Press band selector to set the band for AM,
FM or FM2.
o Select the desired station to be stored by
seek or manual tuning.
o Determine the preset station select button
you wish to use to access that station.
o Press the station select button for more than
two seconds. A select button indicator will
show in the display indicating which select
button you have depressed. The frequency
display will flash after it has been stored into
the memory with a beep sound. You should
then release the button, and proceed to
program the next desired station. A total of
18 stations can be programmed by selecting
one AM and two FM station per button.
o When completed, any preset station may be
recalled by selecting AM, FM or FM2 band
and the appropriate station button.
Page 108 of 205

1- 96 FEATURES OF YOUR HYUNDAI
H290F01O-GAT1. CD Select Button
o Insert the CD with the label facing upward.
o Insert the CD to start CD playback, during
radio operation or cassette tape playing.
o When a disc is in the CD deck, if you press
the play button the CD player will begin
playing even if the radio or cassette player
is being used.
o The CD player can be used when the ignition
switch is in either the "ON" or "ACC" position.
2. FF/REW ( / )
If you want to fast forward or reverse through
the compact disc track, push and hold in the FF
( ) or REW ( ) button.
When you release the button, the compact disc
player will resume playing.
3. TRACK UP/DOWN
o The desired track on the disc currently being
played can be selected using the track
number.
o Press button once to skip forward to the
beginning of the next track. Press button
once to skip back to the beginning of the
track.
4. REPEAT
o To repeat the music you are listening to,
press the RPT button. To cancel , press
again.
o If you do not release RPT operation when the
track ends, it will automatically be replayed.
This process will be continued until you push
the button again.
5. EQUALIZER Button
Press the EQ button to select the CLASSIC,
JAZZ, ROCK and DEFEAT MODE for the
desired tone quality. Each press of the button
changes the display as follows;
NOTE:o To assure proper operation of the unit,
keep the vehicle interior temperature
within a normal range by using the
vehicle's air conditioning or heating
system.
o When replacing the fuse, replace it with
a fuse having the correct capacity.
o The preset station frequencies are all
erased when the car battery is discon-
nected. Therefore, all data will have to be
set again if this should occur.
o Do not add any oil to the rotating parts.
Keep magnets, screwdrivers and other
metallic objects away from the tape
mechanism and head.
o This equipment is designed to be used
only in a 12 volt DC battery system with
negative ground.
o This unit is made of precision parts. Do
not attempt to disassemble or adjust
any parts.
o When driving your vehicle, be sure to
keep the volume of the unit set low
enough to allow you to hear sounds
coming from the outside.
o Do not expose this equipment (includ-
ing the speakers and tape) to water or
excessive moisture.
6. CD EJECT Button
When the button is pressed with the CD
loaded, the CD is ejected.
7. SCAN Button (If installed)
o Press the SCAN button to playback the first
10 seconds of each track.
o Press the SCAN button again within 10 sec.
for the desired track. CLASSIC ® JAZZ ® ROCK ® DEFEAT
Page 112 of 205

1- 100 FEATURES OF YOUR HYUNDAI
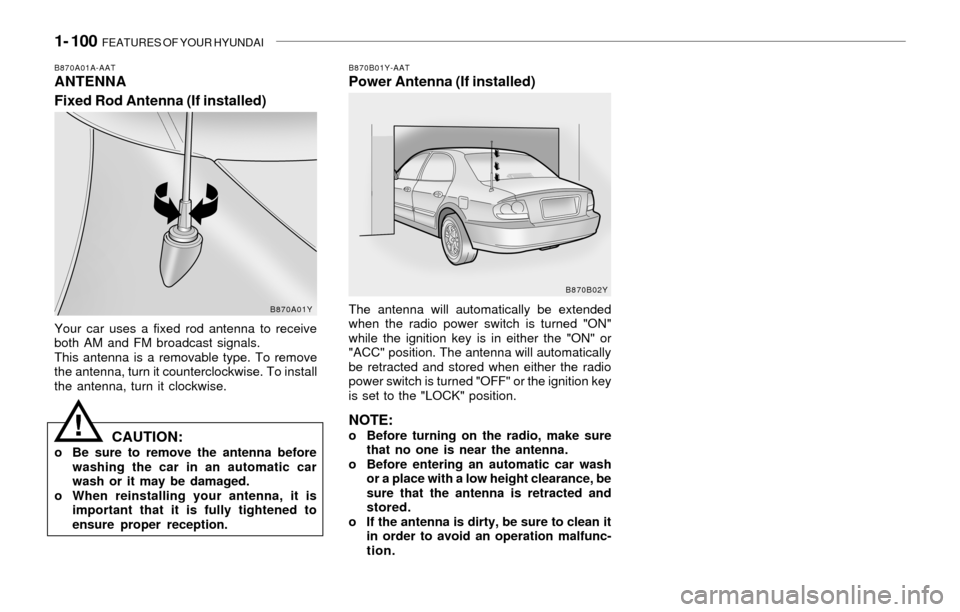
B870A01A-AATANTENNA
Fixed Rod Antenna (If installed)B870B01Y-AATPower Antenna (If installed)
Your car uses a fixed rod antenna to receive
both AM and FM broadcast signals.
This antenna is a removable type. To remove
the antenna, turn it counterclockwise. To install
the antenna, turn it clockwise.The antenna will automatically be extended
when the radio power switch is turned "ON"
while the ignition key is in either the "ON" or
"ACC" position. The antenna will automatically
be retracted and stored when either the radio
power switch is turned "OFF" or the ignition key
is set to the "LOCK" position.
NOTE:o Before turning on the radio, make sure
that no one is near the antenna.
o Before entering an automatic car wash
or a place with a low height clearance, be
sure that the antenna is retracted and
stored.
o If the antenna is dirty, be sure to clean it
in order to avoid an operation malfunc-
tion.CAUTION:o Be sure to remove the antenna before
washing the car in an automatic car
wash or it may be damaged.
o When reinstalling your antenna, it is
important that it is fully tightened to
ensure proper reception.
!
B870A01YB870B02Y
Page 116 of 205

2- 4 DRIVING YOUR HYUNDAI
!
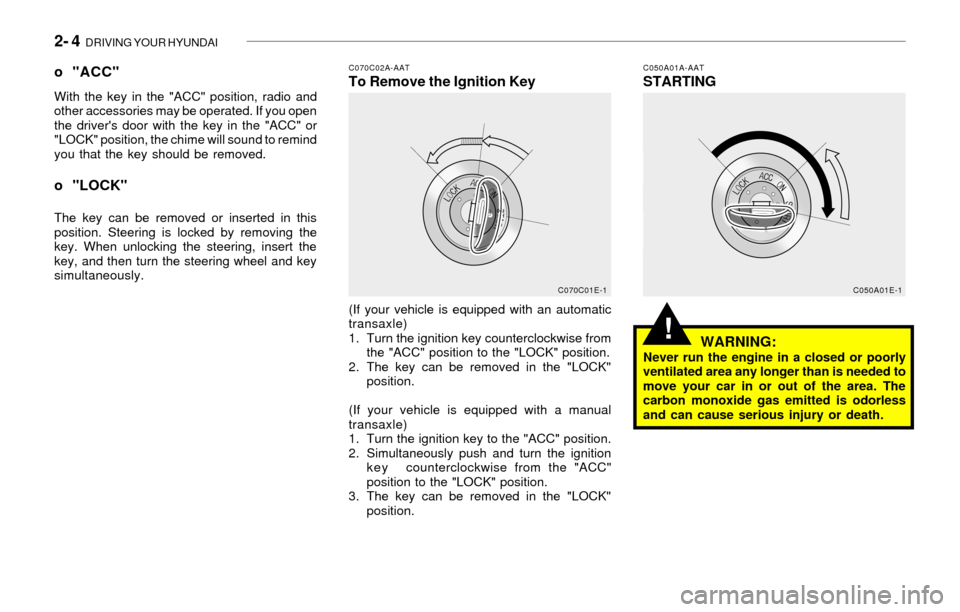
C070C02A-AATTo Remove the Ignition KeyC050A01A-AATSTARTING o "ACC"With the key in the "ACC" position, radio and
other accessories may be operated. If you open
the driver's door with the key in the "ACC" or
"LOCK" position, the chime will sound to remind
you that the key should be removed.
o "LOCK"
The key can be removed or inserted in this
position. Steering is locked by removing the
key. When unlocking the steering, insert the
key, and then turn the steering wheel and key
simultaneously.
(If your vehicle is equipped with an automatic
transaxle)
1. Turn the ignition key counterclockwise from
the "ACC" position to the "LOCK" position.
2. The key can be removed in the "LOCK"
position.
(If your vehicle is equipped with a manual
transaxle)
1. Turn the ignition key to the "ACC" position.
2. Simultaneously push and turn the ignition
key counterclockwise from the "ACC"
position to the "LOCK" position.
3. The key can be removed in the "LOCK"
position.
WARNING:Never run the engine in a closed or poorly
ventilated area any longer than is needed to
move your car in or out of the area. The
carbon monoxide gas emitted is odorless
and can cause serious injury or death.
C070C01E-1
C050A01E-1
Page 164 of 205

DO-IT-YOURSELF MAINTENANCE 6- 9
!
4. Turn the radiator cap counterclockwise with-
out pressing down on it, until it stops. This
relieves any pressure remaining in the cool-
ing system. And remove the radiator cap by
pushing down and turning counterclock-
wise.
Now fill the radiator with clean demineralized
or distilled water. Continue to add clean
demineralized or distilled water in small quan-
tities until the fluid level stays up in the
radiator neck.
5. Start the engine, top off the radiator with
water and then add coolant to the reservoir
until the level is between "L" and "F".
6. Replace the radiator and reservoir caps and
check to be sure the drain cocks are fully
closed and not leaking.G060A02Y-AATSPARK PLUGS
Your engine was originally equipped with plati-
num-tipped spark plugs.
Platinum-tipped spark plugs will last longer than
conventional type spark plugs and can be
identified by blue lines on the ceramic shell.
NOTE:Do not clean or regap platinum-tipped spark
plugs.
WARNING:The cooling fan is controlled by engine
coolant temperature and may sometimes
operate even when the engine is not run-
ning. Use extreme caution when working
near the blades of the coolant fan so that
you are not injured by a rotating fan blade.
As the engine coolant temperature de-
creases, the fan will automatically shut off.
This is a normal condition.
HSM392G060B04Y-AAT
Replacing the Spark PlugsThe spark plugs should be changed at the
intervals specified in the vehicle maintenance
schedule in Section 5 or whenever engine
performance indicates they should be changed.
Symptoms that suggest poor spark plug perfor-
mance include engine misfiring under load, loss
of fuel economy, poor acceleration, etc. When
spark plugs are replaced, always use spark
plugs recommended by Hyundai. The use of
other spark plugs can result in loss of perfor-
mance, radio interference or engine damage.
NOTE:When replacing the spark plugs, always use
the genuine parts recommended.
Recommended Spark Plugs:
Type
RN10PYP4 (CHAMPION)
PGR5C-11 (NGK)
RC10PYB4 (CHAMPION)
PFR5N-11 (NGK)Remark
For 2.4L only
For 2.7L only
DOHC V6
0.1~1.1 mm 0.1~1.1 mm
Page 174 of 205

DO-IT-YOURSELF MAINTENANCE 6- 19
!
If any of your car’s lights or other electrical
accessories stop working, a blown fuse could
be the reason. If the fuse has burned out, you
will see that the metal strip inside the fuse has
burned through. If you suspect a blown fuse,
follow this procedure:
1. Turn off the ignition and all other switches.
2. Open the instrument panel junction box and
examine each fuse. Remove each fuse by
pulling it toward you (a small "fuse puller" tool
is contained in the fuse box to simplify this
operation).
3. Be sure to check all other fuses even if you
find one that appears to have burned out.
4. Replace the blown fuse by pressing a new
fuse of the same rating into place. The fuse
should be a snug fit. If it is not, have the fuse
clip repaired or replaced by a Hyundai dealer.
HXGS416Fuse Puller
G210A01A-AATCHECKING THE BATTERY
WARNING:
Batteries can be dangerous! When working
with batteries, carefully observe the follow-
ing precautions to avoid serious injuries.
The fluid in the battery contains a strong solution
of sulfuric acid, which is poisonous and highly
corrosive. Be careful not to spill it on yourself or
the car. If you do spill battery fluid on yourself,
immediately do the following:
o If battery fluid is on your skin, flush the
affected areas with water for at least 15
minutes and then seek medical assistance.
o If battery fluid is in your eyes, rinse out your
eyes with water and get medical assistance
as soon as possible. While you are being
driven to get medical assistance, continue to
rinse your eyes by using a sponge or soft
cloth saturated with water.
o If you swallow battery fluid, drink a large
quantity of water or milk followed by milk of
magnesia, eat a raw egg or drink vegetable
oil. Get medical assistance as soon as
possible. If you do not have a spare fuse, you may be
able to borrow a fuse of the same or lower
rating from an accessory you can tempo-
rarily get along without (the radio or cigarette
lighter, for example). Always remember to
replace the borrowed fuse.
CAUTION:A burned-out fuse indicates that there is a
problem in the electrical circuit. If you re-
place a fuse and it blows as soon as the
accessory is turned on, the problem is
serious and should be referred to a Hyundai
dealer for diagnosis and repair. Never re-
place a fuse with anything except a fuse
with the same or a lower amperage rating.
A higher capacity fuse could cause damage
and create a fire hazard.
NOTE:See page 6-29 for the junction box descrip-
tions.
!
G200B03Y
GoodBurned out