2003 Hyundai Santa Fe warning light
[x] Cancel search: warning lightPage 125 of 221
DRIVING YOUR HYUNDAI 2- 3
!!WARNING:o The 2WD Santa Fe is not designed for
off-road use. The 4WD Santa Fe is de-
signed primarily for use on paved roads.
However, occasional use in off-highway
conditions such as established unpaved
roads and non-challenging off-road
trails is allowed. The 4WD Santa Fe is not
designed for blazing new trails, chal-
lenging off-road conditions, or unpaved
hill climbing. Exceeding the conditions
that were intended for the vehicle's pri-
mary design may result in injury or death.
o Utility vehicle has a significantly higher
collision rate than other type of vehicles.
o Utility vehicle have higher ground clear-
ance and a narrower track to make them
capable of performing in a wide variety
of off-road applications. Specific design
characteristics give them a higher center
of gravitiy than ordinary cars. An advan-
tage of the higher ground clearance is a
better view of the road allowing you to
anticipate problem. They are not de-
signed for cornering at the same speeds
as conventional 2-wheel drive vehicles
any more than low-slung sports cars are
designed to perform satisfactorily un-
der off-road conditions. If at all possible,
avoid sharp turns or abrupt maneuvers.
As with other vehicles of this type, fail-
ure to operate this vehicle correctly may
result in loss of control or vehicle rollover.
C020A01A-AATBEFORE STARTING THE ENGINE
Before you start the engine, you should always:
1. Look around the vehicle to be sure there are
no flat tires, puddles of oil, water or other
indications of possible trouble.
2. After entering the car, check to be sure the
parking brake is engaged.
3. Check that all windows, and lights are clean.
4. Check that the interior and exterior mirrors
are clean and in position.
5. Check your seat, seatback and headrest to
be sure they are in their proper positions.
6. Lock all the doors.
7. Fasten your seat belt and be sure that all
other occupants have fastened theirs.
8. Turn off all lights and accessories that are
not needed.
9. When you turn the ignition switch to "ON",
check that all appropriate warning lights are
operating and that you have sufficient fuel.
10.Check the operation of warning lights and all
bulbs when key is in the "ON" position.
C030A01E-AATCOMBINATION IGNITION SWITCH
To Start the Engine
o If your Hyundai is equipped with a manual
transaxle, place the shift lever in neutral and
depress the clutch pedal fully.
o If your Hyundai has an automatic transaxle,
place the shift lever in "P" (park).
o To start the engine, insert the ignition key and
turn it to the "START" position. Release it as
soon as the engine starts. Do not hold the
key in the "START" position for more that 15
seconds.
NOTE:o For safety, the engine will not start if the
clutch pedal is not depressed fully
(Manual Transaxle) or the shift lever is
not in "P" or "N" Position (Automatic
Transaxle).
o The ignition key cannot be turned from
"ACC" position to "LOCK" position un-
less the shift lever is in the "P" (Park)
position or the negative battery terminal
is disconnected from the battery. To
remove the key, always confirm that the
shift lever is securely positioned in "P"
(Park) (For Automatic Transaxle)
o For additional information about start-
ing, see page 2-5.
WARNING:o In a collision crash, an unbelted person
is significantly more likely to die than a
person wearing a seatbelt.
Page 127 of 221
DRIVING YOUR HYUNDAI 2- 5
!
C050A01A-AATSTARTING
WARNING:
Never run the engine in a closed or poorly
ventilated area any longer than is needed to
move your car in or out of the area. The
carbon monoxide gas emitted is odorless
and can cause serious injury or death.
C050B01A-AATNormal Conditions:
The Starting Procedure:
1. Insert key, and fasten the seat belt.
2. Depress the clutch pedal fully and place the
gearshift lever (manual transaxle) in neutral
or the selector lever (automatic transaxle) in
"P" (park) position.
3. After turning the ignition key to the "ON"
position, make certain all warning lights and
gauges are functioning properly before start-
ing the engine.
WARNING:Be sure that the clutch is fully depressed
when starting a manual transaxle vehicle.
Your manual transaxle equipped vehicle
will not start unless the clutch pedal is fully
depressed. On a manual transaxle equipped
vehicle that can be started without de-
pressing the clutch, there is the potential to
cause damage to the vehicle or injury to
someone inside or outside the vehicle as a
result of the forward or backward move-
ment of the vehicle that will occur if the
clutch is not depressed when the vehicle is
started.4. Turn the ignition key to the "Start" position
and release it when the engine starts.
After the engine has started, allow the engine
to run for 10 to 20 seconds prior to placing
the vehicle in gear.
The starter should not be operated for more
than 15 seconds at a time. Wait 15-30 sec-
onds between starting attempts to protect
the starter from overheating.
!
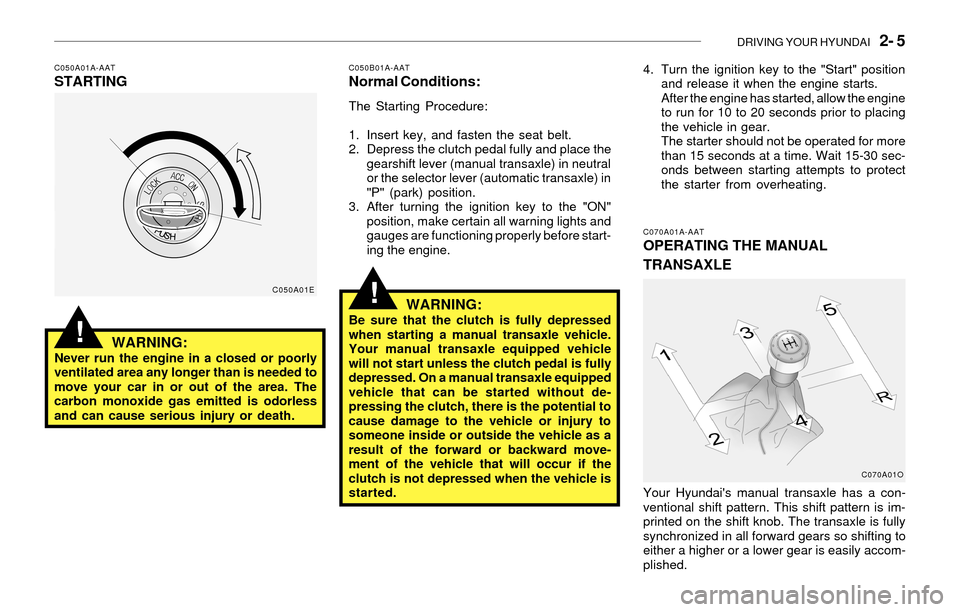
C070A01A-AATOPERATING THE MANUAL
TRANSAXLE
Your Hyundai's manual transaxle has a con-
ventional shift pattern. This shift pattern is im-
printed on the shift knob. The transaxle is fully
synchronized in all forward gears so shifting to
either a higher or a lower gear is easily accom-
plished.
C050A01E
C070A01O
Page 132 of 221
2- 10 DRIVING YOUR HYUNDAI
!
!
C120A02A-AATANTI-LOCK BRAKE SYSTEM (ABS)
(If installed)
The Anti-Lock Brake System (ABS) is designed
to prevent wheel lock-up during sudden braking
or on hazardous road surfaces. The ABS con-
trol module monitors the wheel speed and con-
trols the pressure applied to each brake. Thus,
in emergency situations or on slick roads, ABS
will increase vehicle control during braking.
NOTE:During ABS operation, a slight pulsation
may be felt in the brake pedal when the
brakes are applied. Also, a noise may be
heard in the engine compartment while
braking. These conditions are normal and
indicate that the anti-lock brake system is
functioning properly.
C090N01Y-AATGood Driving Practices
o Never move the gear selector lever from "P"
or "N" to any other position with the accelera-
tor pedal depressed.
o Never move the gear selector lever into "P"
when the vehicle is in motion.
o Be sure the car is completely stopped before
you attempt to shift into "R".
o Never take the car out of gear and coast
down a hill. This may be extremely hazard-
ous. Always leave the car in gear when
moving.
o Do not "ride" the brakes. This can cause
them to overheat and malfunction. Instead,
when you are driving down a long hill, slow
down and shift to a lower gear. When you do
this, engine braking will help slow the car.
o Slow down before shifting to a lower gear.
Otherwise, the lower gear may not be en-
gaged.
o Always use the parking brake. Do not de-
pend on placing the transaxle in "P" to keep
the car from moving.
o Exercise extreme caution when driving on a
slippery surface. Be especially careful when
braking, accelerating or shifting gears. On a
slippery surface, an abrupt change in ve-
hicle speed can cause the drive wheels to
lose traction and the vehicle to go out of
control.WARNING:o Avoid high cornering speeds.
o Do not make quick steering wheel move-
ments, such as sharp lane changes or
fast, sharp turns.
o Always wear your seat belts.
o The risk of rollover is greatly increased if
you lose control of your vehicle at high-
way speeds.
o Loss of control often occurs if two or
more wheels drop off the roadway and
the driver oversteers to reenter the road-
way.
o In the event your vehicle leaves the road-
way, do not steer sharply. Instead, slow
down before pulling back into the travel
lanes.
o In a collision crash, un unbelted person
is significantly more likely to die than a
person wearing a seatbelt.
o Never exceed posted speed limits.
WARNING:ABS will not prevent accidents due to im-
proper or dangerous driving maneuvers.
Even though vehicle control is improved
during emergency braking, always main-
tain a safe distance between you and ob-
jects ahead. Vehicle speeds should always
be reduced during extreme road condi-
tions.
The braking distance for cars equipped
with an anti-lock braking system may be
longer than for those without it in the
following road conditions.
Page 133 of 221
DRIVING YOUR HYUNDAI 2- 11
!
!
!
WARNING:o Driving on rough, gravel or snow-cov-
ered roads.
o Driving with tire chains installed.
o Driving on roads where the road surface
is pitted or has different surface height.
During these conditions the vehicle should
be driven at reduced speeds. The safety
features of an ABS equipped vehicle should
not be tested by high speed driving or
cornering. This could endanger the safety
of yourself or others.
SLIP Control
Limits the drive wheels from spinning exces-
sively during starting or while making acceler-
ated turns on slippery roads to avoid losing the
driving force of the driven wheels.
Driving hints
TCS does not actively apply brakes. Be sure to
decelerate the car sufficiently before entering
curves.
C300A02O-AAT
BRAKE TRACTION CONTROL SYSTEM
(BTCS) (If installed)
On slippery road surfaces, the traction control
system (TCS) limits the drive wheels from
spinning excessively, thus helping the car to
accelerate. It also provides sufficient driving
force and steering performance as the car turns
at accelerated speeds.
CAUTION:When the TCS indicator blinks, SLIP func-
tion has been activated. It also means that
the road is slippery or your car is accelerat-
ing excessively. In this situation, release
foot pressure from the accelerator pedal
and maintain moderate speed.
WARNING:Traction control is only a driving aid; all
normal precautions for driving in inclement
weather and on slippery road surfaces
should be observed.
C300B01O-GATTCS ON Mode
In the TCS ON mode, the TCS indicator light in
the instrument cluster will blink.
NOTE:1) Turn off the engine. Then restart the
engine, and the TCS mode will automati-
cally turn ON.
2) When the traction control system is op-
erating properly, you can feel a slight
pulsation in the vehicle. This is only the
effect of brake control and indicates
nothing unusual.
3) When the engine starts, a click is heard
from the engine compartment; however,
this is only the sound of traction control
being checked.
4) When moving out of the mud or fresh
snow, pressing the accelerator pedal
may not cause the engine speed to in-
crease.
Page 135 of 221
DRIVING YOUR HYUNDAI 2- 13
C310D01O-AATIndicators and Warning
The indicators should illuminate when the igni-
tion key is turned to ON or START but should
go out after three seconds.
If the indicators do not illuminate, or the TCS or
TCS-OFF indicator does not go out after 3
seconds, have it checked by an authorized
dealer.
Should there be any unusual conditions in the
device while driving, TCS-OFF indicator illumi-
nates as a warning.
If TCS-OFF indicator illuminates, pull your car
to a safe place and stop the engine.
Then, start the engine again to check if the TCS-
OFF indicator goes out.
If the indicator remains lit even after the engine
has been started, have your car checked by an
authorized Hyundai dealer.
NOTE:1) When TCS-OFF indicator illuminates,
traction control is automatically deacti-
vated for safety.
2) This warning function is not provided
when the driver selects the TCS-OFF
mode.
C310B01O-AATTCS ON/OFF Mode
In the TCS-ON mode, the TCS indicator light in
the instrument cluster will blink.
If you turn the system off by pressing the TCS
switch, the TCS-OFF indicator light will come on
and stay on. In the TCS-OFF mode, the SLIP
control will be deactivated. Adjust you driving
accordingly. To turn the system back on, press
the switch again. The TCS-OFF indicator light
should go off.
NOTE:1) Turn off the engine. Then restart the
engine, and the TCS mode will automati-
cally turn ON.
2) When the traction control system is op-
erating properly, you can feel a slight
pulsation in the vehicle. This is only the
effect of brake control and indicates
nothing unusual.
3) When the engine starts, a click is heard
from the engine compartment; however,
this is only the sound of traction control
being checked.
4) When moving out of the mud or fresh
snow, pressing the accelerator pedal
may not cause the engine speed to in-
crease.
C350A02O-AATFull-Time 4WD Operation (If installed)
Engine power can be delivered to all front and
rear wheels for maximum power. Full-time 4WD
is useful when good traction is required, such
as, when driving on slippery, wet or snow-
covered roads and when moving out of mud.
These vehicles, however, are not designed for
challenging off-road use. Full-time 4WD ve-
hicles are designed primarily to improve traction
and performance on paved roads and high-
ways in wet and/or slippery conditions. Occa-
sional off-road use such as established un-
paved roads and trails is OK. It is always
important when traveling off-highway that the
driver carefully reduce their speed to a level that
does not exceed the safe operating speed for
those conditions. In general, off-road conditions
provide less traction and braking effectiveness
than on road conditions. These factors must be
carefully considered when driving off-road.
Keeping the vehicle in contact with the driving
surface and under control in these conditions is
always the driver's responsibility for the safety
of him/herself and his or her passengers.
Page 143 of 221
DRIVING YOUR HYUNDAI 2- 21
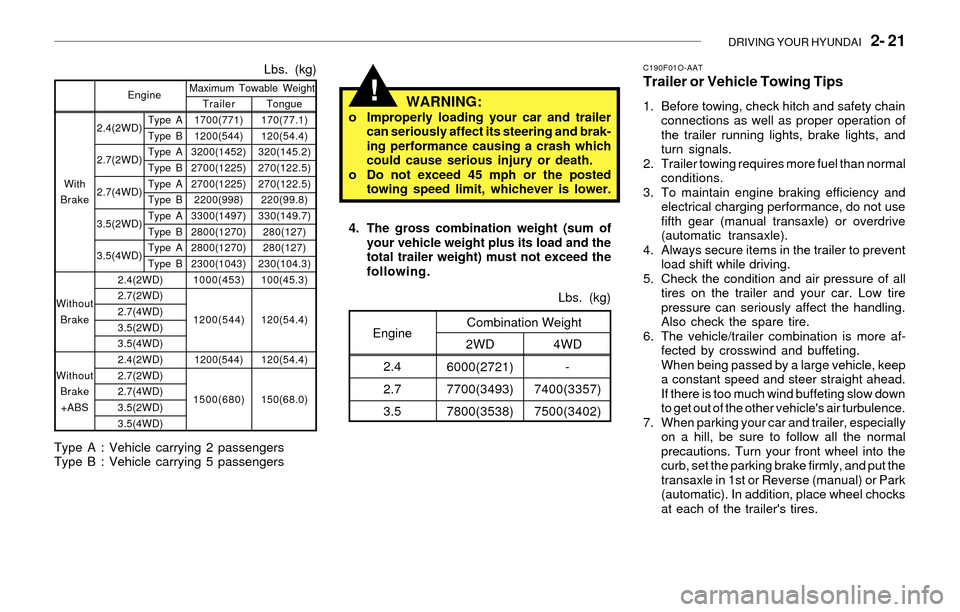
2.4(2WD)
2.7(2WD)
2.7(4WD)
3.5(2WD)
3.5(4WD)Tongue
170(77.1)
120(54.4)
320(145.2)
270(122.5)
270(122.5)
220(99.8)
330(149.7)
280(127)
280(127)
230(104.3)
100(45.3)
120(54.4)
120(54.4)
150(68.0)
Lbs. (kg)
Trailer
1700(771)
1200(544)
3200(1452)
2700(1225)
2700(1225)
2200(998)
3300(1497)
2800(1270)
2800(1270)
2300(1043)
1000(453)
1200(544)
1200(544)
1500(680) Maximum Towable Weight
Type A
Type B
Type A
Type B
Type A
Type B
Type A
Type B
Type A
Type B With
Brake
Without
Brake
Without
Brake
+ABSEngine
2.4(2WD)
2.7(2WD)
2.7(4WD)
3.5(2WD)
3.5(4WD)
2.4(2WD)
2.7(2WD)
2.7(4WD)
3.5(2WD)
3.5(4WD)
Type A : Vehicle carrying 2 passengers
Type B : Vehicle carrying 5 passengers
!
C190F01O-AATTrailer or Vehicle Towing Tips
1. Before towing, check hitch and safety chain
connections as well as proper operation of
the trailer running lights, brake lights, and
turn signals.
2. Trailer towing requires more fuel than normal
conditions.
3. To maintain engine braking efficiency and
electrical charging performance, do not use
fifth gear (manual transaxle) or overdrive
(automatic transaxle).
4. Always secure items in the trailer to prevent
load shift while driving.
5. Check the condition and air pressure of all
tires on the trailer and your car. Low tire
pressure can seriously affect the handling.
Also check the spare tire.
6. The vehicle/trailer combination is more af-
fected by crosswind and buffeting.
When being passed by a large vehicle, keep
a constant speed and steer straight ahead.
If there is too much wind buffeting slow down
to get out of the other vehicle's air turbulence.
7. When parking your car and trailer, especially
on a hill, be sure to follow all the normal
precautions. Turn your front wheel into the
curb, set the parking brake firmly, and put the
transaxle in 1st or Reverse (manual) or Park
(automatic). In addition, place wheel chocks
at each of the trailer's tires. 4. The gross combination weight (sum of
your vehicle weight plus its load and the
total trailer weight) must not exceed the
following.
4WD
-
7400(3357)
7500(3402)Lbs. (kg)
2WD
6000(2721)
7700(3493)
7800(3538)Combination WeightEngine
2.4
2.7
3.5
WARNING:o Improperly loading your car and trailer
can seriously affect its steering and brak-
ing performance causing a crash which
could cause serious injury or death.
o Do not exceed 45 mph or the posted
towing speed limit, whichever is lower.
Page 147 of 221
3- 2 WHAT TO DO IN AN EMERGENCY
!
!
D010A01A-AATIF THE ENGINE WILL NOT START
D010B02A-AATIf Engine Doesn't Turn Over or Turns
Over Slowly
D010C01Y-AATIf Engine Turns Over Normally but Does
Not Start
1. Check fuel level.
2. Check all connectors at ignition, coil and
spark plugs. Re-connect any that may be
disconnected or loose.
3. Check the fuel line in the engine room.
4. If engine still refuses to start, call a Hyundai
dealer or seek other qualified assistance.
D010D01A-AATIf Engine Stalls While Driving
1. Reduce your speed gradually, keeping a
straight line. Move cautiously off the road to
a safe place.
2. Turn on your emergency flashers.
3. Try to start the engine again. If your vehicle
will not start, contact a Hyundai dealer or
seek other qualified assistance.
WARNING:If the engine will not start, do not push or
pull the car to start it. This could result in a
collision or cause other damage. In addi-
tion, push or pull starting may cause the
catalytic converter to be overloaded and
create a fire hazard.
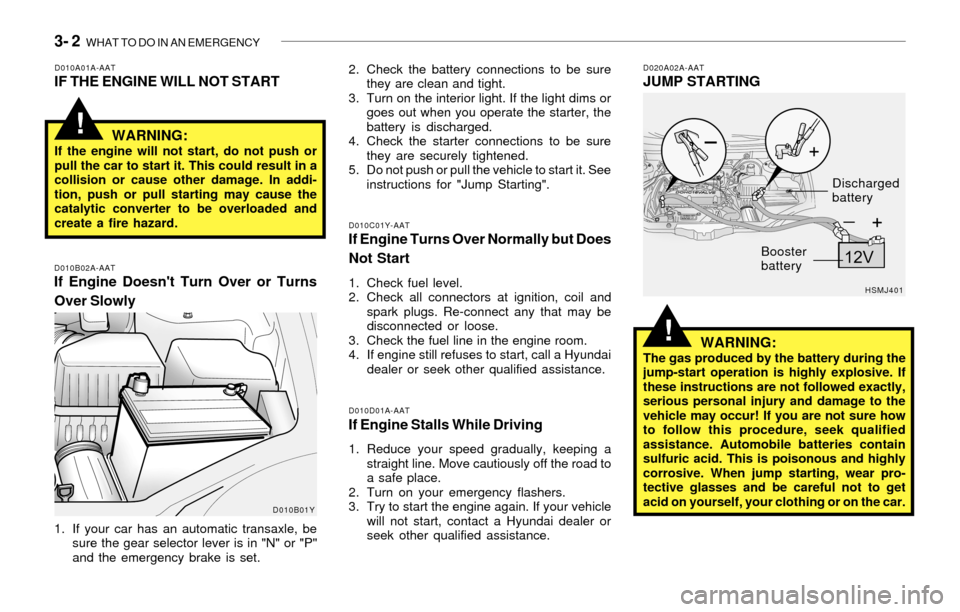
1. If your car has an automatic transaxle, be
sure the gear selector lever is in "N" or "P"
and the emergency brake is set.2. Check the battery connections to be sure
they are clean and tight.
3. Turn on the interior light. If the light dims or
goes out when you operate the starter, the
battery is discharged.
4. Check the starter connections to be sure
they are securely tightened.
5. Do not push or pull the vehicle to start it. See
instructions for "Jump Starting".
D020A02A-AATJUMP STARTING
WARNING:
The gas produced by the battery during the
jump-start operation is highly explosive. If
these instructions are not followed exactly,
serious personal injury and damage to the
vehicle may occur! If you are not sure how
to follow this procedure, seek qualified
assistance. Automobile batteries contain
sulfuric acid. This is poisonous and highly
corrosive. When jump starting, wear pro-
tective glasses and be careful not to get
acid on yourself, your clothing or on the car.
D010B01YHSMJ401
Booster
batteryDischarged
battery
Page 153 of 221
3- 8 WHAT TO DO IN AN EMERGENCY
!
D060G02Y-AAT6. Changing Wheels
D060H02A-AAT7. Reinstall Wheel Nuts
WARNING:
Do not get under the car when it is sup-
ported by the jack! This is very dangerous
as the vehicle could fall and cause serious
injury or death. No one should stay in the
car while the jack is being used.
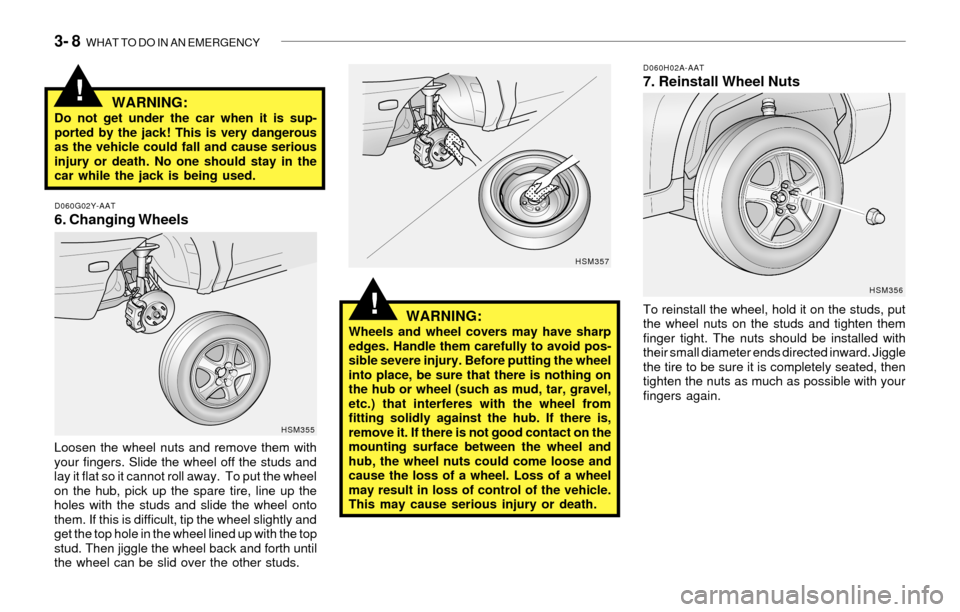
Loosen the wheel nuts and remove them with
your fingers. Slide the wheel off the studs and
lay it flat so it cannot roll away. To put the wheel
on the hub, pick up the spare tire, line up the
holes with the studs and slide the wheel onto
them. If this is difficult, tip the wheel slightly and
get the top hole in the wheel lined up with the top
stud. Then jiggle the wheel back and forth until
the wheel can be slid over the other studs.
WARNING:Wheels and wheel covers may have sharp
edges. Handle them carefully to avoid pos-
sible severe injury. Before putting the wheel
into place, be sure that there is nothing on
the hub or wheel (such as mud, tar, gravel,
etc.) that interferes with the wheel from
fitting solidly against the hub. If there is,
remove it. If there is not good contact on the
mounting surface between the wheel and
hub, the wheel nuts could come loose and
cause the loss of a wheel. Loss of a wheel
may result in loss of control of the vehicle.
This may cause serious injury or death.To reinstall the wheel, hold it on the studs, put
the wheel nuts on the studs and tighten them
finger tight. The nuts should be installed with
their small diameter ends directed inward. Jiggle
the tire to be sure it is completely seated, then
tighten the nuts as much as possible with your
fingers again.
HSM355HSM357
HSM356
!