2003 Hyundai Santa Fe instrument panel
[x] Cancel search: instrument panelPage 49 of 221

FEATURES OF YOUR HYUNDAI 1- 37
B260B01A-AATSRS (Airbag) Service
Reminder Indicator (SRI)
The SRS service reminder indicator (SRI) comes
on and flashes for about 6 seconds after the
ignition key is turned to the "ON" position or after
the engine is started, after which it will go out.
This light also comes on when the SRS is not
working properly. If the SRI does not come on,
or continuously remains on after flashing for
about 6 seconds when you turned the ignition
key to the "ON" position or started the engine,
or if it comes on while driving, have the SRS
inspected by an authorized Hyundai Dealer.
B260D01A-AATTurn Signal Indicator Lights
The blinking green arrows on the instrument
panel show the direction indicated by the turn
signals. If the arrow comes on but does not blink,
blinks more rapidly than normal, or does not
illuminate at all, a malfunction in the turn signal
system is indicated. Your dealer should be
consulted for repairs.
B260E02O-AATSeat Belt Reminder Light
and Chime
The seat belt reminder light blinks until your seat
belt is fastened when the ignition key is turned
from the "OFF" position to "ON" or "START".
And the warning chime will sound for 6 seconds.
B260F01A-AATHigh Beam Indicator Light
The high beam indicator light comes on when-
ever the headlights are switched to the high
beam or flash position.
B260G01A-AATLow Oil Pressure Warning Light
CAUTION:
If the low oil pressure warning light stays on
while the engine is running, serious engine
damage may result. The oil pressure warn-
ing light comes on whenever there is insuf-
ficient oil pressure. In normal operation, it
should come on when the ignition switch
is turned on, then go out when the engine
is started. If the oil pressure warning light
stays on while the engine is running, there
is a serious malfunction.
If this happens, stop the car as soon as it is
safe to do so, turn off the engine and check
the oil level. If the oil level is low, fill the
engine oil to the proper level and start the
engine again. If the light stays on with the
engine running, turn the engine off imme-
diately. In any instance where the oil light
stays on when the engine is running, the
engine should be checked by a Hyundai
dealer before the car is driven again.
!
Page 55 of 221

FEATURES OF YOUR HYUNDAI 1- 43
B340A01A-AATCOMBINATION TURN SIGNAL,
HEADLIGHT AND HIGH-BEAM
SWITCH
Turn Signal Operation
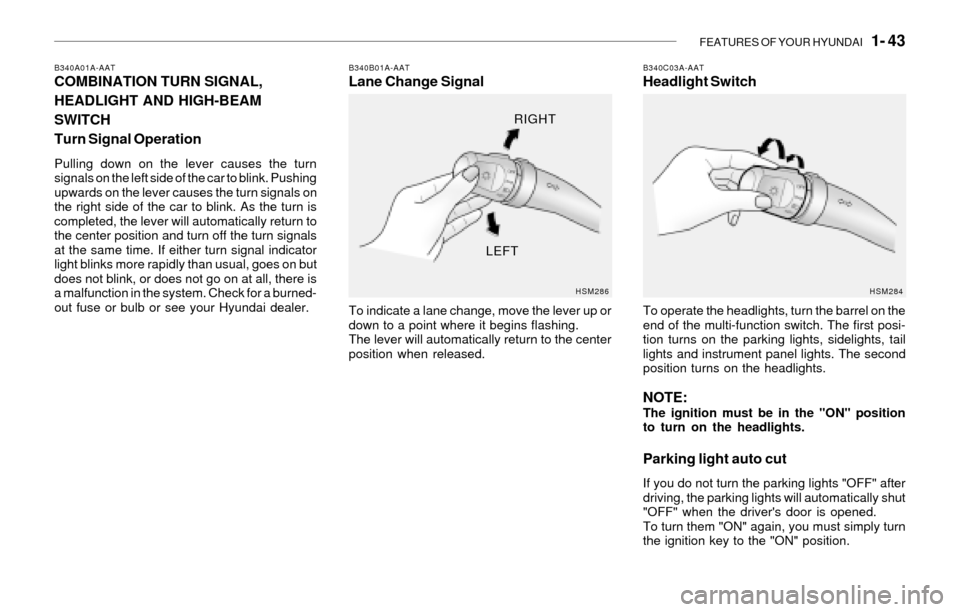
Pulling down on the lever causes the turn
signals on the left side of the car to blink. Pushing
upwards on the lever causes the turn signals on
the right side of the car to blink. As the turn is
completed, the lever will automatically return to
the center position and turn off the turn signals
at the same time. If either turn signal indicator
light blinks more rapidly than usual, goes on but
does not blink, or does not go on at all, there is
a malfunction in the system. Check for a burned-
out fuse or bulb or see your Hyundai dealer.
B340B01A-AATLane Change Signal
To indicate a lane change, move the lever up or
down to a point where it begins flashing.
The lever will automatically return to the center
position when released.
B340C03A-AATHeadlight Switch
To operate the headlights, turn the barrel on the
end of the multi-function switch. The first posi-
tion turns on the parking lights, sidelights, tail
lights and instrument panel lights. The second
position turns on the headlights.
NOTE:The ignition must be in the "ON" position
to turn on the headlights.
Parking light auto cut
If you do not turn the parking lights "OFF" after
driving, the parking lights will automatically shut
"OFF" when the driver's door is opened.
To turn them "ON" again, you must simply turn
the ignition key to the "ON" position.
HSM286HSM284
RIGHT
LEFT
Page 60 of 221

1- 48 FEATURES OF YOUR HYUNDAI
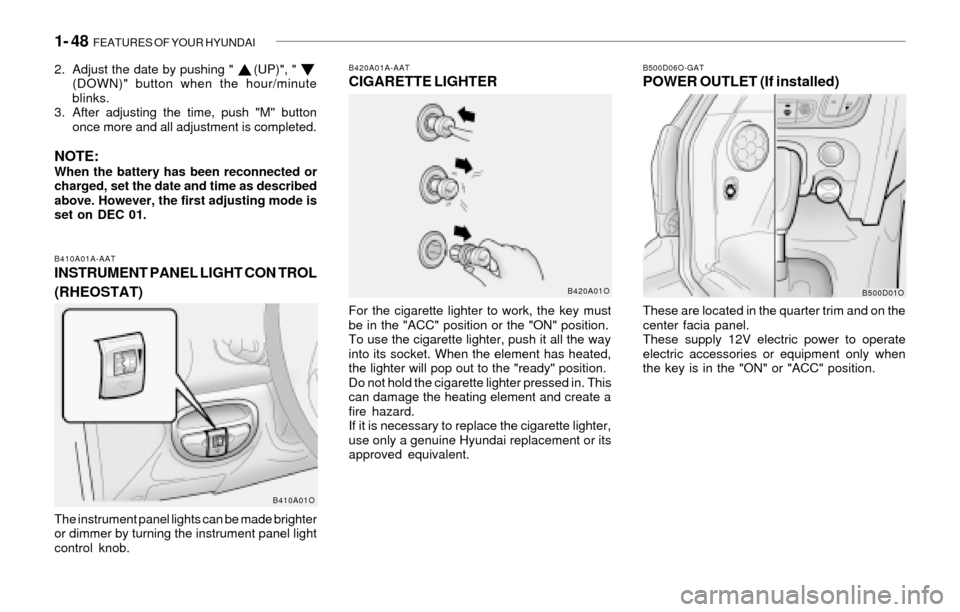
B420A01A-AATCIGARETTE LIGHTER
For the cigarette lighter to work, the key must
be in the "ACC" position or the "ON" position.
To use the cigarette lighter, push it all the way
into its socket. When the element has heated,
the lighter will pop out to the "ready" position.
Do not hold the cigarette lighter pressed in. This
can damage the heating element and create a
fire hazard.
If it is necessary to replace the cigarette lighter,
use only a genuine Hyundai replacement or its
approved equivalent.
B500D06O-GATPOWER OUTLET (If installed)
These are located in the quarter trim and on the
center facia panel.
These supply 12V electric power to operate
electric accessories or equipment only when
the key is in the "ON" or "ACC" position.
B420A01OB500D01O
2. Adjust the date by pushing " (UP)", "
(DOWN)" button when the hour/minute
blinks.
3. After adjusting the time, push "M" button
once more and all adjustment is completed.
NOTE:When the battery has been reconnected or
charged, set the date and time as described
above. However, the first adjusting mode is
set on DEC 01.
B410A01A-AATINSTRUMENT PANEL LIGHT CON TROL
(RHEOSTAT)
The instrument panel lights can be made brighter
or dimmer by turning the instrument panel light
control knob.
B410A01O
Page 91 of 221

FEATURES OF YOUR HYUNDAI 1- 79
B970C02O-AATAutomatic OperationNOTE:If the battery has been discharged or dis-
connected, the temperature mode will reset
to centigrade degree.
This is a normal condition and you can
adjust the temperature mode from centi-
grade to fahrenheit as follows;
Press the TEMP down ( ) button 3 seconds
or more with the AMB button held down.
The display shows that the unit of tempera-
ture is adjusted to centigrade or fahrenheit
(°C
® ®® ®
® °F or °F
® ®® ®
® °C).
The FATC (Full Automatic Temperature Con-
trol) system automatically controls the heating
and cooling by doing as follows:
1. Push the "AUTO" switch. The indicator light
will come on confirming that the Face, Floor
and/or Bi-Level modes as well as the blower
speed and, air conditioner will be controlled
automatically.
2. Push the "TEMP" button to set the desired
temperature.
The temperature will increase to the maxi-
mum 90°F(32°C) by pushing on the bu-
tton. Each push of the button will cause the
temperature to increase by 1°F(0.5°C).
The temperature will decrease to the mini-
mum 62°F(17°C) by pushing on the bu-
tton. Each push of the button will cause the
temperature to decrease by 1°F(0.5°C).
NOTE:Never place things on the sensor which is
located in the car on the instrument panel
to ensure better control of the heating and
cooling system.
B995A01O-GATAMBIENT SWITCH
Pressing the "AMB" button displays the ambient
temperature on display window.
B980A01Y-AATMANUAL OPERATION
The heating and cooling system can be con-
trolled manually as well as by pushing buttons
other than the "AUTO" button. At this state, the
system sequentially works according to the
order of buttons selected.
The function of the buttons which are not se-
lected will be controlled automatically.
Press the "AUTO" button in order to convert to
automatic control of the system.
B970C01O
HSM502B995A01O
Photo sensor
Page 205 of 221

8- 2 CONSUMER INFORMATION & REPORTING SAFETY DEFECTS
I030A02S-AAT
RECOMMENDED INFLATION PRES-
SURES
I020A01A-AATTIRE INFORMATION
The tires supplied on your new Hyundai are
chosen to provide the best performance for
normal driving.
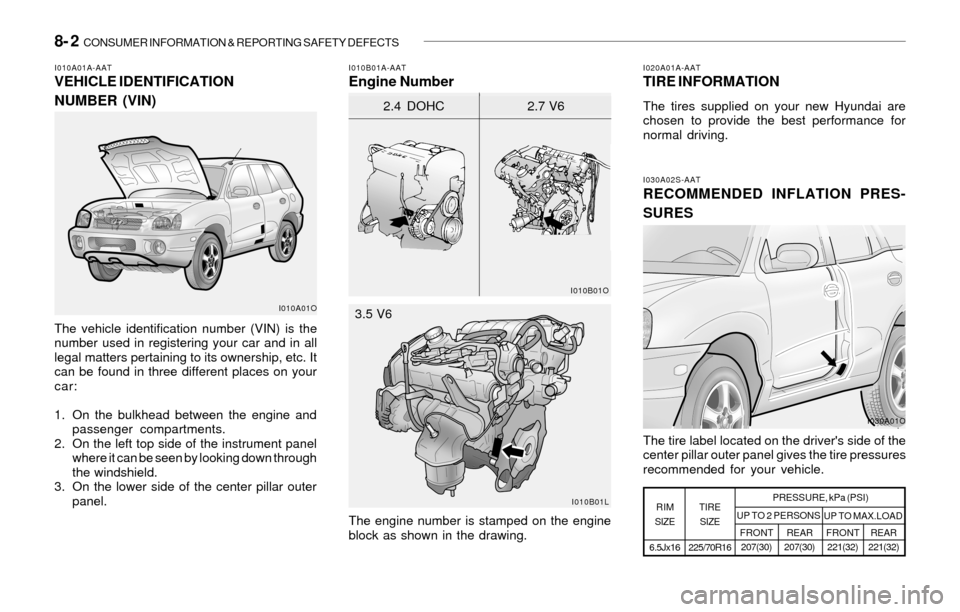
I010B01A-AATEngine NumberI010A01A-AATVEHICLE IDENTIFICATION
NUMBER (VIN)
RIM
SIZETIRE
SIZEPRESSURE, kPa (PSI)
UP TO 2 PERSONS
UP TO MAX.LOAD
FRONT
207(30)REAR
207(30)FRONT
221(32)REAR
221(32)
225/70R16 6.5Jx16
The vehicle identification number (VIN) is the
number used in registering your car and in all
legal matters pertaining to its ownership, etc. It
can be found in three different places on your
car:
1. On the bulkhead between the engine and
passenger compartments.
2. On the left top side of the instrument panel
where it can be seen by looking down through
the windshield.
3. On the lower side of the center pillar outer
panel.
The engine number is stamped on the engine
block as shown in the drawing.The tire label located on the driver's side of the
center pillar outer panel gives the tire pressures
recommended for your vehicle.
I010A01O
I030A01O
I010B01O
2.4 DOHC 2.7 V6
I010B01L
3.5 V6
Page 219 of 221

10- 4 INDEX
Hood Release ....................................................................................1-63
Horn.................................................................................................1-65
I
Ignition Switch ...................................................................................... 2-3
Instrument Cluster and Indicator Lights ...........................................1-36
Instrument Panel Light Control (Rheostat) .......................................1-48
J
Jump Starting ...................................................................................... 3-2
K
Key ................................................................................................... 1-3
If you lose your keys ...................................................................3-11
Positions......................................................................................... 2-4
L
Light Bulbs Replacement ..................................................................6-24
Limited-Slip Differential ......................................................................2-15
Luggage Net ......................................................................................1-60
M
Maintenance Intervals
Explanation of scheduled maintenance items ............................... 5-7
Maintenance under severe usage conditions ............................... 5-6
Scheduled maintenance ................................................................ 5-4
Service requirements .................................................................... 5-2
Mirrors
Day-night inside rearview mirror .................................................1-55
Outside rear view mirror ..............................................................1-53O
Odometer / Trip Odometer ...............................................................1-42
P
Parking Brake ....................................................................................1-59
Power Driver's Seat ..........................................................................1-13
Power Outlet ......................................................................................1-48
Power Steering Fluid Level ...............................................................6-22
R
Rear Seat
Adjusting seatback angle .............................................................1-15
Folding rear seatback and seat cushion ....................................1-16
Rear Window Defroster Switch ........................................................1-47
Reporting Safety Defects ................................................................... 8-7
Roof Rack .........................................................................................1-61
S
Seat
Front.............................................................................................1-10
Rear..............................................................................................1-15
Seat warmer .................................................................................1-15
Seat Belts
3-point system .............................................................................1-20
2-point static type .........................................................................1-22
Pretensioner seat belt ..................................................................1-28
Adjusting your seat belt ..................................................... 1-21, 1-22
Care of seat belts .........................................................................1-19
Precautions..................................................................................1-17