2003 Hyundai Santa Fe set clock
[x] Cancel search: set clockPage 59 of 221
FEATURES OF YOUR HYUNDAI 1- 47
B380A01A-AATREAR WINDOW DEFROSTER
SWITCH
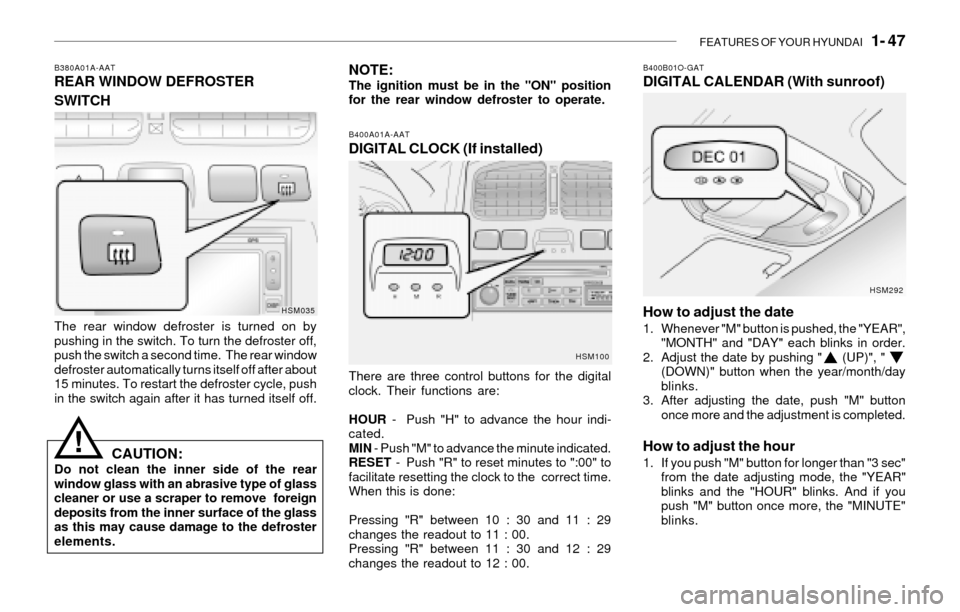
The rear window defroster is turned on by
pushing in the switch. To turn the defroster off,
push the switch a second time. The rear window
defroster automatically turns itself off after about
15 minutes. To restart the defroster cycle, push
in the switch again after it has turned itself off.
CAUTION:Do not clean the inner side of the rear
window glass with an abrasive type of glass
cleaner or use a scraper to remove foreign
deposits from the inner surface of the glass
as this may cause damage to the defroster
elements.
HSM035
!
NOTE:The ignition must be in the "ON" position
for the rear window defroster to operate.
B400A01A-AAT
DIGITAL CLOCK (If installed)
There are three control buttons for the digital
clock. Their functions are:
HOUR - Push "H" to advance the hour indi-
cated.
MIN - Push "M" to advance the minute indicated.
RESET - Push "R" to reset minutes to ":00" to
facilitate resetting the clock to the correct time.
When this is done:
Pressing "R" between 10 : 30 and 11 : 29
changes the readout to 11 : 00.
Pressing "R" between 11 : 30 and 12 : 29
changes the readout to 12 : 00.
B400B01O-GATDIGITAL CALENDAR (With sunroof)
How to adjust the date
1. Whenever "M" button is pushed, the "YEAR",
"MONTH" and "DAY" each blinks in order.
2. Adjust the date by pushing " (UP)", "
(DOWN)" button when the year/month/day
blinks.
3. After adjusting the date, push "M" button
once more and the adjustment is completed.
How to adjust the hour1. If you push "M" button for longer than "3 sec"
from the date adjusting mode, the "YEAR"
blinks and the "HOUR" blinks. And if you
push "M" button once more, the "MINUTE"
blinks.
HSM100HSM292
Page 99 of 221
FEATURES OF YOUR HYUNDAI 1- 87
H260B03O-AAT1. POWER ON-OFF Control Knob
The radio unit may be operated when the ignition
key is in the "ACC" or "ON" position. Press the
knob to switch the power on. The LCD shows
the radio frequency in the radio mode or the CD
track indicator in the CD mode. To switch the
power off, press the knob again.
VOLUME Control
Rotate the knob clockwise to increase the
volume and turn the knob counterclockwise to
reduce the volume.
BALANCE Control
Pull and turn the control knob clockwise to
emphasize right speaker sound. (Left speaker
sound will be attenuated.) When the control
knob is turned counterclockwise, left speaker
sound will be emphasized. (Right speaker sound
will be attenuated.)
2. FAD (Fader Control) Knob
Turn the control knob counterclockwise to
emphasize front speaker sound. (Rear speaker
sound will be attenuated.) When the control
knob is turned clockwise, rear speaker sound
will be emphasized. (Front speaker sound will
be attenuated.)
3. BASS Control Knob
Press to pop the knob out and turn to the left or
right for the desired bass tone.
TREB (Treble Control) Knob
Pull the bass control knob further out.
Turn to the left or right for the desired treble tone.
4. SCAN Button
When the scan button is pressed, the frequency
will increase and the receivable stations will be
tuned in one after another, receiving each sta-
tion for 5 seconds. To stop scanning, press the
scan button again.
5. TUNE (Manual) Select Button
Press the ( ) side or ( ) side to increase or to
decrease the frequency. Press either button
and hold down to continuously scroll.
Release button once the desired station is
reached.
SEEK Operation
(Automatic Channel Selection)
Press the TUNE select button for 0.5 sec or
more. Releasing it will automatically tune to the
next available station with a beep sound.
When the ( ) side is pressed longer than 0.5
second, releasing will automatically tune to the
next higher frequency and when the ( ) side is
pressed longer than 0.5 second, releasing will
automatically tune to the next lower frequency.
6. BAND Selector
Pressing the button changes the AM, FM1
and FM2 bands. The mode selected is dis-
played on LCD.
7. PRESET STATION SELECT Button
Six (6) stations for AM, FM or FM2 respectively
can be preset in the electronic memory circuit
on this unit.
FM/AM
Page 105 of 221
FEATURES OF YOUR HYUNDAI 1- 93
D285B01O-AAT1. POWER ON•OFF Control Knob
Press this knob to turn the system on and off.
VOLUME Control
Turn the knob clockwise to increase volume.
Turn it counterclockwise to decrease volume.
2. BAND Select Button
Press this button to switch between AM, FM1
and FM2. The display will show your selection.
3. RADIO STATION Control Knob
Turn this knob to choose radio stations.
4. SEEK/SCAN Button
SEEK
Press the up or down arrow to seek to the next
or previous station and stay there. The sound
will mute while seeking.
SCAN
Press and hold one of the arrows for more than
two seconds. The radio will produce one beep.
The radio will produce one beep. The radio will
scan to each stations, play for a few seconds,
then go on to the next station. Press one of the
arrows or one of the pushbuttons again to stop
scanning. SCAN will be displayed whenever thetuner is in the scan mode. In FM mode, this
function will scan through the current band such
as FM1 or FM2. The radio will scan stations with
a strong signal only. The sound will mute while
scanning.
5. PRESET STATION Select Button
The six numbered pushbuttons let you return to
your favorite stations. You can set up to 18
stations (six AM, six FM1 and six FM2) by
performing the following steps:
1. Turn the radio on.
2. Press BAND select button to select AM, FM1
of FM2.
3. Tune in the desired station.
4. Press AUTO EQ to choose the bass and
treble equalization that best suits the type of
station you are listening to.
5. Press and hold one of the six numbered
pushbuttons. The radio will produce one
beep. Whenever you press that numbered
pushbutton, the station you set will return
and the bass and treble equalization that you
selected will also be automatically selected
for that pushbutton.
6. Repeat the above steps for each pushbutton.
6. AUDIO Knob
Setting the Tone (BASS/Treble)
Push and release the AUDIO knob until BASS
or TREB appears on the display. Turn the knob
clockwise or counterclockwise to increase or
decrease. The display will show the bass or
treble level. If a station is weak or noisy, you may
want to decrease the treble.
To adjust bass and treble to the middle position,
push and hold the AUDIO knob. The radio will
produce one beep and adjust the display level
to the middle position.
To adjust all tone and speaker controls to the
middle position, push and hold the AUDIO knob
when no tone or speaker control is displayed.
The radio will produce one beep and display
CENTERED.
Adjusting the Speakers (Balance/Fade)
To adjust the balance between the right and left
speakers, push and release the AUDIO knob
until BAL appears on the display. Turn the knob
clockwise to move the sound to the right speak-
ers and counterclockwise to move the sound to
the left speakers.
Page 106 of 221
1- 94 FEATURES OF YOUR HYUNDAI
To adjust the fade between the front and rear
speakers push and release the AUDIO knob
until FADE appears on the display. Turn the
knob clockwise to move the sound to the front
speakers and counterclockwise to move the
sound to the rear speakers.
The middle position balances the sound be-
tween the speakers. To adjust the balance and
fade to the middle position, push the AUDIO
knob then push it again and hold it until you hear
one beep. The balance and fade will be adjusted
to the middle position and the display will show
the speaker balance.
To adjust all tone and speaker controls to the
middle position, push and hold the AUDIO knob
when no tone or speaker control is display ALL
with the level display in the middle position.
7. AUTO EQUALIZER
This feature allows you to choose bass and
treble equalization settings designed for coun-
try jazz, news, pop, rock and classical stations.
Each time you press the AUTO TONE button,
this feature will change to one of the preset
equalization settings previously listed.
To return the bass and treble to the custom
mode, push and release the AUDIO knob until
custom is displayed.
8. Tips About Your Audio System
Hearing damage form loud noise is almost
undetectable until it is too late. Your hearing can
adapt to higher volumes of sound. Sound that
seems normal can be loud and harmful to your
hearing. Take precautions by adjusting the
volume control on your radio to a safe sound
level before your hearing adapts to it.
To help avoid hearing loss or damage do the
following:
1. Adjust the volume knob to the lowest setting.
2. Increase volume slowly until you hear com-
fortably and clearly.
Page 109 of 221
FEATURES OF YOUR HYUNDAI 1- 97
7. TAPE/CD Select Button
Press this button to play a tape when listening
to the radio. Press TAPE/CD to switch between
the tape and compact disc if both are loaded.
The inactive tape or CD will remain safe inside
the radio for future listening.
8. Cassette Tape EJECT Button
Press this button located to the right of the
cassette tape slot to eject a tape. The tape is
ejected with the radio off. Cassette tape may be
loaded with the radio off.
9. Cassette Tape Messages
CHECK TAPE
If this message appears on the radio display, the
tape won't play because of one of the following
errors.
o The tape is tight and the player can't turn the
tape hubs. Remove the tape. Hold the tape
with the open end down and try to turn the
right hub counterclockwise with a pencil.
Turn the tape over and repeat. If the hubs do
not turn easily, your tape may be damaged
and should not be used in the player. Try a
new tape to make sure your player is work-
ing properly.
o The tape is broken. Try a new tape.
o The tape is wrapped around the tape head.
Attempt to get the cassette out. Try a new
tape.
CLEAN
If this message appears on the display, the
cassette tape player needs to be cleaned. It will
still play tapes, but you should clean it as soon
as possible to prevent damage to the tapes and
player. See "Care of Your Cassette Tape Player"
in the Index.
If any error occurs repeatedly or if an error can't
be corrected, contact your dealer.
10. Care of Your Cassette Tape Player
A tape player that is not cleaned regularly can
cause reduced sound quality, reined cassettes
or a damaged mechanism. Cassette tapes
should be stored in their case away from con-
taminants, direct sunlight and extreme heat. If
they aren't they may not operate properly or
may cause failure of the tape player.
Your tape player should be cleaned regularly
after every 59 hours of use. Your radio may
display CLEAN to indicate that you have used
your tape player needs to be cleaned. It will still
play tapes, but you should clean it as soon as
possible to prevent damage to your tapes and
player. If you notice a reduction in sound quality,
try a known good cassette to see of it is the tape
or the tape player or fault. If this other cassette
has no improvement in sound quality, clean the
tape player.The recommended cleaning method for your
cassette tape player is the use of a scrubbing
action, non-abrasive cleaning cassette with
pads which scrub the tape head as the hubs of
the cleaner cassette turn. The recommended
cleaning cassette is available through your
dealer.
When cleaning the cassette tape player with the
recommended non-abrasive cleaning cassette,
it is possible that the cassette may eject, be-
cause the cut tape detection feature on your
radio may recognize it as a broken tape. To
prevent the cleaning cassette from being
ejected, use the following steps:
1. Turn the ignition to ON or ACC.
2. Turn the radio off.
3. Press and hold the TAPE/CD select button
for five seconds. READY will appear on the
display and a cassette symbol will flash for
five second.
4. Insert the scrubbing action cleaning cas-
sette.
5. Eject the cleaning cassette after the
manufacturer's recommended cleaning time.
When the cleaning cassette has been ejected,
the broken tape detection feature is active
again.
Page 115 of 221
FEATURES OF YOUR HYUNDAI 1- 103
D295B01O-AAT1. POWER ON
Press this knob to turn the system on and off.
VOLUME Control
To increase volume, turn the knob clockwise.
Turn it counterclockwise to decrease volume.
2. BAND Select Button
Press this button to switch between AM, FM1
and FM2. Then Display shows your selection.
3. RADIO STATION Control Knob
Turn this knob to select radio stations.
4. SEEK/SCAN Button
SEEK
Press the up or down arrow to go to the next
higher or lower station and stay there. The
sound will mute while seeking.
SCAN
Press and hold either SEEK/SCAN arrow for
two seconds until SCAN appears on the display
and you hear a beep. Use SCAN to listen to
stations for a few seconds. The radio will go to
a station, stop for a few seconds, then go to the
next station. Press either SEEK/SCAN arrow
again to stop scanning. If you press SEEK/
SCAN for more than four seconds, the radio will
change to preset scan mode. Then sound will
mute while scanning.
5. PRESET STATION Select Button
The six numbered pushbuttons let you return to
your favorite stations. You can set up to 18
stations (six AM, six FM1 and six FM2) by
performing the following steps:
1. Turn the radio on.
2. Press AM · FM to select the band.
3. Tune in the desired station.
4. Press AUTO EQ to select the equalization
that best suited type of station selected.
5. Press and hold one of the six numbered
buttons until you hear a beep. Whenever you
press that numbered button, the station you
set will return and the equalization that you
selected will also be automatically selected
for that button.
6. Repeat the above steps for each pushbutton.
PRESET SCAN
Press and hold either SEEK/SCAN arrow for
more than four seconds, PRESET SCAN will
appear on the display. You will hear a double
beep. Use PERSET SCAN to listen to each of
your preset stations for a few seconds. The
radio will go to a preset station stored on your
pushbuttons, stop for a few seconds, then go on
to the next preset stations. Press either SEEK/
SCAN arrow again to stop scanning presets.
6. AUDIO Knob
BASS
Press the AUDIO knob until BASS appears on
the display. Turn the knob to increase or de-
crease bass. When you use this control, the
radio's tone setting will switch to custom mode.
To set the bass to the middle position, select
BASS and press and hold the AUDIO knob. The
radio will produce one beep and set the display
level to zero. To set all tone and speaker
controls to the middle position, press and hold
the AUDIO knob when no tone or speaker
control is active. The radio will produce one
beep and CENTERED will appear on the dis-
play.
Page 177 of 221
DO-IT-YOURSELF MAINTENANCE 6- 7
!
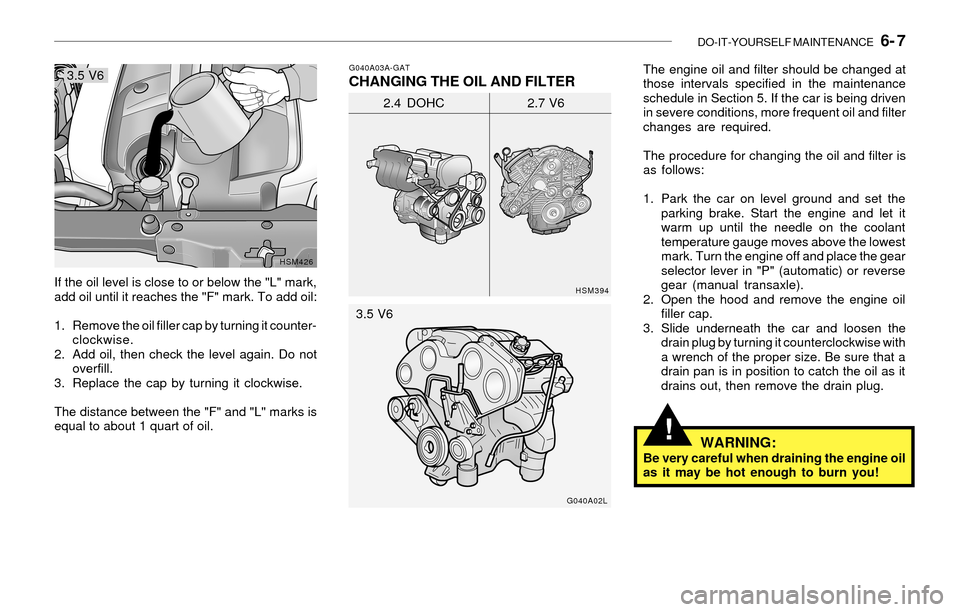
If the oil level is close to or below the "L" mark,
add oil until it reaches the "F" mark. To add oil:
1. Remove the oil filler cap by turning it counter-
clockwise.
2. Add oil, then check the level again. Do not
overfill.
3. Replace the cap by turning it clockwise.
The distance between the "F" and "L" marks is
equal to about 1 quart of oil.
HSM426G040A03A-GAT
CHANGING THE OIL AND FILTERThe engine oil and filter should be changed at
those intervals specified in the maintenance
schedule in Section 5. If the car is being driven
in severe conditions, more frequent oil and filter
changes are required.
The procedure for changing the oil and filter is
as follows:
1. Park the car on level ground and set the
parking brake. Start the engine and let it
warm up until the needle on the coolant
temperature gauge moves above the lowest
mark. Turn the engine off and place the gear
selector lever in "P" (automatic) or reverse
gear (manual transaxle).
2. Open the hood and remove the engine oil
filler cap.
3. Slide underneath the car and loosen the
drain plug by turning it counterclockwise with
a wrench of the proper size. Be sure that a
drain pan is in position to catch the oil as it
drains out, then remove the drain plug.
HSM394
2.4 DOHC 2.7 V6
G040A02L
WARNING:Be very careful when draining the engine oil
as it may be hot enough to burn you! 3.5 V6
3.5 V6
Page 179 of 221
DO-IT-YOURSELF MAINTENANCE 6- 9
G050C01A-AAT
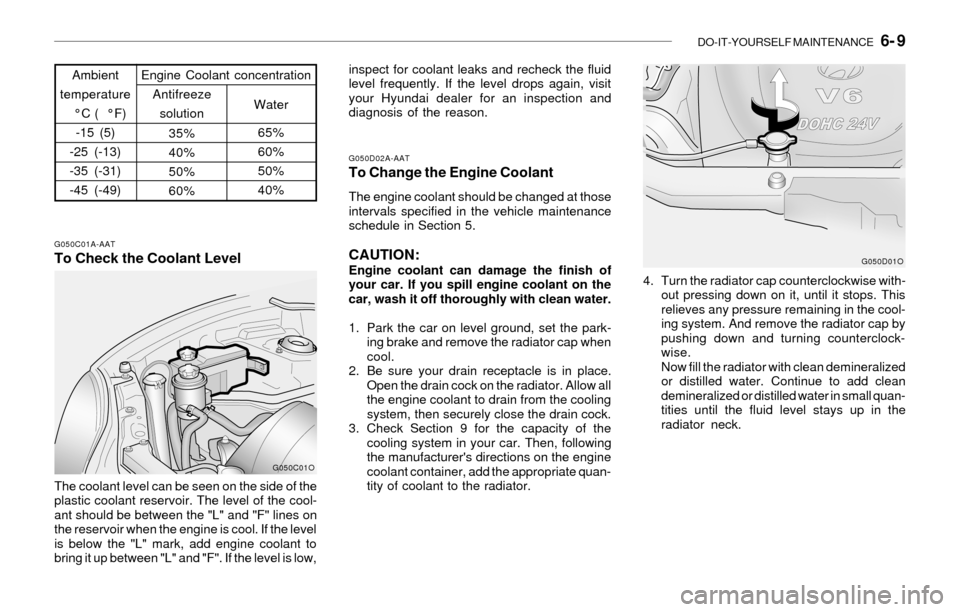
To Check the Coolant Level
The coolant level can be seen on the side of the
plastic coolant reservoir. The level of the cool-
ant should be between the "L" and "F" lines on
the reservoir when the engine is cool. If the level
is below the "L" mark, add engine coolant to
bring it up between "L" and "F". If the level is low,Ambient
temperature
°C ( °F)
-15 (5)
-25 (-13)
-35 (-31)
-45 (-49)
65%
60%
50%
40% 35%
40%
50%
60%Water Antifreeze
solution Engine Coolant concentration
G050C01O
G050D02A-AATTo Change the Engine Coolant
The engine coolant should be changed at those
intervals specified in the vehicle maintenance
schedule in Section 5.
CAUTION:Engine coolant can damage the finish of
your car. If you spill engine coolant on the
car, wash it off thoroughly with clean water.
1. Park the car on level ground, set the park-
ing brake and remove the radiator cap when
cool.
2. Be sure your drain receptacle is in place.
Open the drain cock on the radiator. Allow all
the engine coolant to drain from the cooling
system, then securely close the drain cock.
3. Check Section 9 for the capacity of the
cooling system in your car. Then, following
the manufacturer's directions on the engine
coolant container, add the appropriate quan-
tity of coolant to the radiator. inspect for coolant leaks and recheck the fluid
level frequently. If the level drops again, visit
your Hyundai dealer for an inspection and
diagnosis of the reason.
4. Turn the radiator cap counterclockwise with-
out pressing down on it, until it stops. This
relieves any pressure remaining in the cool-
ing system. And remove the radiator cap by
pushing down and turning counterclock-
wise.
Now fill the radiator with clean demineralized
or distilled water. Continue to add clean
demineralized or distilled water in small quan-
tities until the fluid level stays up in the
radiator neck.G050D01O