2003 Hyundai Matrix length
[x] Cancel search: lengthPage 23 of 312

FEATURES OF YOUR HYUNDAI 1- 15
B170A01E
STA1090P
B180A02A-GAT SEAT BELTS 3-Point System with Emergency Locking Retractor (If Installed)To Fasten Your Belt To fasten your seat belt, pull it out of the retractor and insert the metal tab into the buckle.There will be an audible "click" when the tablocks into the buckle.The seat belt automatically adjusts to the properlength only after the lap belt is adjusted manu-ally so that it fits snugly around your hips. If youlean forward in a slow, easy motion, the belt willextend and let you move around. If there is asudden stop or impact, however, the belt will
B170A04A-AAT HEIGHT ADJUSTABLE FRONT SEAT SHOULDER BELT (If Installed) You can adjust the height of the shoulder belt anchor to one of the 4 positions for maximumcomfort and safty.If the height of the adjusting seat belt is too nearyour neck, you will not be getting the mosteffective protection. The shoulder portion shouldbe adjusted so that it lies across your chest andmidway over your shoulder nearest the doorand not your neck.To adjust the height of the seat belt anchor,lower or raise the height adjuster into an appro-priate position. To raise the height adjuster, pullit up. To lower it, push it down while pressing theheight adjuster button.Release the button to lock the anchor intoposition. Try sliding the height adjuster to makesure that it has locked into the position.
WARNING:
o The height adjuster must be in the locked
position when the vehicle is moving.
o The misadjustment of height of the shoul- der belt could reduce the effectivenessof the seat belt in a crash.
YR10301B
B180A03Y-GAT
SEAT BELTS-Driver's an d passenger's
3-Point System with Webbing Clamp
Locking Retractor ( If Installed)
To Fasten Your Belt To fasten your seat belt, pull it out of the retractor and insert the metal tab into the buckle.There will be an audible "click" when the tablocks into the buckle.The seat belt automatically adjusts to the properlength only after the lap belt is adjusted manu-ally so that it fits snugly around your hips. If youlean forward in a slow, easy motion, the belt willextend and let you move around. If there is a sudden stop or impact, however, the belt willlock into position. It will also lock if you try tolean forward too quickly. Check to make surethat the belt is properly locked and that the beltis not twisted.
Page 25 of 312

FEATURES OF YOUR HYUNDAI 1- 17
B220C01A-AAT To Release the Seat Belt
B220C01FC
When you want to release the seat belt, press the button in the locking buckle. WARNING: The center lap belt latching mechanism isdifferent from those for the rear seat shoul-der belts. When fastening the rear seat shoul-der belts or the center lap belt, make surethey are inserted into the correct buckles toobtain maximum protection from the seatbelt system and assure proper operation.
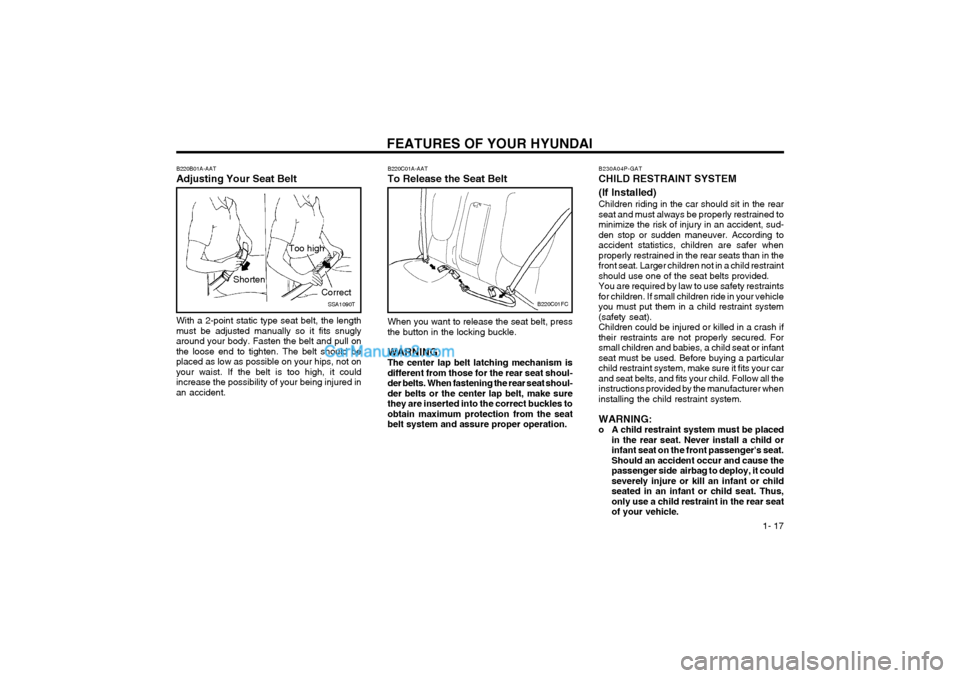
B220B01A-AAT Adjusting Your Seat Belt
SSA1090T
With a 2-point static type seat belt, the length must be adjusted manually so it fits snuglyaround your body. Fasten the belt and pull onthe loose end to tighten. The belt should beplaced as low as possible on your hips, not onyour waist. If the belt is too high, it couldincrease the possibility of your being injured inan accident. Correct
Shorten Too high
B230A04P-GAT CHILD RESTRAINT SYSTEM (If Installed) Children riding in the car should sit in the rear seat and must always be properly restrained tominimize the risk of injury in an accident, sud-den stop or sudden maneuver. According toaccident statistics, children are safer whenproperly restrained in the rear seats than in thefront seat. Larger children not in a child restraintshould use one of the seat belts provided.You are required by law to use safety restraintsfor children. If small children ride in your vehicleyou must put them in a child restraint system(safety seat).Children could be injured or killed in a crash iftheir restraints are not properly secured. Forsmall children and babies, a child seat or infantseat must be used. Before buying a particularchild restraint system, make sure it fits your carand seat belts, and fits your child. Follow all theinstructions provided by the manufacturer wheninstalling the child restraint system. WARNING:
o A child restraint system must be placed
in the rear seat. Never install a child orinfant seat on the front passenger's seat.Should an accident occur and cause thepassenger side airbag to deploy, it couldseverely injure or kill an infant or childseated in an infant or child seat. Thus,only use a child restraint in the rear seatof your vehicle.
Page 26 of 312

FEATURES OF YOUR HYUNDAI
1- 18 o Never use an infant carrier or child safety
seat that "hooks" over a seatback; it may not provide adequate security in an acci-dent.
o Never allow a child to be held in a person's arms while they are in a moving vehicle,as this could result in serious injury tothe child in the event of an accident or asudden stop. Holding a child in a movingvehicle does not provide the child withany means of protection during an acci-dent, even if the person holding the childis wearing a seat belt.
o If the child restraint seat is not anchored properly, the risk of a child being seri-ously injured or killed in a collisiongreatly increases.
o Since a safety belt or child restraint
system can become very hot if it is leftin a closed vehicle, be sure to check theseat cover and buckles before placing achild there.
o When the child restraint system is not in use, fasten it with a safety belt so that itwill not be thrown forward in the case ofa sudden stop or an accident.
o Children who are too large to be in a child restraint should will sit in the rear seatand be restrained with the available lap/shoulder belts. Never allow children toride in the front passenger seat.
o Always make sure that the shoulder belt portion of the outboard lap/shoulder beltis positioned midway over the shoulder,never across the neck or behind theback. Moving the child closer to the cen-ter of the vehicle may help provide agood shoulder belt fit. The lap belt por-tion of the lap/shoulder belt or the centerseat lap belt must always be positionedas low as possible on the child's hips andas snug as possible.
o If the seat belt will not properly fit the child, Hyundai recommends the use ofan approved booster seat in the rear seatin order to raise the child's seating heightso that the seat belt will properly fit thechild.
o Never allow a child to stand up or kneel on the seat. B235G01Y-GAT
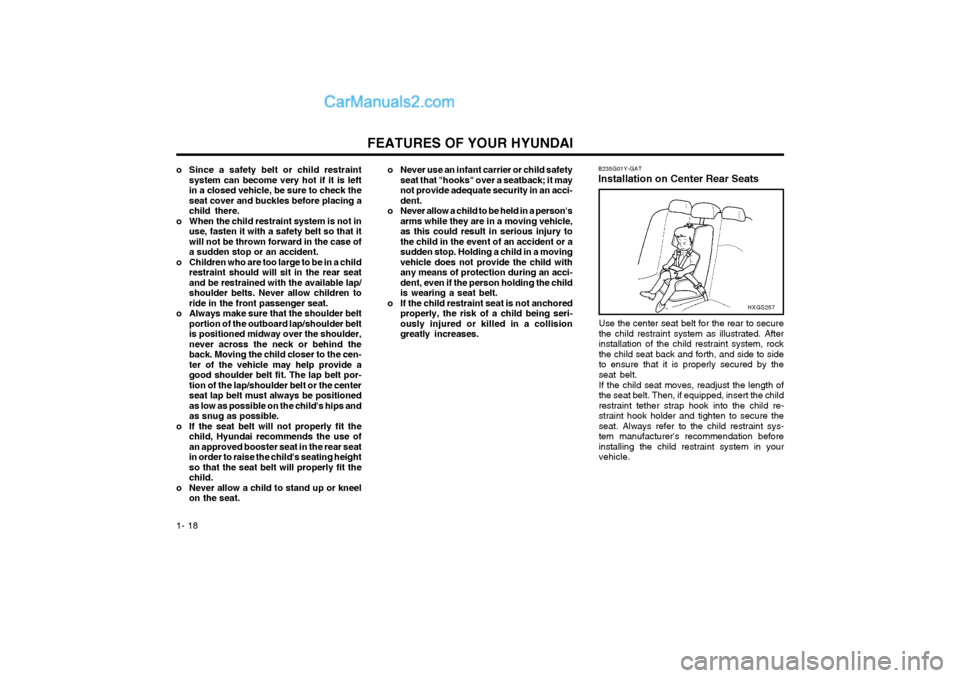
Installation on Center Rear Seats
HXGS257
Use the center seat belt for the rear to secure the child restraint system as illustrated. Afterinstallation of the child restraint system, rockthe child seat back and forth, and side to sideto ensure that it is properly secured by theseat belt. If the child seat moves, readjust the length of the seat belt. Then, if equipped, insert the childrestraint tether strap hook into the child re-straint hook holder and tighten to secure theseat. Always refer to the child restraint sys-tem manufacturer's recommendation beforeinstalling the child restraint system in yourvehicle.
Page 55 of 312

FEATURES OF YOUR HYUNDAI 1- 47
B510D01E
B510B01FC-GAT OUTSIDE REARVIEW MIRROR Electric Type
HFC2011
The outside rearview mirrors can be adjusted to your preferred rear vision, both directly behindthe vehicle, and to the rear of the left and rightsides.The remote control outside rearview mirrorswitch controls the adjustments for both rightand left outside mirrors.
HFC2058
The multi box may be opened by pulling it out by its grip.It is used for storing small articles.If the multi box is removed, the fuse box for thelights and other electrical accessories will beexposed.
B500B02E-GAT MULTI BOX
To adjust the position of either mirror:
1. Move the selecting switch to the right or left
to activate the adjustable mechanism for the corresponding door mirror.
2. Now, adjust mirror angle by depressing the appropriate perimeter switch as illustrated.
CAUTION:
o Do not operate the switch continuously for an unnecessary length of time.
o Scraping ice from the mirror face could cause permanent damage. To removeany ice, use a sponge, soft cloth or ap-proved de-icer.
WARNING:Be careful when judging the size or distanceof any object seen in the passenger siderear view mirror. It is a convex mirror with acurved surface. Any objects seen in thismirror are closer than they appear.
Page 167 of 312

VEHICLE SPECIFICATIONS 9-1
J030A01FC-GAT
TIRE J040A02FC-GAT
ELECTRICAL
ITEM BatteryGenerator
Type Front brake typeRear brake typeParking brake Dual hydraulic with brake boosterVentilated discDrum Cable
J050A01FC-GAT BRAKE
9. VEHICLE SPECIFICATIONS
J010A01FC-GAT
MEASUREMENT
J060A01S-GAT FUEL SYSTEM
J020A01FC-GAT
POWER STEERING Type Wheel free playRack strokeOil pump type Rack and pinion0 ~ 30 mm (0 ~ 1.18 in.)146±1mm (5.7±0.04 in.)Vane type
Front Rear
Fuel tankcapacity Imp.gal
12
US.gal
14.5
Liter
55
Overall lengthOverall widthOverall height (unladen) Wheel base Wheel tread
mm (in.)
4,025(158.4) 1,740(68.5)1,635(64.3)
*1,685(66.3)
2,600(102.3) 1,485 (58.5)1,485 (58.5)
DIESEL
CMF 68 AH 90A (12V)
GASOLINE
MF45AH, MF60AH(12V) 90A (13.5V)
*Installed roof rack
Standard Option
J030B01FC-GAT SPARE TIRE
Temporary Full size
185/65 R14 195/55 R15205/55 R15 (1.8 DOHC only)
StandardOption
9
Page 195 of 312

CONTROLS AND EQUIPMENT
1- 14 of movement whilst the belt is being worn. However, in the event of rapid deceleration orimpact, the belt mechanism will automaticallylock.
The mechanism will also lock if the seat belt
webbing is withdrawn too quickly when thebelt is being fastened or if attempts are madeto withdraw the webbing whilst the vehicle isnot on level ground. Should the seat belt lockunder these conditions, it will be possible torelease the mechanism by allowing a smallamount of webbing to be retracted and thebelt withdrawn again.
SSD1090Q
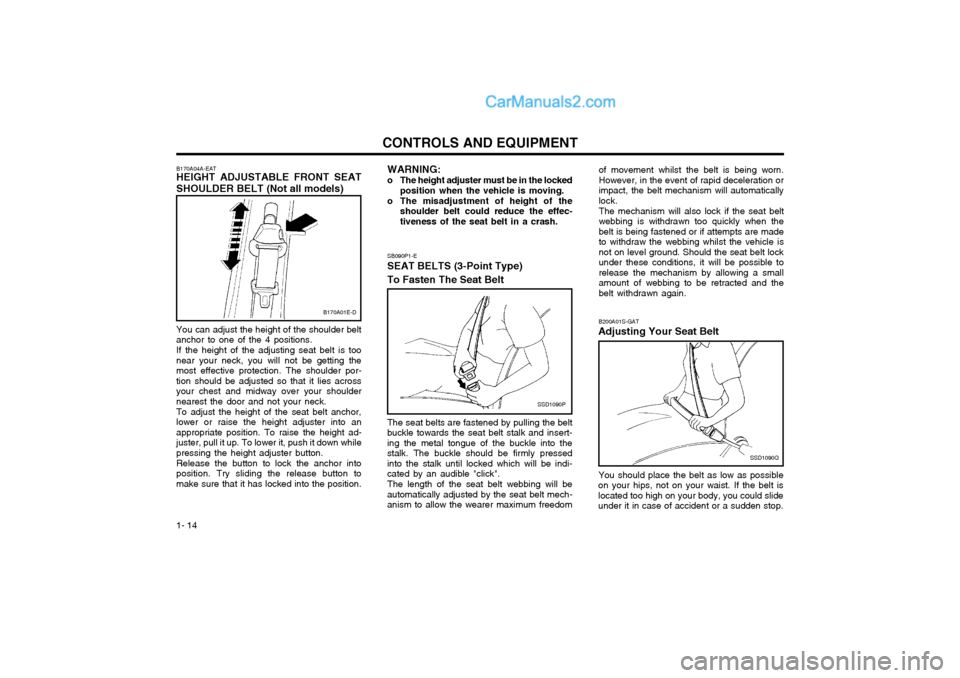
B200A01S-GAT
Adjusting Your Seat Belt
You should place the belt as low as possible
on your hips, not on your waist. If the belt is located too high on your body, you could slideunder it in case of accident or a sudden stop.
SB090P1-E
SEAT BELTS (3-Point Type) To Fasten The Seat Belt
SSD1090P
The seat belts are fastened by pulling the belt
buckle towards the seat belt stalk and insert- ing the metal tongue of the buckle into thestalk. The buckle should be firmly pressedinto the stalk until locked which will be indi-cated by an audible "click".
The length of the seat belt webbing will be
automatically adjusted by the seat belt mech-anism to allow the wearer maximum freedom WARNING:
o The height adjuster must be in the locked position when the vehicle is moving.
o The misadjustment of height of the shoulder belt could reduce the effec-tiveness of the seat belt in a crash.
B170A01E-D
B170A04A-EAT HEIGHT ADJUSTABLE FRONT SEAT SHOULDER BELT (Not all models) You can adjust the height of the shoulder belt anchor to one of the 4 positions. If the height of the adjusting seat belt is too near your neck, you will not be getting themost effective protection. The shoulder por-tion should be adjusted so that it lies acrossyour chest and midway over your shouldernearest the door and not your neck. To adjust the height of the seat belt anchor, lower or raise the height adjuster into anappropriate position. To raise the height ad-juster, pull it up. To lower it, push it down whilepressing the height adjuster button. Release the button to lock the anchor into position. Try sliding the release button tomake sure that it has locked into the position.
Page 196 of 312

1- 15
CONTROLS AND EQUIPMENT
SB090R1-F
To Release the Seat Belt
SSD1090R
The seat belt is released by pressing the
release button in the locking buckle.
When it is released, the belt should automati-
cally draw back into the retractor.
If this does not happen, check the belt to be
sure it is not twisted, then try again.
This could result of death, serious injury or property damage. Both arms should not beunder or over the belt. Rather, one should beover and the other under, as shown in theillustration.
Never wear the seat belt under the arm near-
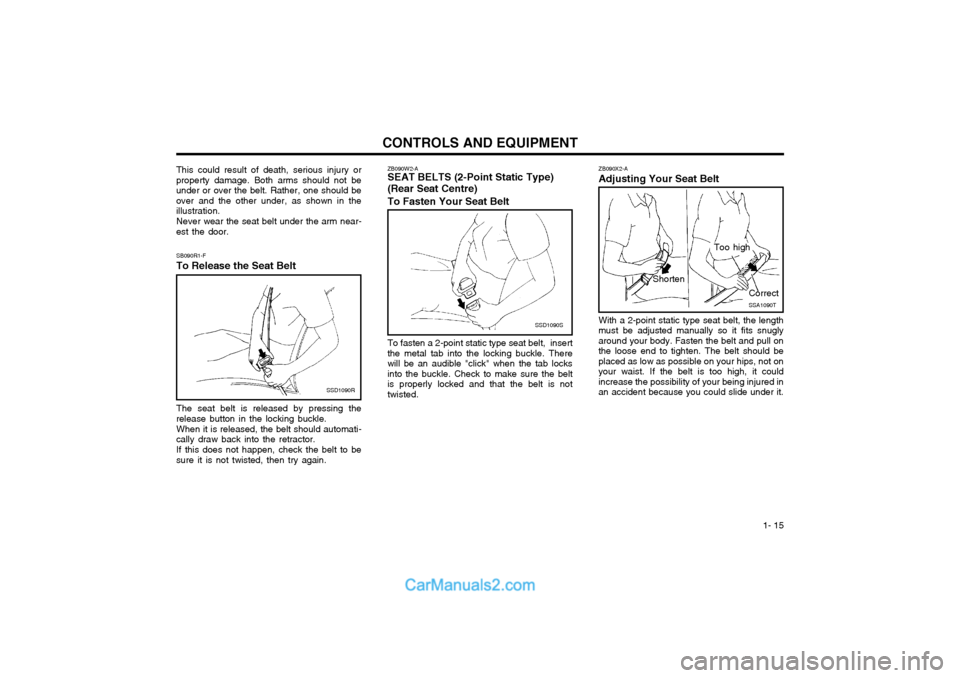
est the door. ZB090X2-A Adjusting Your Seat Belt
SSA1090T
Shorten
Correct
Too high
To fasten a 2-point static type seat belt, insert the metal tab into the locking buckle. Therewill be an audible "click" when the tab locksinto the buckle. Check to make sure the beltis properly locked and that the belt is nottwisted. With a 2-point static type seat belt, the length
must be adjusted manually so it fits snuglyaround your body. Fasten the belt and pull onthe loose end to tighten. The belt should beplaced as low as possible on your hips, not onyour waist. If the belt is too high, it couldincrease the possibility of your being injured inan accident because you could slide under it.
ZB090W2-A SEAT BELTS (2-Point Static Type) (Rear Seat Centre) To Fasten Your Seat Belt
SSD1090S
Page 226 of 312

1- 45
CONTROLS AND EQUIPMENT
SB360C1-F FOLDING THE OUTSIDE REAR VIEW MIRRORS To fold the outside rear view mirrors, push
them towards the rear.
The outside rear view mirrors can be folded
rearward for parking in restricted areas.
WARNING: Do not adjust or fold the outside rear view
mirrors while the vehicle is moving. This could result in loss of control, and anaccident causing death, serious injury orproperty damage.
B510D01E
CAUTION:
o Do not leave the switch on for an unneces-sary length of time.
o Scraping ice from the mirror face could cause permanent damage. To remove any ice, use a sponge, soft cloth orapproved deicer.
o Be careful when judging the size or dis- tance of any object seen in the passen-ger side rear view mirror. It is a convexmirror with a curved surface, any ob-jects seen in this mirror are closer thanthey appear.
B510C01FC-D
B510D01HP-EAT
OUTSIDE REARVIEW MIRROR HEATER (Not all models)
The outside rearview mirror heater is actuated
in connection with the rear window defroster. To heat the outside rearview mirror glass,push in the switch for the rear window de-froster. The rearview mirror glass will be heatedfor defrosting or defogging and will give youimproved rear vision in inclement weatherconditions. Push the switch again to turn theheater off. The outside rearview mirror heaterautomatically turns itself off after 20 minutes. HFC2080-D