2003 Hyundai Grandeur tires
[x] Cancel search: tiresPage 135 of 235
DRIVING YOUR HYUNDAI 2- 3
C020A01A-AAT BEFORE STARTING THE EN- GINE Before you start the engine, you should always:
1. Look around the vehicle to be sure
there are no flat tires, puddles of oil, water or other indications of pos-sible trouble.
2. After entering the car, check to be
sure the parking brake is engaged.
3. Check that all windows, and lights are clean.
4. Check that the interior and exterior mirrors are clean and in position.
5. Check your seat, seatback and
headrest to be sure they are in theirproper positions.
6. Lock all the doors.
7. Fasten your seat belt and be sure
that all other occupants have fas- tened theirs.
8. Turn off all lights and accessories
that are not needed.
9. When you turn the ignition switch to
"ON", check that all appropriate warning lights are operating and that you have sufficient fuel. C030A01A-GAT COMBINATION IGNITION SWITCHTo Start the Engine
o If your Hyundai is equipped with a
manual transaxle, place the shift lever in neutral and depress the clutch pedal fully.
o If your Hyundai has an automatic transaxle, place the shift lever in "P"(park).
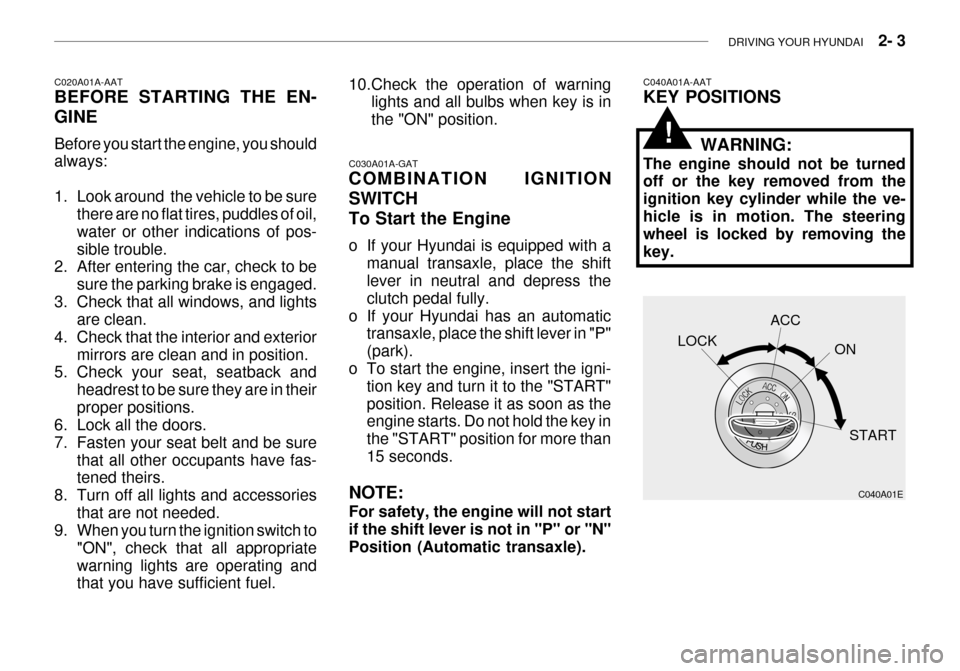
o To start the engine, insert the igni-
tion key and turn it to the "START"position. Release it as soon as the engine starts. Do not hold the key in the "START" position for more than15 seconds.
NOTE: For safety, the engine will not start if the shift lever is not in "P" or "N"Position (Automatic transaxle).
10.Check the operation of warning
lights and all bulbs when key is inthe "ON" position.C040A01A-AAT KEY POSITIONS
WARNING:
The engine should not be turned off or the key removed from the ignition key cylinder while the ve-hicle is in motion. The steering wheel is locked by removing the key.
C040A01E
LOCK
ACC
ON
START
!
Page 147 of 235

DRIVING YOUR HYUNDAI 2- 15
C150A01A-AAT SMOOTH CORNERING Avoid braking or gear changing in cor- ners, especially when roads are wet. Ideally, corners should always be takenunder gentle acceleration. If you follow these suggestions, tire wear will be held to a minimum.
o Don't "ride" the brake or clutch pedal.
This can increase fuel consumptionand also increase wear on thesecomponents. In addition, driving with your foot resting on the brake pedal may cause the brakes to overheat,which reduces their effectiveness and may lead to more serious con- sequences.
o Take care of your tires. Keep them inflated to the recommended pres-sure. Incorrect inflation, either toomuch or too little, results in unnec- essary tire wear. Check the tire pres- sures at least once a month.
o Be sure that the wheels are aligned correctly. Improper alignment canresult from hitting curbs or drivingtoo fast over irregular surfaces. Poor alignment causes faster tire wear and may also result in other prob-lems as well as greater fuel con- sumption.
o Keep your car in good condition. For better fuel economy and reducedmaintenance costs, maintain your car in accordance with the mainte-nance schedule in Section 5. If you drive your car in severe conditions, more frequent maintenance is re-quired (see Section 5 for details). o Keep your car clean. For maximum
service, your Hyundai should bekept clean and free of corrosivematerials. It is especially important that mud, dirt, ice, etc. not be al- lowed to accumulate on the under-side of the car. This extra weight can result in increased fuel con- sumption and also contribute to cor-rosion.
o Travel lightly. Don't carry unneces-
sary weight in your car. Weight re-duces fuel economy.
o Don't let the engine idle longer than
necessary. If you are waiting (andnot in traffic), turn off your engine and restart only when you're ready to go.
o Remember, your Hyundai does not require extended warm-up. As soonas the engine is running smoothly,you can drive away. In very cold weather, however, give your engine a slightly longer warm-up period. o Don't "lug" or "over-rev" the engine.
Lugging is driving too slowly in toohigh a gear resulting in the enginebucking. If this happens, shift to a lower gear. Over-revving is racing the engine beyond its safe limit.This can be avoided by shifting at the recommended speeds.
o Use your air conditioning sparingly. The air conditioning system is oper-ated by engine power so your fuel economy is reduced when you useit.
Page 148 of 235

2- 16 DRIVING YOUR HYUNDAI
C160F01A-AAT Check Spark Plugs and Ignition System Inspect your spark plugs as described in Section 6 and replace them if neces-sary. Also check all ignition wiring and components to be sure they are not cracked, worn or damaged in any way.
C160C01A-AAT Use High Quality Ethylene Glycol Coolant Your Hyundai is delivered with high quality ethylene glycol coolant in the cooling system. It is the only type of coolant that should be used because ithelps prevent corrosion in the cooling system, lubricates the water pump and prevents freezing. Be sure to replaceor replenish your coolant in accor- dance with the maintenance schedule in Section 5. Before winter, have yourcoolant tested to assure that its freez- ing point is sufficient for the tempera- tures anticipated during the winter. C160D01A-AAT Check Battery and Cables Winter puts additional burdens on the battery system. Visually inspect thebattery and cables as described in Section 6. The level of charge in your battery can be checked by your Hyun-dai dealer or a service station. C160E01A-AAT Change to "Winter Weight" Oil if Necessary In some climates it is recommended that a lower viscosity "winter weight" oil be used during cold weather. SeeSection 9 for recommendations. If you aren't sure what weight oil you should use, consult your Hyundai dealer.
C160A01A-AAT WINTER DRIVING The more severe weather conditions of winter result in greater wear andother problems. To minimize the prob- lems of winter driving, you should fol- low these suggestions: C160B01A-GAT Snowy or Icy Conditions To drive your vehicle in deep snow, it may be necessary to use snow tires or to install tire chains on your tires. If snow tires are needed, it is necessaryto select tires equivalent in size and type of the original equipment tires. Failure to do so may adversely affectthe safety and handling of your car. Furthermore, speeding, rapid accel- eration, sudden brake applications, andsharp turns are potentially very haz- ardous practices. During deceleration, use engine brak-ing to the fullest extent. Sudden brake applications on snowy or icy roads may cause skids to occur. You need tokeep sufficient distance between the vehicle in front and your vehicle. Also, apply the brake gently. It should be noted that installing tire chains on the tire will provide a greater driving force, but will not prevent side skids. NOTE: Tire chains are not legal in all prov- inces. Check province laws beforefitting tire chains.
Page 150 of 235

2- 18 DRIVING YOUR HYUNDAI
C190B01S-AAT Trailer Hitches Select the proper hitch and ball combi- nation, making sure that it's location is compatible with that of the trailer or vehicle being towed. Use a quality non-equalizing hitch whichdistributes the tongue load uniformly throughout the chassis. The hitch should be bolted securely to the car and installed by a qualified technician. DO NOT USE A HITCHDESIGNED FOR TEMPORARY IN- STALLATION AND NEVER USE ONE THAT ATTACHES ONLY TO THEBUMPER.
C180A01A-AAT USE OF LIGHTS Check your lights regularly for correct operation and always keep them clean.When driving during the day in condi- tions of poor visibility, it is helpful to drive with headlights on low beam.This enables you to be seen as well as to see. C190A01A-GAT TRAILER OR VEHICLE TOWING If you are considering towing with your car, you should first check with your Province Department of Motor Vehicles to determine their legal requirements.Since laws vary from province to prov- ince the requirements for towing trail- ers, cars, or other types of vehicles orapparatus may differ. Ask your Hyundai dealer for further details before towing.
CAUTION:
Do not do any towing with your carduring its first 2,000 km (1,200 miles) in order to allow the engine to prop-erly break in. Failure to heed this caution may result in serious en- gine or transaxle damage.
!
C170A01A-AAT HIGH SPEED MOTORING Pre-Trip Inspections 1. Tires: Adjust the tire inflation pressures to specification. Low tire inflation pres-sures will result in overheating and possible failure of the tires. Avoid using worn or damaged tireswhich may result in reduced traction or tire failure. NOTE: Never exceed the maximum tire in- flation pressure shown on the tires. 2. Fuel, engine coolant and engine oil: High speed travel consumes more fuel than urban motoring. Do not forget tocheck both engine coolant and engine oil. 3. Drive belt: A loose or damaged drive belt may result in overheating of the engine.
Page 153 of 235

DRIVING YOUR HYUNDAI 2- 21
C190F01Y-GAT Trailer or Vehicle Towing Tips
1. Before towing, check hitch and
safety chain connections as well as proper operation of the trailer run- ning lights, brake lights, and turn signals.
2. Always drive your vehicle at a mod- erate speed (Less than 100 km/h)
3. Trailer towing requires more fuel than normal conditions.
4. To maintain engine braking effi-
ciency and electrical charging per-formance, do not use fifth gear (manual transaxle).
5. Always secure items in the trailer to
prevent load shift while driving.
6. Check the condition and air pres-
sure of all tires on the trailer and your car. Low tire pressure can seriously affect the handling. Also check the spare tire. 10.During your trip, check occasion-
ally to be sure that the load issecure, and that the lights and anytrailer brakes are still working.
11.Avoid jerky starts, sudden accel-
eration or sudden stops.
12.Avoid sharp turns and rapid lane changes.
13.Avoid holding the brake pedal down too long or too frequently. This could cause the brakes to overheat, re- sulting in reduced braking efficien-cy.
14.When going down a hill, shift into a
lower gear and use the engine brak-ing effect. When ascending a long grade, downshift the transaxle to a lowergear and reduce speed to reduce chances of engine overloading and/ or overheating.
15.If you have to stop while going uphill, do not hold the vehicle inplace by pressing on the accelera-tor. This can cause the automatic transaxle to overheat. Use the park- ing brake or footbrake.
7. The vehicle/trailer combination is
more affected by crosswind andbuffeting.When being passed by a large ve- hicle, keep a constant speed and steer straight ahead. If there is toomuch wind buffeting, slow down to get out of the other vehicle's air turbulence.
8. When parking your car and trailer, especially on a hill, be sure to followall the normal precautions. Turnyour front wheel into the curb, set the parking brake firmly, and put the transaxle in 1st or Reverse(manual) or Park (automatic). In addition, place wheel chocks at each of the trailer's tires.
9. If the trailer has electric brakes, start your vehicle and trailer mov-ing, and then apply the trailer brakecontroller by hand to be sure the brakes are working. This lets you check your electrical connection atthe same time.
Page 160 of 235
3- 6 WHAT TO DO IN AN EMERGENCY
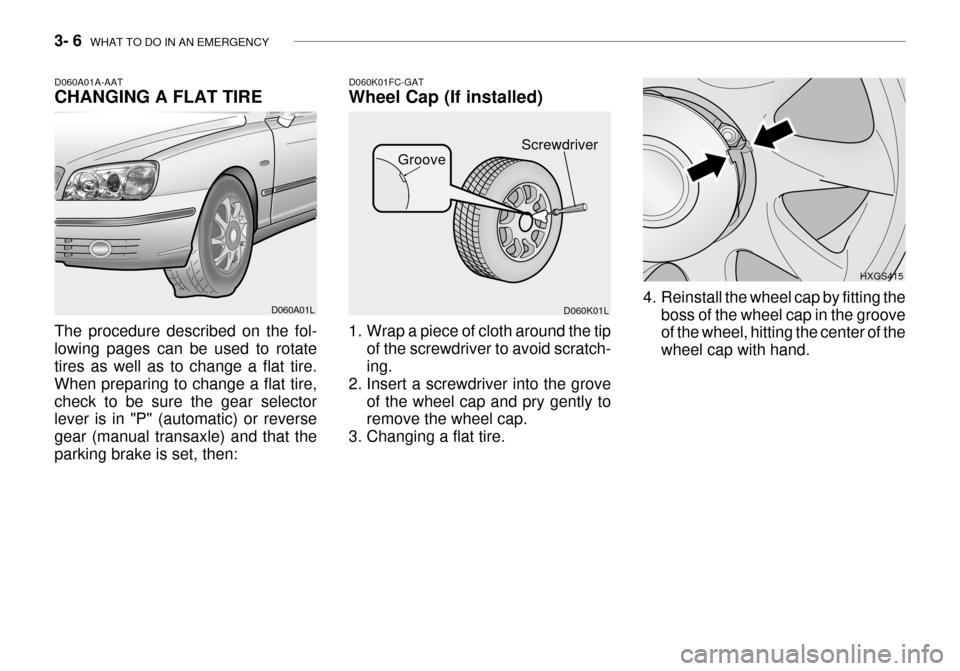
D060K01FC-GAT Wheel Cap (If installed)
D060K01L HXGS415
1. Wrap a piece of cloth around the tip of the screwdriver to avoid scratch- ing.
2. Insert a screwdriver into the grove
of the wheel cap and pry gently toremove the wheel cap.
3. Changing a flat tire. 4. Reinstall the wheel cap by fitting the
boss of the wheel cap in the grooveof the wheel, hitting the center of the wheel cap with hand.
D060A01A-AAT CHANGING A FLAT TIRE The procedure described on the fol- lowing pages can be used to rotate tires as well as to change a flat tire. When preparing to change a flat tire,check to be sure the gear selector lever is in "P" (automatic) or reverse gear (manual transaxle) and that theparking brake is set, then:
D060A01L Screwdriver
Groove
Page 170 of 235

4- 4 CORROSION PREVENTION AND APPEARANCE CARE
trol chemicals are used, you should pay particular attention to the under- side of the car. Start by rinsing the carto remove dust and loose dirt. In win- ter, or if you have driven through mud or muddy water, be sure to thoroughlyclean the underside as well. Use a hard direct stream of water to remove accumulations of mud or corrosivematerials. High pressure car washes may cause water to enter your vehicle. Use a good quality car-washing solu-tion and follow the manufacturer's di- rections on the package. These are available at your Hyundai dealer orauto parts outlet. Don't use strong household detergents, gasoline, strong solvents or abrasive cleaning powdersas these may damage the finish. Use a clean sponge or cloth, rinse it frequently and don't damage the finishby rubbing too hard. For stubborn spots, dampen them frequently and remove them a little at a time. To clean whitewall tires, use a stiff brush or soapy steel-wool scouring pad.To clean plastic wheel covers, use a clean sponge or soft cloth and water. To clean cast aluminum alloy wheels, use a mild soap or neutral detergent. Do not use abrasive cleaners. Protectthe bare-metal surfaces by cleaning, polishing and waxing. Because alumi- num is subject to corrosion, be sure togive aluminum alloy wheels special attention in winter. If you drive on salted roads, clean the wheels thor-oughly afterwards. After washing, be sure to rinse thor- oughly. If soapy water dries on the finish, streaking will result. When the weather is warm and the humidity low, you may find it neces- sary to rinse each section immediatelyafter washing to avoid streaking. After rinsing, dry the car using a damp chamois or soft, absorbent cloth. The reason for drying the car is to removewater from the car so it will dry without water spots. Don't rub, this can dam- age the finish. If you find any nicks or scratches in the paint, use touch-up paint to coverthem to prevent corrosion. To protect the paintwork of the car against corro- sion, you must clean your Hyundai (atleast once a month). Give special at- tention to the removal of salt, mud and other substances on the underside ofthe splashboards of the car. Make sure that the outlets and the underside of the doors are open. Paint damagecan be caused by small accumulation of tar, industrial precipitation, tree resin, insects and bird droppings, when notremoved immediately. If water alone is not strong enough to remove the accu- mulated dirt, use a mild car washingsolution. Be sure to rinse the surface after washing to remove the solution. Never allow the solution to dry on thepainted surfaces.
Page 206 of 235
DO-IT-YOURSELF MAINTENANCE 6- 25
Before performing aiming adjustment,
make sure of the following.
1. Keep all tires inflated to the correct
pressure.
2. Place the vehicle on level ground
and press the front bumper & rear bumper down several times. Place the vehicle at a distance of 3 m (118 in.) from the test wall.
3. See that the vehicle is unloaded (except for full levels of coolant,engine oil and fuel, and spare tire,jack, and tools). Have the driver or equivalent weight placed in driver's seat.
4. Clean the head light lenses and
turn on the headlights (low beam).
5. Open the hood.
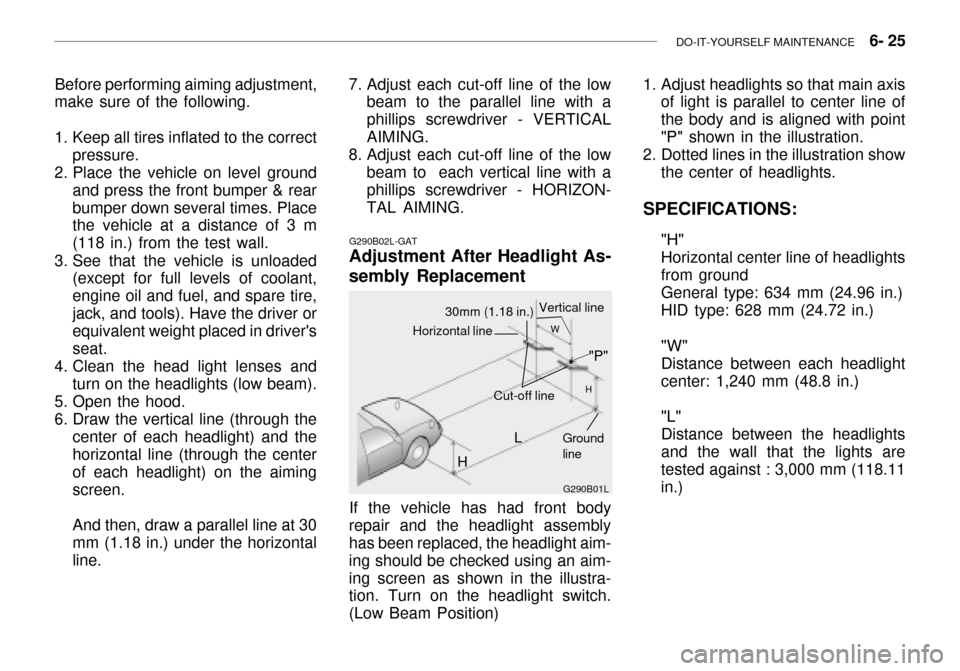
6. Draw the vertical line (through the center of each headlight) and the horizontal line (through the center of each headlight) on the aimingscreen. And then, draw a parallel line at 30 mm (1.18 in.) under the horizontal line.
G290B02L-GAT
Adjustment After Headlight As- sembly Replacement
G290B01L
LW
H
H Cut-off line
Ground line
If the vehicle has had front body
repair and the headlight assembly has been replaced, the headlight aim- ing should be checked using an aim-ing screen as shown in the illustra- tion. Turn on the headlight switch. (Low Beam Position)
"P"
Horizontal line
30mm (1.18 in.) Vertical line
7. Adjust each cut-off line of the low
beam to the parallel line with a phillips screwdriver - VERTICALAIMING.
8. Adjust each cut-off line of the low
beam to each vertical line with a phillips screwdriver - HORIZON- TAL AIMING. 1. Adjust headlights so that main axis
of light is parallel to center line ofthe body and is aligned with point"P" shown in the illustration.
2. Dotted lines in the illustration show the center of headlights.
SPECIFICATIONS: "H"Horizontal center line of headlightsfrom groundGeneral type: 634 mm (24.96 in.) HID type: 628 mm (24.72 in.) "W" Distance between each headlightcenter: 1,240 mm (48.8 in.) "L" Distance between the headlightsand the wall that the lights aretested against : 3,000 mm (118.11 in.)