2003 Hyundai Grandeur radiator
[x] Cancel search: radiatorPage 60 of 235
1- 46 FEATURES OF YOUR HYUNDAI
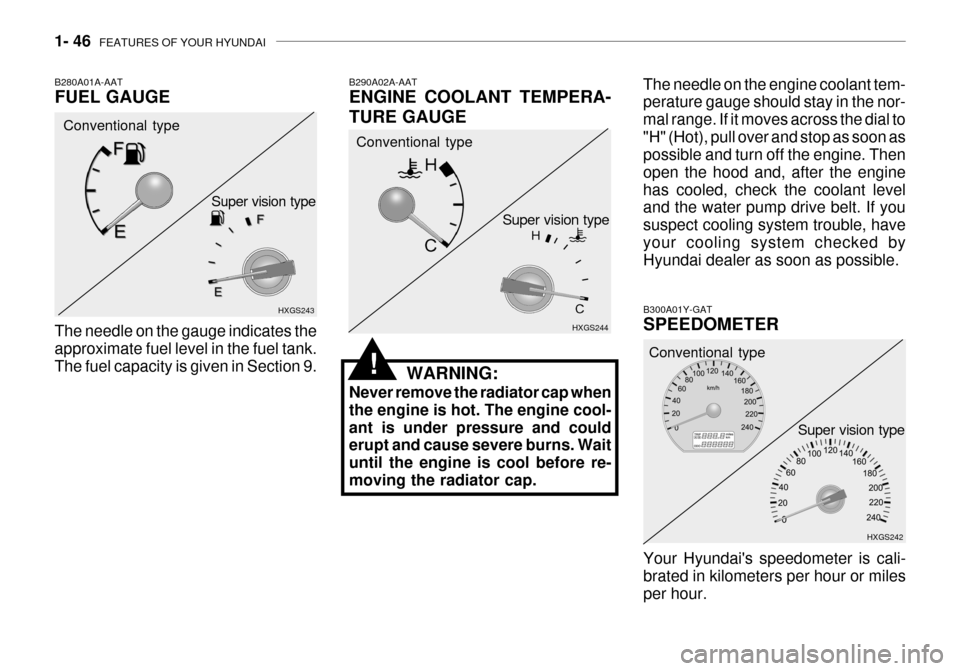
B300A01Y-GAT SPEEDOMETER Your Hyundai's speedometer is cali- brated in kilometers per hour or miles per hour. HXGS242
Conventional type
Super vision type
B280A01A-AAT FUEL GAUGE
B290A02A-AATENGINE COOLANT TEMPERA- TURE GAUGE
WARNING:
Never remove the radiator cap when the engine is hot. The engine cool-ant is under pressure and could erupt and cause severe burns. Wait until the engine is cool before re-moving the radiator cap.
HXGS243
HXGS244
The needle on the gauge indicates theapproximate fuel level in the fuel tank. The fuel capacity is given in Section 9. Conventional type
Conventional type
Super vision type
Super vision type
The needle on the engine coolant tem- perature gauge should stay in the nor- mal range. If it moves across the dial to"H" (Hot), pull over and stop as soon as possible and turn off the engine. Then open the hood and, after the enginehas cooled, check the coolant level and the water pump drive belt. If you suspect cooling system trouble, haveyour cooling system checked by Hyundai dealer as soon as possible.
!
Page 82 of 235
1- 68 FEATURES OF YOUR HYUNDAI
HXGS255
WARNING:
Gasoline vapors are dangerous. Before refueling, always stop the engine and never allow sparks or open flames near the filler area. Ifyou need to replace the filler cap, use a genuine Hyundai replacement part.If you open the fuel filler cap during high ambient temperatures, a slight "pressure sound" may be heard.This is normal and not a cause for concern. Whenever you open the fuel fillercap, turn it slowly.
HXGS207
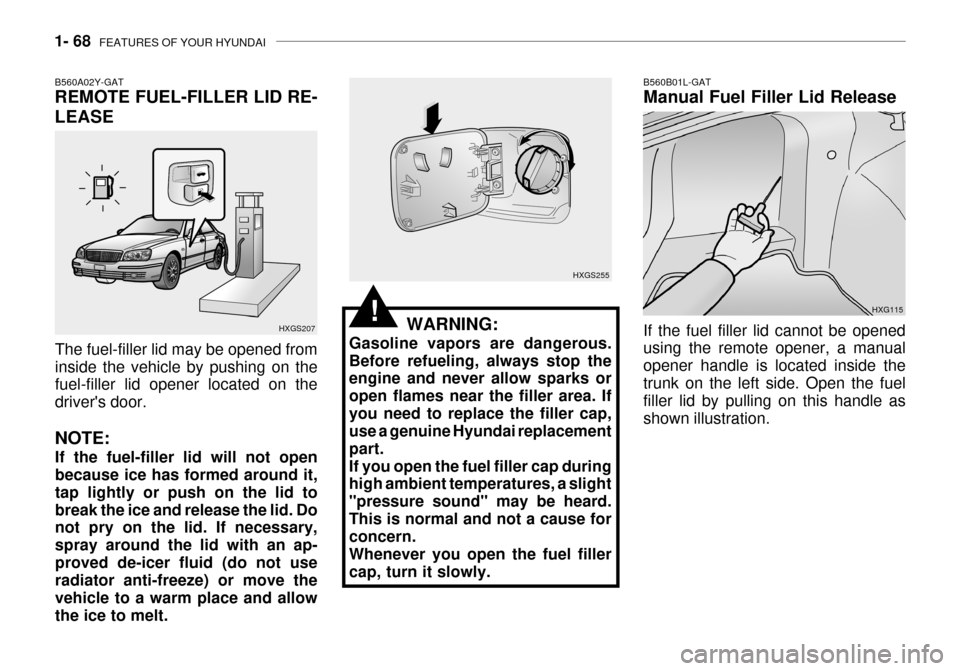
B560A02Y-GAT REMOTE FUEL-FILLER LID RE- LEASE
The fuel-filler lid may be opened from inside the vehicle by pushing on the fuel-filler lid opener located on the driver's door. NOTE: If the fuel-filler lid will not open because ice has formed around it, tap lightly or push on the lid tobreak the ice and release the lid. Do not pry on the lid. If necessary, spray around the lid with an ap-proved de-icer fluid (do not use radiator anti-freeze) or move the vehicle to a warm place and allowthe ice to melt.
!HXG115
B560B01L-GAT Manual Fuel Filler Lid Release If the fuel filler lid cannot be opened using the remote opener, a manual opener handle is located inside thetrunk on the left side. Open the fuel filler lid by pulling on this handle as shown illustration.
Page 158 of 235
3- 4 WHAT TO DO IN AN EMERGENCY
check for coolant leaking from the radiator, hoses or under the car. (If the air conditioning had been in use,it is normal for cold water to be draining from it when you stop).
WARNING:
While the engine is running, keep hair, hands, and clothing away frommoving parts such as the fan and drive belts to prevent injury.
5. If the water pump drive belt is bro- ken or engine coolant is leaking out, stop the engine immediately and call the nearest Hyundai dealer for assistance.
WARNING:
Do not remove the radiator cap whenthe engine is hot. This can allowcoolant to be blown out of the open- ing and cause serious burns.
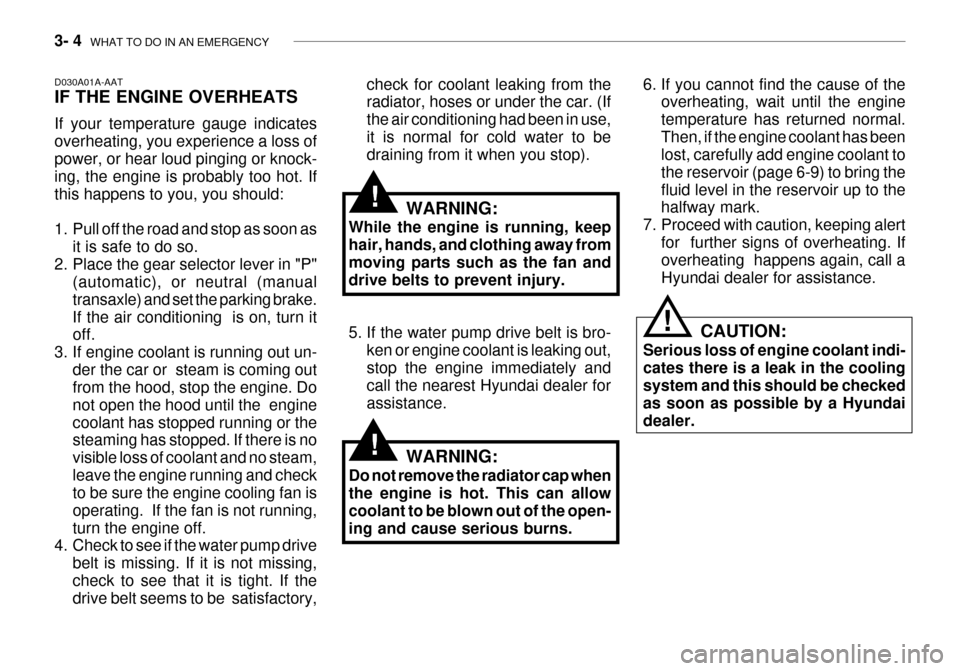
D030A01A-AAT IF THE ENGINE OVERHEATS If your temperature gauge indicates overheating, you experience a loss ofpower, or hear loud pinging or knock- ing, the engine is probably too hot. If this happens to you, you should:
1. Pull off the road and stop as soon as
it is safe to do so.
2. Place the gear selector lever in "P" (automatic), or neutral (manual transaxle) and set the parking brake.If the air conditioning is on, turn it off.
3. If engine coolant is running out un-
der the car or steam is coming outfrom the hood, stop the engine. Do not open the hood until the enginecoolant has stopped running or the steaming has stopped. If there is no visible loss of coolant and no steam,leave the engine running and check to be sure the engine cooling fan is operating. If the fan is not running,turn the engine off.
4. Check to see if the water pump drive
belt is missing. If it is not missing,check to see that it is tight. If the drive belt seems to be satisfactory, 6. If you cannot find the cause of the
overheating, wait until the engine temperature has returned normal.Then, if the engine coolant has been lost, carefully add engine coolant to the reservoir (page 6-9) to bring thefluid level in the reservoir up to the halfway mark.
7. Proceed with caution, keeping alert for further signs of overheating. Ifoverheating happens again, call a Hyundai dealer for assistance.
CAUTION:
Serious loss of engine coolant indi-cates there is a leak in the cooling system and this should be checked as soon as possible by a Hyundaidealer.
!
!
!
Page 180 of 235

5- 8 VEHICLE MAINTENANCE REQUIREMENTS
F060H01A-AAT
o Air Cleaner Filter A Genuine Hyundai air cleaner filter is
recommended when the filter is re- placed. F060J01A-AAT
o Spark Plugs Make sure to install new spark plugs of the correct heat range. F070C02A-AAT
o Coolant The coolant should be changed at the intervals specified in the mainte- nance schedule. F070D01A-AAT
o Manual Transaxle Oil
Inspect the manual transaxle oil ac-cording to the maintenance schedule.
NOTE: If the oil level is low, check forpossible leaks before adding oil. Do not overfill. F070E03A-AAT
o Automatic Transaxle Fluid and
Filter
The fluid level should be in the "HOT" range of the dipstick, after the engine and transaxle are at normal operatingtemperature. Check the automatic transaxle fluid level with the engine running and the transaxle in neutral,with the parking brake properly ap- plied. Use DIAMOND ATF SP-III or SK ATF SP-III when adding or chang-ing fluid. F070F01A-AAT
o Brake Hoses and Lines
Visually check for proper installation,chafing, cracks, deterioration and any leakage. Replace any deteriorated or damaged parts immediately. F070G02A-AAT
o Brake Fluid
Check brake fluid level in the brake fluid reservoir. The level should be between "MIN" and "MAX" marks on the side of the reservoir. Use onlyhydraulic brake fluid conforming to DOT 3 or DOT 4.
F070H01A-AAT
o Rear Brake Drums/Linings,
Parking Brake
Check the rear brake drums and lin-
ings for scoring, burning, leaking fluid,broken parts, and excessive wear. Inspect the parking brake system in-cluding the parking brake lever and cables. For detailed service proce- dures, refer to the Shop Manual.
F070B01A-GAT
o Cooling System Check the cooling system part, such as radiator, coolant reservoir, hosesand connections for leakage and dam- age. Replace any damaged parts.
Page 183 of 235
6- 2 DO-IT-YOURSELF MAINTENANCE
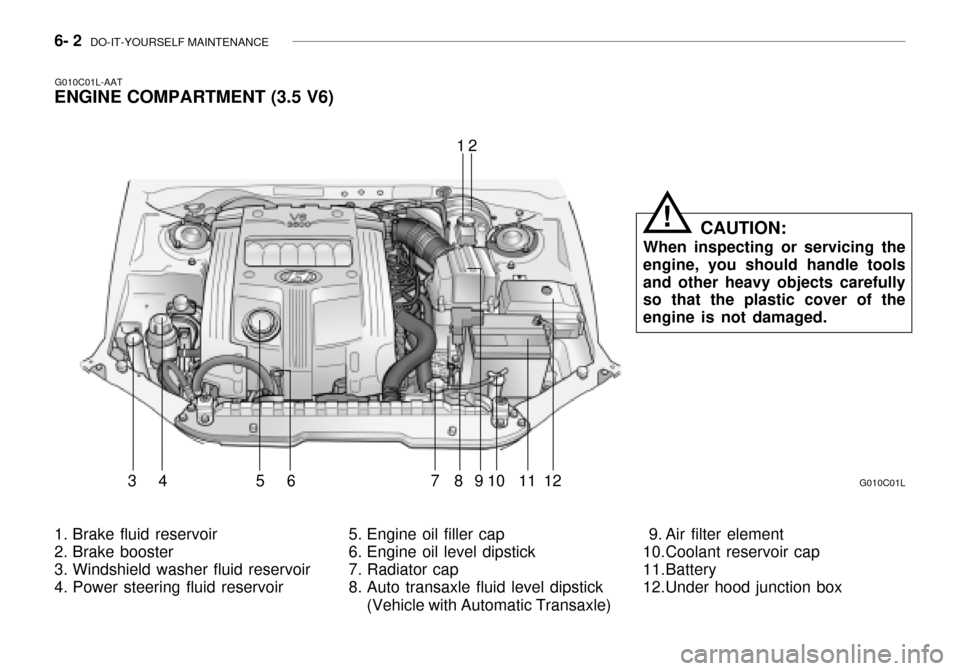
1. Brake fluid reservoir
2. Brake booster
3. Windshield washer fluid reservoir
4. Power steering fluid reservoir 5. Engine oil filler cap
6. Engine oil level dipstick
7. Radiator cap
8. Auto transaxle fluid level dipstick
(Vehicle with Automatic Transaxle) 9. Air filter element
10.Coolant reservoir cap
11.Battery
12.Under hood junction boxG010C01L
12
34 56 7891011
G010C01L-AAT
ENGINE COMPARTMENT (3.5 V6)
12 CAUTION:
When inspecting or servicing the
engine, you should handle tools and other heavy objects carefully so that the plastic cover of the engine is not damaged.
!
Page 184 of 235
DO-IT-YOURSELF MAINTENANCE 6- 3
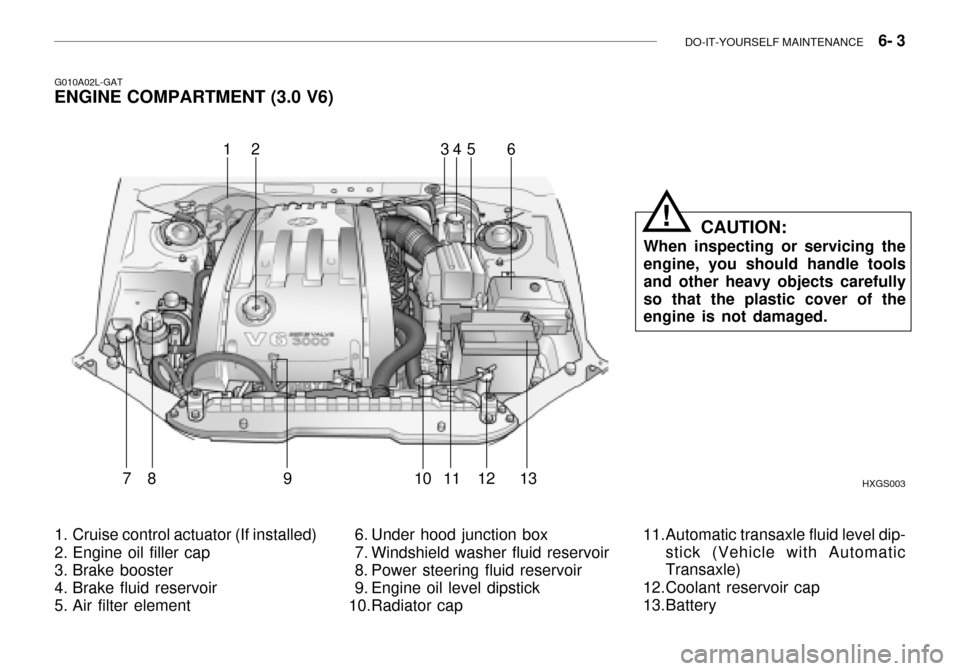
G010A02L-GAT
ENGINE COMPARTMENT (3.0 V6)
HXGS003
164
7891011 1213
1. Cruise control actuator (If installed)
2. Engine oil filler cap
3. Brake booster
4. Brake fluid reservoir
5. Air filter element 6. Under hood junction box
7. Windshield washer fluid reservoir
8. Power steering fluid reservoir
9. Engine oil level dipstick
10.Radiator cap11.Automatic transaxle fluid level dip-
stick (Vehicle with Automatic Transaxle)
12.Coolant reservoir cap
13.Battery
235
CAUTION:
When inspecting or servicing the engine, you should handle tools and other heavy objects carefullyso that the plastic cover of the engine is not damaged.!
Page 185 of 235
6- 4 DO-IT-YOURSELF MAINTENANCE
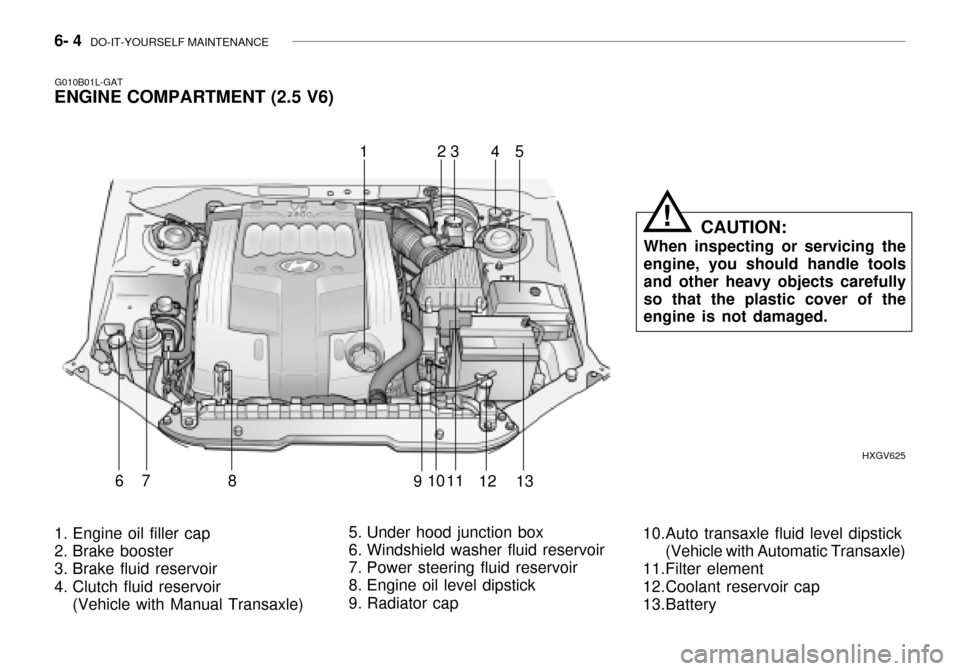
1. Engine oil filler cap
2. Brake booster
3. Brake fluid reservoir
4. Clutch fluid reservoir
(Vehicle with Manual Transaxle) 5. Under hood junction box
6. Windshield washer fluid reservoir
7. Power steering fluid reservoir
8. Engine oil level dipstick
9. Radiator cap
10.Auto transaxle fluid level dipstick
(Vehicle with Automatic Transaxle)
11.Filter element
12.Coolant reservoir cap
13.Battery HXGV625
G010B01L-GAT
ENGINE COMPARTMENT (2.5 V6)
53
678910 1112
124
13
CAUTION:
When inspecting or servicing the engine, you should handle tools and other heavy objects carefullyso that the plastic cover of the engine is not damaged.!
Page 189 of 235

6- 8 DO-IT-YOURSELF MAINTENANCE
4. When the oil has stopped draining,
replace the drain plug using a new washer and retighten by turning itclockwise. Oil pan drain plug tightening torque : 3.5 ~4.0 kgf.m
5. Remove the oil filter by turning it counterclockwise with a oil filter wrench of the proper size. A cer- tain amount of oil will come out when you remove the filter. So besure to have your drain pan in place underneath it.
6. Install a new oil filter in accordance with the instructions on the carton or on the filter itself. Do not over-tighten. Oil filter tightening torque : 1.2 ~ 1.6 kgf.m Be sure that the mounting surface on the engine is clean and that theold gasket is removed completely. Lubricate the new gasket on the filter with clean engine oil beforeinstallation. 7. Refill the crankcase with the rec-
ommended engine oil. Refer to thespecification in chapter 9 for en-gine oil capacity.
8. Start the engine and check to be sure no oil is leaking from the drain plug or oil filter.
9. Shut off the engine and recheck the oil level.
NOTE: Always dispose of used engine oil
in an environmentally acceptable manner. It is suggested that it beplaced in a sealed container and taken to a service station for recla- mation. Do not pour the oil on theground or put it in with the house- hold trash.
WARNING:
Used motor oil may cause irrita-
tion or cancer of the skin if left in contact with the skin for prolongedperiods of time. Wash your hands thoroughly with soap and warm water as soon as possible afterhandling used oil. G050A01A-AAT
CHECKING AND CHANGING THE ENGINE COOLANT
WARNING:
Do not remove the radiator cap
when the engine is hot. When the engine is hot, the engine coolantis under pressure and may erupt through the opening if the cap is removed. You could be seriouslyburned if you do not observe this precaution. Do not remove the ra- diator cap until the radiator is coolto the touch.
!
!