Page 63 of 392

This section gives inf ormation about
the controls and displays that
contribute to the daily operation of
your Honda. All the essential
controls are within easy reach............................
Control Locations .60
...............................
Indicator Lights .61
.............................................
Gauges .67
Controls Near the Steering .......................................
Wheel .71
...................................
Headlights .72
Automatic Lighting Off .....................................
Feature .73
............
Daytime Running Lights . 73
....
Instrument Panel Brightness . 73
................................
Turn Signals .74
.....................
Windshield Wipers .74
..................
Windshield Washers . 76
Rear Window Wiper and .....................................
Washer .76
..........................
Hazard Warning .76
.............
Rear Window Def ogger . 77
......
Steering Wheel Adjustment . 78
...............................
Keys and Locks .79
..............................................
Keys .79
....................
Immobilizer System . 80
............................
Ignition Switch .81
......................
Power Door Locks .82
...................
Remote Transmitter . 84
..............
Childproof Door Locks . 87
........................................
Tailgate .87 ....................................
Glove Box .88
.................................................
Seats .89
............
Power Seat Adjustments . 89
...........
Driver’s Lumbar Support . 90
..........
Manual Seat Adjustments . 91
Second and Third Row seat ............................
Adjustments .92
..........................
Head Restraints .93
........................
Rear Seat Access .94
............
Folding the Second Seat . 94
...............
Folding the Third Seat . 95
...................
Detachable Anchors . 97
....................................
Seat Heaters .98
..............................
Power Windows .99
...........................................
Mirrors .102
...............................
Parking Brake .104
...........................
Beverage Holder .105
.................
Console Compartment . 107
.................................
Cargo Hooks .107
........................
Sunglasses Holder .108
........................................
Sun Visor .109
................................
Vanity Mirror .109
............
Accessory Power Sockets . 110
........................................
Coin Box .111
......................................
Coat Hook .111
...............................
Interior Lights .112
Instruments and Controls
Inst rument s and Cont rols59
Page 64 of 392
Control L ocations
Inst rument s and Cont rols60
INDICATOR LIGHTS (P.61)GAUGES (P.67)
POWER DOOR LOCK
SWITCHES (P.82)
MIRROR
CONTROLS
POWER WINDOW
SWITCHES
HOOD RELEASE
HANDLE AUDIO SYSTEM
ACCESSORY POWER SOCKET CLIMATE CONTROL
SYSTEM
(P.103)
(P.99)
(P.218) (P.110)(P.137,
153.168)
(P.118, 128)
FUEL FILL DOOR
RELEASE
(P.217) PARKING BRAKE
PEDAL
(P.104)REAR A/C CONTROL
(P.135)
Page 65 of 392
�Î
�Î�Î
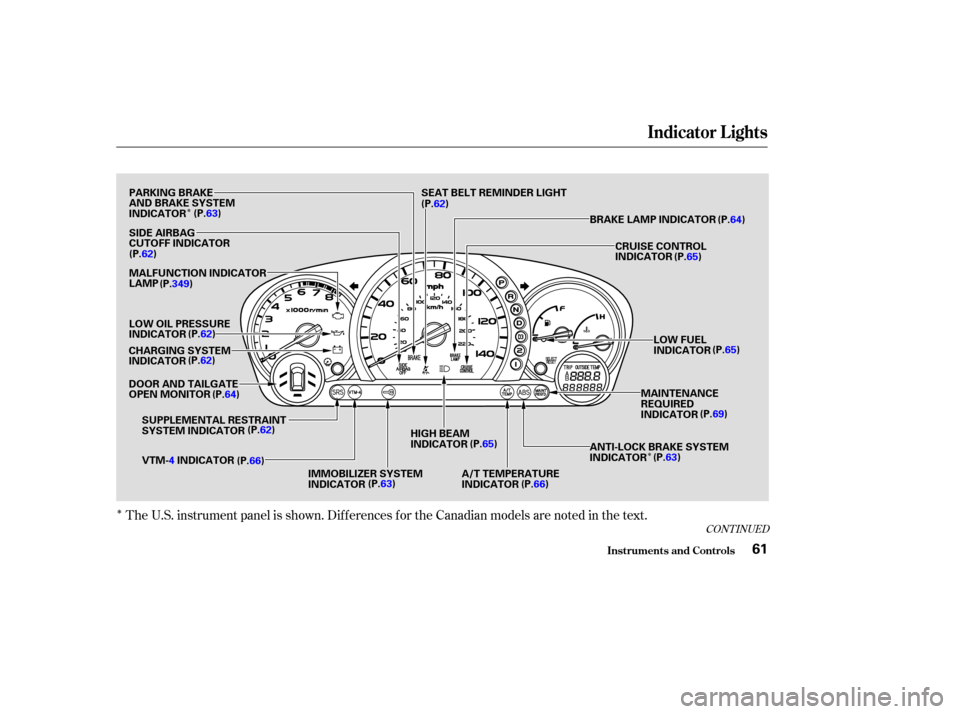
The U.S. instrument panel is shown. Dif f erences f or the Canadian models are noted in the text.
CONT INUED
Indicator L ights
Inst rument s and Cont rols61
PARKING BRAKE
AND BRAKE SYSTEM
INDICATOR(P.63)
SIDE AIRBAG
CUTOFF INDICATOR
(P.62)
MALFUNCTION INDICATOR
LAMP
LOW OIL PRESSURE
INDICATOR (P.62)
CHARGING SYSTEM
INDICATOR (P.62)
DOOR AND TAILGATE
OPEN MONITOR (P.64)
SUPPLEMENTAL RESTRAINT
SYSTEM INDICATOR (P.62)
VTM- 4INDICATOR
(P.66)
IMMOBILIZER SYSTEM
INDICATOR(P.63)HIGH BEAM
INDICATOR
(P.65)
A/T TEMPERATURE
INDICATOR (P.66) ANTI-LOCK BRAKE SYSTEM
INDICATOR
(P.
63)
MAINTENANCE
REQUIRED
INDICATOR
(P.
69)
LOW FUEL
INDICATOR
(P.
65)
CRUISE CONTROL
INDICATOR
(P.
65)
BRAKE LAMP INDICATOR (P.64)
SEAT BELT REMINDER LIGHT
(P. 62)
(P.349)
Page 76 of 392
If you leave the lights on with the
ignition switch in ACCESSORY (I)
or LOCK (0), you will hear a
reminder chime when you open the
driver’s door.
The rotating switch on the lef t lever
controls the lights. Turning this
switch to the ‘‘ ’’ position turns
on the parking lights, taillights,
instrument panel lights, side-marker
lights, and rear license plate lights.
Turning the switch to the ‘‘ ’’
position turns on the headlights. To change f rom low beams to high
beams, push the turn signal lever
f orward until you hear a click. The
blue high beam indicator will light
(see page ). To return to low
beams, pull the turn signal lever
back.To f lash the high beams, pull the
turn signal lever back lightly, then
release it. The high beams will come
on and go of f .
The high beams will stay on f or as
long as you hold the lever back, no
matter what position the headlight
switch is in.
65
Controls Near the Steering Wheel
Inst rument s and Cont rols
Headlights
72
Page 77 of 392

The lights will turn on again when
you unlock or open the driver’s door.
If you unlock the door, but do not
open it within 15 seconds, the lights
will go off. With the driver’s door
open, you will hear a lights-on
reminder chime.
With the headlight switch off, the
high beam headlights come on with
reduced brightness when you turn
the ignition switch to ON (II) and
release the parking brake. They
remain on until you turn the ignition
of f , even if you set the parking brake.
The headlights revert to normal
operation when you turn them on
with the switch.
This feature activates if you leave
the headlight switch in the or
position, remove the key, open,
then close the driver’s door.
If you remove the key f rom the
ignition switch with the headlight
switch on, but do not open the door
and get out, the lights will turn of f
af ter 10 minutes. The Automatic Lighting Of f f eature
turns of f the headlights, f og lights,
parking lights, taillights, side marker
lights, license plate lights and
instrument panel lights within 15
seconds of removing the key f rom
the ignition switch and closing the
driver’s door.
The knob on the instrument panel
controls the brightness of the instru-
ment panel lights. Turn the knob to
adjust the brightness.
On EX model
Controls Near the Steering Wheel
Inst rument s and Cont rols
Automatic Lighting Of f Feature
Daytime Running L ights
(Canadian Models)Instrument Panel Brightness
73
INSTRUMENT PANEL BRIGHTNESS
CONTROL KNOB
Page 83 of 392

Your vehicle comes with two master
keys and a valet key.
The master key fits all the locks on
your vehicle:
Ignition
Driver’s Door
GloveboxThe valet key works only in the
ignition and the door locks. You can
keepthegloveboxlockedwhenyou
leave your vehicle and valet key at a
parking f acility.
These keys contain electronic
circuits that are activated by the
Immobilizer System. They will not
work to start the engine if the
circuits are damaged.
Protect the keys f rom direct
sunlight, high temperature, and
high humidity.
Donotdropthekeysorsetheavy
objects on them.
Keep the keys away f rom liquids.
If they get wet, dry them immedi-
ately with a soft cloth.
The keys do not contain batteries.
Do not try to take them apart.
Your vehicle also comes with two
remote transmitters; see page for
an explanation of their operation.
Youshouldhavereceivedakey
number plate with your keys. You
will need this key number if you ever
have to get a lost key replaced. Keep
the plate stored in a saf e place. If you
need to replace a key, use only
Honda-approved key blanks.
84
CONT INUED
Keys
Keys and Locks
Inst rument s and Cont rols
Remote Transmitter
79
KEY
NUMBER
PLATEMASTER
KEYS
(BLACK)VALET KEY
(GRAY)
Page 86 of 392
 when you let go of
the key.
This is the normal key
position when driving. All f eatures
and accessories on the veh")
�µ
�µ �µ
Use this position
only to start the engine. The switch
returns to ON (II) when you let go of
the key.
This is the normal key
position when driving. All f eatures
and accessories on the vehicle are
usable. Several of the lights on the
instrument panel come on as a test
when you turn the ignition switch
f rom ACCESSORY to ON. The engine will not start if the
Immobilizer System does not
recognize the key’s coding (see page
).
You will hear a reminder beeper if
you leave the key in the ignition
switch in the LOCK (0) or
ACCESSORY (I) position and open
thedriver’sdoor.Removethekeyto
turn of f the beeper.
In this position,
you can operate the audio system
and the accessory power sockets.
Each f ront door has a master door
lock switch. Either switch locks and
unlocks all doors and the tailgate.
Push the top of the switch to unlock
all doors and the tailgate, and the
bottom to lock them.
80
ST A RT (III)
Power Door L ocks
ON (II) A CCESSORY (I)
Keys and Locks
Inst rument s and Cont rols82
MASTER DOOR LOCK SWITCH
Page 87 of 392

Each door has a lock tab on the top.
Whenyoupushdownthelocktabon
the driver’s door, all the doors and
the tailgate lock. Pulling up the lock
tab on the driver’s door unlocks only
that door. The lock tabs on the other
doors lock and unlock only that door.
To lock the f ront passenger’s door
when getting out of the vehicle, push
the lock tab down and close the door.
To lock the driver’s door, along withthe remaining doors and the tailgate,
push the lock tab down or push the
master switch down, then close the
door.
All doors and the tailgate can be
locked f rom the outside by using the
key in the driver’s door. To unlock
only the driver’s door f rom the
outside, turn the key and release it.
If you turn the key and hold it, all
doors and the tailgate will unlock. All
f our doors and the tailgate will
unlock when you unlock the
passenger’s door with the key.
If you f orget and leave the key in the
ignition switch, Lockout Prevention
will not allow you to lock the driver’s
door. With the driver’s door open
andthekeyintheignition,both
master door lock switches are
disabled. However, if the driver’s
door is not open, the master door
lock switches are not disabled.
Pushing the switch down on the
open passenger’s door will lock all
doors. If you try to lock an open
driver’s door by pushing down the
lock tab, the tabs on all doors pop out.
Pushingdownthelocktabonthe
passenger’s door only locks that door.
L ockout Prevent ion
Keys and Locks
Inst rument s and Cont rols83
LOCK TAB
GAUGES (P.67)
POWER DOOR LOCK
SWITCHES (P.82)
MIRROR
CONTROLS
POWER WINDOW
SWITCHES
HOOD RELEASE
HANDLE AUDIO SYSTEM
ACCESSORY P")

or LOCK (0), you will hear a
reminder chime when you open the
driver’s door.
The rotating switch on the lef t lever
controls the")