Page 91 of 415

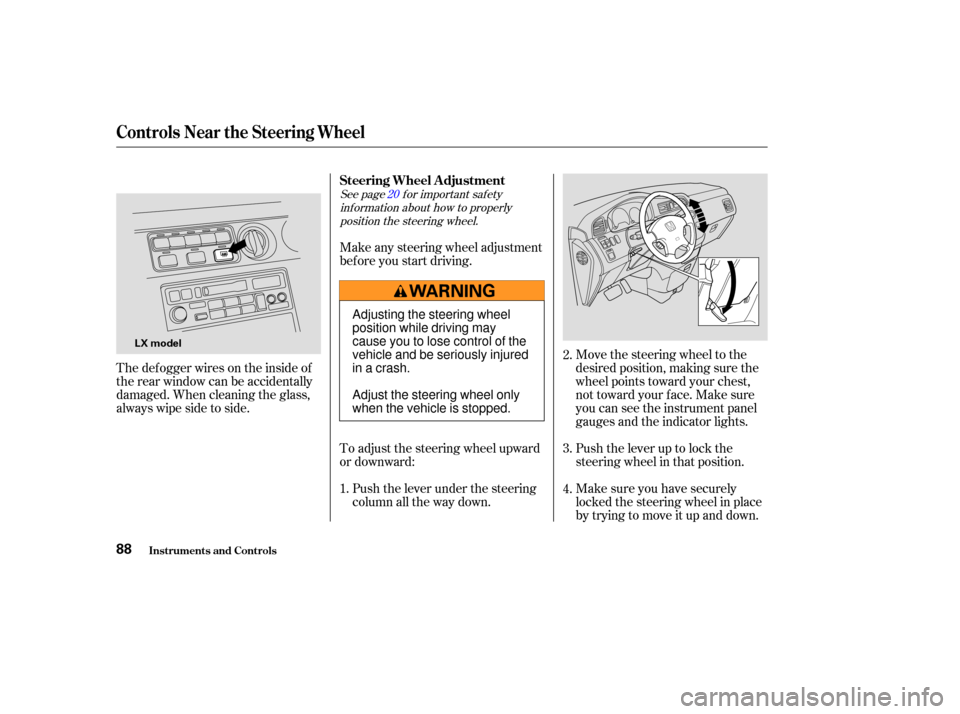
See page f or important saf etyinf ormation about how to properlyposition the steering wheel. 20
Make any steering wheel adjustment
bef ore you start driving.
Make sure you have securely
locked the steering wheel in place
by trying to move it up and down. Push the lever up to lock the
steering wheel in that position. Move the steering wheel to the
desired position, making sure the
wheel points toward your chest,
not toward your f ace. Make sure
you can see the instrument panel
gauges and the indicator lights.
Push the lever under the steering
column all the way down.
To adjust the steering wheel upward
or downward:
Thedefoggerwiresontheinsideof
the rear window can be accidentally
damaged. When cleaning the glass,
always wipe side to side.
3.
4.
1. 2.
Controls Near the Steering Wheel
Inst rument s and Cont rols
Steering Wheel A djustment
88
LX model
Adjusting the steering wheel
position while driving may
cause you to lose control of the
vehicle and be seriously injured
inacrash.
Adjust the steering wheel only
when the vehicle is stopped.
Page 106 of 415

Your Honda is equipped with dual
power sliding doors. The doors on
the EX and EX-L models are
electrically powered and can be
operated with the remote transmitter,
the door handles, or the switches on
the dashboard.
Be sure all passengers are clear of
the sliding doors bef ore closing them.The power sliding doors operate
with the ignition switch in any
position. In addition:
If you shif t out of Park while a door
is opening, you will hear a
continuous tone and the door will
stop moving. If you keep driving with
the door open, the tone continues
until you stop and close the door.
If you shif t out of Park while a door
is closing, you will hear a beep until
the power sliding door closes
completely. Make sure both sliding doors are
closed bef ore you start driving. To open the door with the inside
handle, the childproof door lock
on the door you want to operate
must be unlocked (see page ). The sliding door you want to
operate must be unlocked. The MAIN switch on the
dashboard must be in the ON
position. TheshiftlevermustbeinPark.
98
CONT INUED
Power Sliding Doors (EX, EX-L Models)
Inst rument s and Cont rols103
Closing a power sliding door
while any part of a passenger is
in the door’s path can cause
serious injury.
Make sure all passengers are
clear of the doorway before
closing a sliding door.
Page 108 of 415

To open a sliding door, make sure
the door is unlocked. Then press the
appropriate button. If you forget to unlock the
door f irst, you will hear three beeps.
Unlock the door and try again.
To close a sliding door, press the
appropriate button f or at least two
seconds.
To stop the power sliding door’s
movement, push the appropriate
door button on the remote
transmitter. The door will stop, and
you will hear three beeps.
If you push the same button again,
the door will reverse direction.
To open a door, make sure the door
is unlocked. Then push and release
the bottom of the switch. If you
f orget to unlock the door f irst, you
will hear three beeps. Unlock the
door and try again.
To close a sliding door, push and
release the top of the appropriate
switch.
To stop the power sliding door’s
movement, push either the top or the
bottom of the appropriate switch.
The door will stop, and you will hear
three beeps.
To start the door moving again, push
the switch again: bottom to open, or
toptoclose.
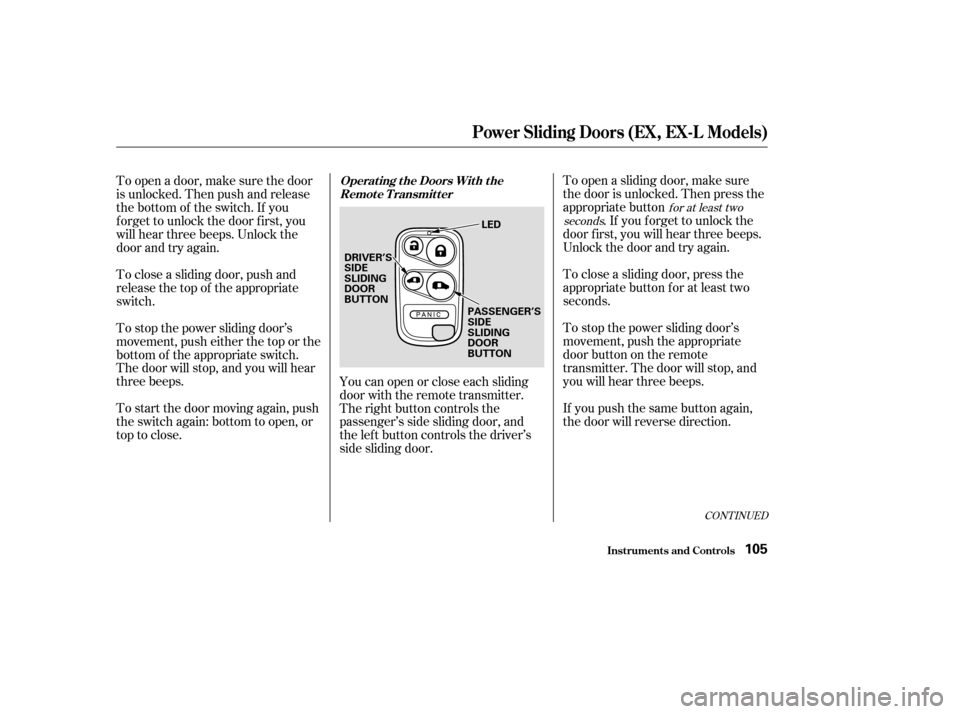
You can open or close each sliding
door with the remote transmitter.
The right button controls the
passenger’s side sliding door, and
the left button controls the driver’s
side sliding door.
f or at least two
seconds
CONT INUED
Operat ing t he Doors Wit h t he Remote Transmitter
Power Sliding Doors (EX, EX-L Models)
Inst rument s and Cont rols105
DRIVER’S
SIDE
SLIDING
DOOR
BUTTON LED
PASSENGER’S
SIDE
SLIDING
DOOR
BUTTON
Page 129 of 415

If your vehicle’s battery is
disconnected or goes dead, or the
driver’s window f use is removed, the
AUTO f unction will be disabled. The
power window system needs to be
reset af ter reconnecting the battery
or installing the f use. You should do
the f ollowing.Start the engine. Push down on
the driver’s window switch until
the window is f ully open.
Pull back on the driver’s window
switch to close the window
completely, then hold the switch
f or a second or two more.
If the power windows do not operate
properly af ter resetting, have your
vehicle checked by a Honda dealer.
Auto reverse stops sensing when the
window is almost closed. You should
always check that all passengers and
objects are away from the window
bef ore closing it. If the driver’s window runs into any
obstacle while it is closing
automatically, it will reverse
direction, and then stop. To close the
window, remove the obstacle, then
use the window switch again.
The power window system has a key-
of f delay f unction. The windows will
stilloperateforuptotenminutes
after you turn off the ignition.
Opening either f ront door cancels
the delay function. You must turn
the ignition switch ON (II) again
bef ore you can operate the windows.
1.
2.
Power Windows
Inst rument s and Cont rols
Auto Reverse
126
Page 151 of 415

When the interior has cooled down
to a more comf ortable temperature,
close the windows and set the
controls as described f or normal
cooling.Air conditioning places an extra load
on the engine. Watch the engine
coolant temperature gauge (see page
) when driving in stop-and-go
traf f ic or climbing a long, steep hill.
If it moves near the red zone, turn
of f the A/C until the gauge reads
normally.
If the interior is very warm f rom
beingparkedinthesun,youcancool
it down more rapidly by setting up
the controls this way:
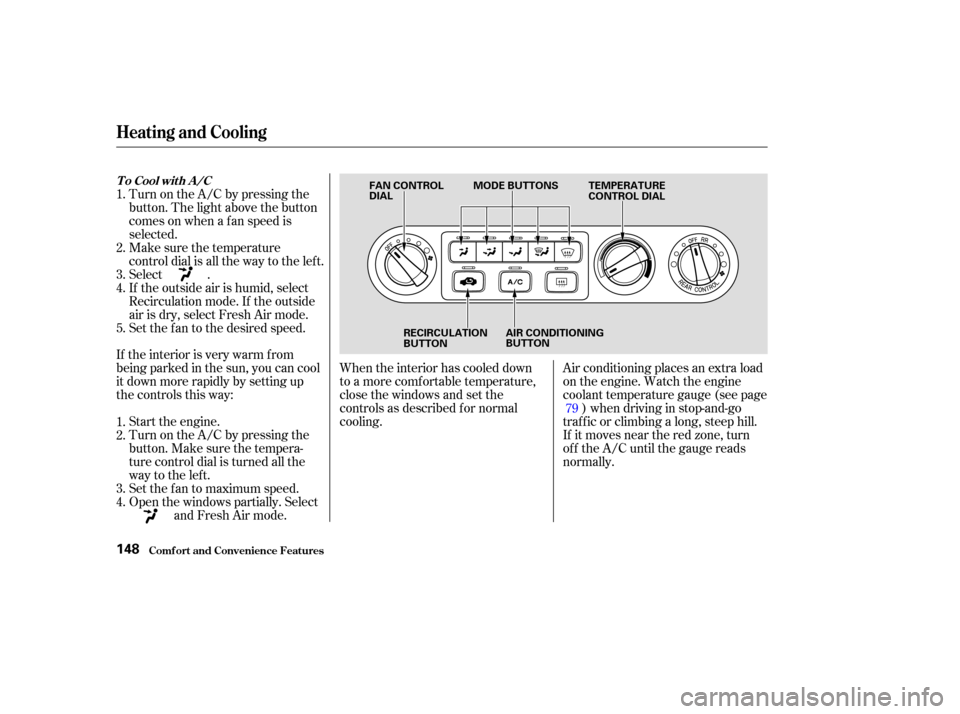
Start the engine.
Turn on the A/C by pressing the
button. Make sure the tempera-
ture control dial is turned all the
way to the left.
Set the f an to maximum speed.
Open the windows partially. Select and Fresh Air mode.
Turn on the A/C by pressing the
button. The light above the button
comesonwhenafanspeedis
selected.
Make sure the temperature
control dial is all the way to the left.
Select .
If the outside air is humid, select
Recirculation mode. If the outside
air is dry, select Fresh Air mode.
Set the f an to the desired speed.
1.
2.
3.
4. 1.
2.
3.
4.
5. 79
Comf ort and Convenience Feat ures
Heating and Cooling
T o Cool wit h A /C
148
FAN CONTROL
DIALMODE BUTTONS
TEMPERATURE
CONTROL DIAL
RECIRCULATION
BUTTON AIR CONDITIONING
BUTTON
Page 173 of 415

�µ�µ
�Ý �Û
The ignition switch must be in
ACCESSORY (I) or ON (II) to
operate the audio system. Turn the
system on by pushing the PWR/
VOL knob.
The band and f requency that the
radio was last tuned to is displayed.
To change bands, press the AM/FM
button. On the FM band, ST will be
displayed if the station is broadcast-
ing in stereo. Stereo reproduction on
AM is not available. Adjust the volume by turning the
PWR/VOL knob. You can use any of f our methods to
f ind radio stations on the selected
band: TUNE, SEEK, SCAN or the
Preset buttons.
Use the TUNE bar to tune
the radio to a desired f requency.
Press the upper part ( ) to tune
to a higher f requency, or the lower
part ( ) to tune to a lower
f requency. The f requency numbers
will start to change rapidly. Release
the bar when the display reaches the
desired f requency. To change the
f requency in small increments, press
and release the TUNE bar quickly. The SEEK f unction
searches the band for a station with
a strong signal. To activate it, push
the SEEK switch up or down, then
release it. Depending on which way
you push the switch, the system
scans upward or downward f rom the
current f requency. It stops when it
finds a station with a strong signal.
Audio System
Comf ort and Convenience Feat ures
Operating the Radio
TUNESEEK
170
Page 185 of 415

�µ�µ
The ignition switch must be in
ACCESSORY (I) or ON (II) to
operate the audio system. Turn the
system on by pushing the PWR/
VOL knob. Adjust the volume by
turning the same knob.
The band and f requency that the
radio was last tuned to is displayed.
To change bands, press the AM/FM
button. On the FM band, ST will be
displayed if the station is broadcast-
ing in stereo. Stereo reproduction on
AM is not available. Use the TUNE bar to tune
the radio to a desired f requency.
Press the side of the bar to tune
to a higher f requency, and the side to tune to a lower
f requency. The f requency numbers
will start to change rapidly. Release
the bar when the display reaches the
desired f requency. To change the
f requency in small increments, press
and release the TUNE bar quickly.
You can use any of f ive methods to
f ind radio stations on the selected
band: TUNE, SEEK, SCAN, AUTO
SELECT, and the preset buttons. The SEEK f unction
searches the band for a station with
a strong signal. To activate it, press
theSEEKbaroneitherthe or side, then release it.
Depending on which side you press,
the system scans upward or down-
ward f rom the current f requency. It
stops when it finds a station with a
strong signal.
Operating the Radio
T UNESEEK
Audio System
Comf ort and Convenience Feat ures182
Page 226 of 415
CONT INUED
You can control all of the DVD
functions with the remote control.
Make sure the rear control operation
has not been disabled with the RR
CTRL knob on the f ront panel.
When using the remote control,
point it at the rear control panel in
the ceiling.
Press this button to start playing a
DVD. Use these buttons to select the
entertainment source (radio,
cassette player, CD player/CD
changer, or DVD player/Auxiliary
device). The selected source will be
showninthedisplay.
Comf ort and Convenience Feat ures
Rear Entertainment System
Operating the DVD Player with
the Remote Control
Source Select ion But t onsPL A Y/PROG Button
223
SOURCE SELECTION
BUTTONS SEEK/SKIP BUTTONS
DISP BUTTON RETURN (T/C) BUTTON
REW/FWD BUTTONS
STOP BUTTON PAUSE BUTTON
PLAY/PROG BUTTON
MENU BUTTON
SUBTITLE BUTTON
AUDIO BUTTON
ANGLE BUTTON
TITLE BUTTON