Page 49 of 415
Second Seat Installation:
Lift the head restraint, then route
the tether strap over the seat-back
between the legs of the head
restraint.
Your vehicle has tether anchorage
points f or a tether-style child seat to
be installed on the second or third
row as shown.
Since a tether can provide additional
security, we recommend using a
tether whenever one is required or
available. (Tethers are required in
Canada.)
Each second row bucket seat has a
tether anchorage point on the
underside of the seat cushion.
Using Child Seats with T ethers
Driver and Passenger Saf ety
Protecting Children
46
TETHER ANCHORAGE POINT
Page 51 of 415
Put the child seat in a second row
vehicle seat and attach the child
seat to the lower anchors
according to the child seat maker’s
instructions.
Your vehicle is equipped with
LATCH (Lower Anchors and
Tethers f or Children) at the second
row seats. The lower anchors are
located between the seat-back and
seat bottom and are to be used only
with a child seat designed f or use
with LATCH. Make sure there are no f oreign
objects around the anchors.
Foreign objects could get in the
way of a secure connection
between the child seat and the
anchors. Move the seat belt buckle or seat
belt tongue away f rom the lower
anchors.
To install a LATCH-compatible child
seat: The exact location of each lower
anchorage is marked with a small
button above the lower anchorage
point.
1.
2.
3.
Using L A T CH
Protecting Children
Driver and Passenger Saf ety48
RIGID TYPE
LOWER
ANCHORS MARKS
Page 52 of 415
Follow the child seat maker’s
instructions f or any additional
advice on adjusting or tightening
the fit.Push and pull the child seat
f orward and f rom side to side to
verif y that it is secure enough to
stay upright during normal driving
maneuvers. Attach the tether strap hook to the
tether anchorage point, and
tighten the strap according to the
child seat maker’s instructions.
Make sure the strap is not twisted.This symbol on rear or f orward
f acing child seats or booster
cushions indicates the presence of
LATCH compatible hardware.
4.
5.
6.
Protecting Children
Driver and Passenger Saf ety
L ower Universal Anchorage
System Symbol
49
FLEXIBLE TYPE
Page 54 of 415

The combination lap belt and
shoulder belt in the center position
of the third seat goes over your
shoulder, across your chest and over
your hips. The shoulder belt has an
emergency locking retractor that
works in combination with the lap
belt.
The seat belts in all positions except
the driver’s and the center position
of the third seat have an additional
locking mechanism that must be
activated to secure a child seat. (See
pages and f or instructions on
how to secure child seats with this
type of seat belt.)
If the shoulder part of the belt is
pulled all the way out, the locking
mechanism will activate. The belt
will retract, but it will not allow the
passenger to move f reely.
To deactivate the locking
mechanism, unlatch the buckle and
let the seat belt f ully retract. To
ref asten the belt, pull it out only as
f ar as needed.
See page f or instructions on how
to wear the lap/shoulder belt
properly.
To f asten the seat belt, unlatch the
metal plate of the shoulder belt from
the anchor on the ceiling and extend
the belt by pulling the metal plate.Attach the metal hook on the edge of
the shoulder belt to the metal loop
on the latch plate of the lap belt
marked CENTER, then tug on the
shoulder belt to make sure it is
securely attached.
Insert the latch plate of the lap belt
into the buckle marked CENTER,
then tug on the lap belt to make sure
the buckle is latched.
To unlock the belt, push the red
PRESS button on the buckle and
detach the shoulder belt f rom the lap
belt.
See page f or how to lengthen the
lap belt, and how to properly position
the lap and shoulder belts.
39
17 18
35
Additional Inf ormation About Your Seat Belts
Driver and Passenger Saf ety51
Page 61 of 415
The driver’s and f ront passenger’s
seat sensors may not work properly
if :Be caref ul not to spill any liquids.
Spilled liquids could damage the
sensors under the f ront seats.
If your vehicle sustains a severe
impact, have the driver’s seat
position sensor and the f ront
passenger’s weight sensors
inspected by your Honda dealer.
You do not wear your seat belt
properly.
You do not sit upright and as f ar
back as possible f rom the steering
wheel or the dashboard (see page
).
You do not secure the child seat
properly, and move the f ront seat
as far back as possible. For additional information on how
your airbags work, see the booklet
titled
that came with your
owner’s manual.
For additional information on how
your airbags work, ask your dealer
f or a copy of the booklet titled
20
SRS: What You Need to Know
About Airbags
SRS:
What You Need to Know About Airbags
.
Driver and Passenger Saf ety
Additional Inf ormation About Your Airbags
U.S.Owners
Canadian Owners
58
Page 66 of 415

CONT INUED
To ensure the f ront passenger’s seat
weight sensors keep the passenger’s
airbag activated when an adult or
large child weighing about 65 lbs/
30 kg or more sits in the front
passenger’s seat, do not allow
anything to decrease the weight on
the seat. This includes, but is not
limited to, these examples:Front passenger’s seat f orcibly
moved backward into luggage or
other items placed behind it. Front passenger’s seat f orcibly
pushed up by luggage or other
items placed under it. Rear passengers pushing up the
frontpassenger’sseatwiththeir
f eet. If a passenger is tall enough to use
the seat belt and sit properly, but the
passenger airbag cutof f indicator
comes on and of f repeatedly, we
recommend that the passenger sits
in a rear seat. If the passenger must
sit on the f ront seat, move the seat
as far to the rear as possible, have
the passenger sit upright, and make
sure the seat belt is worn securely.
To ensure the f ront passenger’s seat
weight sensors keep the passenger’s
airbag deactivated when an infant or
small child weighing about 65 lbs/
30 kg or less sits in the f ront
passenger’s seat, do not allow
anything to increase the weight on
the seat. This includes, but is not
limited to, these examples:
Rear passengers pushing or
pulling the f ront passenger’s seat-
back or pushing the seat rails with
their f eet.
Heavy items placed in the f ront
passenger’s seat-back pocket.
Additional Inf ormation About Your Airbags
Driver and Passenger Saf ety63
Page 67 of 415

If the passenger airbag cutof f
indicator does not light, or comes on
and of f repeatedly while a child seat
is secured on the f ront passenger’s
seat, remove the child seat, then
secure it on a rear seat.
When you turn the ignition switch to
ON (II), the passenger airbag cutof f
indicator will light brief ly then go out.
This tells you that the system is
working properly.
The indicator may come on or of f a
f ew seconds later if the weight on
the f ront passenger’s seat changes.Your f ront and side airbag systems
are virtually maintenance-f ree, and
there are no parts you can saf ely
service. However, you must have
your vehicle serviced if :
Any
airbag that has deployed must be
replaced along with the control
unit, automatic seat belt
tensioners, and other related parts.
Do not try to remove or replace
anyairbagbyyourself.Thismust
be done by a Honda dealer or a
knowledgeable body shop.
Take your vehicle to
an authorized Honda dealer as
soon as possible. If you ignore this
indication, the airbags might not
inf late when you need them.
Additional Inf ormation About Your Airbags
Driver and Passenger Saf ety
Airbag Service
Your airbags ever inf late.
T he SRS indicat or light alert s yout o a problem.
64
Page 74 of 415
�Î
�Î
�Î
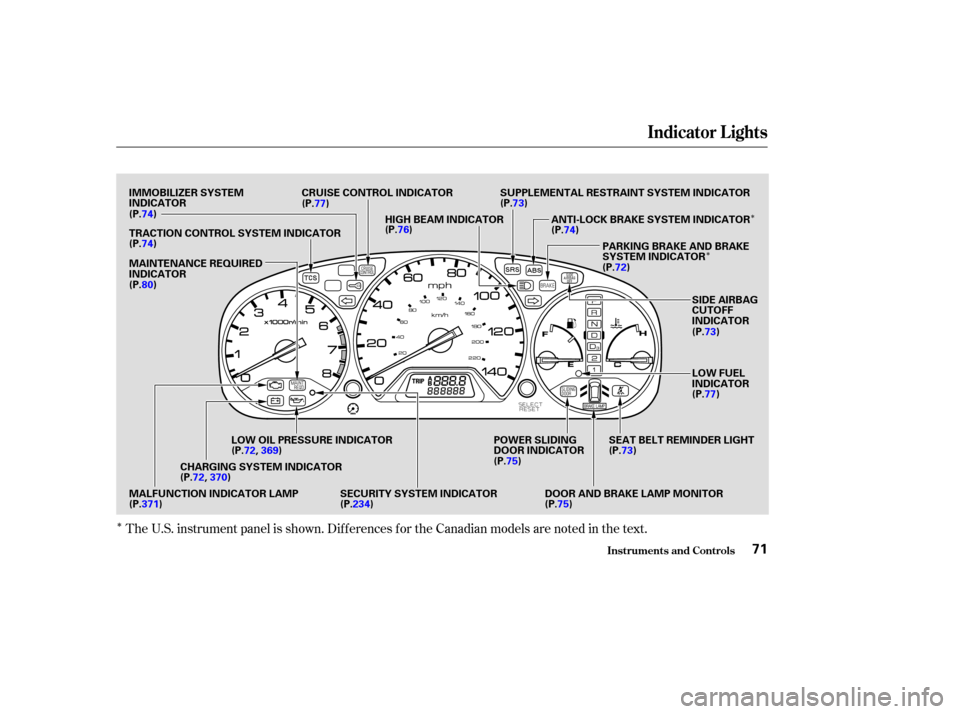
The U.S. instrument panel is shown. Dif f erences f or the Canadian models are noted in the text.
Indicator L ights
Inst rument s and Cont rols71
IMMOBILIZER SYSTEM
INDICATOR CRUISE CONTROL INDICATOR
HIGH BEAM INDICATOR SUPPLEMENTAL RESTRAINT SYSTEM INDICATOR
ANTI-LOCK BRAKE SYSTEM INDICATORPARKING BRAKE AND BRAKE
SYSTEM INDICATOR
SIDE AIRBAG
CUTOFF
INDICATOR
LOW FUEL
INDICATOR
SEAT BELT REMINDER LIGHT
DOOR AND BRAKE LAMP MONITOR
POWER SLIDING
DOOR INDICATOR
SECURITY SYSTEM INDICATOR
LOW OIL PRESSURE INDICATOR
CHARGING SYSTEM INDICATOR
MALFUNCTION INDICATOR LAMP MAINTENANCE REQUIRED
INDICATOR TRACTION CONTROL SYSTEM INDICATOR (P.74)
(P.74)
(P.80) (P.77)
(P.76) (P.73)
(P.74)
(P.72)
(P.73)
(P.77)
(P.73)
(P. 75)
(P.75)
(P.371) (P.72,
369)
(P.72, 370)
(P.234)