Page 96 of 374

Avoid severe shock to the trans-
mitter, such as dropping or throwing
it. Also, protect it f rom extreme hot
or cold temperatures.
Clean the transmitter case with a
sof t cloth. Do not use strong
cleaners or solvents that could harm
the case. Immersing the transmitter
in any liquid will harm the trans-
mitter and cause it to not f unction
properly.
If you lose a transmitter, you will
need to have the replacement
programmed to your vehicle’s
system by your Honda dealer. Any
other transmitters you have will also
need to be reprogrammed.
As required by the FCC:This device complies with Part 15 of theFCC rules. Operation is subject to thef ollowing two conditions: (1) This devicemay not cause harmf ul interf erence, and(2) this device must accept anyinterf erence received, includinginterf erence that may cause undesiredoperation.
Changes or modif ications not expresslyapproved by the party responsible f orcompliance could void the user’sauthority to operate the equipment.
This device complies with IndustryCanada Standard RSS-210.Operation is subject to the f ollowing twoconditions: (1) this device may not causeinterf erence, and (2) this device mustaccept any interf erence that may causeundesired operation of the device.
Keys and Locks
Inst rument s and Cont rols
Transmitter Care
92
Page 97 of 374

The childproof door locks are
designed to prevent children seated
in the rear f rom accidentally opening
the rear doors. Each rear door has a
lock lever near the edge. With the
lever in the Lock position, the door
cannot be opened f rom the inside
regardless of the position of the lock
tab. To open the door, pull the lock
tab up and use the outside door
handle.You can lock or unlock the tailgate in
any of these ways:
Useyourmasterorvaletkeyto
lock and unlock the tailgate.
Turnthekeyclockwisetolockthe
tailgate, and counterclockwise to
unlock it. Lockthetailgatebypushingdown
the lock tab on the driver’s door
(see page ), or by using the
master or valet key in the driver’s
door lock.
You can also lock and unlock the
tailgate with the remote
transmitter (see page ). Lock or unlock the tailgate with
the master door lock switch.
88
89
CONT INUED
On EX model in the U.S., and EX andEX-L models in Canada
Childproof Door L ocks T ailgate
Keys and Locks
Inst rument s and Cont rols93
LEVER
Lock
Unlock
PositionLock Position
Page 98 of 374
You can unlock the hatch glass in
any of these ways:Press the hatch glass release
buttononthedriver’sdoor.
With the tailgate unlocked, open the
tailgate by pulling the handle.
To keep the tailgate door open on an
incline, use the stop f rom the tool kit.
The tool kit is in the storage bin
under the cargo f loor. Put the stop
on the support strut as shown.
Make sure to remove the stop before
closing the tailgate.
Opening t he Hat ch Glass
Keys and Locks
Inst rument s and Cont rols94
HANDLE
STOP
Page 99 of 374

Youcanopenthehatchglassto
access the cargo area with the
tailgate closed. Make sure the
tailgate and the hatch glass are
closed and locked securely bef ore
driving.
The rear wiper will not operate with
the hatch glass open. If you open the
hatch glass while the rear wiper is
operating, the wiper will stop (see
page ).
See page for information on
cargo loading. Keep the tailgate and
the hatch glass closed at all times
while driving to avoid damaging the
tailgate and the hatch glass, and to
prevent exhaust gas f rom getting
into the interior. Seeon page .
Press and hold the hatch glass
release button on the remote
transmitter for about two seconds
(see page ). Use the master or valet key in the
tailgate lock. Turn the key
clockwise as f ar as it will go. The hatch glass will pop up slightly.
To open the hatch glass, lif t it up
f ully.
Make sure the rear wiper switch is
of f and the wiper is in its parked
position bef ore opening the hatch
glass.
To close the hatch glass, lower it,
then press on the handle until it
latches.
90 80
193
60
On EX model in the U.S., and EX andEX-L models in Canada
Keys and Locks
Inst rument s and Cont rols
Carbon
Monoxide Hazard
95
HATCH GLASS OPEN POSITION HATCH GLASS
Page 100 of 374
Open the glove box by pulling the
bottom of the handle. Close it with a
f irm push. Lock or unlock the glove
box with the master key.
The glove box light comes on only
when the instrument panel lights are
on. Glove Box
Keys and Locks
Inst rument s and Cont rols96
Lock
An open glove box can cause
serious injury to your passenger
inacrash,evenifthe
passenger is wearing the seat
belt.
Always keep the glove box
closed while driving.
Page 101 of 374
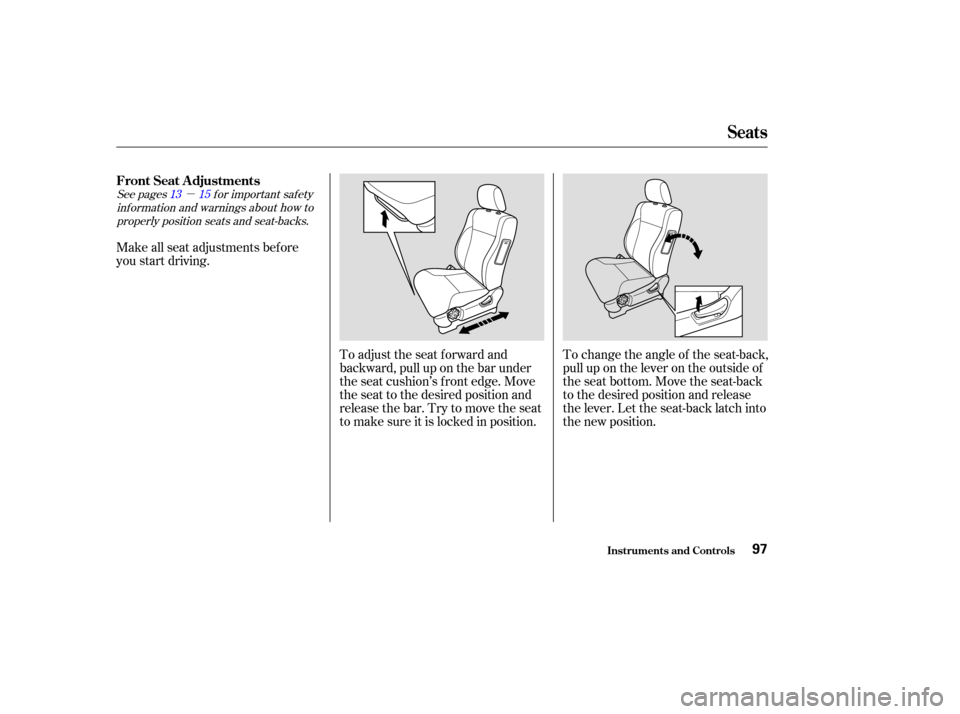
�µ
See pages f or important saf ety
inf ormation and warnings about how toproperly position seats and seat-backs. 13 15
Make all seat adjustments bef ore
you start driving.
To change the angle of the seat-back,
pull up on the lever on the outside of
the seat bottom. Move the seat-back
to the desired position and release
the lever. Let the seat-back latch into
the new position.
To adjust the seat forward and
backward, pull up on the bar under
the seat cushion’s f ront edge. Move
the seat to the desired position and
releasethebar.Trytomovetheseat
to make sure it is locked in position.
FrontSeatAdjustments
Seats
Inst rument s and Cont rols97
Page 104 of 374
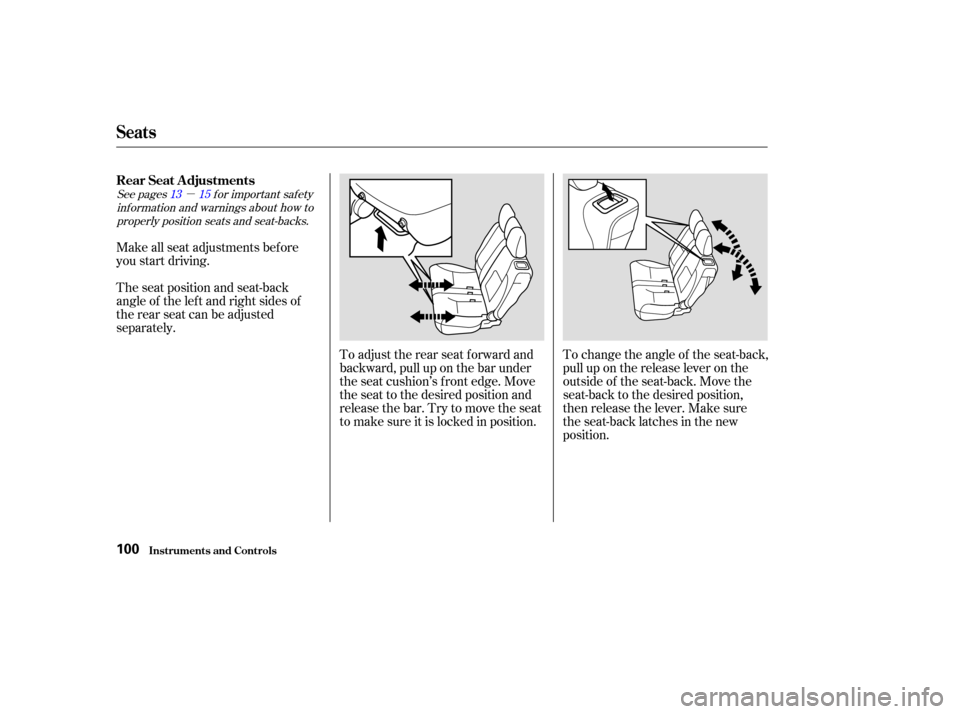
�µ
See pages f or important saf ety
inf ormation and warnings about how toproperly position seats and seat-backs. 13 15
Make all seat adjustments bef ore
you start driving.
The seat position and seat-back
angle of the lef t and right sides of
the rear seat can be adjusted
separately.
To adjust the rear seat f orward and
backward, pull up on the bar under
the seat cushion’s f ront edge. Move
the seat to the desired position and
releasethebar.Trytomovetheseat
to make sure it is locked in position.To change the angle of the seat-back,
pull up on the release lever on the
outside of the seat-back. Move the
seat-back to the desired position,
then release the lever. Make sure
the seat-back latches in the new
position.
Seats
Inst rument s and Cont rols
Rear Seat Adjustments
100
Page 108 of 374
Reverse this procedure to return the
f ront and rear seats to the upright
position. Make sure you install the
head restraints and the seats are
locked securely bef ore driving.
When you return the seat-back to
the upright position, hold the seat-
back to keep it f rom going up too
quickly.The rear seat-back can be f olded
down to give more cargo room. Each
side f olds down separately. With only
half the seat f olded, you can still
carry a passenger in the rear seat.
You can also f old up each of the rear
seats separately to create further
cargo space (see page ).
Push the seat belt buckles into the
seat cushion.
1.
106
Seats
Inst rument s and Cont rols
Folding the Rear Seats
104
BUCKLE