Page 536 of 1139

DTC 66,68: EPS Control Unit lnternal Circuit
1. Clear the DTC.
2. Sta rt the engine.
3. Turn the steering wheel from lock-to-lock several
times, and wait 10 seconds or more.
Does the EPS indicator come on?
YES-Go to step 4.
NO-Check for loose wires or poor connections. lf
the connections are good. the system is OK at this
time.l
4. Stop the engine. and verify the DTC.
ls DTC 66 or 68 indicated?
YES-Check for loose or poor connections at the
EPS control unit. lf the conneclions are good,
substitute a known-good EPS control unit. lf the
symptom/indication goes away, replace the
original EPS control unit and recheck.I
NO Perform the appropriate troubleshooting for
the code indicated. t
DTC 67: Torque Sensor l/F Circuit
1. Clear the DTC.
2. Start the engine.
3. Turn the steering wheelfrom lock-to-lock several
times, and wait 10 seconds or more.
Does the EPS indicator come on?
YES-Go to step 4.
NO Check for loose wires or poor connections. lf the
connections are good, the system is OK at this time. !
4. Stop the engine, and verify the DTC.
ls DTC 67 indicated?
YES Check for loose or poor connections at the
EPS control unit. lf the connections are good,
substitute a known-good EPS control unit. lf the
symptom/indication goes away, replace the
original EPS control unit and recheck. !
NO-Perform the appropriate troubleshooting for
the code indicated.I
17-45
Page 537 of 1139
EPS Components
DTC Troubleshooting (cont'd)
DTC 69: EPS Control Unit Internal Circuit
1. Clear the DTC.
2. Start the engine.
3. Turn the steering wheel from lock-to-lock several
times, and wait 10 seconds or more,
Does the EPS indicator come on?
YES Go to step 4.
NO-Check for loose wires or poor connections. lf
the connections are good, the system is OK at this
time.l
4. Stop the engine, and verify the DTC.
ls DTC 69 indicated?
YES-Check for loose or poor connections at the
EPS control unit. lf the connections are good,
substitute a known-good EPS control unit. lf the
symptom/indication goes away, replace the
original EPS control unit and recheck.l
NO- Perform the appropriate troubleshooting for
the code indicated.l
17-46
Page 538 of 1139

EPS Indicator Circuit Troubleshooting
1.Turn the ignition switch ON (ll), start the engine,
and watch the EPS indicator.
Does the EPS indicator come on?
YES lf the EPS indicator comes on and goes off, it's
OK. lf the EPS indicator stays on or blinks. go to
step 12.
NO Go to step 2.
Turn the ignition switch OFF, then ON (ll) again,
and watch the brake system indicator,
Does the brake system indicator come on?
YES-Go to step 3.
NO Repair open in the indicator power source
circuit.l. Blown No. 10 (7.5A)fuse.
. Open in the wire between the No. 10 (7.5A) fuse
and gauge assembly.. Open circuit inside the under-dash fuse/relay box,. Faulty gauge assembly.
Turn the ignition switch OFF,
Connect a jumper wire between the gauge
assembly 22P connector terminal No. 13 and body
ground, then turn the ignition switch ON (ll).
GAUGE ASSEMBLY 22P CONNECTOR (Blue connector)
Wire side of female terminals
Does the EPS indicator come on?
YES-Go to step 5.
NO Inspect the EPS indicator bulb, if the bulb is
OK, replace the bulb circuit board in the gauge
assembly.l
3.
4.
5. Turn the ignition switch OFF.
6. Disconnect EPS control u n it connector C (20P).
7. Turn the ignition switch ON (ll).
8. Connect EPS control unit connector C (20P)
terminal No. 6 to body ground with a jumper wire.
Wire s d€ oflemale16rmina s
Does the EPS indicatot come on?
YES Go to step 9.
NO Repair open in the wire between the gauge
assembly and the EPS control unit.l
Turn the ignition switch OFF.
Disconnect EPS control unit connector A (2P),
Check for continuity between EPS control unit
connector A terminal No. 2 and body ground.
EPS CONTROL UNITCONNECTOA A I2PI
wire s de oftemale terminals
ls there continuity?
YES Check for loose or poor connections at the
EPS control unit. lf the connections are good,
substitute a known-good EPS control unit. lf the
symptom/indication goes away, replace the
original EPS control unit and recheck.I
NO Repair open in the wire or a bad ground at
G151,t(cont'd)
9.
10.
'l 1.
EPS CONTBOL UNIT CONNECTOB C {2OP)
17-47
Page 541 of 1139

EPS Components
(Motor RemovaUlnstallation (cont'dl
lnsiallation
7. Clean the mating surface of the motor (A) and
gearbox.
Apply a thin coat of silicone grease (P/N 08733-
8070E)to the new O-ring (B), and carefully fit it on
the motor.
Apply grease {Nippon Grease WR-S or equivalent
steering gear grease) into the motor shaft (C).
qE
8 x '1.25 mm20 N.m12.0 kgt.m,7 .2lbl ftl
L==-c].E@
9.
17-50
r0.Install the motor on the gearbox by engaging the
motor shaft and worm shaft (D). Note the motor
installation position {direction of motor wires).
Before tightening the bolts, turn the motor two or
three times right and left about 45 degrees. lvlake
sure the motor is evenly seated on the steering
gearbox and that the O-ring is not pinched betlveen
the mating surfaces.
Installthe removed Darts in the reverse order of
removal. and note these items:
lvlake sure the motor 2P connector is properly
connected.
lvlake sure the motor and EPS wires are not
caught or pinched by any parts.
Reconnect the negative cable to the battery.
Do the engine control module (ECM) idle learn
procedure (see page 11-139).
Enter the anti-theft code for the radio station
Dresets. Reset the clock,
Do the oower window control unit reset
procedure (see page 22-1241.
After installation, start the engine, and let it idle.
Turn the steering wheel from lock-to-lock several
times. Check that the EPS indicator does not come
on.
11.
12.
13.
Page 543 of 1139
EPS Components
Steering Gearbox Removal (cont'd)
Disconnect the EPS wire harness 6P connector (A),
and remove the EPS wire harness (B) and mountino
bracket (C).
12.
Remove the ground cable terminal (A) from the
steering gearbox housing.
..(
.,/ a
b-H\
ry T,-.lt'^ \
'" \--
13.
_-1..1.-'
-a--zii F--_1
17-52
14. Remove the engine wire harness clamps {A)fromthe three mounting brackets.
Remove the heater hose {B) from the bracket.
Open the heater valve cable clamp (A), and
disconnect the heater valve cable (B). Remove theheater valve (C) from the bulkhead, and move jt
aside.
t5.
16.
I
Page 555 of 1139
EPS Components
Steering Gearbox Installation (cont'd)
7. Installthe body stiffener (A), and torque the
mounting bolts to the specified torque.
8 x 1.25 mm29 N.m {3.0 kgf.m,22lbf.ftl
LInstall the heater valve (A) on the bulkhead, and
connect the heater valve cable end (B) to the heater
valve arm (C). Readjust the heater valve cable {seepage 21-46).
9.8 N.m(1.0 kgf m,7.2 tbf.ftl
L-t ,:.i.t'
17-64
9. Reinstall the heater hose (A) on the hose bracket.
Install the engine wire harness clamps (B) to the
three harness brackets.
Under the steering gearbox, install the ground
cable terminal (A) on the steering gearbox housing.
10.
'I t.
9.8 N.m{1.0 kgf.m, 7.2lbf.ft)
Page 558 of 1139

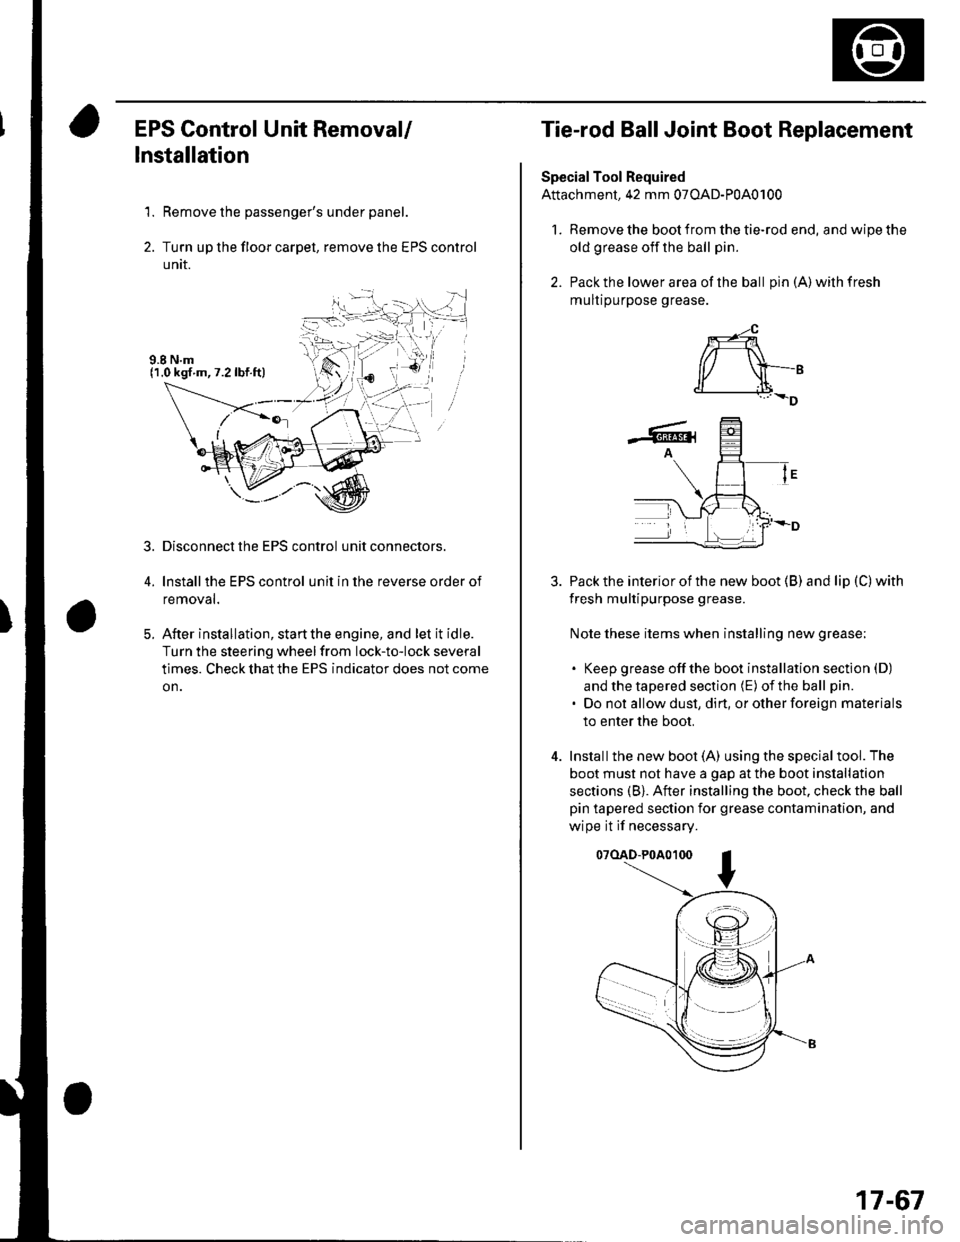
EPS Control Unit Removal/
Installation
1. Remove the passenger's under panel.
2. Turn up the floor carpel, remove lhe EPS control
untr.
Disconnect the EPS control unit connectors.
lnstallthe EPS control unit in the reverse order of
removal.
After installation, start the engine, and let it idle.
Turn the steering wheelfrom lock-to-lock several
times. Check that the EPS indicator does not come
on.
3.
E
Tie-rod Ball Joint Boot Replacement
Special Tool Required
Attachment, 42 mm 07OAD-P0A0100
l. Remove the boot from the tie-rod end, and wipe the
old grease off the ball pin.
2. Pack the lower area of the ball pin(A)wilhfresh
mulr purpose grease.
3. Pack the interior of the new boot (B) and lip (C) with
fresh multipurpose grease.
Note these items when installing new grease;
. Keep grease offthe boot installation section (D)
and the tapered section (E) of the ball pin.
. Do not allow dust, dirt, or other foreign materials
to enter the boot.
4. Installthe new boot (A) using the specialtool. The
boot must not have a gap at the boot installation
sections (B). After installing the boot. check the ball
pin tapered section for grease contamination, and
wipe it if necessary.
07(lAD-P0A0100
*-4
r/ \-,d______i.l+_D
-6rA
17-67
Page 569 of 1139
Front Suspension
Knuckle/Hub/Wheel Bearing Replacement
Exploded View
Check for delormationano oamage.
SPLASH GUARDCheck for corrosion. delormation.and damage.Replace if rusted.
WHEEL BEARINGReplace.
5 mm SCREWSReplace.FLAT SCREWS6x1.0mm9.8Nm(1.0 kgf.m,7.2 lbf.ft)
BRAKE DISC
SPINDLE NUT22 x 1.5 mm181 Nm(18.5 kgf.m, 134 lbt.ft)Replace.'--7.l'tq
IAppy a small amount of engine oilto the seating surface.
lcont'd)
SNAP RING
KNUCKLE
18-11