Page 198 of 317

To add oil, unscrew and remove the
engine oil f ill cap on top of the valve
cover. Pour in the oil, and install the
engine oil f ill cap. Tighten it securely.
Wait a f ew minutes and recheck the
oil level. Do not f ill above the upper
mark; you could damage the engine.Make sure the API Certif ication Seal
says ‘‘For Gasoline Engines.’’
Pour the oil slowly and caref ully so
you do not spill. Clean up any spills
immediately. Spilled oil could
damage components in the engine compartment.
Oil is a major contributor to your
engine’s perf ormance and longevity.
Always use a premium-grade 0W-20
detergent oil displaying the API
Certif ication Seal. This seal indicates
the oil is energy conserving, and that
it meets the American Petroleum
Institute’s latest requirements.
Honda Motor Oil is the pref erred
0W-20 lubricant f or your vehicle. It is
highly recommended that you use
Honda Motor Oil in your vehicle f or
optimum engine protection.
CONT INUED
A dding Oil
Recommended Oil
Engine Oil
Maint enance195
ENGINE OIL
FILL CAP
API CERTIFICATION SEAL
Page 199 of 317
You may use a synthetic motor oil if
it meets the same requirements
given f or a conventional motor oil: it
displays the API Certif ication Seal,
and it is the proper weight as shown
on the chart. When using synthetic
oil, you must f ollow the oil and f ilter
change intervals given in the
maintenance schedule.
Your Honda does not require any oil
additives. Additives may adversely
af f ect your engine’s or transmission’s
perf ormance and durability.
The oil’s viscosity or weight is
provided on the container’s label.
Select the oil f or your vehicle
according to this chart.
A very low-viscosity, f uel-ef f icient
0W-20 oil is the pref erred engine
lubricant f or your Civic Hybrid. This
special oil is f ormulated to help your
engine use less f uel. It is available at
your Honda dealer. A 5W-20 oil may
be used if 0W-20 is not available.
Engine Oil
Maint enance
Synthetic Oil
A dditives
196
Ambient Temperature
Page 200 of 317
Always change the oil and f ilter
accordingtothetimeanddistance
(miles/kilometers) recommenda-
tions in the maintenance schedule.
The oil and f ilter collect contami-
nants that can damage your engine if
they are not removed regularly.
Changing the oil and f ilter requires
special tools and access f rom
underneath the car. The car should
be raised on a service station-type
hydraulic lif t f or this service. Unless
you have the knowledge and proper
equipment, you should have this
maintenance done by a skilled
mechanic.Remove the oil drain bolt and
washer from the bottom of the
engine. Drain the oil into an
appropriate container.
Run the engine until it reaches
normal operating temperature,
then shut it off.
Open the hood and remove the
engine oil f ill cap.
Remove the nine holding clips
with a flat-tipped screwdriver, then
pull the cover down.
1.
2.
4.
3.
CONT INUED
Changing the Oil and Filter
Engine Oil
Maint enance197
HOLDING CLIP DRAIN BOLT
WASHER
Page 201 of 317

Turn of f the engine, let it sit f or
several minutes, then check the oil
level. If necessary, add oil to bring
the level to the upper mark on the
dipstick.
Put the under cover back in place
and reinstall the nine holding clips.
Lock the clips securely by pushing
on the center of each clip.
Put a new washer on the drain bolt,
then reinstall the drain bolt.
Tighten it to:
Refill the engine with the recom-
mended oil.
Engine oil change capacity
(including f ilter):
Replace the engine oil f ill cap.
Start the engine. The oil pressure
indicator light should go out within
f ive seconds. If it does not, turn of f
the engine and reinspect your
work.
Let the engine run f or several
minutes and check the drain bolt
and oil f ilter f or leaks.
Remove the oil f ilter and let the
remaining oil drain. A special
wrench (available from your
Honda dealer) is required to
remove the f ilter.
Install a new oil f ilter according to
instructions that come with it. 7.
8.
9.
10. 12. 11.
5.
6.
Engine Oil
Maint enance198
OIL FILTER
29 lbf·ft (39 N·m , 4.0 kgf·m)
3.4 US qt (3.2
, 2.8 Imp qt) Improper disposal of engine oil can be
harmf ul to the environment. If you
change your own oil, please dispose of
the used oil properly. Put it in a sealed
container and take it to a recycling
center. Do not discard it in a trash bin
or dump it on the ground.
Page 202 of 317

If the coolant level in the reserve
tank is at or below the MIN line, add
coolant to bring it up to the MAX line.
Inspect the cooling system f or leaks.
The coolant you add should always
be a mixture of 50 percent antif reeze
and 50 percent water. Never add
straight antif reeze or plain water.If the reserve tank is completely
empty, you should also check the
coolant level in the radiator.
Make sure the engine and radiator
are cool.
Always use Honda All Season
Antif reeze/Coolant Type 2. This
coolant is pre-mixed with 50 percent
antif reeze and 50 percent water. It
does not require any additional
mixing. If it is not available, you may
use another major-brand non-silicate
coolant as a temporary replacement.
Make sure it is a high-quality coolant
recommended f or aluminum engines.
However, continued use of any non-
Honda coolant can result in
corrosion, causing the cooling
system to malf unction or f ail. Have
the cooling system f lushed and
ref illed with Honda antif reeze/
coolant as soon as possible.
1.
CONT INUED
A dding Engine Coolant
Cooling Syst em
Maint enance199
RESERVE TANK
Removing the radiator cap
while the engine is hot can
cause the coolant to spray out,
seriously scalding you.
Always let the engine and
radiator cool down before
removing the radiator cap.
Page 203 of 317
Remove the radiator cap by
pushing down and turning
counterclockwise. Turn the radiator cap counter-
clockwise, without pressing down
on it, until it stops. This relieves
any pressure remaining in the
cooling system.The coolant level should be up to
the base of the f iller neck. Add
coolant if it is low.Put the radiator cap back on.
Tighten it f ully.
Pour coolant into the reserve tank.
Fill it to half way between the MAX
and MIN marks. Put the cap back
on the reserve tank.
Do not add any rust inhibitors or
other additives to your car’s cooling
system. They may not be compatible
with the coolant or engine compo-
nents.
Pour the coolant slowly and caref ully
so you do not spill. Clean up any
spills immediately. Spilled coolant
could damage components in the
engine compartment.
2.
3.
4.5.
6.
Cooling Syst em
Maint enance200
RADIATOR CAP
RESERVE TANK
Page 204 of 317
CONT INUED
Remove the radiator cap. Turn the ignition ON (II). Turn
the temperature control dial to
maximum heat. Turn of f the
ignition. Open the hood. Make
sure the engine and radiator are
cool to the touch.
Draining the coolant requires access
to the underside of the car. Unless
you have the tools and knowledge,
you should have this maintenance
done by a skilled mechanic. Thecoolingsystemshouldbe
completely drained and ref illed with
new coolant according to the time
and distance recommendations in
the maintenance schedule. Only use
Honda All Season Antif reeze/
Coolant Type 2.
Loosen the drain plug on the
bottom of the radiator. The
coolant will drain through the
splash guard. Drain the coolant
into an appropriate container.
1.
3.
2.
Replacing Engine Coolant
Cooling Syst em
Maint enance201
DRAIN PLUG
Page 205 of 317
�µ
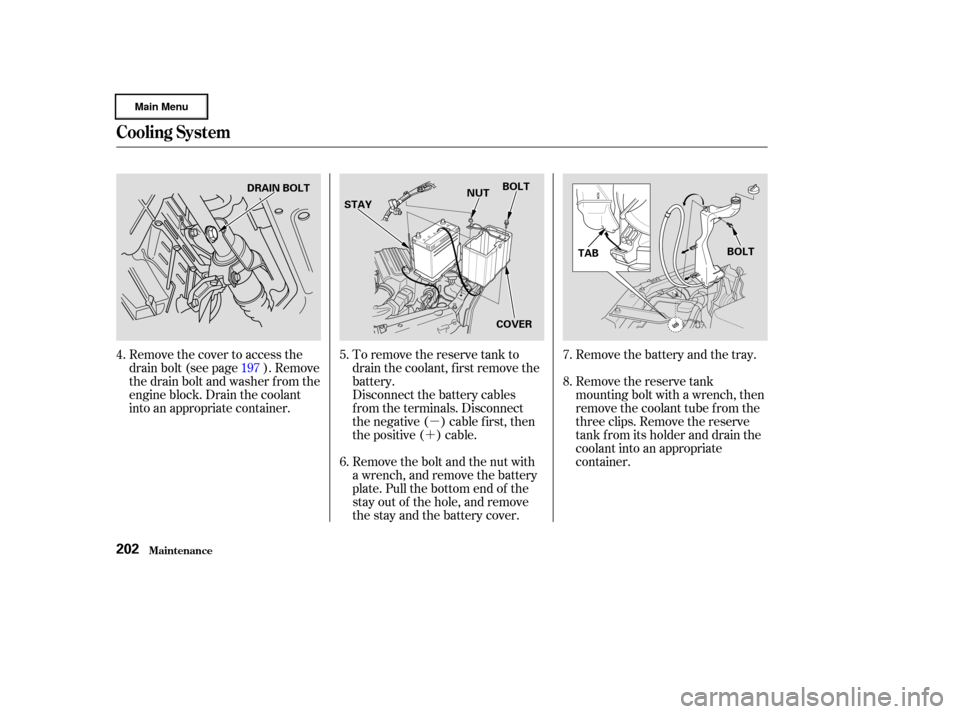
�´ Remove the battery and the tray.
Remove the reserve tank
mounting bolt with a wrench, then
remove the coolant tube f rom the
three clips. Remove the reserve
tank f rom its holder and drain the
coolant into an appropriate
container.
To remove the reserve tank to
drain the coolant, f irst remove the
battery.
Disconnect the battery cables
f rom the terminals. Disconnect
the negative ( ) cable first, then
the positive ( ) cable.
Remove the bolt and the nut with
a wrench, and remove the battery
plate. Pull the bottom end of the
stay out of the hole, and remove
the stay and the battery cover.
Remove the cover to access the
drain bolt (see page ). Remove
the drain bolt and washer f rom the
engine block. Drain the coolant
into an appropriate container.
4.
5.
6.7.
8.
197
Cooling Syst em
Maint enance202
DRAIN BOLT
STAY NUT
BOLT
COVER TAB
BOLT

 recommenda-
tions in the maintenance schedule.
The oil and f ilter collect contami-
nants that can damage your engine")

. Turn
the temperature control dial to
maximum heat. Turn of f the
ignition. Open the hood. Make
sure the engine and radiator are
cool to t")