Page 186 of 317

Be sure
there is adequate ventilation
whenever you operate the engine.
Let the
engine and exhaust system cool
bef ore touching any parts.
Do
not run the engine unless in-
structed to do so. Read the instructions before you
begin, and make sure you have the
tools and skills required.
Bef ore you begin any maintenance,
make sure your car is parked on
level ground and that the parking
brake is set. Also, be sure the engine
is of f . This will help to eliminate
several potential hazards:
You should wear eye protection and
protective clothing when working
near the battery or when using
compressed air. To reduce the possibility of f ire or
explosion, be caref ul when working
around gasoline or batteries. Use a
commercially available degreaser or
parts cleaner, not gasoline, to clean
parts. Keep cigarettes, sparks, and
flames away from the battery and all
f uel-related parts.
Maintenance Saf ety
Maint enance
Important Saf ety Precautions
Carbon monoxide poisoning
f rom engine exhaust.
Burns f rom hot parts.
Injury f rom moving parts.
183
Page 205 of 317
�µ
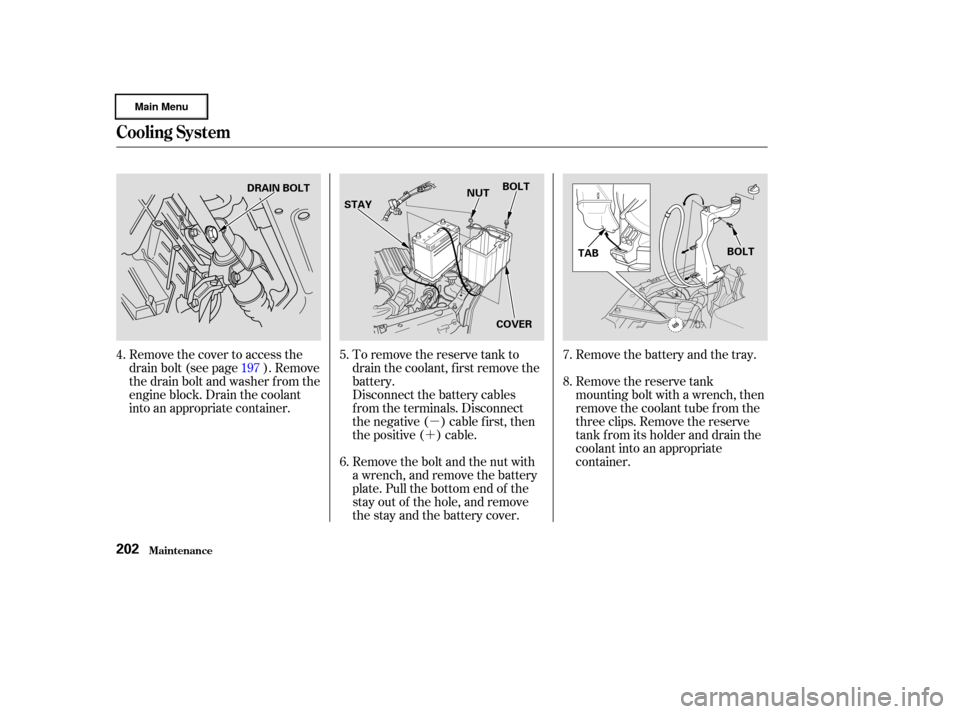
�´ Remove the battery and the tray.
Remove the reserve tank
mounting bolt with a wrench, then
remove the coolant tube f rom the
three clips. Remove the reserve
tank f rom its holder and drain the
coolant into an appropriate
container.
To remove the reserve tank to
drain the coolant, f irst remove the
battery.
Disconnect the battery cables
f rom the terminals. Disconnect
the negative ( ) cable first, then
the positive ( ) cable.
Remove the bolt and the nut with
a wrench, and remove the battery
plate. Pull the bottom end of the
stay out of the hole, and remove
the stay and the battery cover.
Remove the cover to access the
drain bolt (see page ). Remove
the drain bolt and washer f rom the
engine block. Drain the coolant
into an appropriate container.
4.
5.
6.7.
8.
197
Cooling Syst em
Maint enance202
DRAIN BOLT
STAY NUT
BOLT
COVER TAB
BOLT
Page 206 of 317

�´
�µ
CONT INUED
If your car’s battery is disconnected
or goes dead, the audio system will
disableitself.Thenexttimeyouturn
on the radio you will see ‘‘ ’’
in the f requency display. Use the
Preset buttons to enter the five-digit
code (see page ).
When the audio system disables
itself , the clock setting will cancel.
To reset the clock, ref er to the
Digital Clock in the audio system’s
operation.When the coolant stops draining,
tightenthedrainplugatthe
bottom of the radiator.
Put a new washer on the drain bolt,
then reinstall the drain bolt in the
engine block. Tighten it securely.
Tightening torque: Loosen the bleeder bolt on top of
the engine.
Put the tube back in the clips and
put the reserve tank back in place,
making sure its bottom tab is in
the holder. Reinstall and tighten
the mounting bolt securely.
Reinstall the tray, battery, stay,
battery case, and battery plate in
the reverse order of removal.
Reinstall and tighten the bolt and
nut securely.
Reconnect the battery cables to
the terminals. Connect the positive
( ) cable f irst, then the negative
()cable.
Battery posts,
terminals and related accessories
contain lead and lead compounds.
Reinstall the cover.137
12.
13.
11. 10. 9.
15.
14.
Cooling Syst em
Maint enance
WARNING:
Wash hands af ter handling.
203
BLEEDER BOLT
58 lbf·ft (78 N·m , 8.0 kgf·m)
Page 219 of 317
Check the battery terminals for
corrosion (a white or yellowish
powder). To remove it, cover the
terminals with a solution of baking
soda and water. It will bubble up and
turn brown. When this stops, wash it
of f with plain water. Dry of f the
battery with a cloth or paper towel.
Coat the terminals with grease to
help prevent f uture corrosion.
Check the battery condition by
looking at the test indicator window
on the battery.
The label on the battery explains the
test indicator’s colors. Battery posts,
terminals and related accessories
contain lead and lead compounds.
Check the condition of your car’s 12
volt battery monthly. You should
check the color of the test indicator
window, and f or corrosion on the
terminals.
Battery
Maint enance
WARNING:
Wash hands af ter handling.
216
TEST INDICATOR WINDOW
Page 220 of 317
�µ
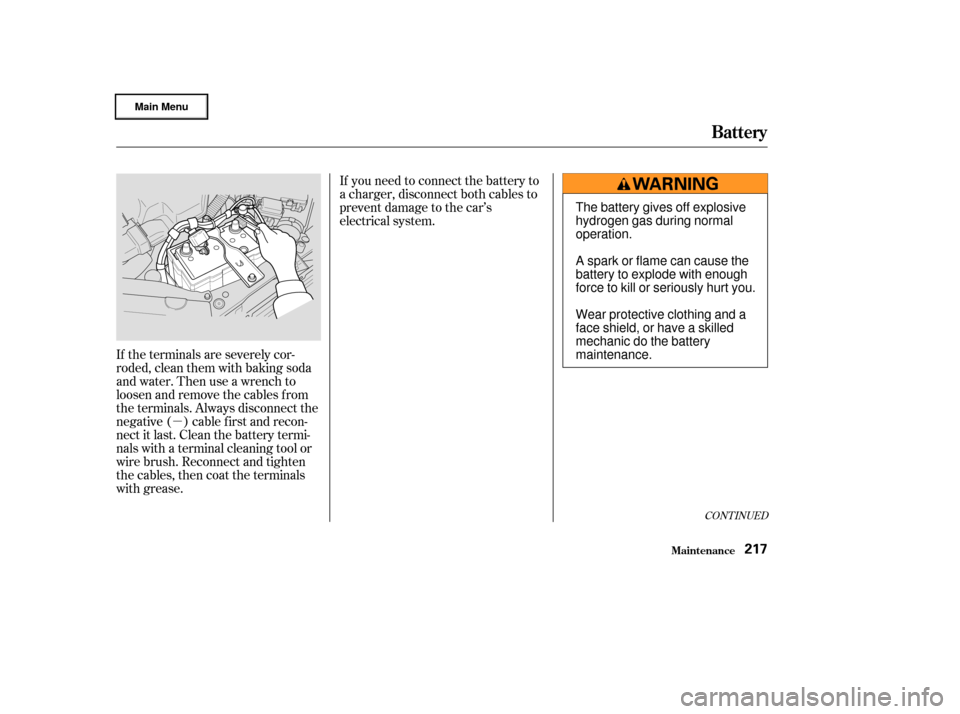
If the terminals are severely cor-
roded, clean them with baking soda
and water. Then use a wrench to
loosen and remove the cables f rom
the terminals. Always disconnect the
negative ( ) cable f irst and recon-
nect it last. Clean the battery termi-
nals with a terminal cleaning tool or
wire brush. Reconnect and tighten
the cables, then coat the terminals
with grease. If you need to connect the battery to
a charger, disconnect both cables to
prevent damage to the car’s
electrical system.
CONT INUED
Battery
Maint enance217
The battery gives off explosive
hydrogen gas during normal
operation.
A spark or flame can cause the
battery to explode with enough
force to kill or seriously hurt you.
Wear protective clothing and a
face shield, or have a skilled
mechanic do the battery
maintenance.
Page 221 of 317
If your car’s battery is disconnected
or goes dead, the audio system will
disableitself.Thenexttimeyouturn
on the radio you will see ‘‘ ’’
in the f requency display. Use the
Preset buttons to enter the five-digit
code (see page ).
When the battery is disconnected,
the clock setting in the audio system
will be canceled. You will need to
reset the clock according to the
instructions of the audio system.
If your car’s 12 volt battery is
disconnected or goes dead, the IMA
battery level gauge reading may not
be correct the next time you turn the
ignition switch to ON (II). It may
show less than the actual level
temporarily. It will show the correct
level af ter you drive f or at least 30
minutes.
137
Battery
Maint enance218
Charging the battery with the cables
connected can seriously damage your
car’s electronic controls. Detach the
battery cables bef ore connecting the
battery to a charger.
Page 246 of 317
.
Wash and dry the exterior
completely.
Cleantheinterior.Makesurethe
carpeting, floor mats, etc. are
completely")
Block the rear wheels.
Fill the f uel tank.
Change the engine oil and f ilter
(see page ).
Wash and dry the exterior
completely.
Cleantheinterior.Makesurethe
carpeting, floor mats, etc. are
completely dry.
If you need to park your car f or an
extended period (more than one
month), there are several things you
should do to prepare it f or storage.
Proper preparation helps prevent
deterioration and makes it easier to
get your car back on the road. If
possible, store your car indoors.
If the car is to be stored for a
longer period, it should be
supported on jackstands so the
tires are of f the ground.
Leave one window open slightly (if
the car is being stored indoors).
Support the f ront wiper blade
arms with a f olded towel or rag so
they do not touch the windshield.
To minimize sticking, apply a
silicone spray lubricant to all door
and trunk seals. Also, apply a
vehiclebodywaxtothepainted
surfaces that mate with the door
and trunk seals.Coverthecarwitha‘‘breathable’’
cover, one made f rom a porous
material such as cotton.
Nonporous materials, such as
plastic sheeting, trap moisture,
which can damage the paint.
Leave the parking brake off. Put
the transmission in Reverse (5-
speed manual) or Park (CVT). Disconnect the 12 volt battery.
Reconnect the 12 volt battery and
drive your car every month f or
about 30 minutes. This will keep
the IMA battery charged and in
good condition.
If you store your car f or 12 months
or longer, have your Honda dealer
perf orm the inspections called f or in
the 24 months maintenance schedule
(Normal Conditions) as soon as you
take it out of storage (see page ).
The replacements called f or in the
maintenance schedule are not
needed unless the car has actually
reached that time or mileage.
197
186
St oring Your Car
Maint enance243
Page 266 of 317
:When you turn the ignition switch to
START (III), you do not hear the
no")
Diagnosing why your engine won’t
start f alls into two areas, depending
on what you hear when you turn the
key to START (III):When you turn the ignition switch to
START (III), you do not hear the
normal noise of the engine trying to
start. You may hear a clicking sound
or series of clicks, or nothing at all.
Check these things:
You hear nothing, or almost
nothing. The engine’s starter
motor does not operate at all, or
operates very slowly.
You can hear the starter motor
operating normally, or the starter
motor sounds like it is spinning
f aster than normal, but the engine
does not start up and run. Check the transmission interlock.
If you have a manual transmission,
the clutch pedal must be pushed
all the way to the f loor or the
starter will not operate. With an
automatic transmission, it must be
in Park or Neutral.
Turn the ignition switch to ON (II).
Turn on the headlights and check
their brightness. If the headlights
are very dim or don’t light at all,
the battery is discharged. See
on page . Turn the ignition switch to START
(III). If the headlights do not dim,
check the condition of the f uses. If
the f uses are OK, there is proba-
bly something wrong with the
electrical circuit f or the ignition
switch or starter motor. You will
need a qualif ied technician to
determine the problem. (See
on page .)
If the headlights dim noticeably or
go out when you try to start the
engine, either the battery is dis-
charged or the connections are
corroded. Check the condition of
the battery and terminal connec-
tions (see page ). You can
then try jump starting the car from
a booster battery (see page ).
265 282
216 265
CONT INUED
Nothing Happens or the Starter
Motor Operates Very Slowly
Jump Starting Emergency T owing
If Your Engine Won’t Start
T aking Care of t he Unexpect ed263
. To remove it, cover the
terminals with a solution of baking
soda and water. It will bubble up and
turn brown. When this stops,")