Page 208 of 429
Never try to insert f oreign objects in
the CD player or the magazine. A new CD may be rough on the
inner and outer edges. The small
plastic pieces causing this roughness
can f lake of f and f all on the re-
cording surf ace of the disc, causing
skipping or other problems. Remove
these pieces by rubbing the inner
and outer edges with the side of a
pencil or pen.
To clean a disc, use a clean sof t cloth.
Wipe across the disc f rom the center
to the outside edge. When a CD is not being played, store
it in its case to protect it f rom dust
and other contamination. To prevent
warpage, keep CDs out of direct
sunlight and extreme heat.
Handle a CD by its edges; never
touch either surf ace. Do not place
stabilizer rings or labels on the CD.
These and contamination f rom
f ingerprints, liquids, and f elt-tip pens
can cause the CD to not play
properly, or possibly jam in the drive. Protecting Compact Discs
Audio System
Comf ort and Convenience Feat ures205
Page 209 of 429
�Î
�Î
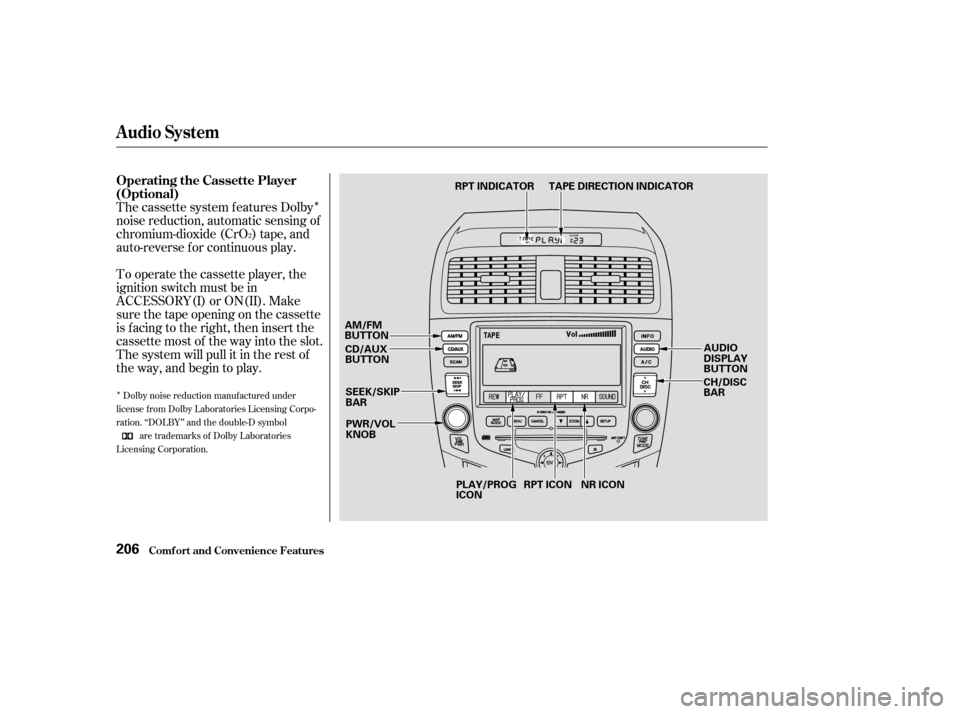
The cassette system f eatures Dolby
noise reduction, automatic sensing of
chromium-dioxide (CrO ) tape, and
auto-reverse f or continuous play.
To operate the cassette player, the
ignition switch must be in
ACCESSORY(I) or ON(II). Make
sure the tape opening on the cassette
is f acing to the right, then insert the
cassette most of the way into the slot.
The system will pull it in the rest of
the way, and begin to play.
2
Dolby noise reduction manuf actured under
license from Dolby Laboratories Licensing Corpo-
ration. ‘‘DOLBY’’ and the double-D symbol are trademarks of Dolby Laboratories
Licensing Corporation.
Operating the Cassette Player
(Optional)
Audio System
Comf ort and Convenience Feat ures206
PWR/VOL
KNOB
CD/AUX
BUTTON
SEEK/SKIP
BAR
AM/FM
BUTTON
CH/DISC
BAR
RPT ICON NR ICON
PLAY/PROG
ICON TAPE DIRECTION INDICATOR
RPT INDICATOR
AUDIO
DISPLAY
BUTTON
Page 210 of 429

�ÛDolby noise reduction turns on when
you insert a cassette. If the tape was
not recorded with Dolby noise reduc-
tion, push the AUDIO DISPLAY
button to change to the audio display,
and turn it of f by touching the NR
icon on the display.
Noise reduction remains of f until you
turn it on by pressing the icon again.
When the system reaches the end of
the tape, it will automatically reverse
direction and play the other side. If
you want to remove the cassette
from the drive, press the eject button
on the cassette player. To switch to the radio or CD player
while a tape is playing, press the
AM/FM, or CD/AUX button. To
change back to the cassette player,
push the CD/AUX button.
The tape direction indicator will light
on the upper display to show you
which side of the cassette is playing.
The indicates the side you
inserted f acing upward is now
playing. If you want to play the other
side, push the AUDIO DISPLAY
button to change to the audio display,
and touch the PLAY/PROG icon.
If you turn the system of f while a
tape is playing, either with the PWR/
VOL knob or by turning of f the
ignition, the cassette will remain in
the drive. When you turn the system
back on, the cassette player will be in
pause mode. To begin playing, push
the AUDIO DISPLAY button to
change to the audio display, and
touch the PLAY/PROG icon.
Audio System
Comf ort and Convenience Feat ures207
Page 211 of 429

�µ
�µ
�Û
�Ý
With a cassette playing, you can use
the FF, REW, SKIP, or REPEAT
f unction to f ind a desired program.
The Skip f unction allows
youtofindthebeginningof asong
or passage. To activate SKIP, press
the SEEK/SKIP bar. Press the side to advance to the
beginning of the next song or
passage, or the side to return to
the beginning of the current song or
passage. FF or REW will be shown in
the upper display as the tape moves.
When the system reaches the
beginning of the next song or
passage (FF), or the beginning of
thecurrentone(REW),itgoesback
to PLAY mode.
Fast Forward and Re-
wind move the tape rapidly. To re-
wind the tape, push the upper side
( ) of the CH DISC bar. You will
seeREWinthedisplay.Tofastfor-
ward the tape, push the lower side
( ) of the CH DISC bar. You will
see FF displayed. Press either side of
the CH DISC bar or touch the
PLAY/PROGiconintheaudio
display to take the system out of re-
wind or f ast f orward. When the sys-
tem reaches the end of the tape, it
reverses direction and begins to play.
T ape Search Functions
SK IP
FF/REW
Audio System
Comf ort and Convenience Feat ures208
Page 212 of 429
�µThe SKIP and REPEAT f unctions
use silent periods on the tape to f ind
the end of a song or passage. These
f eatures may not work to your
satisfaction if there is almost no gap
between selections, a high noise
level between selections, or a silent
period in the middle of a selection.
The Repeat f unction
continuously replays the current
song or passage. Press the AUDIO
DISPLAY button to change to the
audio display, and touch the RPT
icon in the display to activate it; you
will see RPT displayed in the upper
display as a reminder. When the
system reaches the end of the song
or passage currently playing, it will
automatically go into rewind. When
it senses the beginning of the same
song or passage, the system returns
to PLAY mode. It will continue to
repeat this same program until you
deactivate REPEAT by touching the
icon again. REPEAT
Audio System
Comf ort and Convenience Feat ures209
Page 213 of 429

The cassette player picks up dirt and
oxides f rom the tape. This contami-
nation builds up over time and
causes the sound quality to degrade.
To prevent this, you should clean the
player af ter every 30 hours of use.
Your dealer has a cleaning kit
available.
If you do not clean the cassette
player regularly, it may eventually
become impossible to remove the
contamination with a normal
cleaning kit.
Use 100-minute or shorter cassettes.
Cassettes longer than that use
thinner tape that may break or jam
the drive.Look at the cassette before you
insert it. If the tape is loose, tighten
it by turning a hub with a pencil or
your f inger.
If the label is peeling of f , remove it
from the cassette or it could cause
the cassette to jam in the player.
Never try to insert a warped or
damaged cassette in the player.
When they are not in use, store
cassettes in their cases to protect
them f rom dust and moisture. Never
place cassettes where they will be
exposed to direct sunlight, high heat,
or high humidity. If a cassette is
exposed to extreme heat or cold, let
it reach a moderate temperature
bef ore inserting it in the player.
Never try to insert f oreign objects
into the cassette player.If you see the error indication
‘‘ ’’ f lashing on the display,
press the TAPE eject button to
remove the cassette from the unit.
Make sure the tape is not damaged.
If the cassette will not eject or the
error indication stays on after the
cassette ejects, take the car to your
Honda dealer.
If you see the error indication
‘‘ ’’ on the upper display,
press the TAPE eject button to
remove the cassette from the unit.
Make sure the tape is not damaged.
If the cassette will not eject or the
error indication stays on after the
cassette ejects, take the car to your
Honda dealer.
On Audio system with Navigation
System
On Audio systems without Navigation
System
Caring f or the Cassette Player
Audio System
Comf ort and Convenience Feat ures210
Page 214 of 429

�Û�Ý�´
�µ �´
�µ
�´ �µ
Three controls f or the audio system
are mounted in the steering wheel
hub. These let you control basic
f unctions without removing your
hand f rom the wheel. The VOL button adjusts the volume
up ( ) or down ( ). Press the top
or bottom of the button and hold it
until the desired volume is reached,
then release it.
The MODE button changes the
mode. Pressing the button
repeatedly selects FM1, FM2, AM,
CD (if a CD is loaded), or a cassette
(if equipped).
If you are listening to the radio, use
the CH button to change stations.
Each time you press the top ( ) of
the button, the system goes to the
next preset station on the band you
are listening to. Press the bottom
( ) to go back to the previous
station.If youareplayingaCD,thesystem
skips to the beginning of the next
track each time you press the top
( ) of the CH button. Press the
bottom ( ) to return to the
beginning of the current track. Press
it again to return to the previous
track. You will see the disc and track
number in the display.
If youareplayingatapeinthe
optional cassette player, press the
top ( ) of the CH button to advance
to the next selection. Press the
bottom( )togobacktothe
previous selection. The system
senses a silent period, then goes
back to play mode.
On all EX and V6 models
Remote Audio Controls
Audio System
Comf ort and Convenience Feat ures211
CH BUTTON
VOL BUTTON MODE BUTTON
Page 215 of 429

�µ
Your car’s audio system will disable
itself if it is disconnected f rom
electrical power f or any reason. To
make it work again, the user must
enter a specif ic code using the preset
bars or the TUNE knob. Because
there are hundreds of number
combinations possible, making the
system work without knowing the
exact code is nearly impossible.
Youshouldhavereceivedacardthat
lists your audio system’s code
number and serial number. It is best
tostorethiscardinasafeplaceat
home. In addition, you should write
the audio system’s serial number in
this Owner’s Manual. If you should
happen to lose the card, you must
obtain the code number f rom your
Honda dealer. To do this, you will
need the system’s serial number. When all the digits in the code are
entered correctly, the radio will start
playing.
If you make a mistake entering the
code, do not start over or try to
correct your mistake. Complete the
sequence, then enter the correct
code. You have ten tries to enter the
correct code. If you are unsuccessf ul
in ten attempts, you must then leave
the system on f or one hour bef ore
trying again.
If your car is equipped with a
navigation system, press and release
the TUNE knob; the number ‘‘0’’
appears on the display.
You will have to store your favorite
stations on each side of the preset
bars (1 6) af ter the system begins
working. Your original settings were
lost when power was disconnected.
If your car’s battery is disconnected
or goes dead, or the radio f use is
removed, the audio system will
disable itself . If this happens, you
will see ‘‘ ’’/‘‘ ’’ in the
frequencydisplaythenexttimeyou
turn on the system. Use the preset
bars to enter the code.
If ‘‘0’’ is not the f irst digit in your
code, turn the TUNE knob lef t or
right until the f irst digit is
displayed. Press and release the
TUNE knob to store it. Enter the
remaining digits the same way. If ‘‘0’’ is the f irst digit in your code,
press and release the TUNE knob
to store it.
On EX, EX-V6 and LX-V6 models
Thef t Protection
Audio System
Comf ort and Convenience Feat ures212