Page 62 of 429

This section gives inf ormation about
the controls and displays that
contribute to the daily operation of
your Honda. All the essential
controls are within easy reach............................
Control Locations .60
...............................
Indicator Lights .61
.............................................
Gauges .68
...............................
Speedometer .68
.................................
Tachometer .68
.....................................
Odometer .69
Outside Temperature ...................................
Indicator .69
...................................
Trip Meter .70
...................
Temperature Gauge . 70
..................................
Fuel Gauge .70
Maintenance Required ...................................
Indicator .71
Controls Near the Steering .......................................
Wheel .73
...................................
Headlights .74 Automatic Lighting Off
.....................................
Feature .75
............
Daytime Running Lights . 76
....
Instrument Panel Brightness . 76
................................
Turn Signals .77
.....................
Windshield Wipers .77
..................
Windshield Washers . 79
..........................
Hazard Warning .79
.............
Rear Window Def ogger . 79
......
Steering Wheel Adjustment . 80
...............................
Keys and Locks .82
..............................................
Keys .82
....................
Immobilizer System . 83
............................
Ignition Switch .84
......................
Power Door Locks .86
...................
Remote Transmitter . 87
...........................................
Trunk .91
........
Emergency Trunk Opener . 92
....................................
Glove Box .93
............................
Seat Adjustments .94
.............
Front Seat Adjustments . 94
Driver’s Seat Manual Height ..............................
Adjustment .95
Driver’s Seat Power Height ..............................
Adjustment .95 Driver’s Seat Power
............................
Adjustments .96
...........
Driver’s Lumbar Support . 97
........................
Rear Seat Access .98
..........................
Head Restraints .99
.....................
Folding Rear Seat .100
..................................
Seat Heaters .102
............................
Power Windows .103
.......................................
Moonroof .107
...........................................
Mirrors .108
..
Adjusting the Power Mirrors . 108
...............................
Parking Brake .110
.................
Console Compartment . 111
..........................................
Armrest .111
.........................
Beverage Holders .112
.........................
Center CD Pocket .113
...................................
Coin Pocket .113
........................................
Sun Visor .114
................................
Vanity Mirror .115
......................................
Coat Hook .115
........................
Sunglasses Holder .116
............
Accessory Power Sockets . 116
...............................
Interior Lights .117
..............................
Ceiling Light .117
...................................
Spotlights .118
........................
Courtesy Lights .119
Instruments and Controls
Inst rument s and Cont rols59
Page 105 of 429

The HI or LO indicator lights and
remains lit until you turn it of f by
pushing the opposite side of the
switch lightly. The indicator will turn
off.
In HI, the heater turns of f when the
seat gets warm, and turns back on
after the seat’s temperature drops. It
continues to cycle as long as you
leave it set on HI. The HI indicator
remains lit as a reminder that you
have the heater on.
In LO, the heater runs continuously.
It does not cycle with temperature
changes.Do not use the seat heaters, even
on the LO setting, if the engine is
lef t idling f or an extended period.
They can weaken the battery,
causing hard starting. Use the HI setting only to heat the
seats quickly. Select the LO
setting when the seats f eel warm.
The HI setting draws large
amounts of current f rom the
battery.
Follow these precautions whenever
you use the seat heaters:
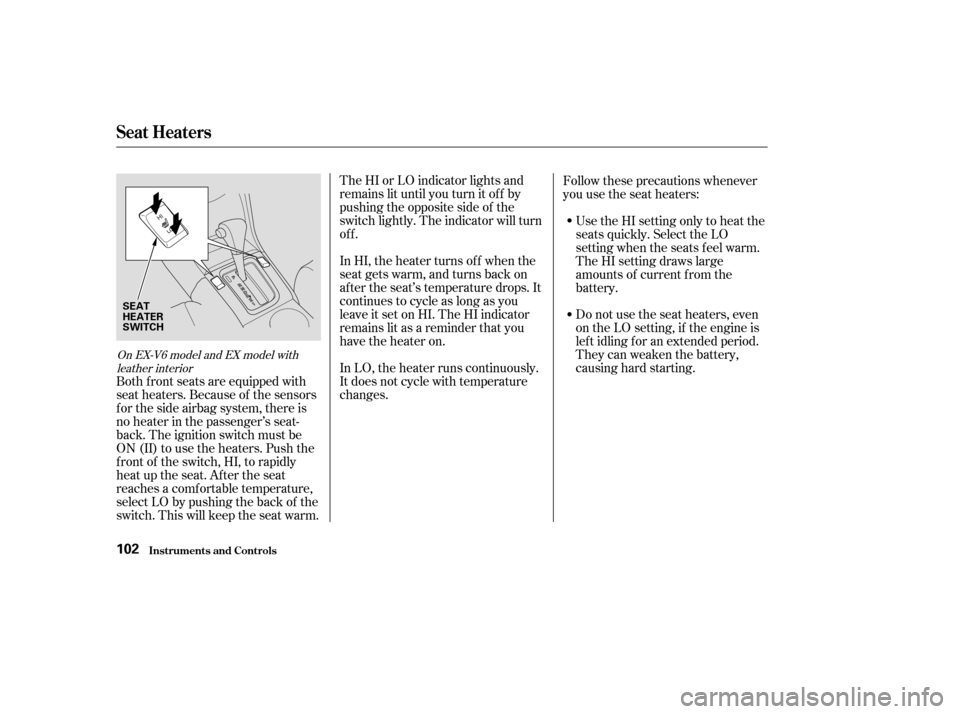
Both f ront seats are equipped with
seat heaters. Because of the sensors
f or the side airbag system, there is
no heater in the passenger’s seat-
back. The ignition switch must be
ON (II) to use the heaters. Push the
f ront of the switch, HI, to rapidly
heat up the seat. After the seat
reaches a comf ortable temperature,
select LO by pushing the back of the
switch. This will keep the seat warm.
On EX-V6 model and EX model with leather interior
Seat Heaters
Inst rument s and Cont rols102
SEAT
HEATER
SWITCH
Page 120 of 429
These sockets are intended to supply
power f or 12 volt DC accessories
that are rated 120 watts or less (10
amps).
They will not power an automotive
type cigarette lighter element. When both sockets are being used,
the combined power rating of both
accessories should be 120 watts or
less (10 amps).Af ter both doors are closed tightly,
the light dims slightly, then f ades out
in about 30 seconds. In the ON
position, the ceiling light stays on
continuously.
The ceiling light (with the switch in
the center position) also comes on
when you unlock the door with the
remote transmitter (see page ).
The light f ades out af ter both doors
are closed.
The ceiling light has a three-position
switch. In the OFF position, the light
does not come on. In the center
position, the ceiling light comes on
when you open either door. 88
CONT INUED
AccessoryPowerSockets,InteriorLights
Inst rument s and Cont rols
Ceiling L ight
117
O OF
FFF O
ON
N
DOOR ACTIVATED
ACCESSORY POWER SOCKET
Page 121 of 429
The ceiling light (with the switch in
the center position) comes on when
you remove the key f rom the ignition
switch. If you do not open a door, the
light stays on, then f ades out in
about 30 seconds.
If you leave either door open with
the key not in the ignition switch, the
ceiling light will go of f af ter three
minutes.Turn on a spotlight by pushing the
lens. Push the lens again to turn it
of f . You can use the spotlights at all
times. Spotlights
Interior Lights
Inst rument s and Cont rols118
LX and LX-V6 models EX and EX-V6 models
Page 122 of 429
The courtesy light in each door
comes on when the door is opened,
and goes out when the door is closed.
Your car also has a courtesy light in
the ignition switch. This light comes
on when you open the driver’s door.
It f ades out in about 30 seconds af ter
the door is closed.
The spotlights (with the switch in
the DOOR position) also come on
when you unlock the door with the
remote transmitter, and when you
remove the key from the ignition
switch.(See Ceiling Light on page
.)
The spotlights have a two-position
switch. In the DOOR position, the
lights come on when you open either
door. In the OFF position, the lights
do not come on. 117
CONT INUED
On EX and EX-V6 models
Interior Lights
Inst rument s and Cont rols
Courtesy Lights
119
IGNITION SWITCH LIGHT
DOOR LIGHT
OFF
DOOR
ACTIVATED
Page 123 of 429
The courtesy light between the
spotlights comes on when you turn
the parking lights on. To adjust its
brightness, turn the Select/Reset
knob on the instrument panel.
On EX and EX-V6 models
Interior Lights
Inst rument s and Cont rols120
COURTESY LIGHT
Page 125 of 429

Proper use of the Heating and
Cooling system can make the
interior dry and comf ortable, and
keep the windows clear f or the best
visibility.
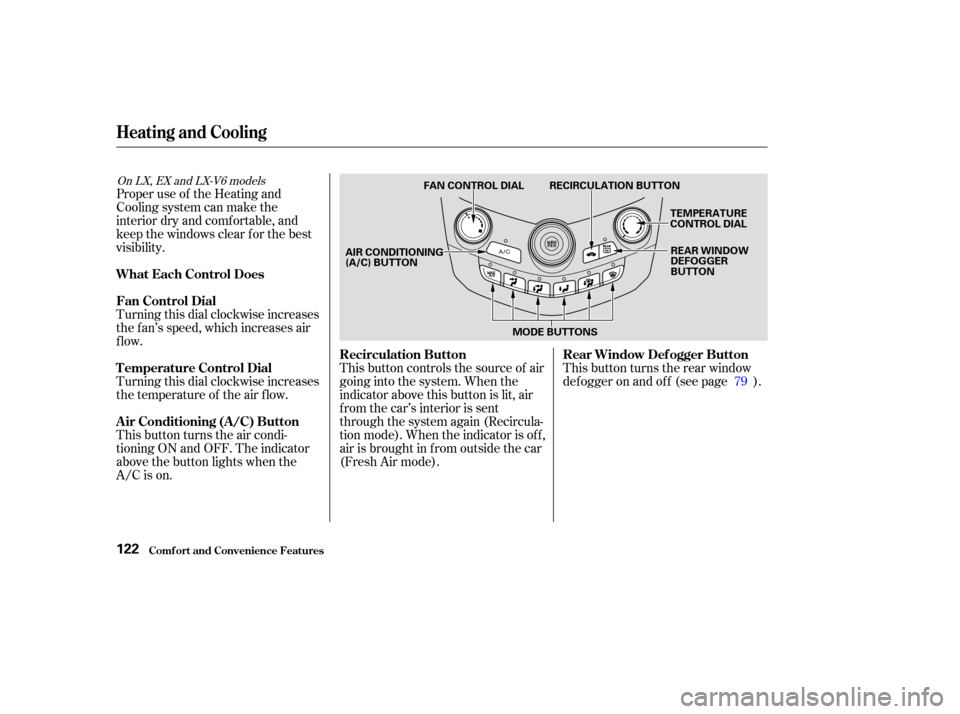
Turning this dial clockwise increases
the f an’s speed, which increases air
flow.
Turning this dial clockwise increases
the temperature of the air flow.
This button turns the air condi-
tioning ON and OFF. The indicator
above the button lights when the
A/C is on.This button controls the source of air
going into the system. When the
indicator above this button is lit, air
from the car’s interior is sent
through the system again (Recircula-
tion mode). When the indicator is off,
air is brought in f rom outside the car
(Fresh Air mode).
This button turns the rear window
def ogger on and of f (see page ).
79
On LX, EX and LX-V6 models
Comf ort and Convenience Feat ures
Heating and Cooling
What Each Control Does
Fan Control Dial
T emperature Control Dial
Air Conditioning (A/C) Button Recirculation Button
Rear Window Def ogger Button
122
TEMPERATURE
CONTROL DIAL
FAN CONTROL DIAL RECIRCULATION BUTTON
REAR WINDOW
DEFOGGER
BUTTON
AIR CONDITIONING
(A/C) BUTTON
MODE BUTTONS
Page 354 of 429
CONT INUED
The ceiling light, spotlight, door light
and vanity mirror light come apart
the same way, but they do not use
thesametypeof bulb.Removethelensbycarefully
prying on the edge of the lens with
a f ingernail f ile or a small f lat-tip
screwdriver. Do not pry on the
edge of the housing around the
lens.
Door light:Pry on the top lef t or right of the
lens.
Ceiling light: Pry on the f ront edge of the lens
near both sides.
Spotlights: Pry on the inner edge of both
spotlights. Remove the bulb by pulling it
straight out of its metal tabs.
Push the new bulb into the metal
tabs. Carefully snap the lens back
in place.
1.
2.
3.
On LX and LX-V6 models
On EX and EX-V6 models
Lights
Maint enance
Replacing Bulbs in the Interior
Lights
351
CEILING LIGHTBULB SPOTLIGHTS
BULBS
SPOTLIGHTS
BULBS