Page 179 of 429

�µ�µ
When that disc ends, the next disc in
the CD changer is loaded and played.
Af ter the last disc f inishes, the
system returns to disc 1.
To select a dif f erent disc, press the
appropriate side of a preset bar (1
6). If you select an empty position in
the CD changer, the system will go
into the loading sequence (see page ). Each time you press and
release it, the system skips forward
to the beginning of the next track.
Press and release to skip
backward to the beginning of the
current track. Press and release it
again to skip to the beginning of the
previous track.
You can use the SKIP bar while a
disc is playing to select passages and
change tracks. To move rapidly within a track, press
andholdtheleftorrightsideof the
SKIP bar. You will hear a beep and
the system will continue to move.
Press to move f orward, or
to move backward. Release the
bar when the system reaches the
point you want.
Select the CD changer by pressing
the CD button. You will see ‘‘CD’’ in
the display. The system will begin
playing the last selected disc in the
CD changer. You will see the disc
and track numbers displayed. This f eature, when
activated, samples all the tracks on
the selected disc in the order they
are recorded on the CD. To activate
the Scan f eature, select the Scan
mode by pressing the SCAN button.
You will see SCAN in the display.
The system will then play the first
track f or approximately ten seconds.
If you do nothing, the system will
then play the following tracks for ten
seconds each. When it plays a track
that you want to continue listening to,
press the SCAN button again.
174
Operat ion
Audio System
Comf ort and Convenience Feat ures
SCAN
176
Page 180 of 429
�µ
CONT INUED
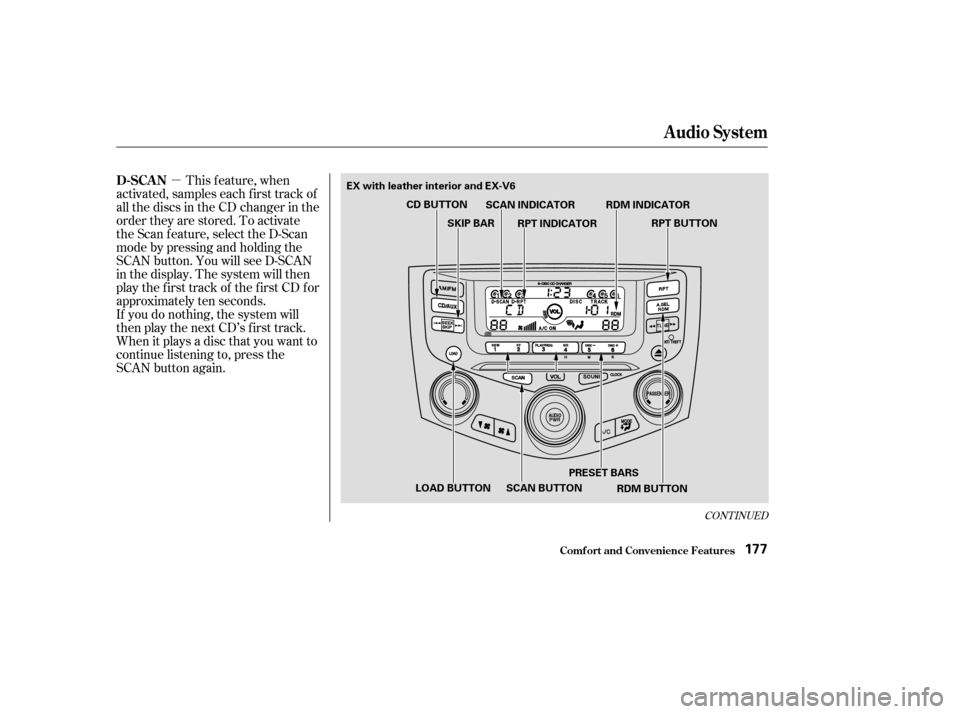
This f eature, when
activated, samples each first track of
all the discs in the CD changer in the
order they are stored. To activate
the Scan f eature, select the D-Scan
mode by pressing and holding the
SCAN button. You will see D-SCAN
in the display. The system will then
play the first track of the first CD for
approximately ten seconds.
If you do nothing, the system will
then play the next CD’s first track.
When it plays a disc that you want to
continue listening to, press the
SCAN button again.
Audio System
Comf ort and Convenience Feat ures
D-SCAN
177
RDM BUTTON
SCAN BUTTON
LOAD BUTTON PRESET BARS
CD BUTTON
SCAN INDICATOR
RPT BUTTON
RDM INDICATOR
RPT INDICATOR
SKIP BAR
EX with leather interior and EX-V6
Page 182 of 429

�µ�µ
CONT INUED
To take the system out of CD mode,
press the AM/FM button. Each time
you press the AM/FM button, the
system will change to the next mode;
FM1, FM2 or AM. When you return
to CD mode by pressing the CD
button, play will continue at the same
point that it lef t of f .
If you turn the system of f while a CD
is playing, either with the PWR/VOL
knob or the ignition switch, play will
continue at the same point when you
turn it back on.
This f eature, when
activated, replays all the tracks on
the selected disc in the order they
are recorded on the CD. To activate
the disc repeat f eature, select the D-
Repeat mode by pressing and
holding the RPT button. You will see
D-RPT in the display. The system
continuously replays the current CD.
Press the RPT button again to turn it
of f . Pressing either side of the SKIP
or TUNE bar also turns of f the
repeat feature. This feature,
when activated, plays the tracks
within a CD in random order, rather
than in the order they are recorded
on the CD. To activate Random Play,
press the RDM button. You will see
RDM in the display. The system will
then select and play tracks randomly.
This continues until you deactivate
RandomPlaybypressingtheRDM
button again, or you select a
dif f erent CD with a preset bar.
Audio System
D-REPEAT RANDOM PLAY
Comf ort and Convenience Feat ures179
Page 183 of 429
To remove the disc that is currently
playing, press the eject button. You
will see ‘‘EJEC’’ in the display. When
you remove the disc f rom the slot,
the system automatically begins the
Load sequence so you can load
another CD in that position. If you do
not load another CD, af ter 15
seconds, the system selects the
previous mode (AM, FM1, or FM2).
If you do not remove the disc f rom
the slot, the system will reload the
disc af ter 15 seconds, and select the
previous mode (AM or FM). To
begin playing the disc, press the CD
button.
To remove a different CD from the
changer,firstselectitwiththeleftor
right side of the appropriate preset
bar. When that CD begins playing,
press the eject button.
Removing CDs f rom t he Changer
Audio System
Comf ort and Convenience Feat ures180
CD SLOT
CD
BUTTON
PWR/VOL KNOBEJECT BUTTON
AM/FM BUTTON
EX with leather interior and EX-V6
Page 192 of 429

�µ�µ �µ
CONT INUED
You can store the
f requencies of your f avorite radio
stations in the six preset icons. Each
icon will store one f requency on the
AM band, and two f requencies on
the FM band.
To store a f requency: Push the AUDIO DISPLAY button
to view the audio display. You will
see the six preset icons.
Select the desired band, AM or
FM. FM1 and FM2 let you store
two f requencies with each preset
icon.
UsetheTUNE,SEEK,orSCAN
function to tune the radio to a
desired station.
Pick the preset icon (1 6) you
want for that station. Touch the
icon, and hold it until you hear a
beep. Repeat steps 2 to 4 to store a total
of six stations on AM and twelve
on FM.
Once a station’s f requency is stored,
simply touch the proper preset icon
to tune to it.
The preset f requencies will be lost if
your car’s battery goes dead, is
disconnected, or the radio f use is
removed. If you are
traveling far from home and can no
longer receive the stations you
preset, you can use the Auto Select
feature to find stations in the local
area.
To activate Auto Select, touch the
Auto Select icon on the display. The
A.SEL indicator will f lash in the
upper display, and the system will go
into scan mode f or several seconds.
It automatically scans both bands,
looking f or stations with strong
signals. It stores the f requencies of
six AM stations and twelve FM
stations in the preset icons. You can
then use the preset icons to select
those stations.
1.
2.
3.
4. 5.
Audio System
Comf ort and Convenience Feat ures
Preset
A UT O SEL ECT
189
Page 205 of 429
To remove the disc that is currently
playing, press the eject button. You
will see ‘‘EJEC’’ in the upper and
audio displays. When you remove
the disc f rom the slot, the system
automatically begins the load
sequence so you can load another
CD in that position. If you do not
load another CD, after 15 seconds,
the system selects the previous
mode (AM, FM1, or FM2).
If you do not remove the disc f rom
the slot, the system will reload the
disc af ter 15 seconds and put the CD
changer in pause mode. To begin
playing the disc, press the CD button.
To remove a different CD from the
changer,firstselectitwiththe
appropriate disc icon or the DISC bar.
When that CD begins playing, press
the eject button.
Removing CDs f rom t he Changer
Audio System
Comf ort and Convenience Feat ures202
CD SLOTDISC BAR
EJECT
BUTTON
CD
BUTTON
Page 210 of 429

�ÛDolby noise reduction turns on when
you insert a cassette. If the tape was
not recorded with Dolby noise reduc-
tion, push the AUDIO DISPLAY
button to change to the audio display,
and turn it of f by touching the NR
icon on the display.
Noise reduction remains of f until you
turn it on by pressing the icon again.
When the system reaches the end of
the tape, it will automatically reverse
direction and play the other side. If
you want to remove the cassette
from the drive, press the eject button
on the cassette player. To switch to the radio or CD player
while a tape is playing, press the
AM/FM, or CD/AUX button. To
change back to the cassette player,
push the CD/AUX button.
The tape direction indicator will light
on the upper display to show you
which side of the cassette is playing.
The indicates the side you
inserted f acing upward is now
playing. If you want to play the other
side, push the AUDIO DISPLAY
button to change to the audio display,
and touch the PLAY/PROG icon.
If you turn the system of f while a
tape is playing, either with the PWR/
VOL knob or by turning of f the
ignition, the cassette will remain in
the drive. When you turn the system
back on, the cassette player will be in
pause mode. To begin playing, push
the AUDIO DISPLAY button to
change to the audio display, and
touch the PLAY/PROG icon.
Audio System
Comf ort and Convenience Feat ures207
Page 213 of 429

The cassette player picks up dirt and
oxides f rom the tape. This contami-
nation builds up over time and
causes the sound quality to degrade.
To prevent this, you should clean the
player af ter every 30 hours of use.
Your dealer has a cleaning kit
available.
If you do not clean the cassette
player regularly, it may eventually
become impossible to remove the
contamination with a normal
cleaning kit.
Use 100-minute or shorter cassettes.
Cassettes longer than that use
thinner tape that may break or jam
the drive.Look at the cassette before you
insert it. If the tape is loose, tighten
it by turning a hub with a pencil or
your f inger.
If the label is peeling of f , remove it
from the cassette or it could cause
the cassette to jam in the player.
Never try to insert a warped or
damaged cassette in the player.
When they are not in use, store
cassettes in their cases to protect
them f rom dust and moisture. Never
place cassettes where they will be
exposed to direct sunlight, high heat,
or high humidity. If a cassette is
exposed to extreme heat or cold, let
it reach a moderate temperature
bef ore inserting it in the player.
Never try to insert f oreign objects
into the cassette player.If you see the error indication
‘‘ ’’ f lashing on the display,
press the TAPE eject button to
remove the cassette from the unit.
Make sure the tape is not damaged.
If the cassette will not eject or the
error indication stays on after the
cassette ejects, take the car to your
Honda dealer.
If you see the error indication
‘‘ ’’ on the upper display,
press the TAPE eject button to
remove the cassette from the unit.
Make sure the tape is not damaged.
If the cassette will not eject or the
error indication stays on after the
cassette ejects, take the car to your
Honda dealer.
On Audio system with Navigation
System
On Audio systems without Navigation
System
Caring f or the Cassette Player
Audio System
Comf ort and Convenience Feat ures210