Page 308 of 429

The cooling system capacity is:Start the engine and let it run for
about 30 seconds. Then turn of f
the engine.
Fill the radiator with coolant up to
the base of the f iller neck.
Fill the reserve tank to the MAX
mark. Install the reserve tank cap.
Install the radiator cap, and
tighten it to the first stop.
Start the engine and let it run until
the radiator cooling f an comes on
at least twice. Then stop the
engine.
Remove the radiator cap. Pour
coolant into the radiator up to the
base of the f iller neck and into the
reserve tank up to the MAX mark. Start the engine and hold it at
1,500 rpm until the cooling f an
comes on. Turn of f the engine.
Check the coolant level in the
radiator and add coolant if needed.
Install the radiator cap, and
tighten it fully.
If necessary, f ill the reserve tank
to the MAX mark. Install the
reserve tank cap.
16.
17.
18.
15. 14. 13.
12. 10.
11.
With automatic transmission:
With 5-speed manual transmission:
With 6-speed manual transmission:With automatic transmission:
Cooling Syst em
Maint enance
4-cylinder models
6-cylinder models
305
1.37 US gal (5.2)
1.40 US gal (5.3
)
1.77 US gal (6.7
)
1.74 US gal (6.6
)
Page 311 of 429

To thoroughly f lush the transmission,
the technician should drain and ref ill
it with Honda ATF-Z1, then drive the
vehicle a short distance. Do this
three times. Then drain and ref ill the
transmission a f inal time.Insert the dipstick all the way back
into the transmission securely as
shown in the illustration.
The transmission should be drained
and ref illed with new f luid according
to the time and distance recommen-
dations in the maintenance schedule.
If you are not sure how to add f luid,
contact your Honda dealer. Check the f luid level with the engine
at normal operating temperature.
Park the car on level ground. Shut
of f the engine.
Remove the dipstick (yellow loop)
f rom the transmission, and wipe it
with a clean cloth. Insert the dipstick all the way into
the transmission securely as
shown in the illustration.
Make sure the notch fits in the
dipstick guide and the dipstick is
down all the way.
Make sure the rubber cap on the
dipstick fits in the dipstick guide
and that you push the dipstick in
all the way.
1.
2.
6.
3.
6-cylinder models
Automatic Transmission
T ransmission Fluid
Maint enance308
DIPSTICKUPPER MARK
LOWER MARK
Page 313 of 429

Check the f luid level with the
transmission at normal operating
temperature and the car sitting on
level ground. Remove the
transmission f iller bolt and caref ully
f eel inside the bolt hole with your
f inger. The f luid level should be up
to the edge of the bolt hole. If it is
not, add Honda Manual Transmis-
sion Fluid (MTF) until it starts to
run out of the hole. Reinstall thef iller bolt and tighten it securely.
If Honda MTF is not available, you
may use an SAE 10W-30 or 10W-40
viscosity motor oil with the API
Certif ication seal that says ‘‘FOR
GASOLINE ENGINES’’ as a
temporary replacement. However,
motor oil does not contain the proper
additives, and continued use can
cause stiffer shifting. Replace as
soon as it is convenient.
The transmission should be drained
and ref illed with new f luid according
to the time and distance recommen-
dations in the maintenance schedule.
On 4-cylinder models
5-speed Manual Transmission
T ransmission Fluid
Maint enance310
FILLER BOLT
Correct level
Page 316 of 429

The f luid level should be between
theMINandMAXmarksontheside
of the reservoir. If the level is at or
below the MIN mark, your brake
system needs attention. Have the
brake system inspected f or leaks or
worn brake pads.
Always use Honda Heavy Duty
Brake Fluid DOT 3. If it is not
available, you should use only DOT 3
or DOT 4 f luid, f rom a sealed
container, as a temporary
replacement. However, the use of
any non-Honda brake fluid can cause
corrosion and decrease the lif e of the
system. Have the brake system
f lushed and ref illed with Honda
Heavy Duty Brake Fluid DOT 3 as
soon as possible.
Check the f luid level in the reser-
voirs monthly. There are up to two
reservoirs, depending on the model.
They are:
Brake f luid reservoir (all models)
Clutch f luid reservoir
(manual transmission only)
The brake f luid should be replaced
according to the time recommenda-
tion in the maintenance schedule. Pour the f luid slowly and caref ully so
you do not spill. Clean up any spills
immediately. Spilled f luid could
damage components in the engine
compartment.
Brake f luid marked DOT 5 is not
compatible with your car’s braking
system and can cause extensive
damage.Brake System
Brake and Clutch Fluid
Maint enance313
MAX
MIN
Page 319 of 429
The air cleaner element is inside the
air cleaner housing on the driver’s
side of the engine compartment.
To replace it:Loosen the f our bolts, and remove
the air cleaner housing cover.
Remove the old air cleaner
element. Caref ully clean the inside of the
air cleaner housing with a damp
rag.
Place the new air cleaner element
in the air cleaner housing.
Reinstall the air cleaner housing
cover, and tighten the four bolts.
The air cleaner element should be
replaced according to the distance
recommendation in the maintenance
schedule.
1.3.
4.
5.
2.
Maint enance
Replacement
A ir Cleaner Element
4-cylinder Models
316
BOLTS
AIR CLEANER ELEMENT
Page 321 of 429
Clean the hood latch assembly with a
mild cleaner, then lubricate it with a
multipurpose grease. Lubricate all
the moving parts (as shown),
including the pivot. Follow the time
and distance recommendations in
the Maintenance Schedule. If you
are not sure how to clean and grease
the latch, contact your Honda dealer.Remove the f our nuts with a
wrench, then remove the coil
cover.
The spark plugs in your car are a
special iridium-tipped design f or
longer lif e. The spark plugs should
be replaced according to the distance
recommendation in the maintenance
schedule.
1.
ReplacementSpark Plugs
Hood L atch
(4-cylinder Models)
Hood L atch, Spark Plugs (4-cylinder Models)
Maint enance318
PIVOTS NUTS
COIL COVER
LATCH ASSEMBLY NUTS
Page 324 of 429
CONT INUED
Cleanoffanydirtandoilthathas
collected around the ignition coil.
Disconnect the wire connector
f rom the ignition coil by pushing
on the lock tab and pulling on the
connector. Pull on the plastic
connector, not the wires.
Loosen the two holding clips by
turning the heads one-quarter turn
counterclockwise with a f lat-tipped
screwdriver. Remove the cover on
the f ront cylinder bank by pulling
it straight up.
The spark plugs in your car are a
special iridium-tipped design f or
longer lif e. The spark plugs should
be replaced according to the distance
recommendation in the maintenance
schedule.
1.2.
3.
Spark Plugs (6-cylinder Models)
Maint enance
Replacement
321
CONNECTOR
HOLDING CLIP IGNITION COIL
Page 328 of 429
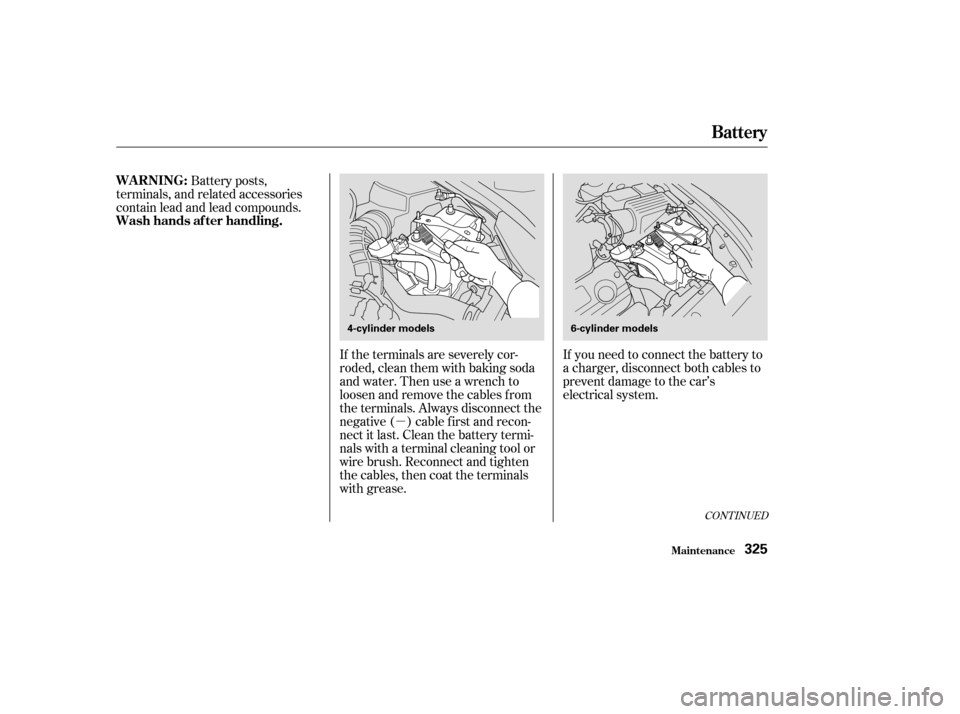
�µIf you need to connect the battery to
a charger, disconnect both cables to
prevent damage to the car’s
electrical system.
If the terminals are severely cor-
roded, clean them with baking soda
and water. Then use a wrench to
loosen and remove the cables f rom
the terminals. Always disconnect the
negative ( ) cable f irst and recon-
nect it last. Clean the battery termi-
nals with a terminal cleaning tool or
wire brush. Reconnect and tighten
the cables, then coat the terminals
with grease.
Battery posts,
terminals, and related accessories
contain lead and lead compounds.
CONT INUED
WARNING:
Wash hands af ter handling.
Battery
Maint enance325
4-cylinder models 6-cylinder models

,
including the pivot. Follow the time
and distance recommenda")