Page 16 of 240
AM/FM STEREO
1.Seek:Press
/to find the
next listenable station down/up the
frequency band.
2.Tune:Press
/to manually
adjust the radio frequency down/up.
3.AM/FM:Press to choose a
frequency band in radio mode.
4.Memory preset buttons:To set
a station: Select frequency band
AM/FM1/FM2; tune to a station,
press and hold a preset button until sound returns.
AM/FM
1234
Entertainment Systems
16
Page 19 of 240
. Then, press REW (for the beginning of the current
selection) or FF (to advance to the next selection). The tape MUST have
a blank section of at least four seconds duration between pro")
next selection). Then, press REW (for the beginning of the current
selection) or FF (to advance to the next selection). The tape MUST have
a blank section of at least four seconds duration between programs.
5.Side 1–2:Press to change tape
direction.
6.REW (rewind):Press to rewind
the tape.
FF (fast forward):Press to
advance the tape.
7.Memory preset buttons:To set
a station: Select frequency band
AM/FM1/FM2; tune to a station,
press and hold a preset button until sound returns.
8.
Dolby�noise reduction:Works in tape mode only. Reduces tape
noise and hiss; press to activate/deactivate.
9.Scan:Press SCAN to hear a brief
sampling of all listenable radio
stations or all tape selections. Press
again to stop.
10.Tune:Works in radio mode only.
Press TUNE
/to change
frequency down/up
11.Seek:Press and
release
/for previous/next
strong station, selection or track.
12.Power/volume:Press to turn
ON/OFF; turn to increase or
decrease volume levels.
SIDE 1 - 2
REW
FF
Entertainment Systems
19
Page 20 of 240
13.AM/FM:Press to choose a
frequency band in radio mode.
14.Bass:Press
/to
decrease/increase the bass output.
15.Treble:Press
/to
decrease/increase the treble output.
16.EJ (Eject):Press to eject a
tape.
17.Cassette door:Insert a cassette into the cassette door.
PREMIUM AM/FM STEREO/CASSETTE/SINGLE CD
EJ
Entertainment Systems
20
Page 21 of 240
1.Power/volume:Press to turn
ON/OFF; turn to increase/decrease
volume.
2.Scan:Press to hear a brief
sampling of all listenable stations,
tape selections or CD tracks. Press
again to stop.
3.CD Door:Insert a CD with the
label side up.
4.Cassette door:Insert the
cassette with the opening to the
right.
5.Eject:Press to eject the
cassette/CD. The radio will resume
playing.
6.Tape:Press to start tape play.
Press to stop tape during
rewind/fast forward.
CD:Press to start CD play. With the
dual media audio, press CD to
toggle between single CD and CD
changer play (if equipped).
7.Mute:Press to MUTE playing
media; press again return to playing
media.
SCAN
Entertainment Systems
21
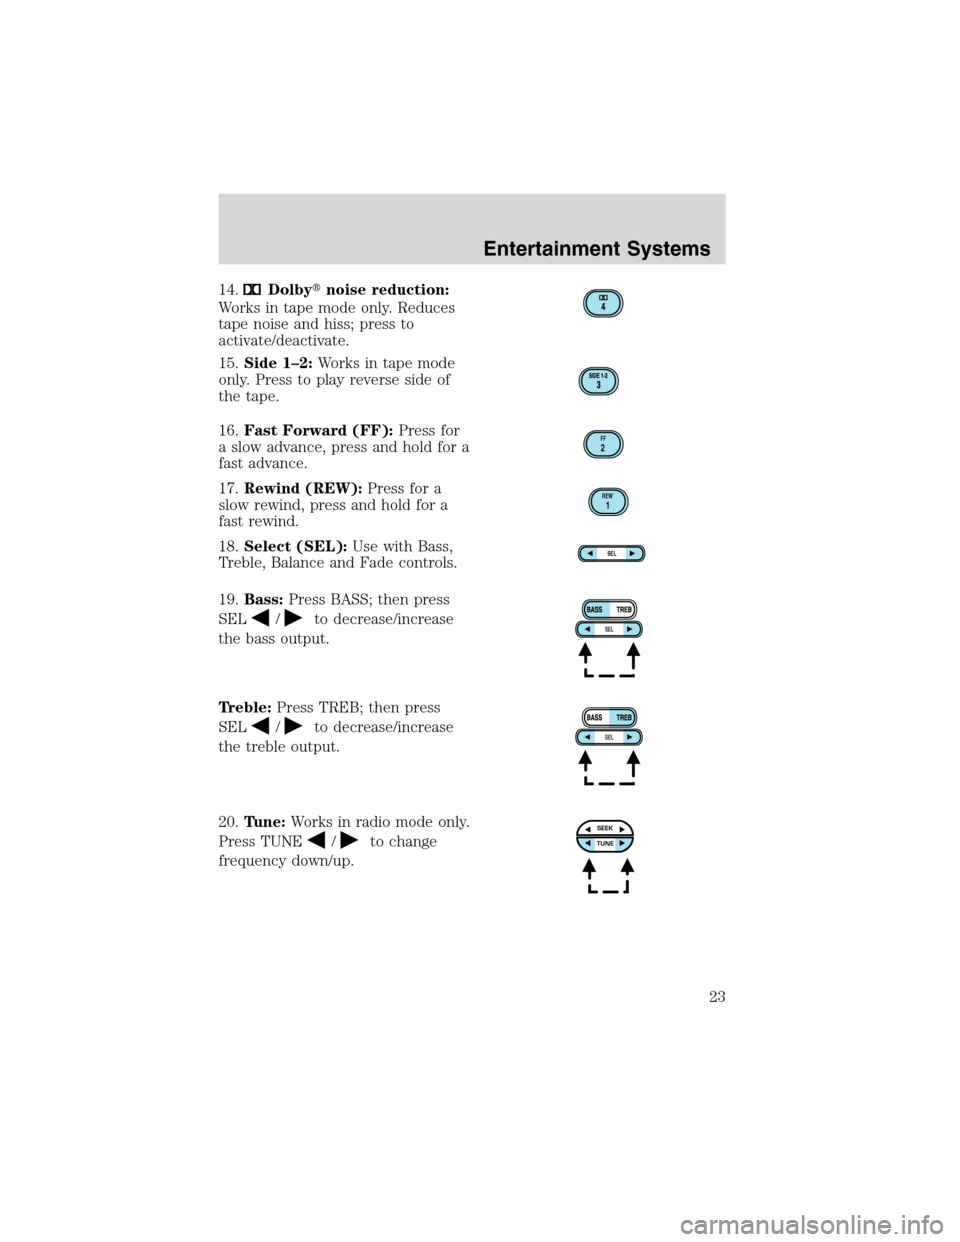
Page 23 of 240
14.Dolby�noise reduction:
Works in tape mode only. Reduces
tape noise and hiss; press to
activate/deactivate.
15.Side 1–2:Works in tape mode
only. Press to play reverse side of
the tape.
16.Fast Forward (FF):Press for
a slow advance, press and hold for a
fast advance.
17.Rewind (REW):Press for a
slow rewind, press and hold for a
fast rewind.
18.Select (SEL):Use with Bass,
Treble, Balance and Fade controls.
19.Bass:Press BASS; then press
SEL
/to decrease/increase
the bass output.
Treble:Press TREB; then press
SEL
/to decrease/increase
the treble output.
20.Tune:Works in radio mode only.
Press TUNE
/to change
frequency down/up.
FF2
REW1
SEL
SEEKTUNE
Entertainment Systems
23
Page 26 of 240
.
Show NAME:Displays station’s call letters.
Show NONE:Nothing appears in")
Show TYPE:Displays the station’s format (i.e., Jazz, Classic, Country,
Info, Oldies, R&B, Religious, Rock, Soft and Top 40).
Show NAME:Displays station’s call letters.
Show NONE:Nothing appears in the display.
Compression:Brings soft and loud CD passages together for a more
consistent listening level.
Setting the clock:Press MENU until SELECT HOUR or SELECT
MINUTE is displayed. Use SEL to manually increase (
) or decrease
(
) the hours/minutes. Press MENU again to disengage clock mode.
10.Memory presets:To set a
station: Select frequency band
AM/FM; tune to a station, press and
hold a preset button until sound
returns. In CD mode, press to move between CDs.
This radio is equipped with six station memory preset controls which
allow you to set up to six AM stations and 12 FM stations (six in FM1
and six in FM2).
11.CD:Press to select CD mode.
Seamless play:In CD mode, the
transition between the end of one
CD and the beginning of another will not contain delay time unless SEEK
or a preset control is pressed.
12.AM/FM:Press to select a
frequency band in radio mode.
Autoset:Allows you to set the
strongest local radio stations without losing your original manually set
preset stations for AM/FM1/FM2 . Press and momentarily hold AM/FM.
AUTOSET will flash on the display. When the six strongest stations are
filled, the station stored in preset 1 will begin playing. If there are less
than six strong stations, the system will store the last one in the
remaining presets. Press and momentarily hold to disengage (AUTOSET
OFF will appear in the display.).
13.Power/volume:Press to turn
ON/OFF; turn to increase or
decrease volume levels.
Entertainment Systems
26
Page 27 of 240

14.Load:Press to load a CD. Press
and hold to load up to six discs.
15.Shuffle:Press to play tracks in
random order. Press SHUF to cycle
through SHUF DISC, SHUF TRAC or
SHUF OFF.
16.Scan:Press to hear a brief
sampling of all listenable stations or
CD tracks. Press again to stop.
17.Disc/Tune:Radio: Press
orto manually tune down or up
the frequency band.
CD: Press
orto select the previous or next track on the CD.
18.CD door:Insert a CD label side
up.
REAR AUDIO CONTROLS (IF EQUIPPED)
The Personal Audio System allows the rear seat passengers to listen to
one media source (radio, tape, CD, or CD changer if equipped) while the
front seat passengers listen to another. However, front and rear seat
passengers can not listen to two different radio stations simultaneously.
To engage, simultaneously press the memory preset controls 3 and 5.
Press again to disengage.
1.Memory:Push successively to
allow rear seat passengers to scroll
through memory presets. Push in
CD changer mode (if equipped) to
advance to the next disc.
2.Seek:Press
orto access
the previous or next station,
selection or track.
3.Headphone jack:Plug a 3.5 mm headphone into the jack.
4.Headphone/speaker:Press to turn all speakers off (headphone
mode). Press again to deactivate the headphone and activate system
speakers.
VOLUME MEDIA
MEMSEEK
5
4
26
3
1
Entertainment Systems
27
Page 28 of 240

5.Volume:Press + to increase and—to decrease volume levels. From
the rear seat controls, volume can not be set higher than the front seat
setting.
6.Media:Push to toggle between AM, FM1, FM2, tape, CD or CD
changer mode (if equipped).
Plug a 3.5 mm headphone into either one of the two
jacks. Press
the
/control to operate the headphones.
The rear speakers will cut out once the speaker on/off control is pressed.
A soft audible sound may be heard from the rear speakers. The front
speaker will remain playing for the front passengers. Press the
/
control again to deactivate the headphones (Personal Audio System).
RADIO FREQUENCIES
AM and FM frequencies are established by the Federal Communications
Commission (FCC) and the Canadian Radio and Telecommunications
Commission (CRTC). Those frequencies are:
AM - 530, 540–1700, 1710 kHz
FM- 87.7, 87.9–107.7, 107.9 MHz
RADIO RECEPTION FACTORS
There are three factors that can effect radio reception:
•Distance/strength: The further you travel from an FM station, the
weaker the signal and the weaker the reception.
•Terrain: Hills, mountains, tall buildings, power lines, electric fences,
traffic lights and thunderstorms can interfere with your reception.
•Station overload: When you pass a broadcast tower, a stronger signal
may overtake a weaker one and play while the weak station frequency
is displayed.
CASSETTE/PLAYER CARE
Do:
•Use only cassettes that are 90 minutes long or less.
•Tighten very loose tapes by inserting a finger or pencil into the hole
and turning the hub.
•Remove loose labels before inserting tapes.
•Allow tapes which have been subjected to extreme heat, humidity or
cold to reach a moderate temperature before playing.
Entertainment Systems
28

:Press to eject a
ta")