Page 938 of 4378
 with 225 Newtons (50 pounds) load and tappet filled
with leak- down fluid. —
desired Connecting rod bearing-
to-crankshaft clearance
— allowab")
a
20- 200 seconds to leakdown 3.18 mm (0.125 in) with 225 Newtons (50 pounds) load and tappet filled
with leak- down fluid. —
desired Connecting rod bearing-
to-crankshaft clearance
— allowable 0.022-
0.069 mm (0.00086- 0.0027 in) Connecting rod side clearance 0.11-
0.49 mm (0.0047- 0.0193 in) Balance Shaft
Journal diameter 52.108-
52.082 mm (2.0515- 2.0505 in) Bore inside diameter 55.689-
55.664 mm (2.192- 2.191 in) Maximum runout 0.025 mm (0.001 in)
End play 0.075-
0.200 mm (0.003- 0.008 in)
Torque Specifications Description Nm lb-
ft lb-
in EGR transducer bracket-
to-intake manifold bolts 10 — 89
Ignition coil-
to-intake manifold bolts 6 — 53
Water outlet tube-
to-intake manifold stud bolt 10 — 89
EGR tube-
to-EGR valve nut 40 30 —
Water outlet tube-
to-front water pump bolt 10 — 89
Fuel supply manifold bolts 10 — 89
LH valve cover-
to-cylinder head bolts 10 — 89
LH valve cover-
to-cylinder head stud bolts 10 — 89
EGR tube-
to-exhaust manifold nut 40 30 —
RH valve cover-
to-cylinder head bolts 10 — 89
RH valve cover-
to-cylinder head stud bolts 10 — 89
Coolant recovery reservoir-
to-cylinder head stud bolts 10 — 89
Coolant recovery reservoir-
to-bracket bolts 5 — 44
Crankshaft pulley bolt 160 118 —
Camshaft position sensor bolts 3 — 27
Camshaft synchronizer-
to-front cover bolt 25 18 —
Front cover-
to-cylinder block bolts 25 18 —
Radiator fan shroud-
to-radiator bolts 9 — 80
Camshaft thrust plate-
to-cylinder block bolts 12 9 —
Camshaft synchronizer drive gear-
to-camshaft bolt 45 33 —
Timing chain tensioner-
to-cylinder block bolts 12 9 —
Exhaust manifold-
to-cylinder head nuts 33 24 —
Power steering pump bracket-
to-water pump nuts 20 15 —
Power steering pump bracket-
to-generator bracket bolts 20 15 —
Generator bracket-
to-cylinder head bolts 40 30 —
Exhaust manifold studs 8 — 71
A/C compressor bracket-
to-cylinder head bolts 48 35 —
A/C compressor bracket-
to-cylinder head nut 48 35 — �K�l�j . 4 �b�a
62003 Mustang Workshop Manual
17. 11. 2011file:///C:/Ford/2000 - 2004/tsocache/SHEF_4464/S3B~us~en~ ...
Page 939 of 4378

A/C compressor bracket-
to-cylinder head stud bolt 25 18 —
Oil level indicator tube-
to-cylinder head bolt 10 — 89
Coolant recovery reservoir bracket-to-
GOP bolts 9 — 80
Motor mount-
to-subframe nuts 115 85 —
Oil pan drain plug 26 19 —
Wire harness bracket to motor mount nut 27 20 —
Steering column pinch bolt 47 35 —
Front subframe-
to-body bolts 90 66 —
Front subframe-
to-shock tower bolts 115 85 —
Oil pan-to-
cylinder block bolts a — — —
Oil pan-to-
transmission bell housing 45 33 —
Main bearing bridge nuts 32 24
Oil pump cover-
to-engine front cover bolts 25 18 —
Oil pump cover-
to-engine front cover bolt 10 89 —
Oil pickup tube-
to-cylinder block bolts 25 18 —
Oil pickup tube-
to-oil pan baffle nut 48 35 —
Flywheel-
to-crankshaft bolts 80 59 —
Wire harness bracket-
to-motor mount stud- nut 27 20 —
Engine ground strap-
to-motor mount nut 27 20 —
Motor mount-
to-motor mount bracket bolts 70 52 —
RH motor mount-
to-motor mount bracket nut 70 52 —
Hood ground strap-
to-hood hinge bolt 12 9 —
Hood hinge nuts 12 9 —
Generator mounting bracket 25 18 —
Power steering pump bracket nuts 8 — 71
Power steering pump bolts 25 18 —
Valve tappet guide plate bolts 12 9 —
Generator positive cable nut 10 — 89
Power steering pressure tube to pump nut 40 30 —
Accelerator cable bracket-
to-intake manifold bolts 10 — 89
42-
pin connector bolt 10 — 89
Transmission oil cooler tube bracket-
to-motor mount bracket nut 27 20
Torque converter-
to-flywheel nuts 36 27 —
Engine-
to-transmission bolts 40 30 —
Engine mount bracket-
to-engine bolts 70 52 —
Engine mount bracket-
to-engine nuts 70 52 —
Water pump pulley bolts 25 18 —
Oil filter
b — — —
Upper intake manifold-
to-lower intake manifold bolts a — — —
Lower intake manifold-
to-cylinder head bolts a — — —
Rocker arm pivot-
to-cylinder head bolts a — — — �K�l�j . 5 �b�a
62003 Mustang Workshop Manual
17. 11. 2011file:///C:/Ford/2000 - 2004/tsocache/SHEF_4464/S3B~us~en~ ...
Page 973 of 4378
IN-
VEHICLE REPAIR
Crankshaft Pulley
Removal 1. Remove the drive belt (8620). For additional information, refer to Section 303 - 05 .
2. Remove the radiator coolant recovery reservoir (8A080).
3. Raise the vehicle on a hoist. For additional information, refer to Section 100 - 02 .
4. Remove the crankshaft pulley bolt. SECTION 303-
01A: Engine — 3.8L 2003 Mustang Workshop Manual Special Tool(s)
Remover, Crankshaft Vibration
Damper
303-
009 (T58P-6316- D) Remover, Crankshaft Vibration
Damper
303-
176 (T82L-6316- B) Installer, Crankshaft
Damper/Crankshaft Front Oil
Seal
303-
175 (T82L-6316- A)
Material Item Specification
Silicone Gasket and Sealant
F7AZ-
19554- EA or equivalent WSE-
M4G323- A4 �K�l�j . 1 �b�a
32003 Mustang Workshop Manual
17. 11. 2011file:///C:/Ford/2000 - 2004/tsocache/SHEF_4464/S3B~us~en~ ...
Page 975 of 4378
4. Install the radiator coolant recovery reservoir.
5. Install the drive belt. For additional information, refer to
Section 303 - 05 . �K�l�j . 3 �b�a
32003 Mustang Workshop Manual
17. 11. 2011file:///C:/Ford/2000 - 2004/tsocache/SHEF_4464/S3B~us~en~ ...
Page 1026 of 4378
IN-
VEHICLE REPAIR
Oil Pan
Removal 1. Disconnect the battery ground cable.
2. Remove the air cleaner outlet pipe. For additional information, refer to Section 303 - 12 .
3. Remove the radiator sight shield.
4. Remove the coolant recovery reservoir. 1. Disconnect the hose.
SECTION 303-
01A: Engine — 3.8L 2003 Mustang Workshop Manual Special Tool(s)
3 Bar Engine Support Kit
303-
F072 Lifting Bracket Set, Engine
303-
D095 (D94L-6001- A) or
equivalent
Material Item Specification
SAE 5W-
20 Premium Synthetic
Blend Motor Oil
XO- 5W20-QSP or equivalent WSS-
M2C153-
H Metal Surface Cleaner
F4AZ-
19A536- RA or equivalent WSE-
M5B392-
A Silicone Gasket and Sealant
F7AZ-
19554- EA or equivalent WSE-
M4G323-
A4 �K�l�j . 1 �b�a
122003 Mustang Workshop Manual
17. 11. 2011file:///C:/Ford/2000 - 2004/tsocache/SHEF_4464/S3B~us~en~ ...
Page 1027 of 4378
2. Remove the bolts.
3. Remove the coolant recovery reservoir.
5. Install the special tool.
6. Install the special tool.
7. Install the special tool.
8. Raise and support the vehicle. For additional information, refer to Section 100 - 02 . �K�l�j . 2 �b�a
122003 Mustang Workshop Manual
17. 11. 2011file:///C:/Ford/2000 - 2004/tsocache/SHEF_4464/S3B~us~en~ ...
Page 1036 of 4378
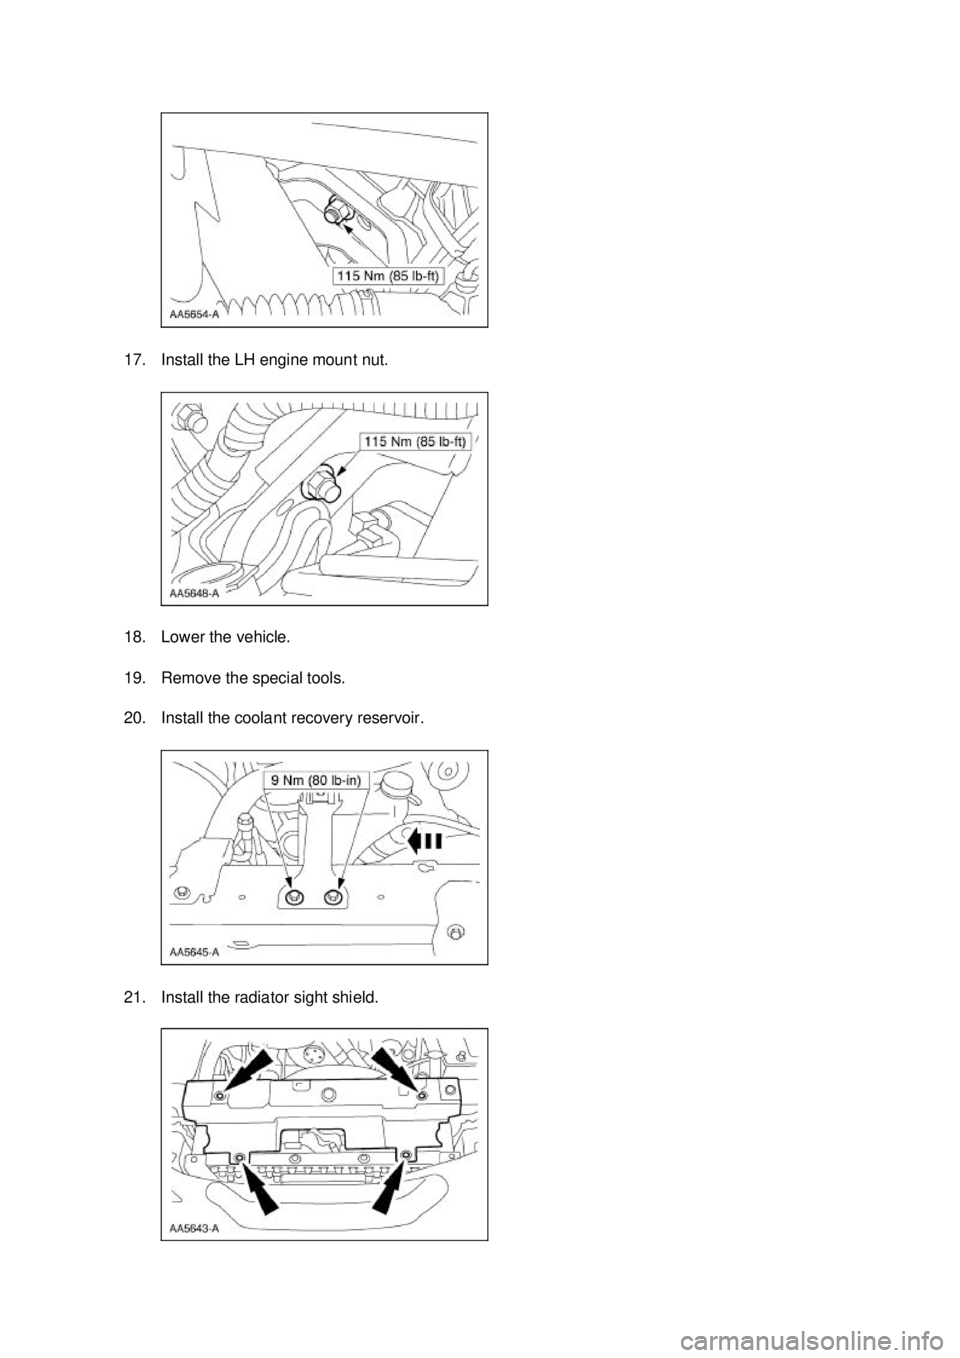
17. Install the LH engine mount nut.
18. Lower the vehicle.
19. Remove the special tools.
20. Install the coolant recovery reservoir.
21. Install the radiator sight shield. �K�l�j . 11 �b�a
122003 Mustang Workshop Manual
17. 11. 2011file:///C:/Ford/2000 - 2004/tsocache/SHEF_4464/S3B~us~en~ ...
Page 1047 of 4378
IN-
VEHICLE REPAIR
Engine Support Insulators
Removal 1. Disconnect the battery ground cable (14301). For additional information, refer to Section 414 -
01 .
2. Remove the air cleaner outlet tube (9B659). For additional information, refer to Section 303 - 12 .
3. Remove the radiator sight shield (8C291).
4. Remove the coolant recovery reservoir (8A080). 1. Disconnect the hose.
2. Remove the bolts. 3. Remove the coolant recovery reservoir. SECTION 303-
01A: Engine — 3.8L 2003 Mustang Workshop Manual Special Tool(s)
3 Bar Engine Support Kit
303-
F072 Engine Lift Bracket Set
303-
D095 (D94L-6001- A) or
equivalent �K�l�j . 1 �b�a
82003 Mustang Workshop Manual
17. 11. 2011file:///C:/Ford/2000 - 2004/tsocache/SHEF_4464/S3B~us~en~ ...
. For additional information, refer to Section 303 - 05 .
2. Remove the radiator coolant recovery reservoir (8A080).")


. For additional information, refer to Section 414 -
01 .
2. Remove the air cleaner outlet tube")