Page 1928 of 4378
10. Disconnect the cylinder head temperature (CHT) sensor electrical connector on the back of the
left cylinder head.
11. Disconnect the engine oil pressure sender electrical connector.
12. Disconnect the fuel pressure sensor electrical connector. 13. Disconnect the LH heated oxygen sensor (HO2S) electrical connector. �K�l�j . 3 �b�a
42003 Mustang Workshop Manual
18. 11. 2011file:///C:/Ford/2000 - 2004/tsocache/SHEF_4464/S3B~us~en~ ...
Page 1930 of 4378

REMOVAL AND INSTALLATION
Supply Manifold
Removal and Installation
WARNING: Do not smoke or carry lighted tobacco or open flame of any type when
working on or near any fuel related components. Highly flammable mixtures are always present
and may ignite. Failure to follow these instructions may result in personal injury.
WARNING: Fuel in the fuel system remains under high pressure even when the engine is
not running. Before working on or disconnecting any of the fuel lines or fuel system
components, the fuel system pressure must be relieved. Failure to follow these instructions
may result in personal injury.
1. Disconnect the battery ground cable.
2. Remove the upper intake manifold. For additional information, refer to Section 303 - 01A .
3. Relieve the fuel pressure. For additional information, refer to Section 310 - 00 .
4. Disconnect the fuel line. For additional information, refer to Section 310 - 00 .
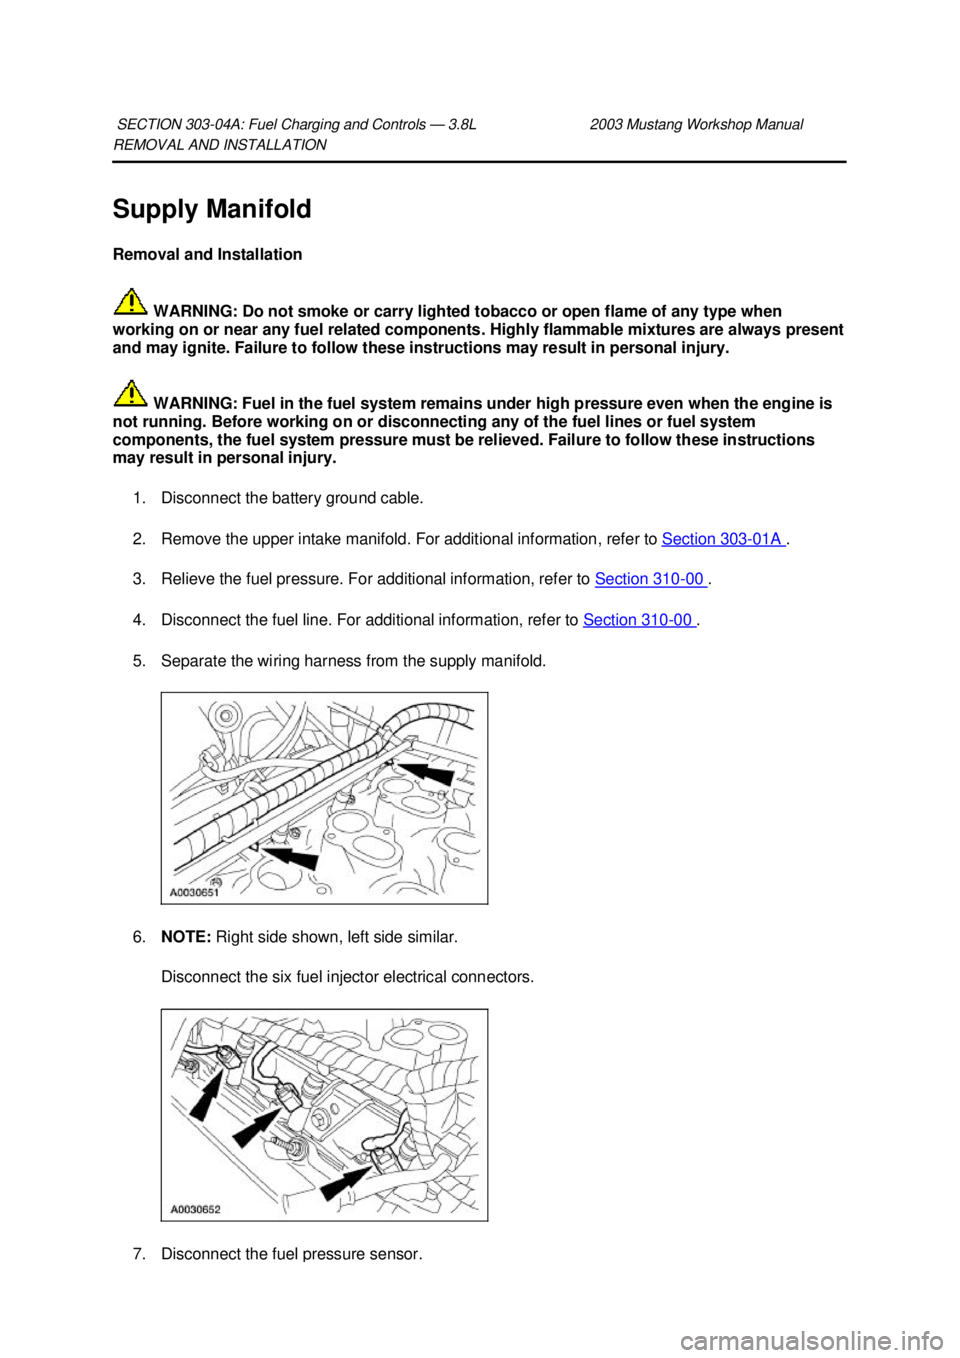
5. Separate the wiring harness from the supply manifold.
6. NOTE: Right side shown, left side similar.
Disconnect the six fuel injector electrical connectors. 7. Disconnect the fuel pressure sensor. SECTION 303-
04A: Fuel Charging and Controls — 3.8L 2003 Mustang Workshop Manual �K�l�j . 1 �b�a
32003 Mustang Workshop Manual
18. 11. 2011file:///C:/Ford/2000 - 2004/tsocache/SHEF_4464/S3B~us~en~ ...
Page 1935 of 4378
Item Part
Number Description
1 — Engine control sensor wiring —
42 pin electrical
connector 2 — RH heated oxygen sensor (HO2S) electrical
connector
3 — LH heated oxygen sensor (HO2S) electrical
connector
4 — Ground wire electrical connector
5 — LH ignition coil electrical connectors
6 — Fuel pressure sensor electrical connector
7 — Fuel temperature sensor electrical connector
8 — Power distribution box battery feed electrical wire
9 — 2 pin electrical connector
10 — 4 pin electrical connector
11 — Camshaft position sensor (CMP) electrical
connector �K�l�j . 2 �b�a
32003 Mustang Workshop Manual
18. 11. 2011file:///C:/Ford/2000 - 2004/tsocache/SHEF_4464/S3B~us~en~ ...
Page 1936 of 4378
12 — Coolant reservoir bottle electrical connector
13 — Radio ignition interference capacitor electrical
connector
14 — Fuel injector electrical connectors
15 — Exhaust vacuum regulator (EVR) electrical
connector
16 — Differential pressure feedback EGR electrical
connector
17 — RH ignition coil electrical connectors
18 — Ignition coil electrical connectors
19 — Throttle position (TP) sensor electrical connector
20 — Idle air control (IAC) solenoid electrical connector
21 — Voltage regulator electrical connector
22 — Engine coolant temperature (ECT) electrical
connector
23 — Generator battery electrical connector
24 — Radio ignition interference capacitor electrical
connector
25 — Crankshaft position (CKP) sensor electrical
connector
26 — Air conditioning compressor clutch electrical
connector
27 — 16 pin electrical connector �K�l�j . 3 �b�a
32003 Mustang Workshop Manual
18. 11. 2011file:///C:/Ford/2000 - 2004/tsocache/SHEF_4464/S3B~us~en~ ...
Page 1941 of 4378

REMOVAL AND INSTALLATION
Fuel Injectors
Removal
WARNING: Do not smoke or carry lighted tobacco or open flame of any type when
working on or near any fuel related components. Highly flammable mixtures are always present
and may be ignited. Failure to follow these instructions may result in personal injury.
WARNING: Fuel in the fuel system remains under high pressure even when the engine is
not running. Before working on or disconnecting any of the fuel lines or fuel system
components, the fuel pressure must be relieved. Failure to follow these instructions may result
in personal injury.
1. Relieve the fuel pressure. For additional information, refer to Section 310 - 00 .
2. Remove the supply manifold. For additional information, refer to Fuel Injection Supply Manifold in this section.
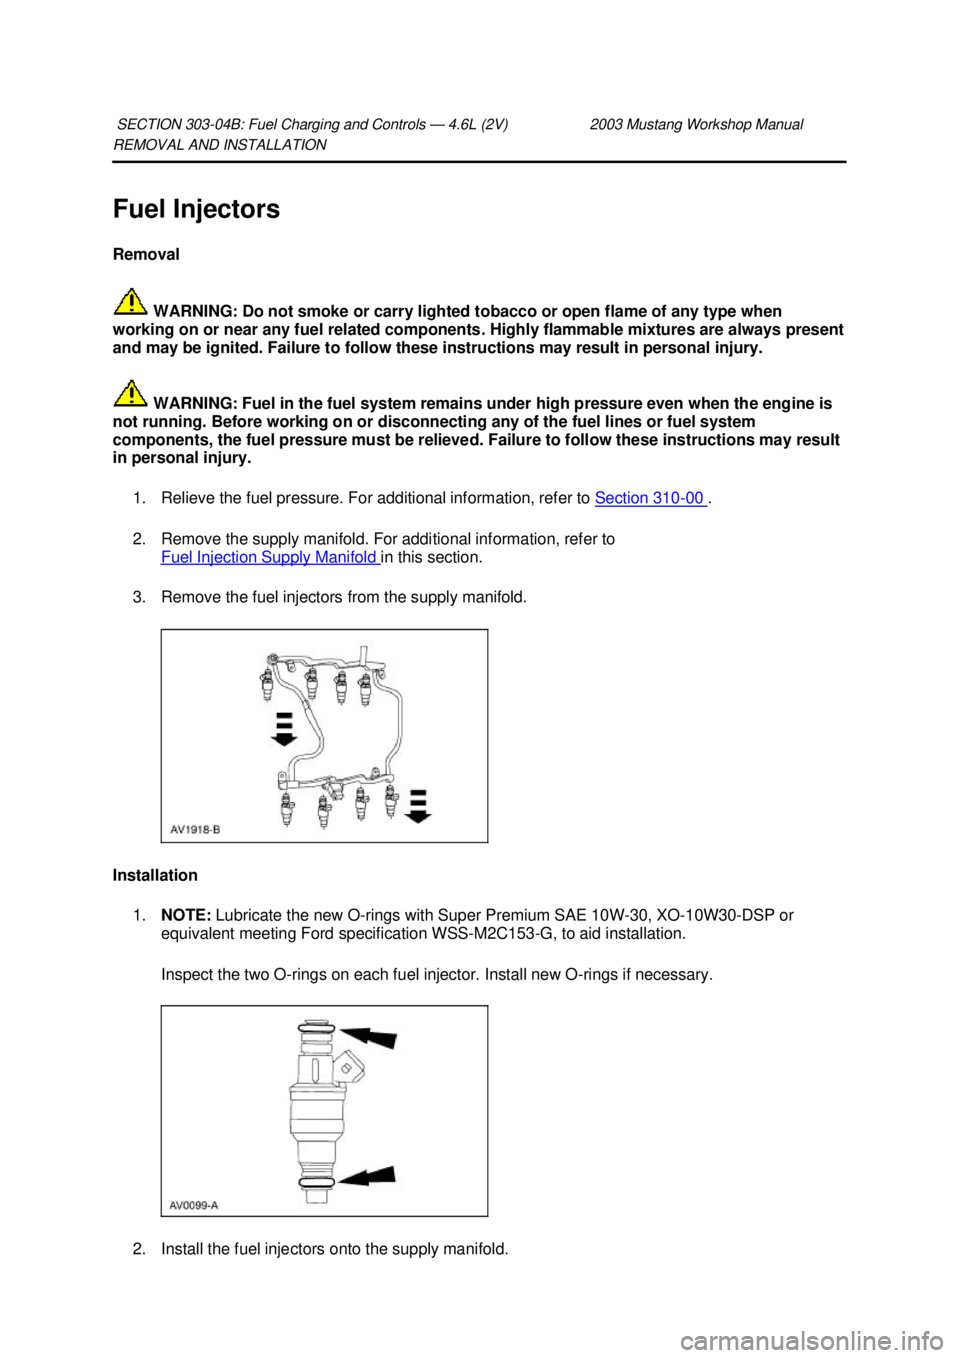
3. Remove the fuel injectors from the supply manifold.
Installation 1. NOTE: Lubricate the new O- rings with Super Premium SAE 10W-30, XO-10W30- DSP or
equivalent meeting Ford specification WSS- M2C153-G, to aid installation.
Inspect the two O- rings on each fuel injector. Install new O- rings if necessary.
2. Install the fuel injectors onto the supply manifold.
SECTION 303-
04B: Fuel Charging and Controls — 4.6L (2V) 2003 Mustang Workshop Manual �K�l�j . 1 �b�a
22003 Mustang Workshop Manual
18. 11. 2011file:///C:/Ford/2000 - 2004/tsocache/SHEF_4464/S3B~us~en~ ...
Page 1944 of 4378
6. Disconnect the following connections:
�zFour ignition coils
�z Four fuel injectors
�z Positive crankcase ventilation (PCV) hose from valve cover.
7. Disconnect the following connectors: �zRH radio ignition interference capacitor
�z Engine coolant temperature (ECT) sensor 8. Disconnect the 16 pin connector �K�l�j . 2 �b�a
142003 Mustang Workshop Manual
18. 11. 2011file:///C:/Ford/2000 - 2004/tsocache/SHEF_4464/S3B~us~en~ ...
Page 1957 of 4378

REMOVAL AND INSTALLATION
Fuel Injection Supply Manifold
Removal
WARNING: Do not smoke or carry lighted tobacco or open flame of any type when
working on or near any fuel related components. Highly flammable mixtures are always present
and may be ignited. Failure to follow these instructions may result in personal injury.
WARNING: Fuel in the fuel system remains under high pressure even when the engine is
not running. Before working on or disconnecting any of the fuel lines or fuel system
components, the fuel pressure must be relieved. Failure to follow these instructions may result
in personal injury.
1. Disconnect the battery ground cable (14301). For additional information, refer to Section 414 -
01 .
2. Disconnect the air cleaner outlet tube. For additional information, refer to Section 303 - 12 .
3. Relieve the fuel pressure. For additional information, refer to Section 310 - 00 .
4. Disconnect the fuel line. For additional information, refer to Section 310 - 00 .
5. Remove the throttle body (9E926). For additional information, refer to Throttle Body in this
section.
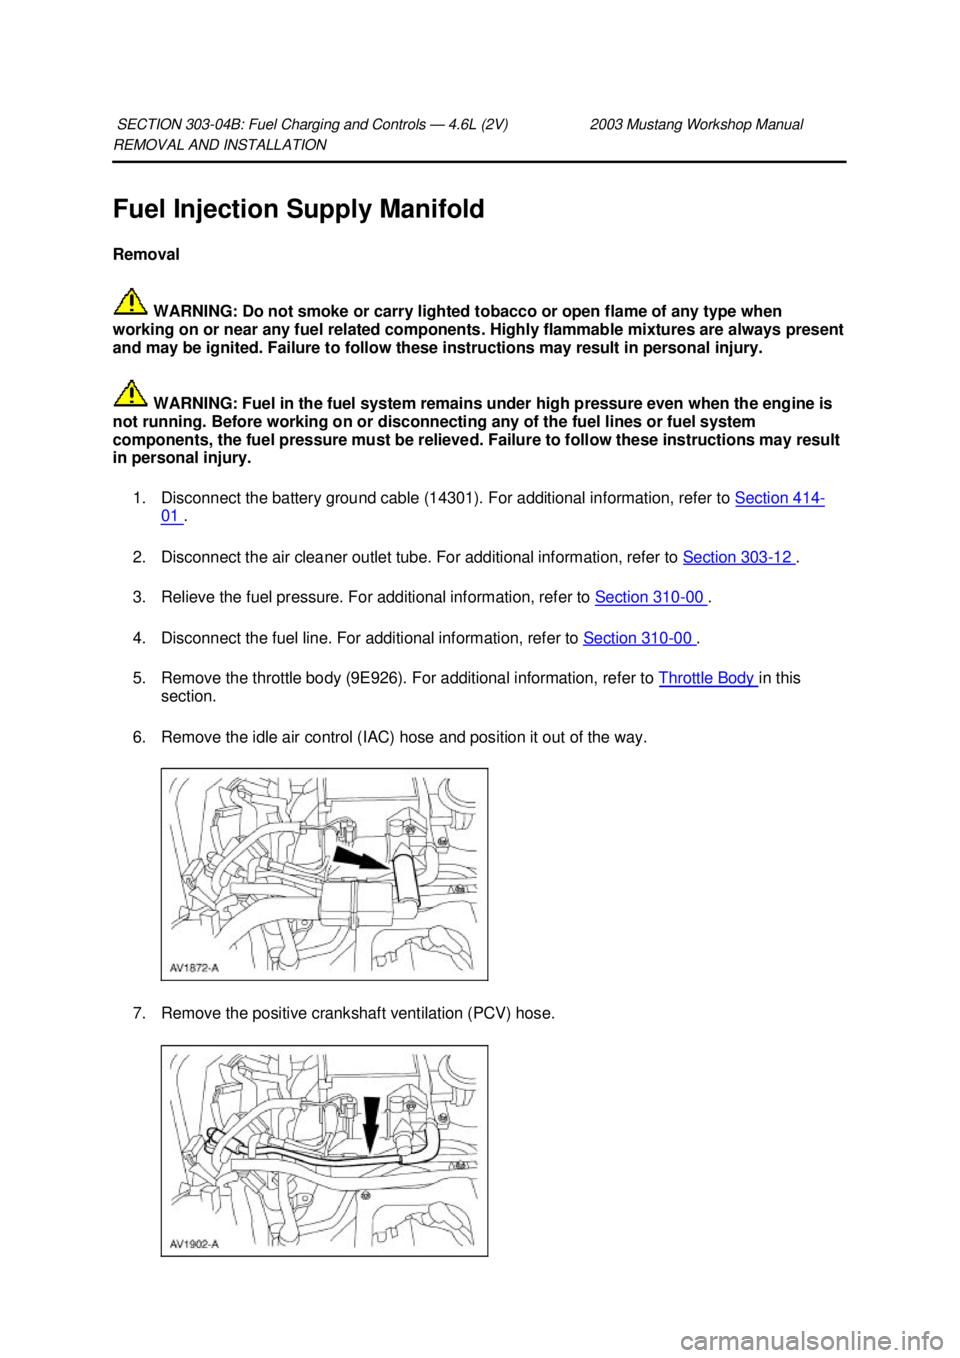
6. Remove the idle air control (IAC) hose and position it out of the way.
7. Remove the positive crankshaft ventilation (PCV) hose.
SECTION 303-
04B: Fuel Charging and Controls — 4.6L (2V) 2003 Mustang Workshop Manual �K�l�j . 1 �b�a
82003 Mustang Workshop Manual
18. 11. 2011file:///C:/Ford/2000 - 2004/tsocache/SHEF_4464/S3B~us~en~ ...
Page 1961 of 4378
3. Install the EGR to exhaust manifold tube. For additional information, refer to
Section 303 - 08 .
4. NOTE: The engine is removed for clarity.
Position the EVR bracket and tighten the bolts.
5. Connect the EVR solenoid vacuum lines.
6. Connect the LH fuel injector electrical connectors.
7. Connect the ground wire. �K�l�j . 5 �b�a
82003 Mustang Workshop Manual
18. 11. 2011file:///C:/Ford/2000 - 2004/tsocache/SHEF_4464/S3B~us~en~ ...