Page 1710 of 4378

IN-
VEHICLE REPAIR
Oil Pan
Removal 1. Disconnect the battery ground cable. For additional information, refer to Section 414 - 01 .
2. Remove the transmission. For additional information, refer to Section 307 - 01 or
Section 308 -
03B .
3. Remove the air intake scoop. For additional information, refer to Section 303 - 12 .
4. Remove the air cleaner outlet tube. For additional information, refer to Section 303 - 12 .
5. Remove the radiator sight shield.
6. Remove the manifold and tube assembly— accumulator to compressor, 4.6L. For additional
information, refer to Section 412 - 03 .
SECTION 303-
01D: Engine — Mach I 4.6L (4V) 2003 Mustang Workshop Manual Special Tool(s)
Compressor, Coil Spring
204-
D001 (D78P-5310- A) Lifting Bracket, Engine
303-
D088 (D93P-6001- A2) 3-
Bar Engine Support Kit
303- F072
Material Item Specification
Metal Surface Cleaner
F4AZ-
19A536- RA or
equivalent WSE-
M5B392- A Silicone Gasket and Sealant
F7AZ-
19554- EA or equivalent WSE-
M4G323-
A4 Super Premium SAE 5W-20
Engine Oil
XO- 5W20- QSP or equivalent WSS-
M2C153- H �K�l�j . 1 �b�a
112003 Mustang Workshop Manual
17. 11. 2011file:///C:/Ford/2000 - 2004/tsocache/SHEF_4464/S3B~us~en~ ...
Page 1719 of 4378
18. Install the two engine mount nuts.
19. Install the transmission. For additional information, refer to
Section 307 - 01 or
Section 308 - 03B .
20. Lower the vehicle.
21. Fill the engine crankcase with clean engine oil.
22. Install the A/C line. For additional information, refer to Section 412 - 03 .
23. Install the manifold and tube assembly— accumulator to compressor, 4.6L. For additional
information, refer to Section 412 - 03 .
24. Install the radiator sight shield.
25. Install the air cleaner outlet tube. For additional information, refer to Section 303 - 12 .
26. Install the air intake scoop. For additional information, refer to Section 303 - 12 .
27. Install the battery ground cable. For additional information, refer to Section 414 - 01 .
28. Start the engine and check for leaks. �K�l�j . 10 �b�a
112003 Mustang Workshop Manual
17. 11. 2011file:///C:/Ford/2000 - 2004/tsocache/SHEF_4464/S3B~us~en~ ...
Page 1739 of 4378
9. Disconnect the electrical connector.
10. Drain the engine cooling system. For additional information, refer to Section 303 - 03A .
11. Disconnect the fuel tube spring lock coupling. For additional information, refer to Section 310 -
00 .
12. Remove the upper radiator hose (8260).
13. Disconnect the throttle cable, and the speed control cable, and remove the throttle return spring. �K�l�j . 3 �b�a
192003 Mustang Workshop Manual
17. 11. 2011file:///C:/Ford/2000 - 2004/tsocache/SHEF_4464/S3B~us~en~ ...
Page 1743 of 4378
27.
NOTE: The lifting bracket bolts will be installed when the vehicle is raised.
Position the RH lifting bracket.
28. Install the LH lifting bracket.
29. Disconnect the radiator vent hose from the degas bottle.
30. Remove the degas bottle return hose. �K�l�j . 7 �b�a
192003 Mustang Workshop Manual
17. 11. 2011file:///C:/Ford/2000 - 2004/tsocache/SHEF_4464/S3B~us~en~ ...
Page 1749 of 4378
51. Disconnect and remove the lower hose from the radiator.
52.
NOTE: Drain the power steering fluid into a suitable container.
Disconnect the hose from the power steering reservoir.
53. Remove the bolt and the anti- rotation clip.
54. Loosen the fitting and disconnect the high pressure hose from the power steering pump. �K�l�j . 13 �b�a
192003 Mustang Workshop Manual
17. 11. 2011file:///C:/Ford/2000 - 2004/tsocache/SHEF_4464/S3B~us~en~ ...
Page 1827 of 4378
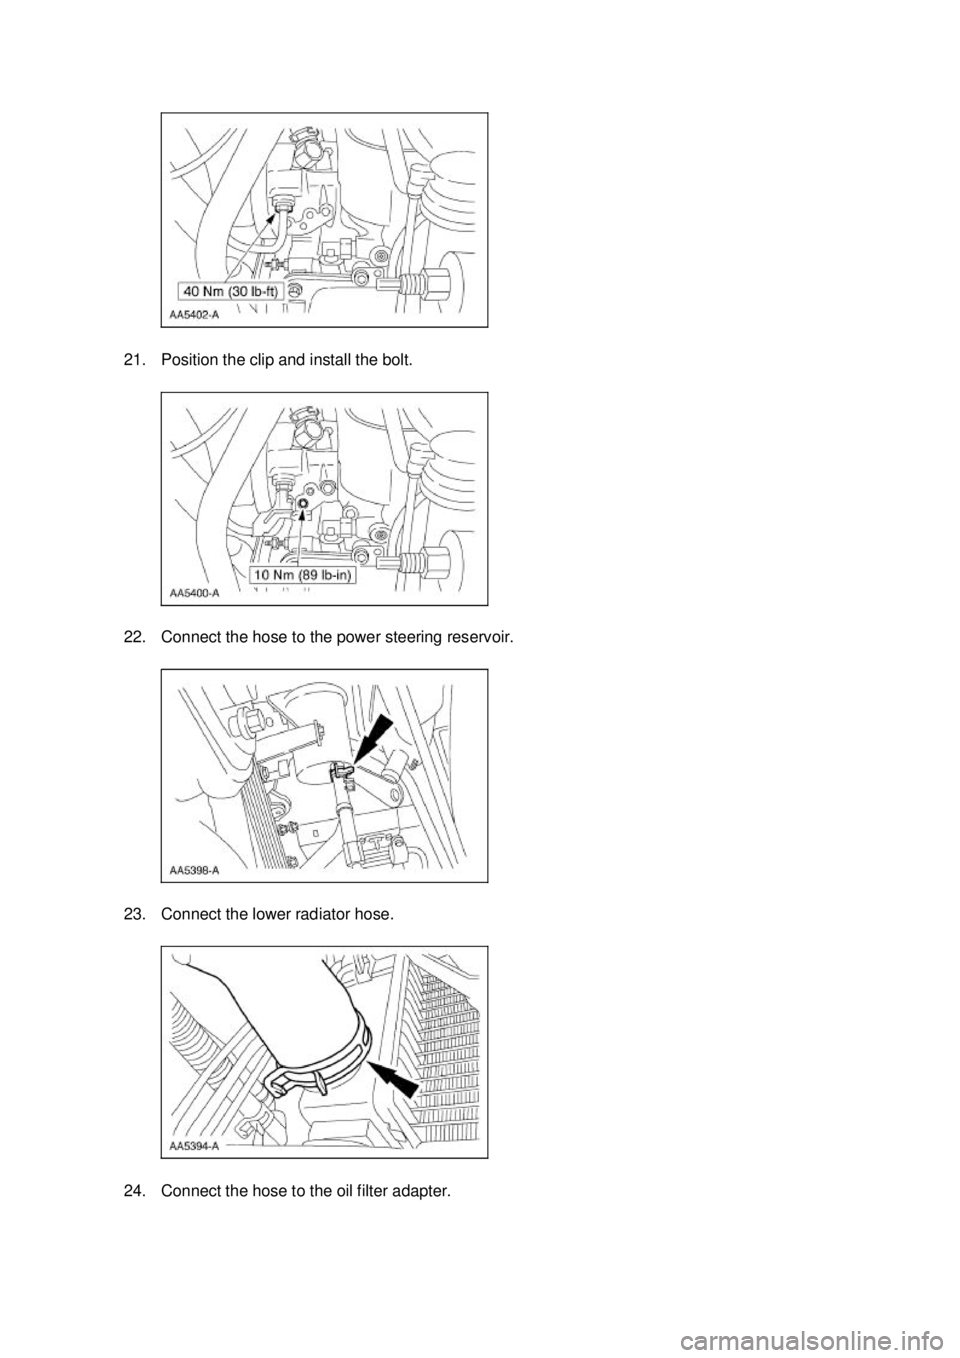
21. Position the clip and install the bolt.
22. Connect the hose to the power steering reservoir.
23. Connect the lower radiator hose.
24. Connect the hose to the oil filter adapter. �K�l�j . 7 �b�a
182003 Mustang Workshop Manual
17. 11. 2011file:///C:/Ford/2000 - 2004/tsocache/SHEF_4464/S3B~us~en~ ...
Page 1832 of 4378
42. Connect the radiator vent hose to the degas bottle.
43. Remove the LH lifting bracket.
44. Remove the RH lifting bracket.
45. Connect the A/C tube. �K�l�j . 12 �b�a
182003 Mustang Workshop Manual
17. 11. 2011file:///C:/Ford/2000 - 2004/tsocache/SHEF_4464/S3B~us~en~ ...
Page 1836 of 4378
58. Connect the throttle cable and the speed control actuator cable, and install the throttle return
spring.
59. Install the upper radiator hose.
60. Connect the wiring connector.
61. Install the air cleaner assembly. 1. Install the air cleaner and the outlet tube as an assembly
2. Install the bolt. �K�l�j . 16 �b�a
182003 Mustang Workshop Manual
17. 11. 2011file:///C:/Ford/2000 - 2004/tsocache/SHEF_4464/S3B~us~en~ ...