Page 983 of 4378
6.
NOTE: The number 12 bolt is not part of the tightening sequence.
Tighten the fasteners to 26 Nm (19 lb- ft) in the sequence shown.
7. Install a new oil filter.
8. Install the wiring harness pin- type retainer. �K�l�j . 6 �b�a
92003 Mustang Workshop Manual
17. 11. 2011file:///C:/Ford/2000 - 2004/tsocache/SHEF_4464/S3B~us~en~ ...
Page 1029 of 4378
15. Remove the starter motor. For additional information, refer to
Section 303 - 06 .
16. Position the wiring harness bracket aside.
17. Remove the transmission lower bolts.
18. Remove the oil pan bolts.
19. Position a safety stand under the subframe crossmember. �K�l�j . 4 �b�a
122003 Mustang Workshop Manual
17. 11. 2011file:///C:/Ford/2000 - 2004/tsocache/SHEF_4464/S3B~us~en~ ...
Page 1072 of 4378
22. Disconnect the engine oil pressure sender electrical connector.
23. Remove the pin-
type retainer.
24. Disconnect the crankshaft position (CKP) sensor electrical connector.
25. Remove the engine wiring harness.
26. Remove the stud bolt. �K�l�j . 7 �b�a
212003 Mustang Workshop Manual
17. 11. 2011file:///C:/Ford/2000 - 2004/tsocache/SHEF_4464/S3B~us~en~ ...
Page 1125 of 4378
23. Position the wiring harness.
24. Connect the following connectors:
�z42- pin electrical connector
�z 16-pin electrical connector
�z 8-pin electrical connector
�z A/C pressure switch
25. Connect the heater hoses. �K�l�j . 6 �b�a
102003 Mustang Workshop Manual
17. 11. 2011file:///C:/Ford/2000 - 2004/tsocache/SHEF_4464/S3B~us~en~ ...
Page 1134 of 4378

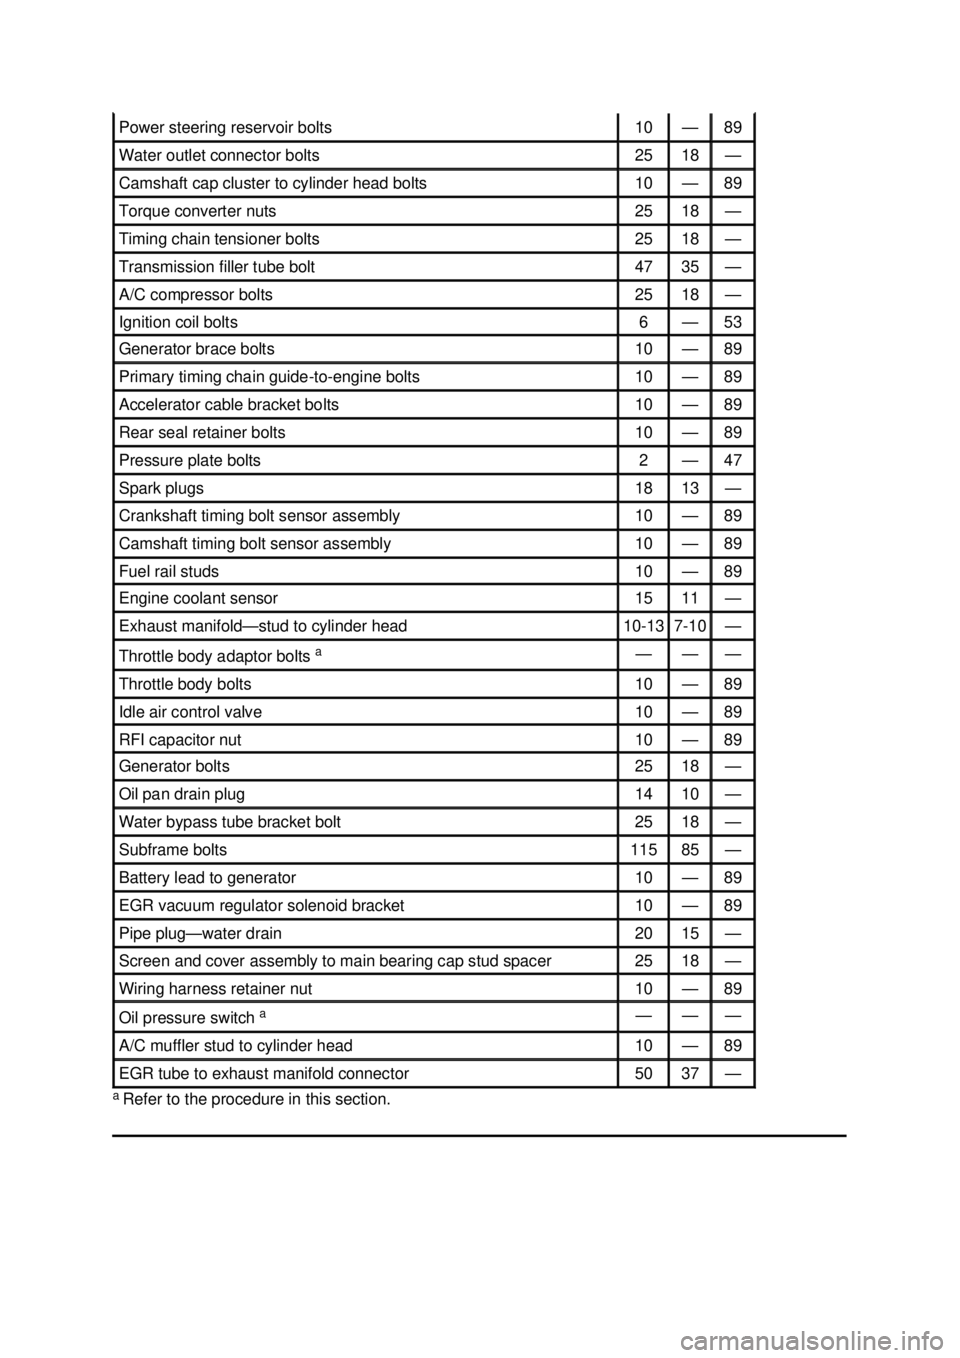
a
Refer to the procedure in this section. Power steering reservoir bolts 10 — 89
Water outlet connector bolts 25 18 —
Camshaft cap cluster to cylinder head bolts 10 — 89
Torque converter nuts 25 18 —
Timing chain tensioner bolts 25 18 —
Transmission filler tube bolt 47 35 —
A/C compressor bolts 25 18 —
Ignition coil bolts 6 — 53
Generator brace bolts 10 — 89
Primary timing chain guide-
to-engine bolts 10 — 89
Accelerator cable bracket bolts 10 — 89
Rear seal retainer bolts 10 — 89
Pressure plate bolts 2 — 47
Spark plugs 18 13 —
Crankshaft timing bolt sensor assembly 10 — 89
Camshaft timing bolt sensor assembly 10 — 89
Fuel rail studs 10 — 89
Engine coolant sensor 15 11 —
Exhaust manifold—
stud to cylinder head 10-
13 7-10 —
Throttle body adaptor bolts
a — — —
Throttle body bolts 10 — 89
Idle air control valve 10 — 89
RFI capacitor nut 10 — 89
Generator bolts 25 18 —
Oil pan drain plug 14 10 —
Water bypass tube bracket bolt 25 18 —
Subframe bolts 115 85 —
Battery lead to generator 10 — 89
EGR vacuum regulator solenoid bracket 10 — 89
Pipe plug—
water drain 20 15 —
Screen and cover assembly to main bearing cap stud spacer 25 18 —
Wiring harness retainer nut 10 — 89
Oil pressure switch
a — — —
A/C muffler stud to cylinder head 10 — 89
EGR tube to exhaust manifold connector 50 37 — �K�l�j . 5 �b�a
62003 Mustang Workshop Manual
17. 11. 2011file:///C:/Ford/2000 - 2004/tsocache/SHEF_4464/S3B~us~en~ ...
Page 1166 of 4378
IN-
VEHICLE REPAIR
Valve Cover RH
Removal and Installation 1. Remove the air cleaner outlet tube. For additional information, refer to Section 303 - 12 .
2. Disconnect the fuel line. For additional information, refer to Section 310 - 00 .
3. Separate the engine wiring harness from the valve cover studs.
4. Separate the engine wiring harness from the valve cover studs.
5. Remove the positive crankcase ventilation (PCV) hose from the valve cover and position aside.
SECTION 303-
01B: Engine — 4.6L (2V) 2003 Mustang Workshop Manual Material
Item Specification
Silicone Gasket and Sealant
F7AZ-
19554- EA or equivalent WSE-
M4G323- A4 �K�l�j . 1 �b�a
32003 Mustang Workshop Manual
17. 11. 2011file:///C:/Ford/2000 - 2004/tsocache/SHEF_4464/S3B~us~en~ ...
Page 1169 of 4378
IN-
VEHICLE REPAIR
Valve Cover LH
Removal and Installation 1. Position the oil level tube (6754) out of the way.
2. Disconnect the breather tube.
3. Separate the engine wiring harness in the locations shown.
SECTION 303-
01B: Engine — 4.6L (2V) 2003 Mustang Workshop Manual Material
Item Specification
Silicone Gasket and Sealant
F7AZ-
19554- EA or equivalent WSE-
M4G323- A4 �K�l�j . 1 �b�a
32003 Mustang Workshop Manual
17. 11. 2011file:///C:/Ford/2000 - 2004/tsocache/SHEF_4464/S3B~us~en~ ...
Page 1170 of 4378
4. Disconnect the engine wiring harness retainer and position it aside.
5. Remove the bolts, studs and the valve cover in the sequence shown.
�zInspect and clean the sealing surfaces.
6. NOTE: Apply an eight millimeter bead of silicone gasket and sealant at the intersection of the
engine front cover and the cylinder head.
To install, reverse the removal procedure. �K�l�j . 2 �b�a
32003 Mustang Workshop Manual
17. 11. 2011file:///C:/Ford/2000 - 2004/tsocache/SHEF_4464/S3B~us~en~ ...