2003 FORD MUSTANG trailer
[x] Cancel search: trailerPage 2 of 256

Brakes 138
Traction control/AdvanceTrac 142
Transmission operation 144
Vehicle loading 154
Trailer towing 156
Roadside Emergencies 157
Getting roadside assistance 157
Hazard flasher switch 158
Fuel pump shut-off switch 159
Fuses and relays 160
Changing tires 165
Jump starting 170
Wrecker towing 175
Customer Assistance 176
Reporting safety defects (U.S. only) 186
Cleaning 187
Maintenance and Specifications 194
Engine compartment 197
Engine oil 199
Battery 203
Fuel information 214
Part numbers 237
Refill capacities 238
Lubricant specifications 240
Accessories 245
Index 248
All rights reserved. Reproduction by any means, electronic or
mechanical including photocopying, recording or by any
information storage and retrieval system or translation in
whole or part is not permitted without written authorization
from Ford Motor Company. Ford may change the contents
without notice and without incurring obligation.
Copyright © 2002 Ford Motor Company
Table of Contents
2
Page 148 of 256
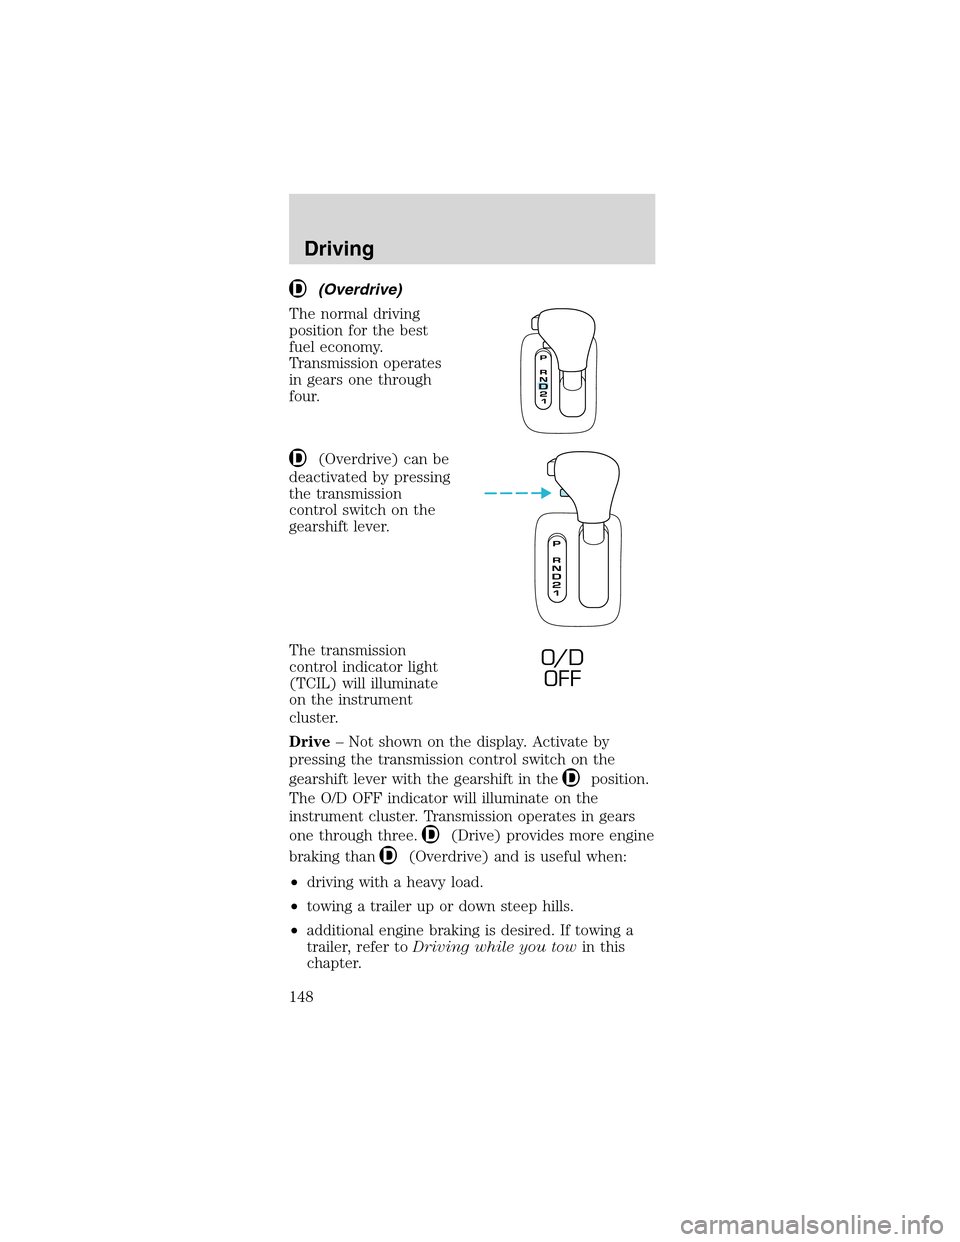
(Overdrive)
The normal driving
position for the best
fuel economy.
Transmission operates
in gears one through
four.
(Overdrive) can be
deactivated by pressing
the transmission
control switch on the
gearshift lever.
The transmission
control indicator light
(TCIL) will illuminate
on the instrument
cluster.
Drive–Not shown on the display. Activate by
pressing the transmission control switch on the
gearshift lever with the gearshift in the
position.
The O/D OFF indicator will illuminate on the
instrument cluster. Transmission operates in gears
one through three.
(Drive) provides more engine
braking than
(Overdrive) and is useful when:
•driving with a heavy load.
•towing a trailer up or down steep hills.
•additional engine braking is desired. If towing a
trailer, refer toDriving while you towin this
chapter.
O/ D
OFF
Driving
148
Page 154 of 256
VEHICLE LOADING
Before loading a vehicle, familiarize yourself with the
following terms:
•Base Curb Weight:Weight of the vehicle
including any standard equipment, fluids,
lubricants, etc. It does not include occupants or
aftermarket equipment.
•Payload:Combined maximum allowable weight of
cargo, occupants and optional equipment. The
payload equals the gross vehicle weight rating
minus base curb weight.
•GVW (Gross Vehicle Weight):Base curb weight
plus payload weight. The GVW is not a limit or a
specification.
•GVWR (Gross Vehicle Weight Rating):
Maximum permissible total weight of the base
vehicle, occupants, optional equipment and cargo.
The GVWR is specific to each vehicle and is listed
on the Safety Certification Label on the driver’s
door pillar.
•GAWR (Gross Axle Weight Rating):Carrying
capacity for each axle system. The GAWR is
specific to each vehicle and is listed on the Safety
Certification Label on the driver’s door pillar.
•GCW (Gross Combined Weight):The
combined weight of the towing vehicle (including
occupants and cargo) and the loaded trailer.
•GCWR (Gross Combined Weight Rating):
Maximum permissible combined weight of towing
vehicle (including occupants and cargo) and the
loaded trailer
•Maximum Trailer Weight Rating:Maximum
weight of a trailer the vehicle is permitted to tow.
The maximum trailer weight rating is determined
by subtracting the vehicle curb weight for each
engine/transmission combination, any required
option weight for trailer towing and the weight of
the driver from the GCWR for the towing vehicle.
•Maximum Trailer Weight:Maximum weight of a
trailer the loaded vehicle (including occupants
Driving
154
Page 155 of 256
and cargo) is permitted to tow. It is determined
by subtracting the weight of the loaded trailer
towing vehicle from the GCWR for the towing
vehicle.
•Trailer Weight Range:Specified weight range
that the trailer must fall within that ranges from
zero to the maximum trailer weight rating.
Remember to figure in the tongue load of your
loaded trailer when figuring the total weight.
Do not exceed the GVWR or the GAWR
specified on the certification label.
Do not use replacement tires with lower load
carrying capacities than the originals because they
may lower the vehicle’s GVWR and GAWR
limitations. Replacement tires with a higher limit
than the originals do not increase the GVWR and
GAWR limitations.
The Safety Certification Label, found on the driver’s
door pillar, lists several important vehicle weight
rating limitations. Before adding any additional
equipment, refer to these limitations. If you are
adding weight to the front of your vehicle,
(potentially including weight added to the cab), the
weight added should not exceed the front axle
reserve capacity (FARC). Additional frontal weight
may be added to the front axle reserve capacity
provided you limit your payload in other ways (i.e.
restrict the number of occupants or amount of cargo
carried).
Always ensure that the weight of occupants, cargo
and equipment being carried is within the weight
limitations that have been established for your
vehicle including both gross vehicle weight and front
and rear gross axle weight rating limits. Under no
circumstance should these limitations be exceeded.
Exceeding any vehicle weight rating
limitation could result in serious damage to
the vehicle and/or personal injury.
Driving
155
Page 156 of 256
TRAILERTOWING
Your vehicle is not equipped to tow. No towing
packages are available through Ford or
Lincoln/Mercury dealers.
RECREATIONAL TOWING
(ALL WHEELS ON THE GROUND)
Follow these guidelines for your specific powertrain
combination to tow your vehicle with all four wheels
on the ground (such as behind a recreational
vehicle).
These guidelines are designed to ensure that your
transmission is not damaged due to insufficient
lubrication.
All Rear Wheel Drive (RWD) vehicles:
This applies to all cars and 4x2 trucks/sport utilities
with rear wheel drive capability.
An example of recreational towing is towing your
vehicle behind a motorhome. The following
recreational towing guidelines are designed to
ensure that your transmission is not damaged.
•Place the transmission in N (Neutral)
•Maximum speed is 56 km/h (35 mph)
•Maximum distance is 80 km (50 miles)
If a distance of 80 km (50 miles) or a speed of 56
km/h (35 mph) must be exceeded, you must
disconnect the driveshaft. Ford recommends the
driveshaft be removed/installed only by a qualified
technician. See your local dealer for driveshaft
removal/installation.
Improper removal/installation of the driveshaft
can cause transmission fluid loss, damage to
the driveshaft and internal transmission
components.
Driving
156
Page 166 of 256
Ifyou use the temporary spare tire
continuously or do not follow these
precautions, the tire could fail, causing you to lose
control of the vehicle, possibly injuring yourself or
others.
When driving with the temporary spare tiredo not:
•use more than one temporary spare tire at a time
•exceed 80 km/h (50 mph) or drive further than 3
200 km (2 000 miles) total under any
circumstances
•load the vehicle beyond maximum vehicle load
rating listed on the tire pressure label on the
inside of the glove compartment door
•tow a trailer
•use tire chains
•drive through an automatic car wash, because of
the vehicle’s reduced ground clearance
•try to repair the temporary spare tire or remove it
from its wheel
•use the wheel for any other type of vehicle
Use of a temporary spare tire at any one wheel
location can lead to impairment of the following:
•handling, stability and braking performance
•comfort and noise
•ground clearance and parking at curbs
•Winter driving capability
Tire change procedure
To prevent the vehicle from moving when
you change a tire, be sure the parking brake
is set, then block (in both directions) the wheel
that is diagonally opposite (other side and end of
the vehicle) to the tire being changed.
Roadside Emergencies
166
Page 222 of 256

•Using the air conditioner or defroster may reduce
fuel economy.
•You may want to turn off the speed control in
hilly terrain if unnecessary shifting between third
and fourth gear occurs. Unnecessary shifting of
this type could result in reduced fuel economy.
•Warming up a vehicle on cold mornings is not
required and may reduce fuel economy.
•Resting your foot on the brake pedal while driving
may reduce fuel economy.
•Combine errands and minimize stop-and-go
driving.
Maintenance
•Keep tires properly inflated and use only
recommended size.
•Operating a vehicle with the wheels out of
alignment will reduce fuel economy.
•Use recommended engine oil. Refer toLubricant
specificationsin this chapter.
•Perform all regularly scheduled maintenance
items. Follow the recommended maintenance
schedule and owner maintenance checks found in
your vehicle scheduled maintenance guide.
Conditions
•Heavily loading a vehicle or towing a trailer may
reduce fuel economy at any speed.
•Carrying unnecessary weight may reduce fuel
economy (approximately 0.4 km/L [1 mpg] is lost
for every 180 kg [400 lb] of weight carried).
•Adding certain accessories to your vehicle (for
example bug deflectors, rollbars/light bars,
running boards, ski/luggage racks) may reduce
fuel economy.
•Using fuel blended with alcohol may lower fuel
economy.
•Fuel economy may decrease with lower
temperatures during the first 12–16 km (8–10
miles) of driving.
Maintenance and Specifications
222
Page 229 of 256
![FORD MUSTANG 2003 4.G Owners Manual until it is at normal operating temperature
(approximately 30 km [20 miles]). If your vehicle has
been operated for an extended period at high
speeds, in city traffic during hot weather or pulling a
t FORD MUSTANG 2003 4.G Owners Manual until it is at normal operating temperature
(approximately 30 km [20 miles]). If your vehicle has
been operated for an extended period at high
speeds, in city traffic during hot weather or pulling a
t](/manual-img/11/5211/w960_5211-228.png)
until it is at normal operating temperature
(approximately 30 km [20 miles]). If your vehicle has
been operated for an extended period at high
speeds, in city traffic during hot weather or pulling a
trailer, the vehicle should be turned off for about 30
minutes to allow fluid to cool before checking.
1. Drive the vehicle 30 km (20 miles) or until it
reaches normal operating temperature.
2. Park the vehicle on a level surface and engage the
parking brake.
3. With the parking brake engaged and your foot on
the brake pedal, start the engine and move the
gearshift lever through all of the gear ranges. Allow
sufficient time for each gear to engage.
4. Latch the gearshift lever in P (Park) and leave the
engine running.
5. Remove the dipstick, wiping it clean with a clean,
dry lint free rag. If necessary, refer toIdentifying
components in the engine compartmentin this
chapter for the location of the dipstick.
6. Install the dipstick making sure it is fully seated in
the filler tube.
7. Remove the dipstick and inspect the fluid level.
The fluid should be in the designated area for
normal operating temperature or ambient
temperature.
Low fluid level
Do not drive the
vehicle if the fluid level
is at the bottom of the
dipstick and the ambient temperature is above 10°C
(50°F).
Correct fluid level
The transmission fluid should be checked at normal
operating temperature 66°C-77°C (150°F-170°F) on
a level surface. The normal operating temperature
can be reached after approximately 30 km (20
miles) of driving.
Maintenance and Specifications
229