Page 1 of 256
Introduction 3
Instrument Cluster 10
Warning and control lights 10
Gauges 15
Entertainment Systems 19
AM/FM stereo cassette with CD 19
AM/FM stereo with CD 28
AM/FM stereo cassette (CD changer compatible) 43
Climate Controls 63
Lights 67
Headlamps 67
Turn signal control 70
Bulb replacement 71
Driver Controls 76
Windshield wiper/washer control 76
Steering wheel adjustment 77
Power windows 78
Mirrors 80
Speed control 80
Locks and Security 89
Keys 89
Locks 89
Anti-theft system 91
Seating and Safety Restraints 99
Seating 99
Safety restraints 102
Air bags 114
Child restraints 119
Driving 133
Starting 133
Table of Contents
1
Page 8 of 256
These are some of the symbols you may see on your
vehicle.
Vehicle Symbol Glossary
Safety Alert
See Owner’s Guide
Fasten Safety BeltAir Bag-Front
Air Bag-SideChild Seat
Child Seat
Installation WarningChild Seat Tether
Anchorage
Brake SystemAnti-Lock Brake
System
Brake Fluid -
Non-Petroleum
BasedTraction Control
AdvanceTracMaster Lighting
Switch
Hazard Warning
FlasherFog Lamps-Front
Fuse CompartmentFuel Pump Reset
Windshield
Wash/WipeWindshield
Defrost/Demist
Rear Window
Defrost/DemistPower Windows
Front/Rear
Power Window
LockoutChild Safety Door
Lock/Unlock
Introduction
8
Page 11 of 256
 are
operational. If the light fails to illuminate, con")
Charging system
Illuminates when the
battery is not charging
properly.
Air bag readiness
Illuminates to confirm
that the air bags (front
or side) are
operational. If the light fails to illuminate, continues
to flash or remains on, have the system serviced
immediately.
Anti-theft system
Illuminates when the
SecuriLock�Passive
Anti-theft System is
armed. If the light fails to illuminate, continues to
flash or remains on, have the system serviced.
Service engine soon
Illuminates briefly to
ensure the system is
functional. If it comes
on after the engine is
started, one of the engine’s emission control systems
may be malfunctioning. The light may illuminate
without a driveability concern being noted. The
vehicle will usually be drivable and will not require
towing.
Light turns on solid:
Temporary malfunctions may cause the light to
illuminate. Examples are:
1. The vehicle has run out of fuel.
2. Poor fuel quality or water in the fuel.
3. The fuel cap may not have been properly installed
and securely tightened.
These temporary malfunctions can be corrected by
filling the fuel tank with high quality fuel of the
AIR
BAG
SERVICE
ENGINE
SOON
Instrument Cluster
11
Page 13 of 256
.
O/D off (if equipped)
Illuminates when the
overdrive function")
Low fuel
Illuminates when the
fuel level in the fuel
tank is at, or near,
empty (refer toFuel
gaugein this chapter for more information).
O/D off (if equipped)
Illuminates when the
overdrive function has
been turned OFF using
the transmission control switch (TCS) on the
gearshift. If the light does not come on or the light
flashes steadily, have your vehicle serviced as soon
as possible, damage to the transmission could occur.
Traction Control�active
Illuminates when the
Traction Control�
system is active. It will
be lit for a minimum of
four seconds or for the duration of the Traction
Control�event.
For more information, refer to theDrivingchapter.
Anti-lock brake system (ABS)
To confirm the
anti-lock brake system
(ABS) warning light is
functional it will
momentarily illuminate when the ignition is turned
to the ON position (alternatively for some vehicles
when the ignition is moved from the ON position to
the START position, the light will momentarily
illuminate just prior to reaching the START
position). If the light remains on, continues to flash
or fails to illuminate, have the ABS serviced
immediately. If the ABS light remains on, it means
the anti-lock brake system has malfunctioned and is
disabled, however, the normal brake system will still
function unless the brake warning light also remains
LOW
FUEL
O/D
OFF
ABS
Instrument Cluster
13
Page 24 of 256
These stations are temporarily stored in the memory
preset controls (until deactivated) and are accessed
in the same manner as your original presets.
To deactivate autoset and return to your audio
system’s manually set memory stations, press the
AUTO control again.
Setting the clock
To set the hour, press
and hold the CLK
control and press
SEEK:
•
to decrease
hours and
•
to increase
hours.
To set the minute,
press and hold the CLK
control and press
TUNE:
•
to decrease
minutes and
•
to increase
minutes.
If your vehicle has a separate clock, (other than the
digital radio display), the CLK control will not
function in the above manner.
The CLK control will
allow you to switch
between media display
mode (radio station,
stereo information,
etc.) and clock display
mode (time). When in
AUTO
CLK
AUTO
CLK
AUTO
CLK
Entertainment Systems
24
Page 25 of 256
, the med")
clock mode, the media information will display for 10
seconds, when the radio is turned on, and then
revert to clock information. Any time that the media
is changed, (new radio station, etc.), the media
information will again display for 10 seconds before
reverting back to the clock. In media mode, the
media information will always be displayed.
Tune adjust
The tune control works in radio mode.
Tune adjust in radio mode
•Press
to move to
the next frequency
down the band
(whether or not a listenable station is located
there). Hold the control to move through the
frequencies quickly.
•Press
to move to the next frequency up the
band (whether or not a listenable station is
located there). Hold for quick movement.
Tape/CD select
•To begin tape play
(with a tape loaded
into the audio
system) while in the radio or CD mode, press the
TAPE control. Press again during rewind or fast
forward to stop the rewind or fast forward
function.
•To begin CD play (if
CD(s) are loaded),
press the CD
control. The first track of the disc will begin
playing. If returning from radio or tape mode, CD
play will begin where it stopped last.
Press the CD control to toggle between single CD
and CD changer (if equipped).
TAPE CD
TAPE CD
Entertainment Systems
25
Page 28 of 256
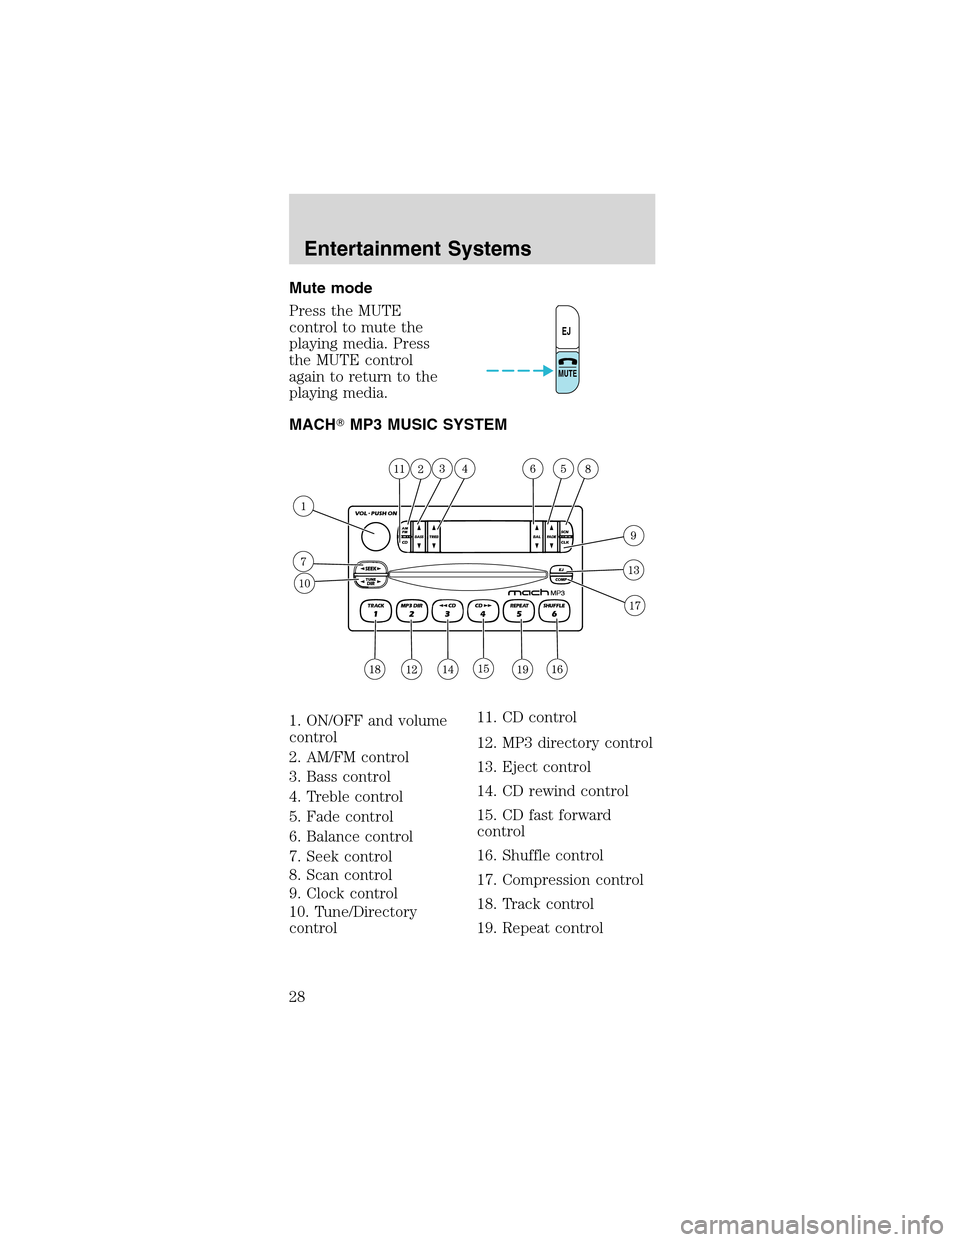
Mute mode
Press the MUTE
control to mute the
playing media. Press
the MUTE control
again to return to the
playing media.
MACH�MP3 MUSIC SYSTEM
1. ON/OFF and volume
control
2. AM/FM control
3. Bass control
4. Treble control
5. Fade control
6. Balance control
7. Seek control
8. Scan control
9. Clock control
10. Tune/Directory
control11. CD control
12. MP3 directory control
13. Eject control
14. CD rewind control
15. CD fast forward
control
16. Shuffle control
17. Compression control
18. Track control
19. Repeat control
EJ
MUTE
Entertainment Systems
28
Page 34 of 256
Setting memory preset stations
1. Select the frequency
band with the AM/FM
select control.
2. Select a station. Refer toTune adjustorSeek
functionfor more information on selecting a station.
3. Press and hold a memory preset control until the
sound returns, indicating the station is held in
memory on the control you selected.
Accessing memory preset stations
1. Select the desired
frequency band with
the AM/FM select
control.
2. Press the preset control which contains the
desired station frequency. The desired station will
begin to play.
Setting the clock
To set the hour, press
and hold the CLK
control while
performing the
following functions:
Entertainment Systems
34


 and are accessed
in the same manner as your original presets.
To deactivate autoset and return to your audio
sys")